Northwest Stamper

Tag: jennifer blomquist

  • A Kinda Eclectic Convention Display Board Sample

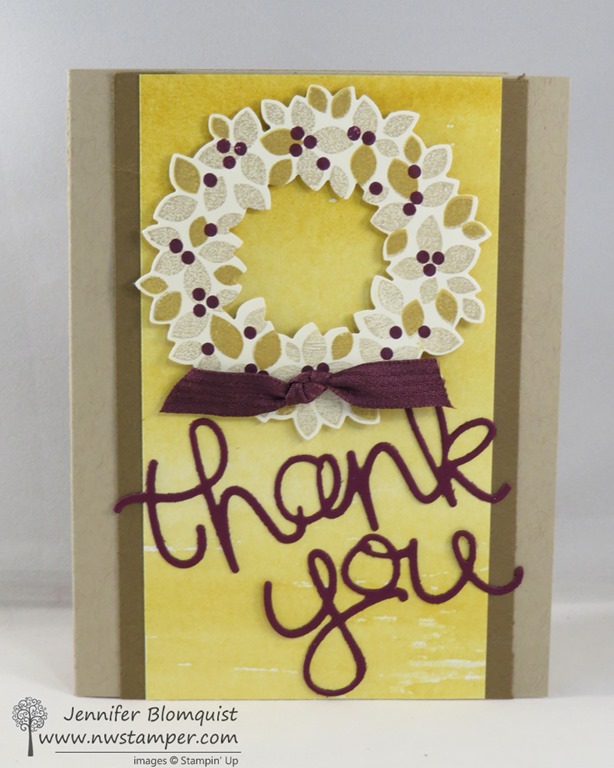
    How about another quick share using the oh so pretty Kinda Eclectic stamp set?  This was another card I created for Convention last year and I realized I hadn’t shared it yet.

    It was one of those “a little bit of this and that” cards and so there were lots of fun little touches.

    Tips for this card:

    • Stamp the sunburst image in Crumb Cake onto a piece of scrap paper.  Then I heat embossed the image with clear embossing powder by inking up the stamp again with Versamark and stamping on top of the Crumb Cake image.  After heat embossing you can sponge over the embossed lines with So Saffron ink to make a soft sun background.
    • Use the Starburst Framelits to cut out your sun image for a different textured edge
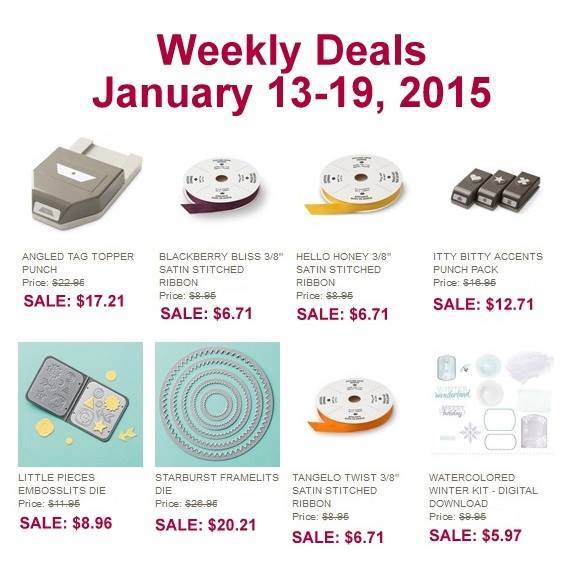
      (Save 25% off these framelits through Monday 1/19 with the weekly deals!)

    • Use the Bitty Butterfly Punch and the Elegant Butterfly Punch to create your layered butterflies.
    • Create your own background by using the rows of dots stamp from the Kinda Eclectic stamp set and off set each row.  I used different colors of inks to further mix it up!

    You’re Invited!  It’s a Sale-a-Bration Celebration!

    Come to a very special event where I will spoil you! Sweet treats, specials, sneak peeks, stamping make n takes, gifts, games, prizes and more!

    FREE! You can only EARN your way in!  Here is how:

    1. Spend at least 150.00 during the months of Saleabration! (Jan.-March)
    2. Host a Saleabration workshop, Private Class, or online party!  (Hostesses earn 25.00 MORE for FREE! *must be min. 250 in sales)
    3. BEST DEAL – Purchase the Starter Kit  (Get 2 FREE Saleabration choices! Or a Project Kit!)

    Monday, April 20th. (If you qualify and can’t attend, I will mail you the make n takes and gifts that will be passed out!)  This is something new I’m doing this year and I can’t wait to start planning all the fun for this event!

    NWstamper signature_thumb[9]

    order online button for sig 3_thumb[4]

    Project Supplies Used:
    (if you are reading this in email, click here to see the list of supplies)

  • New Weekly Deals are Here

    New Weekly Deals are Here

    Happy Tuesday!  With Tuesday comes not only the newest Weekly Deals – with some fun punches for 25% off – but also a new photopolymer set as well!

    New Weekly Deals

    10906196_10203845677125720_8495145385950997983_n


    So many great items this week.  I can’t get enough of the Itty Bitty Accents Punch Pack – if you don’t have it, you won’t be sad you did!  Browse some projects using them.

    I also love the starburst framelits (see project ideas) and the stitched ribbon.  So really, you just can’t go wrong! 🙂

    Shop the weekly deals here

    New Stamp Set – Better than Email

    There has also been a new stamp set released today as well.  Which is good if you are selling your projects (because the (c) Stampin’ Up text grants you the right to resell projects using images from SU)  or if you just need a cute thing to put on the back of your cards. 🙂

    Better than email stamp setGet your copy online here


    NWstamper signature_thumb[9]

    order online button for sig 3_thumb[4]


  • Scrapbooking Sunday: Use Up those Paper Scraps with this Layout

    I love my cards… love doing card making, but I used to scrapbook and the other day I was flipping through some of my scrapbooks (which don’t think they are complete themed affairs that complete a given year or all about a trip or what not… Smile  I’m not that good!) and realized I missed it.  So, I want to start back up my Scrapbooking Sundays here on the blog so I can have something that reminds me I need to get my photos in albums on a regular basis.  So here is my first for 2015!

    Strategy for keeping up with photos:

    So, I am guilty of having thousands of photos on my phone and on my computer and on my camera…. but not out where anyone can see them.  And where I will totally forget the context for some of the fun pictures I’ve taken.  I found a photo album from when I was in high school and while I remember many of the people and general stories of what was going on… I have no idea when the pictures took place or who everyone was.  And when I look at photos from when I was a kid or pictures from my parents or my husband’s parents, I have no idea what is going on.  *total sad face!*

    I didn’t like that and needed a strategy!  So, here is what I plan to do

    1. Once a month, send the photos from the month to Costco.  It could be 2 photos or it could be 50… whatever memories I want to keep and be able to share with my family later.
    2. Use the Project Life journaling pens (since they are archival safe) and jot a quick note on the back of the photo with the date and people in the picture (so if they ever get separated from my album, I know what the scoop is later)
    3. Drop them into the Project Life photo album page protectors and grab some of the Project Life cards to quickly write out what was happening in the pictures.
    4. DONE!

    5. Then, if there are extra special memories or photos, I’ll print extra copies and do a full 12×12 traditional scrapbook layout.  I love doing traditional layouts so I want to keep doing them, I just don’t want to hold up getting photos off my camera and into albums because it takes me a while to get a traditional layout done.

    Using Up Scraps with Scrapbooking

    I always forget that the scrapbooking is “SCRAP”booking.  Which means it is great for using up your extra paper scraps.  And that was the inspiration for today’s layout

    • Use up all those extra strips of paper that you trim off for your card and other projects as a fun accent in your layout.  I combined two photos across the page and then placed the Moonlight designer paper stack strips at different heights behind the pictures (don’t forget, this paper is 25% off through Monday!).  Sometimes cutting the strip in half so I had enough to go out the top and the bottom of the picture

    • Use extra cardstock scraps to make elements for the page like the letters for your page title!  I used the Tiny Letters thinlit dies to cut out most of the letters from my Blackberry Bliss cardstock.
    • Then to keep it interesting, I used my Metro Alphabet stamps to stamp the word “Hunt” and emphasize it.  You could get a similar effect by cutting out a different paper color or pattern to emphasize a word or words in your title.
    • Use extra elements you may have lying around to add some dimension, like these Wooden Elements from the Stampin’ Up variety pack.  I wanted to add some shine so I inked the top of the circle with my Gold Encore ink pad and then heat set it with my heat tool.

    So there you have it.  Some ideas for getting those scraps off your table and into some created project!

    Want to learn more about Project Life and photo album pocket memory keeping?

    I have a video talking about Project Life and then another where I walk through creating the layout I shared above.

    You can also email me or give me a call, I’d be glad to chat with you about it and give you some suggestions for getting started!  Plus, get free cards as part of the Sale-a-Bration promotion with any $50 purchase!  Score!

    image

    Shop and earn with Sale-a-Bration here

    I’m also happy to set up a Memory Keeping free demonstration with make & take for you and your friends… just let know!

    NWstamper signature_thumb[9]

    order online button for sig 3_thumb[4]

    Project Supplies Used:
    (if you are reading this in email, click here to see the list of supplies)

  • Framed Flowers Card for a Friend with Pictogram Punches

    When I saw that the paper stacks in the Stampin’ Up catalog were on the weekly deals this week for 25% off, I was pretty excited.  I love my paper and though I need to work on using it more (hence why I’m planning my technique class this month to be all about Using You Paper!)  I have had some fun with it already including this card:

    Tips for making this card:

    • Die cut the center of a piece of the All Abloom designer paper stack (I thought this looked like some fab wallpaper) and then layer over a piece of Whisper White cardstock to make the focal point in your card.
    • Take the same oval you used to cut the piece out of your patterned paper and the next size bigger and nest them on a piece of scrap Soft Suede cardstock.  Run them together through your big shot to get a “frame” for your cut out.

    • Use the colors from the paper you chose to decide which colors to stamp your vase and flowers from the Pictogram Punches stamp set and then punch out the flowers with the matching Itty Bitty Accent Punch Pack.
    • Make a dimensional sentiment by taking a strip white cardstock and folding in both ends to make a “Z” shape on each side.  Then glue the ends flat to your cardfront while holding up the middle with a dimensional.

    LAST CALL!  Stacked with Love Valentine’s Day Class

    Just a reminder, I’m getting ready to order all the supplies and start cutting and prepping for the Stacked with Love class next week.  If you would like a kit and/or the instructions, don’t forget to sign up ASAP.  It’s a lot of fun and everything is cut and ready for you to do all the fun part.

    Sign up here!

    NWstamper signature_thumb[9]

    order online button for sig 3_thumb[4]

    Project Supplies Used:
    (if you are reading this in email, click here to see the list of supplies)

  • Bright Birthday Card with Celebrate Today and Sale-a-Bration Accessories

    Did you catch my Occasions Catalog walkthough video?  If you did, you saw me showing this card when I talked about both Sale-a-bration products as well as the Celebrate You stamp set and framelit bundle.  It was my first time playing with this set and I just had too much fun!

    Tips for making this card:

    • If you like the Celebrate Today stamp set, then you definitely should go for the bundle!  You get framelits to cut out almost all of the shapes including those cute balloons (and pennants, which I didn’t in this card, but could have).  Plus you save money in the process.
    • When picking colors for your card, pick your papers or your accessories to get inspiration from. In this case, I reached for my Best Year Ever (FREE) Sale-a-Bration accessory pack and used the ribbons and buttons.  So, the rest of the card was centered around those colors – Crushed Curry, Calypso Coral, and Coastal Cabana
    • Don’t be afraid to go “off the page”!  I let my elements (like the sentiment and the balloon) have their edges peek over the edges of my white layer.  This gives the card more interest and keeps it from being too stiff.

    Get those buttons and ribbons free!

    You can only get them for free (that’s the best price, right?) and you can do it one of two ways:

    1. Place a $50 order in my online store and you can pick their bundle as your free Sale-a-Bration item
      OR
    2. Purchase my I WANT IT ALL Product Sampler from me.  As a bonus for getting the full shebang (all for only $26 for all the papers and accessories in the catalog) you’ll get a sampler of these ribbons, buttons AND the coordinating designer paper!  Sweet right?

    Have fun and enjoy the new goodies!

    NWstamper signature_thumb[9]

    order online button for sig 3_thumb[4]

    Project Supplies Used:
    (if you are reading this in email, click here to see the list of supplies)

  • Twitterpated Valentine’s Card from the Upcoming Stacked with Love Class by Mail

    Anyone ready for some Valentine’s?  I had so much fun working with the new You Plus Me stamp set and Stacked with Love paper stack (LOVE that you can get them in a BUNDLE!) that I just had to put together a class showing a number of fun different options you can do using just a few supplies.  Right now I’m up to 8 cards, so that is the offical count for the class… but I have a few more in the works and I’ll make sure to add them as bonus ideas to the instruction set as I finish them. Smile  In the meantime, I wanted to share today one of the cards I really liked from the set:

    I like how clean and simple it is and still isn’t a boring card.  Would you agree?

    Tips for making this card:

    • Mix and match the patterns from the Stacked with Love designer paper stack to create interesting patterns on your card.  This card uses 3 papers:  the Coral linen paper under the sentiment, the red stripes, and the XOXO piece – all from the same pack of paper.
    • Use your stamps to add extra touches like the hearts and arrows, which come from the You Plus Me stamp set.
    • Keep things from looking too boxy by tearing the left edge of your sentiment.  It is a subtle touch but keeps everything from being too squared off!

    Here is a quick peek at the 8 cards I’ve already finished using this same stamp set and paper pack:

    The class includes the following supplies:

    • Stacked with Love designer paper pack
      all required pieces for the 8 class cards will be precut for you plus you get to keep everything not used in those cards
    • 20 white notecards and envelopes
    • Itty Bitty Accents Epoxy Stickers pack
    • All precut cardstock needed for the 8 class cards
    • All additional ribbons and accessories needed for the 8 class cards
    • Photos of all the cards plus instructions for each card
    • (optional) You Plus Me stamp set – save $3 from the catalog price when you add it with your class registration!

    Kit by Mail Option:  Instructions, all supplies, plus extras – all for only $25 plus shipping if required!
    SAVE & add on the stamp set we use for all the cards for only $16 clear or $23 woodmount.  That is $3 less than the catalog price!


    Class Options


    Instructions Only Option:  Already have the supplies and just want the instructions?
    I will have them to send out next week and you can order yours for only $3.95.


    If you are in the Seattle area, join me for this class in person on 1/17 at 7pm in Redmond,WA  (register here)

    NWstamper signature_thumb[9]

    order online button for sig 3_thumb[4]

  • The NEW 2015 Occasions Catalog and Sale-a-Bration Catalog are here!

    Woo hoo!  It is launching day for the new Occasions Catalog AND you get to start earning free stamps, paper, and accessories as part of Sale-a-Bration NOW!  Can I get a whoop-whoop? Smile   I’m mailing out more catalogs to people who told me they needed a copy, but in the meantime, here are your links to view all the pretty pages from the comfort of your computer chair.

    2015 Occasions Catalog cover

    Click here to view the Catalog as a PDF

    **Start shopping online!**

    2015 Sale-a-Bration catalog cover

    Click here to view the Sale-a-Bration flyer in PDF format

    Make sure you know your Perks!

    • SHOPGet any one item in the Sale-a-Bration catalog for FREE for each $50 you spend.  It can be on Occasions catalog items, Clearance Rack items, Weekly Deals, and so on…
      $50 = 1 free item, $100 = 2 free items, $150 = 3 free items plus $25 in hostess rewards to spend however you want!
    • HOST – Host a craft night with your friends and not only will you have a fun time but if your groups orders are $250 or more, you get an EXTRA $25 in hostess rewards.  Which means, for $250 in orders, you get $65 to spend!
      And yes, if you place a personal order of $250 or more, you still get the bonus hostess rewards!
    • JOINJoin my group of Fun n’ Crafty stampers and you’ll not only get $125 in whatever goodies you want for $99, but you get free shipping and can choose 1 big project kit from the Occasions Catalog or 2 free items from the Sale-a-bration catalog.  You’ll also get everything you need to start sharing Stampin’ Up with your friends or just enjoy the perks of being a demo yourself which include discounts on all your orders, a bi-monthly magazine, and active online forums and Facebook groups!
      Get started here


    Try it before you buy it all with Product Samplers!

    Don’t forget to sign up today!  Spaces are filling up and I’ll get the first round going this week and you will want to be in that so you get your goodies extra fast!

    Every catalog release I offer samplers to give you a chance to try out a little of each of the new items so you can see which you love and which not so much – because there is usually at least 1 or 2 that surprise you. :)

    I WANT IT ALL Product Share with FREE Sale-a-Bration BONUS!

    2015 Occasions Catalog Full Product Share

    Get a little bit of ALL the new papers and accessories from the Occasions Catalog including 51 sheets of paper, 4 pieces of 3″x6″ washi paper, 12 yards of ribbon, 11 buttons/embellishments and 6 epoxy stickers!  All for only $26.00, plus a free Sale-a-Bration BONUS!

    Or just get the paper and see all the paper designs or have a wide variety without having to break the bank to buy them all?  Then the paper share is for you!  Get 51 sheets of paper – that is one piece of EVERY PATTERN in the catalog for only $10.50

    See all the details and reserve your spot here

    Occasions Catalog Walkthrough Video is coming soon!

    I got laid up with a stomach bug yesterday and so I didn’t finish editing the video.  I’ll finish it up this afternoon so check back here on the blog or subscribe to my YouTube Channel to see it when it goes live shortly.

    New Weekly Deals

    Finally, since it is Tuesday, the weekly deals have switched over and there are some pretty specials.  But most of all, check out the Notetag punch which carried over from the Holiday Catalog and matches multiple stamps from the new Occasions catalog!  You won’t be sad you got it.

    image

    NWstamper signature_thumb[9]

    order online button for sig 3_thumb[4]

  • LAST DAY for the Holiday Catalog and one more Sneak Peek with the Hello You Thinlit Dies

    It’s true, it’s the last day of the Holiday Catalog. So if you were wanting some of the items from the catalog, now is the day to make sure you grab them!  Plus, it is also the last day of the Year-End Clearance Sale and many of these great deals will go away after tonight.  There are a few items that are carrying over from the Holiday Catalog and I’ll share that list at the end of this post. 

    In the meantime, I wanted to share one more project that came out of my “Use up all the scraps on my desk” project. Smile

    I had extras of the wreaths that I had stamped and die cut using the Wondrous Wreath bundle, back when I was experimenting with colors for a class this fall.  I kept them lying around and so I though I would finally use them.  I decided to pair them with the retiring Color Me Autumn designer paper (50% off through tonight!) and use the new Hello You thinlits that are available starting tomorrow to make my own unique thank you cards!

    Tips for making this card:

    • The Hello You thinlits include the words “Hello”, “Thanks”, “You”, and “Happy”.  Snip off the “s” on the Thanks and you can create your own custom Thank You sentiment!thank you sentiment from Hello You Thinlit die
    • Just because a paper pack’s name implies it is a “fall” or “christmas” pack… many of the papers can be used anytime!  Like this yellow painted looking paper from the Color Me Autumn pack.  It totally works for anytime of year.
    • When stamping your wreaths, not only mix and match the colors you use, but mix and match the ORDER you stamp them as well!  In the sample above, I stamped first with Hello Honey, then Soft Suede, and then Blackberry Bliss.  In this sample below, I stamped first with Crumb Cake and then did Hello Honey and Blackberry Bliss.  I still can’t decide which I like better. Smile 
    • Don’t want to hassle with a bow? Tie a knot in a piece of ribbon and trim the ends.  Attach to your project with a glue dot! Easy peasy!

    10646980_782080281839792_4434187347945494541_n

    I’m getting excited!  I’m going to try to film a catalog walkthrough tonight of the new Occasions Catalog so you can get the full scoop tomorrow.  So, if you have any questions, let me know and I’ll try to make sure to cover them!

    ———————————————-

    SAVE THE DATE – 4/20/2014!

    Earn your spot at the Saleabration CELEBRATION in April!


    Come to a very special event where I will spoil you!  Sweet treats, specials, sneak peeks, stamping make n takes, gifts, games, prizes and more!

    FREE! You can only EARN your way in!

    1. Host a Saleabration workshop or Private Class  (Hostesses earn 25.00 MORE for FREE! *must be min. 250 in sales)
    2. Purchase the Starter Kit  (Get 2 FREE Saleabration choices! Or a Project Kit!)
    3. Spend at least 150.00 during the months of Saleabration! (Jan.-March)

    Monday, April 20th. (If you qualify and can’t attend, I will mail you the make n takes and gifts that will be passed out!)  This is something new I’m doing this year and I can’t wait to start planning all the fun for this event!
    This is only available through me, Jennifer Blomquist – so shoot me an email at jennifer@nwstamper.com to get the details and save your spot!.

    ———————————————-

    NWstamper signature_thumb[9]

    order online button for sig 3_thumb[4]

    Project Supplies Used:
    (if you are reading this in email, click here to see the list of supplies)

  • Seasonally Scattered Valentine’s Box & NEW Product Shares!

    You’ve probably seen my projects and others using Seasonally Scattered and many of them were focused on the Thanks and Merry sentiments.  You know, because they fit so well for fall and for winter.  But before the stamp set disappears in a couple days (last day to snag it is Jan 5th!) I wanted to share this project I created for the Convention Display boards this summer.

    You may have seen this project on my blog from a long while back:

    Seasonally Scattered Love Card blog post

    And with that card I did heat embossing and sponging, but I had an idea to do something similar but wanted to really make the “LOVE” sentiment POP!  So I started working and I kept grabbing for things I hadn’t used in a while and this box came out:

    See?!  Now do you see why I can’t believe this set is not continuing on for Valentine’s Day?

    Anyway, I had lots of fun making this box and you could totally use bits and pieces from the box to make a card or make your own special box for someone you love.

    Tips for making this project:

    • Use the kraft gift boxes for your base.  They are very inexpensive easy to pop together, and very sturdy for your box.
    • Start by heat embossing your LOVE image onto a piece of Watercolor Paper using versamark and black embossing powder.
    • Use the Aqua Painter and your Real Red ink pad to color in the paper EXCEPT for the “LOVE” sentiment.
      NOTE – when picking up color with your Aqua Painter, make sure to pick up the color from your ink pad LID and not the surface of the pad itself to avoid diluting your ink pad in one spot.
    • Cut out the sentiment using the Oval framelits and then cut out a bigger Oval from the white crepe filter paper.  Fringe the edge of the larger oval and layer behind.
    • Stamp around the edges and heat emboss another piece of watercolor paper for your top using just the scatter design portion of the LOVE stamp.  This gives you the coordinating look on top.
    • Add a spiral flower using the Spiral Flower die (use glue dots or liquid glue to hold your flower together) and add some watercolored scraps of the filter paper to the middle of the flower for filler.

    • Did you know? You can color the Vintage Faceted buttons with your Blendabilities to make them custom fit your projects?  That is what I did here with my Cherry Cobbler blendabilities!

    And there you have it, a great little box for that special someone for Valentine’s Day or any time of the year.

    10885273_782080285173125_3511162684151308190_n

    Try it all out first with my Product Samplers!

    The details are up!  In 2 days (or as I get the shares filled), I’ll be placing the order for everyone’s samplers of the newest papers and accessories from the spring Occasions catalog!  This is a great way to try it all out without breaking the bank paying for full packs of everything.  Then once you see it in person, you can decide which items you love and which you are good with just a couple pieces. Smile  It’s a win-win!

    2015 Occasions Catalog Full Product Share

    BONUS – this year I’m offering a bonus to everyone who signs up for the “I Want it All” sampler and you get a bonus sampler of the coordinating Sale-a-Bration Paper, Ribbon, and Buttons!  That’s a whole lot of goodies for only $26 (plus shipping if needed).

    2015 Occasions Catalog Product Share Bonuses

    Check out my Product Shares page for more details

    Email me at jennifer@nwstamper.com to reserve your spot today!

    NWstamper signature_thumb[9]

    order online button for sig 3_thumb[4]

    Project Supplies Used:
    (if you are reading this in email, click here to see the list of supplies)

  • Another Sneak Peek with Simply Wonderful and Tip for Using Your Patterned Paper Scraps

    If you are like me, you have a pile of paper scraps on your desk… some punch outs, some larger cut pieces, some stamped images.  And I have a heck of a time convincing myself to recycle them because I just know they will be useable in another project.  Unfortunately, I don’t actually use them most of the time and they just pile up.  Like so –

    2015-01-01 15.18.40

    So, I decided to spend some time this week using them up!  I’ve been sharing some of my progress on my Facebook page – www.facebook.com/nwstamper – but I just loved how this card turned out and so I had to share it here.

    This is also a sneak peek of the Sale-a-Bration set Simply Wonderful.  I can already tell I’m going to have LOTS of fun with this one.

    But the thing I really wanted to share was the technique for using up your scraps of paper to create this diagonal pattern for the card.

    Tips for making this card:

    • This is perfect use for 6×6 paper packs or pieces from my Paper Samplers!  New Occasions Catalog Paper Sampler is coming soon!  Watch HERE for more details.
    • Cut your strips of paper to 3/4” x 3” and adhere at an angle across a scrap piece of cardstock.  (I did two at a time and had two 1-1/4” x 4” pieces next to each other when glueing)
    • Trim the excess paper off the edges to get your final piece of patterned paper
    • The All is Calm specialty designer paper makes a pretty backdrop but it is only available until January 5th!
    • Add some baker’s twine and some Sequins (like the In Color Sequins) to add some coordinating bling to your card.

    Check out a video for how I put this card together –

    (viewing this post in email, click here to see it on my blog)

    10881524_782080278506459_9149890569407734836_n

    Did you know?  There are extra perks beyond placing your order during Sale-a-Bration!

    1. Get your friends together for a crafting night or host an online party, and when you and your friends together spend $250 at your event, you’ll get a BONUS $25 to spend ON TOP of the $40 you get free in hostess perks!  That is $65 in freebies just for getting together with your friends!  You invite the people, I’ll provide the projects.  Smile  Email me at jennifer@nwstamper.com for details.
    2. Purchase the starter kit for only $99 and not only will you get products of your choice worth up to $125 and free shipping, but you’ll also get to pick out 2 Sale-a-Bration items to get FREE too!  I host a wonderful community of demonstrators and would love for you to join us.  (Plus ask me about the bonus perks you can earn throughout Sale-a-Bration!)

    Start working on your wishlist and get ready for the launch in only 3 more days!  Yay!

    NWstamper signature_thumb[9]

    order online button for sig 3_thumb[4]

    Project Supplies Used:
    (if you are reading this in email, click here to see the list of supplies)

  • Non-Christmas Partridge and Pears Card with NEW Sale-a-Bration stamp–Simply Wonderful

    When I first saw this Partridge and Pears stamp set, I knew I wanted to use my Blendabilities to color it – but it took until now to actually color the entire tree!  Turns out it is great for cards anytime of the year, don’t you think?

    I mixed and matched retiring stamps (Partridge and Pears) with upcoming stamps (Simply Wonderful from Sale-a-Bration).  Not at all Christmas-y!  Smile

    Tips for making this card:

    • Stamp the tree image from Partridge and Pears using Memento ink onto White cardstock.  Then color with blendabilities to match the colors and feel you want for your card.  In this case, I used:  Old Olive, Daffodil Delight, Calypso Coral, Crumb Cake, and the Skin Tones.
    • Stamp the sentiment from the Simply Wonderful stamp set to make this an anytime card (starting January 6, it will be FREE with a $50 order or if you join my Stampin’ Up team)!
    • Add the “hi” die cut from the Label Flipcard Thinlit for a fun touch to your sentiment, with a pearl for the dot of the “I”.
    • Use Stampin’ Dimensionals under the center of the sentiment to help make a rippling banner look.

    10885462_782080301839790_8262101909808401812_n

    Yay!  4 more days until the Sale-a-Bration promotion starts and the Occasions Catalog kicks off!  I have more projects to share each day and can’t wait to show you the entire catalog on the 6th!  If you have any questions, feel free to send them in now and I’ll not only answer you now but will make sure to include the answers in my upcoming video.

    Need a catalog?  I’m putting more in the mail and would be glad to send you a copy.  Just email me at jennifer@nwstamper.com and I’ll get you set up!

    NWstamper signature_thumb[9]

    order online button for sig 3_thumb[4]

    Project Supplies Used:
    (if you are reading this in email, click here to see the list of supplies)

  • A Hodge-Podge Birthday Card with Amazing Birthday

    While working on cards for the Convention Display boards last summer, I had an idea for using the Amazing Birthday stamp set.  It made total sense in my mind… then I started trying to put it to paper.  In the end, it didn’t turn out exactly like I was dreaming, but I figured I’d share it anyway (heck I sent it in to Stampin’ Up and they displayed it!) in the hopes it gives you some ideas that you can use, especially since Amazing Birthday is on sale as part of the weekly deals this week!

    I liked that there were so many circles in the set that punched out using the same 1-1/4” Circle circle punch and wanted to try the “peek-a-boo” style of card.

    Tips for making this card:

    • Stamp the different circle images by first coloring with markers and stamping onto White Paper.  I used the colors that matched those in the Sweet Taffy patterened paper.  Then punch out using the 1-1/4” Circle punch.
    • Punch a few holes in your larger piece of white paper using the 1-3/8” circle punch and the 1-3/4” circle punch.  Layer over coordinating patterned paper and then use dimensionals to pop up the stamped images in the middle of the circles.

    • When stamping on wood (like the middle sentiment) ink your image using Stazon and then stamp.  That keeps the ink from running and getting fuzzy like it might with your classic dye inks.
    • I embossed the white background using the Arrows embossing folder and thought it needed a little something extra, so I filled the valleys of the embossed area with Crystal Effects!  It is hard to see in the photo but it gives it a nice shiny background when you see it in person.


    I love this stamp set and it is so versatile!  So, if you like it, don’t miss out while it is on 25% off with the Weekly Deals! Smile 

    Have a safe and wonderful New Year’s Eve and I’ll see you in 2015!

    NWstamper signature_thumb[9]

    order online button for sig 3_thumb[4]

    Project Supplies Used:
    (if you are reading this in email, click here to see the list of supplies)