Northwest Stamper

Category: Cards

  • Bright Birthday Card with Celebrate Today and Sale-a-Bration Accessories

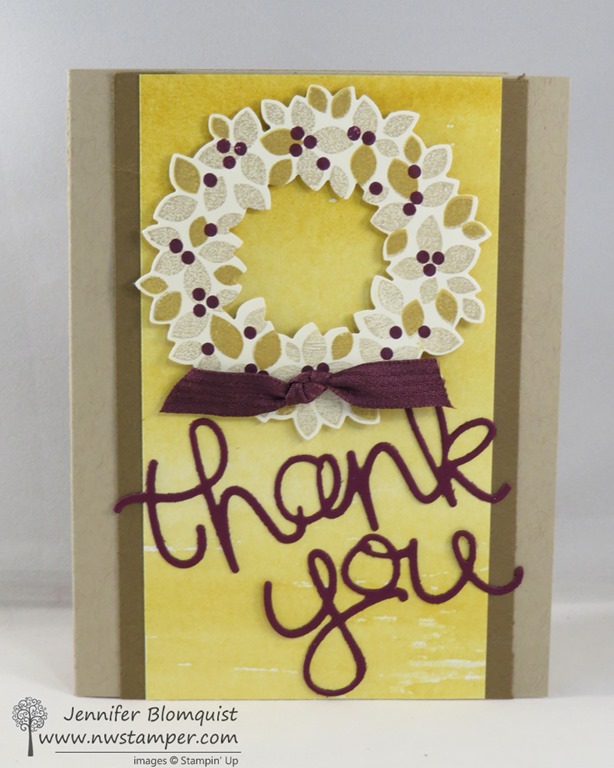
    Did you catch my Occasions Catalog walkthough video?  If you did, you saw me showing this card when I talked about both Sale-a-bration products as well as the Celebrate You stamp set and framelit bundle.  It was my first time playing with this set and I just had too much fun!

    Tips for making this card:

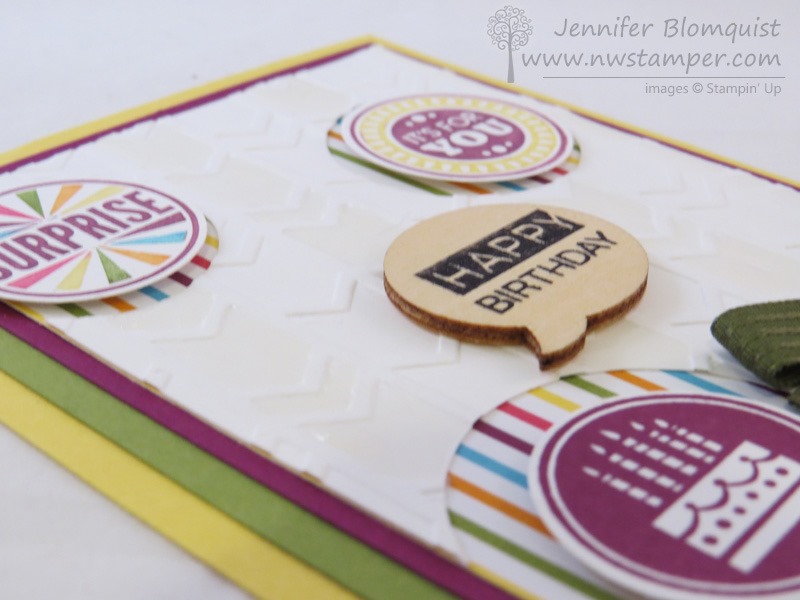
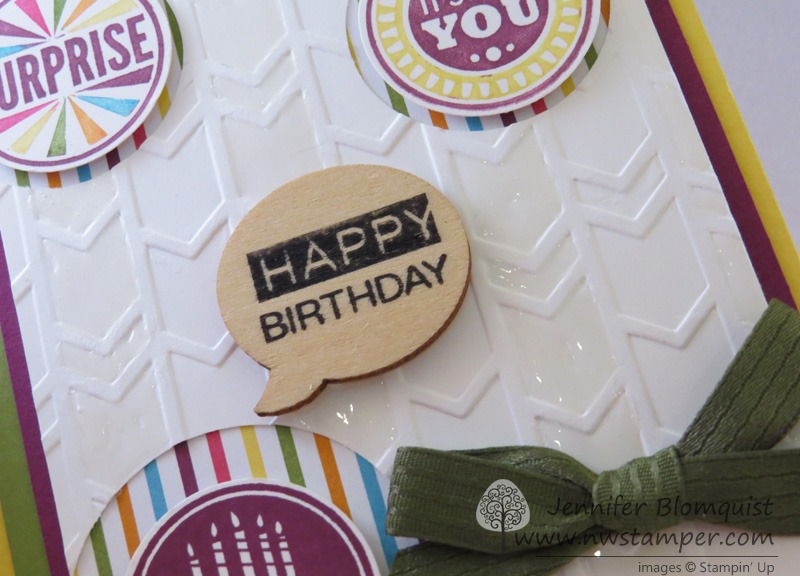
    • If you like the Celebrate Today stamp set, then you definitely should go for the bundle!  You get framelits to cut out almost all of the shapes including those cute balloons (and pennants, which I didn’t in this card, but could have).  Plus you save money in the process.
    • When picking colors for your card, pick your papers or your accessories to get inspiration from. In this case, I reached for my Best Year Ever (FREE) Sale-a-Bration accessory pack and used the ribbons and buttons.  So, the rest of the card was centered around those colors – Crushed Curry, Calypso Coral, and Coastal Cabana
    • Don’t be afraid to go “off the page”!  I let my elements (like the sentiment and the balloon) have their edges peek over the edges of my white layer.  This gives the card more interest and keeps it from being too stiff.

    Get those buttons and ribbons free!

    You can only get them for free (that’s the best price, right?) and you can do it one of two ways:

    1. Place a $50 order in my online store and you can pick their bundle as your free Sale-a-Bration item
      OR
    2. Purchase my I WANT IT ALL Product Sampler from me.  As a bonus for getting the full shebang (all for only $26 for all the papers and accessories in the catalog) you’ll get a sampler of these ribbons, buttons AND the coordinating designer paper!  Sweet right?

    Have fun and enjoy the new goodies!

    NWstamper signature_thumb[9]

    order online button for sig 3_thumb[4]

    Project Supplies Used:
    (if you are reading this in email, click here to see the list of supplies)

  • Twitterpated Valentine’s Card from the Upcoming Stacked with Love Class by Mail

    Anyone ready for some Valentine’s?  I had so much fun working with the new You Plus Me stamp set and Stacked with Love paper stack (LOVE that you can get them in a BUNDLE!) that I just had to put together a class showing a number of fun different options you can do using just a few supplies.  Right now I’m up to 8 cards, so that is the offical count for the class… but I have a few more in the works and I’ll make sure to add them as bonus ideas to the instruction set as I finish them. Smile  In the meantime, I wanted to share today one of the cards I really liked from the set:

    I like how clean and simple it is and still isn’t a boring card.  Would you agree?

    Tips for making this card:

    • Mix and match the patterns from the Stacked with Love designer paper stack to create interesting patterns on your card.  This card uses 3 papers:  the Coral linen paper under the sentiment, the red stripes, and the XOXO piece – all from the same pack of paper.
    • Use your stamps to add extra touches like the hearts and arrows, which come from the You Plus Me stamp set.
    • Keep things from looking too boxy by tearing the left edge of your sentiment.  It is a subtle touch but keeps everything from being too squared off!

    Here is a quick peek at the 8 cards I’ve already finished using this same stamp set and paper pack:

    The class includes the following supplies:

    • Stacked with Love designer paper pack
      all required pieces for the 8 class cards will be precut for you plus you get to keep everything not used in those cards
    • 20 white notecards and envelopes
    • Itty Bitty Accents Epoxy Stickers pack
    • All precut cardstock needed for the 8 class cards
    • All additional ribbons and accessories needed for the 8 class cards
    • Photos of all the cards plus instructions for each card
    • (optional) You Plus Me stamp set – save $3 from the catalog price when you add it with your class registration!

    Kit by Mail Option:  Instructions, all supplies, plus extras – all for only $25 plus shipping if required!
    SAVE & add on the stamp set we use for all the cards for only $16 clear or $23 woodmount.  That is $3 less than the catalog price!


    Class Options


    Instructions Only Option:  Already have the supplies and just want the instructions?
    I will have them to send out next week and you can order yours for only $3.95.


    If you are in the Seattle area, join me for this class in person on 1/17 at 7pm in Redmond,WA  (register here)

    NWstamper signature_thumb[9]

    order online button for sig 3_thumb[4]

  • LAST DAY for the Holiday Catalog and one more Sneak Peek with the Hello You Thinlit Dies

    It’s true, it’s the last day of the Holiday Catalog. So if you were wanting some of the items from the catalog, now is the day to make sure you grab them!  Plus, it is also the last day of the Year-End Clearance Sale and many of these great deals will go away after tonight.  There are a few items that are carrying over from the Holiday Catalog and I’ll share that list at the end of this post. 

    In the meantime, I wanted to share one more project that came out of my “Use up all the scraps on my desk” project. Smile

    I had extras of the wreaths that I had stamped and die cut using the Wondrous Wreath bundle, back when I was experimenting with colors for a class this fall.  I kept them lying around and so I though I would finally use them.  I decided to pair them with the retiring Color Me Autumn designer paper (50% off through tonight!) and use the new Hello You thinlits that are available starting tomorrow to make my own unique thank you cards!

    Tips for making this card:

    • The Hello You thinlits include the words “Hello”, “Thanks”, “You”, and “Happy”.  Snip off the “s” on the Thanks and you can create your own custom Thank You sentiment!thank you sentiment from Hello You Thinlit die
    • Just because a paper pack’s name implies it is a “fall” or “christmas” pack… many of the papers can be used anytime!  Like this yellow painted looking paper from the Color Me Autumn pack.  It totally works for anytime of year.
    • When stamping your wreaths, not only mix and match the colors you use, but mix and match the ORDER you stamp them as well!  In the sample above, I stamped first with Hello Honey, then Soft Suede, and then Blackberry Bliss.  In this sample below, I stamped first with Crumb Cake and then did Hello Honey and Blackberry Bliss.  I still can’t decide which I like better. Smile 
    • Don’t want to hassle with a bow? Tie a knot in a piece of ribbon and trim the ends.  Attach to your project with a glue dot! Easy peasy!

    10646980_782080281839792_4434187347945494541_n

    I’m getting excited!  I’m going to try to film a catalog walkthrough tonight of the new Occasions Catalog so you can get the full scoop tomorrow.  So, if you have any questions, let me know and I’ll try to make sure to cover them!

    ———————————————-

    SAVE THE DATE – 4/20/2014!

    Earn your spot at the Saleabration CELEBRATION in April!


    Come to a very special event where I will spoil you!  Sweet treats, specials, sneak peeks, stamping make n takes, gifts, games, prizes and more!

    FREE! You can only EARN your way in!

    1. Host a Saleabration workshop or Private Class  (Hostesses earn 25.00 MORE for FREE! *must be min. 250 in sales)
    2. Purchase the Starter Kit  (Get 2 FREE Saleabration choices! Or a Project Kit!)
    3. Spend at least 150.00 during the months of Saleabration! (Jan.-March)

    Monday, April 20th. (If you qualify and can’t attend, I will mail you the make n takes and gifts that will be passed out!)  This is something new I’m doing this year and I can’t wait to start planning all the fun for this event!
    This is only available through me, Jennifer Blomquist – so shoot me an email at jennifer@nwstamper.com to get the details and save your spot!.

    ———————————————-

    NWstamper signature_thumb[9]

    order online button for sig 3_thumb[4]

    Project Supplies Used:
    (if you are reading this in email, click here to see the list of supplies)

  • Another Sneak Peek with Simply Wonderful and Tip for Using Your Patterned Paper Scraps

    If you are like me, you have a pile of paper scraps on your desk… some punch outs, some larger cut pieces, some stamped images.  And I have a heck of a time convincing myself to recycle them because I just know they will be useable in another project.  Unfortunately, I don’t actually use them most of the time and they just pile up.  Like so –

    2015-01-01 15.18.40

    So, I decided to spend some time this week using them up!  I’ve been sharing some of my progress on my Facebook page – www.facebook.com/nwstamper – but I just loved how this card turned out and so I had to share it here.

    This is also a sneak peek of the Sale-a-Bration set Simply Wonderful.  I can already tell I’m going to have LOTS of fun with this one.

    But the thing I really wanted to share was the technique for using up your scraps of paper to create this diagonal pattern for the card.

    Tips for making this card:

    • This is perfect use for 6×6 paper packs or pieces from my Paper Samplers!  New Occasions Catalog Paper Sampler is coming soon!  Watch HERE for more details.
    • Cut your strips of paper to 3/4” x 3” and adhere at an angle across a scrap piece of cardstock.  (I did two at a time and had two 1-1/4” x 4” pieces next to each other when glueing)
    • Trim the excess paper off the edges to get your final piece of patterned paper
    • The All is Calm specialty designer paper makes a pretty backdrop but it is only available until January 5th!
    • Add some baker’s twine and some Sequins (like the In Color Sequins) to add some coordinating bling to your card.

    Check out a video for how I put this card together –

    (viewing this post in email, click here to see it on my blog)

    10881524_782080278506459_9149890569407734836_n

    Did you know?  There are extra perks beyond placing your order during Sale-a-Bration!

    1. Get your friends together for a crafting night or host an online party, and when you and your friends together spend $250 at your event, you’ll get a BONUS $25 to spend ON TOP of the $40 you get free in hostess perks!  That is $65 in freebies just for getting together with your friends!  You invite the people, I’ll provide the projects.  Smile  Email me at jennifer@nwstamper.com for details.
    2. Purchase the starter kit for only $99 and not only will you get products of your choice worth up to $125 and free shipping, but you’ll also get to pick out 2 Sale-a-Bration items to get FREE too!  I host a wonderful community of demonstrators and would love for you to join us.  (Plus ask me about the bonus perks you can earn throughout Sale-a-Bration!)

    Start working on your wishlist and get ready for the launch in only 3 more days!  Yay!

    NWstamper signature_thumb[9]

    order online button for sig 3_thumb[4]

    Project Supplies Used:
    (if you are reading this in email, click here to see the list of supplies)

  • Non-Christmas Partridge and Pears Card with NEW Sale-a-Bration stamp–Simply Wonderful

    When I first saw this Partridge and Pears stamp set, I knew I wanted to use my Blendabilities to color it – but it took until now to actually color the entire tree!  Turns out it is great for cards anytime of the year, don’t you think?

    I mixed and matched retiring stamps (Partridge and Pears) with upcoming stamps (Simply Wonderful from Sale-a-Bration).  Not at all Christmas-y!  Smile

    Tips for making this card:

    • Stamp the tree image from Partridge and Pears using Memento ink onto White cardstock.  Then color with blendabilities to match the colors and feel you want for your card.  In this case, I used:  Old Olive, Daffodil Delight, Calypso Coral, Crumb Cake, and the Skin Tones.
    • Stamp the sentiment from the Simply Wonderful stamp set to make this an anytime card (starting January 6, it will be FREE with a $50 order or if you join my Stampin’ Up team)!
    • Add the “hi” die cut from the Label Flipcard Thinlit for a fun touch to your sentiment, with a pearl for the dot of the “I”.
    • Use Stampin’ Dimensionals under the center of the sentiment to help make a rippling banner look.

    10885462_782080301839790_8262101909808401812_n

    Yay!  4 more days until the Sale-a-Bration promotion starts and the Occasions Catalog kicks off!  I have more projects to share each day and can’t wait to show you the entire catalog on the 6th!  If you have any questions, feel free to send them in now and I’ll not only answer you now but will make sure to include the answers in my upcoming video.

    Need a catalog?  I’m putting more in the mail and would be glad to send you a copy.  Just email me at jennifer@nwstamper.com and I’ll get you set up!

    NWstamper signature_thumb[9]

    order online button for sig 3_thumb[4]

    Project Supplies Used:
    (if you are reading this in email, click here to see the list of supplies)

  • A Hodge-Podge Birthday Card with Amazing Birthday

    While working on cards for the Convention Display boards last summer, I had an idea for using the Amazing Birthday stamp set.  It made total sense in my mind… then I started trying to put it to paper.  In the end, it didn’t turn out exactly like I was dreaming, but I figured I’d share it anyway (heck I sent it in to Stampin’ Up and they displayed it!) in the hopes it gives you some ideas that you can use, especially since Amazing Birthday is on sale as part of the weekly deals this week!

    I liked that there were so many circles in the set that punched out using the same 1-1/4” Circle circle punch and wanted to try the “peek-a-boo” style of card.

    Tips for making this card:

    • Stamp the different circle images by first coloring with markers and stamping onto White Paper.  I used the colors that matched those in the Sweet Taffy patterened paper.  Then punch out using the 1-1/4” Circle punch.
    • Punch a few holes in your larger piece of white paper using the 1-3/8” circle punch and the 1-3/4” circle punch.  Layer over coordinating patterned paper and then use dimensionals to pop up the stamped images in the middle of the circles.

    • When stamping on wood (like the middle sentiment) ink your image using Stazon and then stamp.  That keeps the ink from running and getting fuzzy like it might with your classic dye inks.
    • I embossed the white background using the Arrows embossing folder and thought it needed a little something extra, so I filled the valleys of the embossed area with Crystal Effects!  It is hard to see in the photo but it gives it a nice shiny background when you see it in person.


    I love this stamp set and it is so versatile!  So, if you like it, don’t miss out while it is on 25% off with the Weekly Deals! Smile 

    Have a safe and wonderful New Year’s Eve and I’ll see you in 2015!

    NWstamper signature_thumb[9]

    order online button for sig 3_thumb[4]

    Project Supplies Used:
    (if you are reading this in email, click here to see the list of supplies)

  • Rediscovered: Season of Style Quick Cards!

    Someone reminded me of this class I did a while back and that the Season of Style cards and Cherry Cobbler ribbon are both on the Year-End Blowout Sale for cheap!  So I thought I would offer to anyone who purchases the Season of Style cards from my online store, I’ll send you the tutorial for FREE for this set of 20 unique cards!

    Season of Style Designer Tags Card Set
    20 Cards Quick!
    Free instructions when you get these items from the clearance rack or $3.95 for just the instructions

    imageimageimage

    or just get the photos and basic instructions for all 20 cards emailed to you for only $3.95:


    NWstamper signature_thumb[9]

    order online button for sig 3_thumb[4]

  • A Sweet and Simple Monochromatic Card with Hello Honey

    As part of my In Color Club, I send out a card that focuses on the In Color of the month.  This was one of the cards I sent out for the last Hello Honey month.  It is a quick card that was fast and easy using the In Color supplies they received that month.

    Tips for making this card:

    • Keep your colors simple.  I added a touch of Mossy Meadow to my Hello Honey card just to ground everything and make the embossed flower pop.
    • Use the Flower Shop stamp set to heat emboss with White Embossing powder on Hello Honey cardstock and punch out with the Pansy punch.

    • Add a second pansy punch piece under the top flower and offset it for make some green leaves.
    • The Bravo stamp set isn’t just for congratulations!  Use the “Sweet” stamp set for anything from birthday, new baby, or a fun thank you card!

    • Use White cardstock to break up the designer paper and the solid cardstock.  It helps keep the pattern from getting too overwhelming.

    NWstamper signature_thumb[9]

    order online button for sig 3_thumb[4]

    Project Supplies Used:
    (if you are reading this in email, click here to see the list of supplies)

  • Christmas Fun with a Punch Art Snowman Gift Card Holder

    Well, another Christmas is past and it was a good one this year for our family.  We had a great day relaxing at home on Christmas and then a noisy day on the 26th with family and cousins. Smile  But isn’t that the best kind of day, at least for kids?

    I had two more Christmas projects I wanted to share and today is a gift card holder I made for a friend.  It started out with a fun punch art snowman gift tag that I converted to a belly band for the holder.

    Punches used for the snowman:

    • 1-3/4” Circle Punch
    • Wide Oval Punch
    • Banner Punch
    • Starburst Framelit (for the background)

    It is really easy to put him together too!  The hat is 2 wide ovals punched out in black (you just trim down one to make the top hat part), his head is the 1-3/4’ circle punch in white, then the body is a wide oval punch in white.  Glue those pieces to a strip of patterned paper for the scarf so he looks about how you like (I used the Trim the Tree designer paper stack – also on discount right now).  Punch out a second piece of designer paper using the banner punch and glue at an angle to create the other tail of the scarf.  His nose is just a freehand cut scrap of Pumpkin Pie cardstock and then I drew on his eyes, mouth, and buttons with a black marker. 

    Add accents like the All is Calm snowflake embellishment (another discount item) to cover up where you adhered the banner punch and a little pearl in the middle for flair.  I also used the Chalk Pen to make dashes around my Starburst framelit die cut for the background and to make the white trim on his hat.

    Pretty cute, huh?

    He was made onto a belly band as the gift card hold was a trifold card.  On the front and inner flap, I decorated with the Trim the Tree designer paper.

    Then you flip it open to reveal a space for your message and the gift card.  I actually added a second pocket to the top flap so they could have 2 gift cards inside.  And the pocket had a little space cut out for easier grabbing using the small oval punch.

    It was easy and fun to make and I hope my friend liked it!

    I also know that those instructions for the snowman may have been a bit tough to follow, so I’ll try to put together a video to help show what I was talking about. Smile 

    And like I mentioned, both the Trim the Tree paper and the All is Calm snowflake embellishments are part of the Year End Blowout Sale!  They are only available for about another week, so grab then now so you can get started on your Holiday scrapbook pages or projects for next year!

    All is calm snowflake embellishments trim the tree designer paper stack

    NWstamper signature_thumb[9]

    order online button for sig 3_thumb[4]

    Project Supplies Used:
    (if you are reading this in email, click here to see the list of supplies)

  • Festival of Trees–a Christmas Card and a Gift Certificate Holder

    I thought I was done with my Christmas projects, but I found 4 more I wanted to share with you. Smile  I had been having fun the last week or so and thought I’d share them with you before Christmas is officially over!  Especially since some of the accents on the projects are part of the Year-End Clearance Sale!  Including:

    imageimageimage

    #1 – Festival of Trees Gift Certificate Holder

    Yes, there is still time to get a gift certificate if you need last minute stocking stuffer (just email me at jennifer@nwstamper.com).  It won’t come in the cute holder, but you could make your own if you are feeling crafty tonight!

    I had to pull out a lot of my Holiday Catalog goodies because I had been neglecting some of them… like the Trim the Tree designer paper stack and this AWESOME Red Satin Woven Ribbon.  And of course there is the easy and funky Festival of Trees stamp set.

    I mounted the trees on a Deco Label die cut that I popped up with Stampin’ Dimensionals so I could slide the ribbon underneath to allow it to be opened and closed as necessary.  Then on the inside I added more trim for the gift certificate by adhering a strip of cardstock on the bottom of the inside to form a pocket and then used the matching Trim the Tree designer paper to accent it.  What a fun present!

    And then, since this was an odd size (7” x 4”) I needed to figure out an envelope.  Then it hit me!  I have an Envelope Punch Board and can make my own custom envelope!  I reached for my Under the Tree specialty designer paper because it was made from Kraft cardstock and so it is heavier (ie – will hold up better in the mail) AND it is stiff enough that it helps smooth out the bumps to make sure bow and embellishments on the front of the holder don’t get caught up in the post office.   Plus it just looked cool. Smile

    Under the Tree kraft envelope for gift certificate

    Ok, then on to matching project #2

    #2 –  Festival of Trees Christmas Card

    I thought this coordinated so well, I’d share it today too.  This also uses the Festival of Trees stamp set but adds the sentiment from the Endless Wishes stamp set (sniff, sniff… so sad Endless Wishes didn’t make it onto the carry over list!  Love those snowflakes and sentiments!)

    I really liked the color and weight of the Under the Tree specialty designer paper, it added to the vintage feel I was going for, so I used that for the Red and Kraft trees pattern paper in the background.  Then I was back with more sparkle paper for the front tree and then the little Christmas tree from the Clearance Rack Merry Minis Punch Pack.  It is just such a cute accent!  I even had to use it for the inside as well.

    See the little green trees on the inside? Fun, right?

    I hope you have a wonderful Christmas eve full of fun Family and holiday traditions – or at least good times remembering some special Holiday memories!

    NWstamper signature_thumb[9]

    order online button for sig 3_thumb[4]

    Project Supplies Used:
    (if you are reading this in email, click here to see the list of supplies)


  • A Vintage Feel for a White Christmas Snow Scene Card

    Alright, are you ready for the last card in my Christmas card series?  I LOVE this card!  Seriously one of my favorites this year.  It was a mix and match of a few different cards using the White Christmas stamp set (which I’m SO SAD is not carrying over at this point).  But I really liked the vintage-y feel.

    Tips for making this card:

    • Start out with a Sahara Sand card base and base for your stamped image.  Then stamp the snow scene from White Christmas in black ink before you start covering it with snow.
    • Create the snow by sponging the ground with Whisper White craft ink (and YES! You can still get it from Stampin’ Up!) and stamp your falling snow with the same ink.
    • Add highlights and coloring in your snowman using the Chalk Pen.  It creates a bolder white, and while its not the best for coloring in large areas, the smaller space of the snowman is just the right size.
    • Punch out a star shape after you’ve stamped your trees so you can get it just where you’d like and then glue a piece of Gold glimmer paper behind it for just the right amount of sparkle.  And by gluing the paper behind the hole, it makes it a bit more subtle than when you punch out a gold star and glue it on top.
    • Add some sponging and emboss your card base to finish out the look!

    Need a last minute gift?

    There are 2 great last minute gift ideas that you can buy now and print out today!

    1. Give a Gift Certificate!
      Email me at jennifer@nwstamper.com and I can email you a gift certificate to print out today!  You can get it in any increment you choose and they can use it whenever they’d like for whatever they’d like!
    2. Give the gift of Monthly craft projects with Paper Pumpkin!
      Shop online for Prepaid Paper Pumpkin subscriptions and you will also receive a gift card you can print out to give the recipient with the code for them to redeem their monthly subscription.  You can get 1, 3, 6, or 12 month subscriptions and they get everything they need for fun projects each month!

    NWstamper signature_thumb[9]

    order online button for sig 3_thumb[4]

    Project Supplies Used:
    (if you are reading this in email, click here to see the list of supplies)

  • A Simple Elegant Card Perfect for a Birthday, Wedding, or White Christmas!

    Today is my Birthday and I am so excited for an afternoon where I don’t have to do anything except kick back with some great music and pull out all my preorder goodies and craft, craft, craft!  But before I got elbows deep in paper and ink, I wanted to share with you a card I put together for Stamp Club this month!

    I had had someone ask about a birthday card and I had seen a card that used white embossed paper over a white cardbase that I loved and so I set out to replicate and tweak that idea using my Stampin’ Up supplies I had at home.  I just love how elegant it turned out and I was so excited to share it with everyone at my events this month!  I made mine be birthday but switch out the sentiment and it would be great for just about any occasion!

    Tips for making this card:

    • Emboss a smaller piece of cardstock (in this case 2-3/4”x 3-3/4”) with your favorite embossing folder.  I liked the Mosaic embossing folder because it was a simple repetitive design that felt elegant and gave the card some visual structure.) and then mat it on a 3”x4” piece of white cardstock.
    • Since everything is based in white, pick a contrasting ribbon to anchor your color.  I love Black & White and so this Black Chevron ribbon was just the thing!
    • Punch 6 Petite Petal flowers and crumple each one up into the smallest ball you can in your hand.  Don’t worry if the petals are smashed in all the wrong directions, that is good!  The important thing is getting them extra wrinkled and textured.
    • Adhere the flowers together using glue dots and add a rhinestone to the center for sparkle amongst the texture.
    • Need extra sparkle?  Add a strip of Dazzling Diamonds glitter paper for a mess-free glitz on your card.

    You don’t need a lot of supplies to make a card that will wow them everytime. So, grab some paper and a flower punch, and have fun creating!

    My Birthday Gift is a Gift for You!

    maestro%20clipart

    I love celebrating birthdays… all the fun, cheer, and even a few presents!  I’ve been so amazed to receive some very sweet gifts this year (some fun crafty goodies, some shopping money to get more, and even some pampering by my hubby!) So I wanted to share the joy by giving you all a gift as well!

    I’m giving YOU a $5 gift certificate to be spent starting January, for every $25 you order today and tomorrow!
    This even counts if you order gift certificates from me or Paper Pumpkin prepaid subscriptions!
    So you can finish up your holiday shopping and get a little something fun for you as well. Smile

    Shop online or email me your order to jennifer@nwstamper.com and I’ll get your certificate emailed out to you right away!
    If your order is less than $150, then please use hostess code XMUM7PJZ.
    To purchase a gift certificate
    , email me so I can make sure I have all the details.  If you are interested in giving a Paper Pumpkin Subscription, you have the option to order them online here.

    And can I just brag about my super hubby today?  In the past we haven’t done much for birthdays but he has been amazing today including this yummy breakfast in bed!  Eggs, sausage, and the oh so delicious Orange Rolls!  Talk about spoiling a girl! 2014-12-18 08.01.11

    So I hope you all have a wonderful day too!  Until tomorrow!

    NWstamper signature_thumb[9]

    order online button for sig 3_thumb[4]

    Project Supplies Used:
    (if you are reading this in email, click here to see the list of supplies)