
I’m so excited to be getting back to blogging and get started by sharing a fun and EASY project ideas as part of the Fun n’ Crafty Stampers Blog Hop this month! Though I haven’t been blogging for a while, I have been doing lots of creating for my local classes, retreat, and demonstrator training event – all of which have taken place in the last month or so. So, when it was time for a blog hop with the theme Fall and Halloween, it was the perfect kick off to get back into sharing here with you!
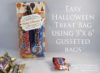
Easy Halloween Treat Bag using Gusseted Bags!
Now, I know some people are big Halloween people and make and send Halloween cards… and if that is you, I think that is awesome! For me, I love to make Halloween cards and projects, but the ones that seem to actually get the most use turn out to be anything that involves candy. Because who doesn’t love getting candy, especially when it is wrapped up all cute!
So, I came across this idea from Patty Bennett for using designer paper inside one of Stampin’ Up’s 3″x6″ Gusseted Bags to create an easy treat bag and I just had to create my own version!A
All you have to do is :
- cut a 2 7/8″ strip of your favorite designer paper to 7″
- score at 1″ from the top
- Slide the patterned paper into the bag (make sure it is tucked into the back gusset)
- add your treats
- and fold over at the score line to seal things up!
I recommend sealing it closed by either using some Fast Fuse adhesive or simple stapling the flap down. Once you have your treats safely tucked away – and didn’t I tell you that this was a super quick and easy project – you can decorate the front as much or as little as you want.
I grabbed the new Spooky Cat stamp set and stamped the spiderweb treat tag onto a piece of scrap Very Vanilla cardstock. Then I added the Happy Halloween sentiment (also from the same stamp set) in contrasting Pumpkin Pie ink.
Now the best part is that this tag image, stamps out PERFECTLY using the Everyday Label punch! Then you can just add some black rhinestones on each side for a fun tag. I also wanted to use some of the Vintage Crochet Trim for a little fun behind it. I just taped the ribbon to the back of the tag before adhering it to the front of the bag.

These treat bags are perfect for parties or handing out to friends and co-workers
Quick, easy, and cost effective too! The gusseted bags are only $4.50 for 25 bags! Plus, you can get up to 48 pieces of the right size patterned paper from one pack of designer paper! So, one pack of patterned paper, one set of bags, and some candy and you are set for a party worth of trick or treaters!
Check out more great ideas in the Fun n’ Crafty Group Blog Hop
Thanks for checking out my project and taking part in our blog hop! If you want to try this at home – and I encourage you to do so – card dimensions and supplies are listed for you at the bottom of this post.
There are more amazing ideas and inspiration you don’t want to miss. If you just started, make sure to hop back and check out the cute creations by Merit and then continue on to Susan’s blog.
*** Please leave a comment at the end of this post and on the blog hop stops, and let us know what you think!***
- Tobe – The Craft Sea
- Christine – Artful Musings
- Merit – MB Squared Designs
- Jennifer – NW Stamper<—YOU ARE HERE
- Susan – Stampin’ By the SF Bay


Make this project at home! Here is what you’ll need:
- Spooky Night designer paper (potions) – 2 7/8″ x 7″, scored at 1″
- Very Vanilla cardstock – scraps to punch out the Everyday Label punch
- Vintage Crochet Trim – 8″
Supply List


Leave a Reply to Heather Cancel reply