Northwest Stamper

Tag: stampin’ up

  • The Convention Swap that Made Me Need the Alphabet Rotary Stamp


    ~~ LAST DAY to Shop the Holiday Extravaganza ~~
    ~~ Join Stampin’ Up with me & pick out $125 in any catalog or sale items to receive for only $74.25!~~


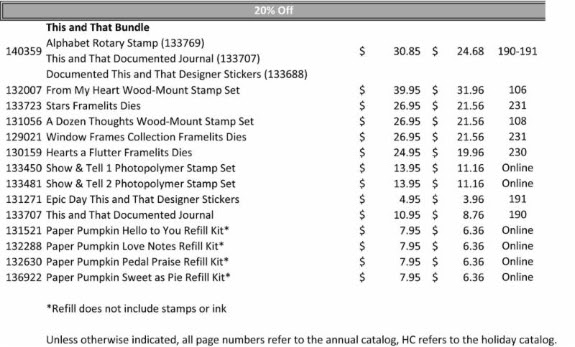
    With all the hub bub about the Online Extravaganza, I was looking through the list and seeing the things I loved and the items I totally wanted to grab.  For example, the Alphabet Rotary Stamp.  I had seen it in the past and didn’t think much of it, but now that it is 50% off Today ONLY, I thought I would share the card that got me super excited about it.

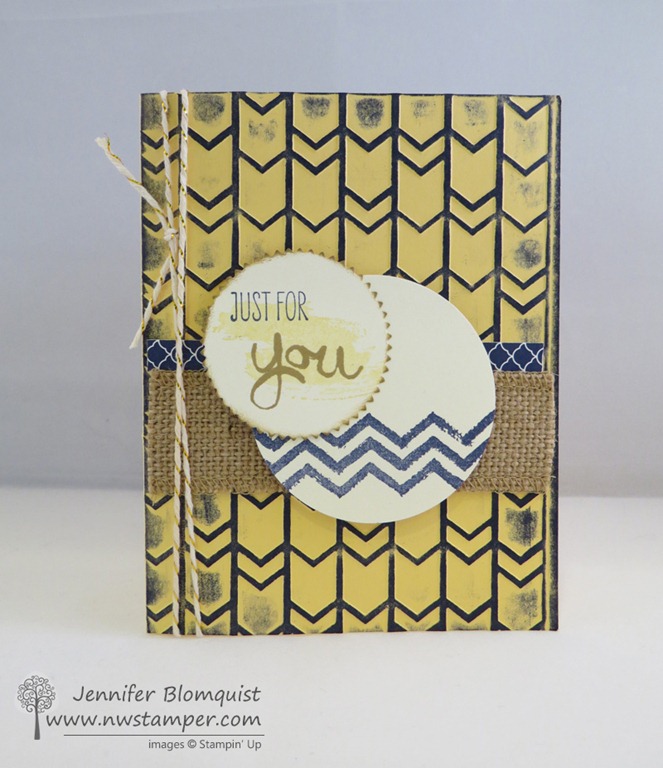
    This was a convention display board card by Jeanna Bohanon that I received as a swap card this last summer.  I’ve totally been meaning to share it but thought now would be a great time.  Can’t we all use a little sunny rainbow in our day?  I also love how complicated it looks, but how simple it is to create!  My kind of card!

    Tips for making this card:

    • Heat emboss your image (in this case the LOVE from Seasonally Scattered) with white embossing powder.  Then do some quick coloring with your Stampin’ Write markers over the top of the embossing powder.  The dye-based ink will not stick to the embossed image, letting the white show through.
    • Add your own sentiment touch by using the Alphabet Rotary stamp!  It gives you 13 spaces for numbers, letters, or characters including these cute hearts.  You can add spaces too so you could make it be more than one word.  It is a perfect way to add your own touch to sentiments on your card.
    • Add some scraps from your craft table, like some Black Chevron Ribbon (or pick one of the colors that is on sale today for 50% off too!), some Brights buttons, twine, or even that cute 1/8” Silver Taffeta ribbon.

    I can’t wait to play with my rotary stamp and have fun making lots of customized sentiments for my cards and scrapbooking! 

    Reminder – Today is the last day for the starter kit deal and the chance to get 25% off all your purchases in December including new Occasions Catalog items and Sale-a-Bration 2015 items!

    I’m excited to welcome new folks to my group of Fun n’ Crafty stampers – from hobbiest looking for great deals to folks wanting to earn free stamps and extra money – and we’d love to have you join us.  You only have through today to get in on the $75 starter kit deal which also gets you an extra 5% off all your purchases in December.  And you have until March 2015 to make your first set of minimums!  Email me if you have any questions (jennifer@nwstamper.com) or get started picking out your starter kit here.

    NWstamper signature_thumb[9]

    order online button for sig 3_thumb[4]

    Project Supplies Used:
    (if you are reading this in email, click here to see the list of supplies)

  • One Day Doorbusters and a Great Starter Kit Deal!

    It’s official!  We are kicked off into the holiday season!  I for once am actually almost completely done with my holiday shopping… and now need to focus on finishing up my Christmas Cards and also putting together my December Scrapbook album.  Every year I’ve ended up putting together a scrapbook of just the happenings in December.  And with 3 birthdays in our family (mine and both my kiddos) plus Christmas, there is always a lot of photos and lots to talk about. 

    This year I’m trying out an idea I heard from the December daily style albums.  Basically, I’m putting together the basic skeleton of my album together in advance using the Stampin’ Up 6×8 Project Life Album and Hello December Card Collection & Accessory Pack.  That way, I can add in my pictures as I go and then add in extra pages as needed along the way. Smile But I don’t have to start from scratch at the end of the month!   You know, something like this:

    image

    So, while I’m working on that, don’t forget about today’s Doorbusters from the Online Sale!  (See ALL the sale items listed here)


    imageimage
    Project Life BundleGift Box Bundle


    Shop the Online Extravaganza Sale Here

    As of very early this morning, the Blendabilities bundle is sold out. 
    I know, total bummer, but if you had your heart set on that deal, email me at jennifer@nwstamper.com
    and I’ll give you the best deal I can with my demonstrator discount!  Or check out another awesome option below:

    Another great option!
    Not only can you get in on the doorbusters on Monday, but you can turn those into an even better deal when you combine it with the starter kit special! 
    Get $125 in your choice of items for $75 PLUS get at least 25% off anything you order in Decemberincluding NEW Occasions catalog items and free Sale-a-Bration items!
    BLENDABILITIES STARTER KIT:
    The Blendabilities doorbuster may have sold out, but you can make your own with the discounted Starter Kit!

    1. Visit the Join The Fun page on my website to get start picking out your starter kit
    2. When you get to select your $125 in items for your kit, you can pick either:
      – 10 Packs of Blendabilities + the Color Lifter Marker = $124.45 value for $74.25
      or
      – 9 Packs of Blendabilites + the Color Lifter Marker + Memento Ink pad + 20 Notecards & Envelopes = $124.40 value for $74.25
      That is a 60% SAVINGS!
    3. You’ll pay tax but your shipping is free!

    You will receive an email once you check out giving you your password for the demonstrator website where you can start checking out all the inside scoop and demonstrator forums.  Plus, any order you place in December will give you at least a 25% discount.

    Get Started on Your Kit

    A few FAQ I’ve been asked:

    • What are the requirements if I sign up?
      None!  This is a no obligation, try it and see if you like it kind of thing.  If you buy/sell $300 by March 2015, then you will continue to receive the perks of being a demonstrator for the following 3 months.  At that point, you just need to sell/buy $300 each quarter to maintain your active status.
    • What if I don’t meet the minimums in a quarter?
      Your active demonstrator status is dropped and you keep everything you’ve earned or purchased and just continue crafting and creating however you;d like.  There is no penalty at all!
    • What are the perks of being a demonstrator?
      Get 35% off your first order of $150 or more, get 25% off all your purchases in December, earn money on anything anyone orders from you, be connected with other enthusiastic stampers through the Stampin’ Connection demonstrator forum, my team’s Facebook group, see the spring catalog and sale-a-bration promotion first and even order from it in December with your discount, be the first to hear about Stampin’ Up news and share your excitement with others and be inspired in your crafting.  Plus I’m here to help you navigate it all and get what you want out of your experience.

    Don’t need Blendabilities?  Pick anything you want for the $125 value!
    Plus, get 25% off all your orders in December if you get your starter kit during the sale.

    Join Here


    NWstamper signature_thumb[9]

    order online button for sig 3_thumb[4]

  • Distressing, Burlap, and Work of Art for Masculine Monday

    Distressing, Burlap, and Work of Art for Masculine Monday


    ~~ Shop the Holiday Extravaganza Now through Dec 2nd.
    Don’t miss 1-Day Only doorbusters today ONLY!  see the details ~~
    ~~ Join Stampin’ Up with me & pick out $125 in any catalog or sale items to receive for only $74.25!~~


    Amidst all the excitement and hubbub of the Online Extravaganza that started today, over at the Stylin’ Stampin’ Inkspiration blog, we are sharing some different ideas for those masculine cards we all need throughout the year.  This was my contribution

    This was one of those cards where you just start slapping things  and in the end you call it good. Smile

    I started by embossing a So Saffron card base with the Arrows Embossing folder (which happens to be only $5 with today’s doorbuster sale!) and then colored the embossed parts using Night of Navy ink and my brayer.

    (check out a video for how to color with a brayer here)

    I added some Night of Navy designer paper and some burlap ribbon to break up the embossed pattern…. you know, gotta have some burlap on all your masculine cards. Smile

    Finally I used my Work of Art stamp set to help with my central sentiments.

    side view work of art distressed card with arrows embossing folder

    Like I said, a little bit of this and a little bit of that… but sometimes that is all you need.

    Want this or other embossing folders for only $5? Make sure to grab them today as part of the 1-Day Doorbusters happening today only.  Shop the sale here.

    NWstamper signature_thumb[9]

    order online button for sig 3_thumb[4]

    Project Supplies Used:
    (if you are reading this in email, click here to see the list of supplies)

    Built for Free Using: My Stampin Blog

  • It’s a Stampin’ Up Holiday Online Extravaganza!

    It’s a Stampin’ Up Holiday Online Extravaganza!

    It’s the final week in Gratitude Month and we are getting ready for the kick off the big sales for holiday shopping!  Stampin’ Up has a doozy in store for you as well. Smile  Seriously, Blendabiliites, embossing folders, washi tape, punches, kits, and more!

    Gratitude Month Week 4 Thank You Gift –
    FREE embossing folder of your choice with a $50 order
    Shop online & use hostess code UCJDBQH4

    Get a double or triple whammy in savings when you add in this final week’s thank you gift


    online extravaganza logo

    Great deals all week long!

    1 Day Doorbusters – Nov 24th ONLY

    All Week Savings – Nov 24th  to Dec 2nd

    1 Day Doorbusters – Dec 1st ONLY


    Shop here for all the deals with Hostess Code UCJDBQH4 to receive your Gratitude Week 4 Thank You gift!

    The Best Deal? Join Stampin’ Up with NO obligation! For this sale week only, get $125in your choice of product (including sale items below) for only $74.25! Join Here

    NWstamper signature_thumb[9]

    order online button for sig 3_thumb[4]

  • Quick and Easy Card with a Little Help From My Blendabilities

    Today over on the Stylin’ Stampin’ Inkspiration blog, we are sharing some quick and easy cards for you.  So, I thought I’d share one of the cards I created for my Stamp Club this fall.

    I kept it quick to go together thanks to my handy Big Shot and the Scalloped Tag Topper punch, so that we could focus on playing with the Blendabilities!

    Tips for making this card

    • By using an embossing folder for your contrasting color of paper, it keeps your simple card interesting to look at without overwhelming the stamped image.
    • Dimensions for this card:
      Hello Honey cardstock – 8.5” x 5.5” folded in half
      Lost Lagoon cardstock – 5.5” x 1.75”, which is just right for two rows of the large polka dots on the Large Polka Dot Embossing folder
      Whisper White cardstock – 4.25” x 2”
    • Cut a piece of the Mossy Meadow ribbon and hold it in place by stapling it to the top of the tag
    • The flower images from the Bloom with Hope hostess stamp set are perfect for coloring with Blendabilities.  In this case, we use the Night of Navy trio!  Who knew the dark sounding color could be so light and pretty when you stick with the lightest color marker for most of your image?!

    Just a small amount of stamping, a little embossing, and a little coloring and you have a pretty card that is perfect for any occasion.

    Just a reminder, we are on week 3 of Gratitude Month and the special thank you gift this week is a bonus punch on your Northwest Stamper rewards card!  Get to your free stamp set even faster this week when you shop online & use hostess code UCJDBQH4.image

    Finally, next week will be the kick off for the Holiday Shopping Sale!  I’ll be getting details soon, but I know you’ll have the special Gratitude Month week 4 gift from me PLUS all the great deals from Stampin’ Up!  If you want to be one of the first to hear about the details, make sure you are on my mailing list as I’ll be sending out the details once I have them so you are ready to go. Smile 

    Get on the newsletter mailing list here

    NWstamper signature_thumb[9]

    order online button for sig 3_thumb[4]

    Project Supplies Used:
    (if you are reading this in email, click here to see the list of supplies)

  • Bright Banner Birthday Card using Project Life + Double Reward Points!

    Just popping in for a quick blog post because I wanted to share with you another bright and fun project.  How about a celebration card with lots of cheery colors?

    See that bright pattern I used for the big banner?  I was getting tricky and instead of using designer paper, I used a card from the Project Life Everyday Adventure set!  I die cut it using my Banner framelits and matted it with a Black banner.

    Then grab some coordinating Cardstock and punch some little banners using the Banner punch.  I topped it off with some twine and then it was time to get some sparkle on!  Courtesy of the 2013 In Color sequins.

    I even had to add a sequin to the sentiment from the Yippee Skippee Stamp set.  Can’t leave any part unblinged. 🙂

    Gratitude Month Week 3 Thank You Gift!

    All this week, get DOUBLE PUNCHES on your Northwest Stamper Reward card!  Yep!  All orders through Sunday are giving you a way to earn a free stamp set from me even faster!

    For every $40 you spend (before tax and shipping) earn 2 punches on your punch card.  At 10 you’ll get to pick a free stamp set to receive totally free!

    And just a reminder of the newest Weekly Deals:

    weekly deal 11-18-14

    Have a wonderful week and I’ll be back with more projects for you soon!

    NWstamper signature_thumb[9]

    order online button for sig 3_thumb[4]

    Project Supplies Used:
    (if you are reading this in email, click here to see the list of supplies)

  • All about Stars Birthday Card featuring Mossy Meadow

    When the new catalog came out this summer, I launched my In Color club where each month we had a featured color that everyone in the club got a bundle based on that color (so cardstock, ink pad, ink refill, marker, ribbon, accessories, and then a couple card ideas).  Well, this was one of the cards I made for the Mossy Meadow month:

    I have been LOVING using all the stars stuff that has come out this year and as I was telling someone last night, the star embossing folder has become my new polka dot folder.  It is great for just about any type of card as a fun background texture.

    Tips for creating this card:

    • Cut a 2” strip of cardstock to use with the Scallop Tag Topper punch to create your central piece.  Punch the top first and THEN stamp your sentiment.
    • I love the stars confetti punch, and it goes great with a tag like this.  You can just slide you tag all the way in to the punch anywhere you like, and then punch for a cool cut out effect.
    • Layer your tag over a darker color cardstock to make your punched out stars really stand out.

    • Slide your ribbon through the hole created by the scallop tag topper punch and use the Handheld Mini Stapler from Stampin’ Up to hold it in place easily.

    Use this design with any colors but when you stick with neutrals and a single color family (in this case the 2014-2016 In Colors).

    Reminder – 2 Days Left for this week’s thank you gift:

    Week 2 Thank You Gift – Free ink pad of your choice with a $40 order
    image
    Shop online & use hostess code UCJDBQH4


    NWstamper signature_thumb[9]

    order online button for sig 3_thumb[4]

    Project Supplies Used:
    (if you are reading this in email, click here to see the list of supplies)

  • Gratitude Month Week 2 FREE Tutorial – Patriotic Thank You Card

    As promised, though a little late, I shared this tutorial with my newsletter mailing list earlier this week (if you aren’t on the list you can sign up here).  But I also wanted to make sure to post it on my blog as well!  This was my card for Veteran’s Day and so it is a thank you card with a patriotic touch.

    November Gratitude Month – Week 2 PDF Tutorial – Patriotic Thank You Card

    Tips for this card:

    • Emboss the three main stars from Be the Star stamp set onto your favorite colored cardstock and heat set with white embossing powder for maximum punch.
    • Each star can be exactly die cut using the coordinating Stars framelits and did you notice how well they nestle together?
    • Take the banner shape from the For All Things stamp set and stamp in Crumb Cake ink and cut out.  Then cut it in half to create two banners for your card.  Staple together with the mini stapler from Stampin’ Up and you have a cute accent for the top of your card.
      Personally, I like stapling twice for decoration. Smile 


    • Add a button and some ribbon, but keep it neutral so your stars can take center stage.

    And most importantly, make sure to give this card to someone who means so much to you!

    NWstamper signature_thumb[9]

    order online button for sig 3_thumb[4]

    Gratitude Month Week 2 Thank You Gift – FREE Ink pad w/ a $40 order
    Shop online & use hostess code UCJDBQH4

    Project Supplies Used:
    (if you are reading this in email, click here to see the list of supplies)

  • New Weekly Deals For You

    Enjoy the new weekly deals that just started today!  I have to admit, I’m severely tempted by that Happiness Is Project Life Accessory kit!  I’ve been wanting it for AGES and now that it is on special…… it has cute supplies for not just project life but scrapbooking and/or card making too!  Also, love that Daffodil Delight seam binding as well – great for when you need something bring to perk up your projects.

    1013842_10203405559483054_8953758511945085590_n

    Shop the Weekly Deals Here

    Week 2 of Gratitude Month!

    All month I’m celebrating you and all the people I’m thankful for in my life!  To help you play along, I’m sharing a new gratitude project tutorial each week along with a special thank you gift each week for folks who order with me.

    Week 2 Thank You Gift – Free ink pad of your choice with a $40 order
    image
    Shop online & use hostess code UCJDBQH4

    Week 2 Tutorial – Grateful For You Card

    The full tutorial is going out today to folks on my newsletter list (subscribe here) and I’ll have the tutorial and details posted to my blog tomorrow as well!

    NWstamper signature_thumb[9]

    order online button for sig 3_thumb[4]

    Gratitude Month Week 2 Thank You Gift – FREE Ink pad w/ a $40 order
    Shop online & use hostess code UCJDBQH4

  • Celebrate Card with a little help from the Chevron Tag-a-Bags!

    Today’s card share was an experiment for me – doing something a little bit different for my papers.  Can you spot what it is?

    If you were wondering where that chevron paper came from, you are in the right ballpark!  Yes, that Is from Stampin’ Up, and No, it isn’t from one of the paper packs.  Instead I was trying to put together a card for the Convention display boards as part of of the Stylin’ Stampin’ inkspiration gals and I was starting from the stamped and punched flowers.  Then I saw the chevron bags sitting on my craft desk and I thought the pattern would make a great background!

    Tips for making this card:

    • Make a fun background paper using one of the Chevron Tag-a-Bags!  The are only $3.95 for 10 food safe bags and so they are great for gift bags (like this christmas bag I shared last week) or as paper for a card.Chevron Tag-a-BagsChevron Tag-a-Bags
    • The bags have a seam in the back, so for a large area, you will want to cut the front out, but for smaller strips you can use the back of the bags.
    • Mount the paper bag to some cardstock and if you use neutrals like I did, it lets your stamped elements really take center stage.
    • To make the flower and leaves, use the Bloom for You stamp with matching Fun Flower punch in two colors.  Offset the green with the purple to make the leaves in the background for your flower!
    • Add a few loops of linen thread for flair and then add one more pop of color with the Thick Baker’s Twine behind everything.

    These would be perfect for goodie bags for a party or just a little something to give to someone to celebrate an achievement or just to share a treat or gift to say “I’m celebrating you, because you are awesome!”  Smile  Because don’t we all need to hear now and then that we are awesome just for being us?  Life can get tough and we are our worst critics, so help remind someone that they are great!

    ————————

    And speaking of celebrating – it’s now WEEK 2 of GRATITUDE WEEK!  I’ll be sharing more gratitude themed projects this week including a FREE TUTORIAL coming out tomorrow!

    In the meantime, that means there is a new thank you gift for orders this week too!

    Gratitude Month Week 2 Free Gift – Ink Pad of your Choice w/ a $40 order
    Shop online & use hostess code UCJDBQH4

    ————————

    NWstamper signature_thumb[9]

    order online button for sig 3_thumb[4]

    See the Catalogs online – Annual Catalog  |  Holiday Catalog  |  Holiday Supplement
    Save more when shopping – Weekly Deals  |  Clearance Rack

    Project Supplies Used:
    (if you are reading this in email, click here to see the list of supplies)

  • Holiday Gift Bag for Christmas using Seasonally Scattered

    How about something a little different today – a fun gift bag that is WAY QUICKER to make than you might expect using the Seasonally Scattered stamp set and those great chevron printed bags from Stampin’ Up.

    I created this for the Convention Display boards this last summer (yes, I’m still working on finishing up sharing all the projects for that! Smile) and I was asked to make some 3D projects for each the stamp sets I was given.  I started adding a little bit here and there and finally it all came together in a fun festive bag.

    Tips for making this project:

    • Start by gluing down a tea lace doily to the front of the preprinted chevron bags from Stampin’ Up.  The preprinted bags are great for small treats or gifts and since they already have the pattern it makes it easy to just add a little bit here and there and have it look great.
    • I stamped the Merry sentiment from the Seasonally Scattered stamp set on a piece of scrap paper and cut it out.  Layer over some scrap Old Olive cardstock and tear the edges of the Old Olive paper so it is just longer and taller than the stamped image.
      That is right… just tear… no tricks or special tools.  I usually just rip my paper pulling at a slight angle so I expose some of the core of my cardstock for a more textured look.
    • Loop some seam binding ribbon and adhere to the back and you can add everything to your doily with Stampin’ Dimensionals!

    • Then just punch out some extra banners using the Banner punch ( 1- Cherry Cobbler, 1- Old Olive, 1- Whisper White stamped with the snowflakes from the merry sentiment stamp)
    • Stuff your bag and then staple some Gold Sequins and the banners to the top corner to keep it closed!

    The only part that takes any time with these bags is the cutting out of the Merry sentiment, but you could use a framelit and die cut it to make it even faster!

    NWstamper signature_thumb[9]

    order online button for sig 3_thumb[4]

    Gratitude Month Week 1 Free Tutorial – Kinda Eclectic Thank You Card

    Shop online & use hostess code UCJDBQH4
    See the Catalogs online – Annual Catalog  |  Holiday Catalog  |  Holiday Supplement
    Save more when shopping – Weekly Deals  |  Clearance Rack

    Project Supplies Used:
    (if you are reading this in email, click here to see the list of supplies)

  • Wondrous Wreath Gratitude Card for the Fun n’ Crafty Blog Hop

    Wondrous Wreath Gratitude Card for the Fun n’ Crafty Blog Hop

    Fun n Crafty Blog Hop badgeIn keeping with the theme of Gratitude this month, a few of us from the Fun n’ Crafty Stampin’ Up! demonstrator team put together a mini-blog hop based around the theme of Gratitude.  This was my card I wanted to share with you today!


    I LOVE this Wondrous Wreath stamp set and matching framlits, especially because you can easily cut out your wreath both outside AND IN and have all the little leaf shapes. Smile

    For this card, I used more “Fall” colors instead of the reds and greens like I did on my Christmas Wreath card.  I used the following colors:

    • Hello Honey ink for the full wreath stamp with all the leaves
    • Soft Suede ink for the partial wreath stamp with about 1/4 of the leaves
    • Blackberry Bliss ink for the berries and the bow

    And speaking of the bow, how awesome is it that you don’t have to hand cut that either! Smile  I stamped my bow and cut it out with the matching die but I’ve seen super pretty cards using glimmer paper for the bow or just plain cardstock as well.  Gotta love having options.

    Then you can kind of see the card base is stamped as well.  I used the Hardwood background stamp ….
    (TIP – I love my clearmount stamps, but when it comes to background sized stamps, I ALWAYS recommend to my customers to get them in wood.  Sure, you save a little space when you get it in clear, but then you have to get the $17 clear block to use with it, and in the case of a stamp like this, it is pain in the rear to get the sticker on right onto the back of the stamp!  I just think it is way easier and often more economical to get the background stamps in woodmount.  Though I’ll still love you if you decide you want it in clear. Smile )

    but anyway, I used the Hardwood background stamp in the same color as the paper, which in this case was crumb cake.

    I also made this card the same except for using Sahara Sand as my background instead of Crumb Cake.  Both are pretty… not sure which I like better, actually.  Swing by my Facebook page and cast your vote which paper you like better!

    And now, check out a few more ideas for sharing gratitude this month!:

    10353106_10204078100138887_7954284539736439010_n

    We don’t have a long list this this month so it’s easy to check everything out and enjoy the inspiration!  And please leave Sara and Pam some love on their blogs… I know it would mean a lot to them. Smile

    NWstamper signature_thumb[9]

    order online button for sig 3_thumb[4]

    Gratitude Month Week 1 Free Tutorial – Kinda Eclectic Thank You Card

    use hostess code UCJDBQH4
    See the Catalogs online – Annual Catalog  |  Holiday Catalog  |  Holiday Supplement
    Save more when shopping – Weekly Deals  |  Clearance Rack

    Card Supplies Used:
    (if you are reading this in email, click here to see the list of supplies)