Northwest Stamper

Tag: jennifer blomquist

  • New Weekly Deals & Extra Holiday Catalog Paper Samplers

    I can’t believe we are down to the last 2 days of 2014!  I always think I’m going to get so much done during the Christmas “break” but turns out between Christmas, 3 household birthdays, and visiting family the time just flies by!

    For example, while rearranging and reorganizing my craft room (again), I found extra Holiday Catalog paper samplers.  I had planned to do something with them a month ago but totally forgot.

    2014-09-05 14.05.58

    See we prepped a bunch for my Stampin’ Bingo night this fall and had a couple people cancel at the last minute which left me with extras.  Which got put in my cupboard… and out of sight, out of mind.

    2015 Holiday Catalog paper sampler fb

    So, my forgetfulness is your gain!

    1. Purchase one of the extra Paper Samplers for only $10 plus shipping to you!  It would have cost you $76 plus tax and shipping to get all of these papers before and this way you get a little bit of all of them!


      OR

    2. Place a $50 order in my online store or by emailing me your order to jennifer@nwstamper.com and I’ll mail a pack out to you for FREE!

    Many of the patterns are great for any time of the year, so you will be able to use them for projects now and in the future!


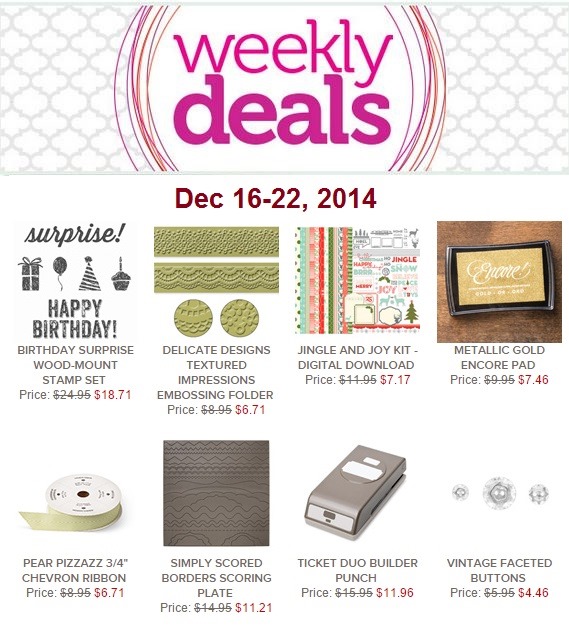
    New Weekly Deals are Here

    They have also updated the weekly deals with some new goodies.  I LOVE LOVE LOVE Amazing Birthday and think it is awesome it is on sale.

    1484339_10204775446900150_320774949343753934_n

    Here is one of the cards I created using Amazing Birthday for Convention:

    See More Samples with Amazing Birthday Here

    Ok, off to finish my cleaning and see what other goodies I find. Smile

    NWstamper signature_thumb[9]

    order online button for sig 3_thumb[4]

  • Rediscovered: Season of Style Quick Cards!

    Someone reminded me of this class I did a while back and that the Season of Style cards and Cherry Cobbler ribbon are both on the Year-End Blowout Sale for cheap!  So I thought I would offer to anyone who purchases the Season of Style cards from my online store, I’ll send you the tutorial for FREE for this set of 20 unique cards!

    Season of Style Designer Tags Card Set
    20 Cards Quick!
    Free instructions when you get these items from the clearance rack or $3.95 for just the instructions

    imageimageimage

    or just get the photos and basic instructions for all 20 cards emailed to you for only $3.95:


    NWstamper signature_thumb[9]

    order online button for sig 3_thumb[4]

  • A Sweet and Simple Monochromatic Card with Hello Honey

    As part of my In Color Club, I send out a card that focuses on the In Color of the month.  This was one of the cards I sent out for the last Hello Honey month.  It is a quick card that was fast and easy using the In Color supplies they received that month.

    Tips for making this card:

    • Keep your colors simple.  I added a touch of Mossy Meadow to my Hello Honey card just to ground everything and make the embossed flower pop.
    • Use the Flower Shop stamp set to heat emboss with White Embossing powder on Hello Honey cardstock and punch out with the Pansy punch.

    • Add a second pansy punch piece under the top flower and offset it for make some green leaves.
    • The Bravo stamp set isn’t just for congratulations!  Use the “Sweet” stamp set for anything from birthday, new baby, or a fun thank you card!

    • Use White cardstock to break up the designer paper and the solid cardstock.  It helps keep the pattern from getting too overwhelming.

    NWstamper signature_thumb[9]

    order online button for sig 3_thumb[4]

    Project Supplies Used:
    (if you are reading this in email, click here to see the list of supplies)

  • Last Holiday Projects with the White Christmas Stamp Set & SNEAK PEEK!

    I’m finally finishing up sharing my holiday projects and in a way I’m sad about it.  I LOVED the White Christmas stamp set from Stampin’ Up but only started using it really in the last few weeks.  Turns out I was right to love it because it always seems to turn out so cute!  Even on something as simple as a gift tag, like this:

    Quick, easy, and festive for that special gift.

    Tips for making this tag:

    • This is one of the very few times I will tell you to punch your circle BEFORE stamping  The spacing is very particular and so it is so much easier if you punch first because you can see what you are doing thanks to the stamp set being a photopolymer (completely clear) set.
    • Stamp your banner sentiment in black ink FIRST and then add your snowman in the space that fits under the banner.
    • Use your Stampin’ Write markers to color the “banner thread” and to color in your snowman and add snow (I used Old Olive, Pumpkin Pie, Real Red, and Soft Sky)
    • Use the 1-3/4” circle punch for the circle and then the 2-3/8” scallop circle for the accent.  Add to a tag made from a 2” strip punched on top with the scallop tag topper to make your tag.
    • Add a All is Calm snowflake embellishment (on sale through Jan 5th after which it is discontinued) for a great touch of metallic shine.
    • Top it off with the Woven Satin ribbon from the 2014 Holiday Catalog – such a soft and pretty ribbon!  Also only available until Jan 5th.

    Sneak Peek!

    I also had to share a quick project I made using the new Treat Bag framelit coming out in the 2015 Occasions Catalog – Stampin’ Up’s spring catalog.  It is so easy to make and was perfect for me to use to send some movie ticket gift cards to my family this year.

    2014-12-19 20.52.42

    I made it out of the Nordic Noel designer paper from the 2014 Holiday Catalog and stamped the deer and sentiment from the White Christmas stamp set.  Wrap with some Gold Satin ribbon and add Gold sequins and the Nordic Designer buttons to break up the paper pattern and add just a touch of decoration.  I can’t wait to play more with this die!  It also comes with lots and lots of extra accent dies. I show them all on my Occasions Catalog sneak peek video here – http://youtu.be/qZ8UNeXhJrc?t=6m10s

    image

    NWstamper signature_thumb[9]

    order online button for sig 3_thumb[4]

    Project Supplies Used:
    (if you are reading this in email, click here to see the list of supplies)

  • Christmas Fun with a Punch Art Snowman Gift Card Holder

    Well, another Christmas is past and it was a good one this year for our family.  We had a great day relaxing at home on Christmas and then a noisy day on the 26th with family and cousins. Smile  But isn’t that the best kind of day, at least for kids?

    I had two more Christmas projects I wanted to share and today is a gift card holder I made for a friend.  It started out with a fun punch art snowman gift tag that I converted to a belly band for the holder.

    Punches used for the snowman:

    • 1-3/4” Circle Punch
    • Wide Oval Punch
    • Banner Punch
    • Starburst Framelit (for the background)

    It is really easy to put him together too!  The hat is 2 wide ovals punched out in black (you just trim down one to make the top hat part), his head is the 1-3/4’ circle punch in white, then the body is a wide oval punch in white.  Glue those pieces to a strip of patterned paper for the scarf so he looks about how you like (I used the Trim the Tree designer paper stack – also on discount right now).  Punch out a second piece of designer paper using the banner punch and glue at an angle to create the other tail of the scarf.  His nose is just a freehand cut scrap of Pumpkin Pie cardstock and then I drew on his eyes, mouth, and buttons with a black marker. 

    Add accents like the All is Calm snowflake embellishment (another discount item) to cover up where you adhered the banner punch and a little pearl in the middle for flair.  I also used the Chalk Pen to make dashes around my Starburst framelit die cut for the background and to make the white trim on his hat.

    Pretty cute, huh?

    He was made onto a belly band as the gift card hold was a trifold card.  On the front and inner flap, I decorated with the Trim the Tree designer paper.

    Then you flip it open to reveal a space for your message and the gift card.  I actually added a second pocket to the top flap so they could have 2 gift cards inside.  And the pocket had a little space cut out for easier grabbing using the small oval punch.

    It was easy and fun to make and I hope my friend liked it!

    I also know that those instructions for the snowman may have been a bit tough to follow, so I’ll try to put together a video to help show what I was talking about. Smile 

    And like I mentioned, both the Trim the Tree paper and the All is Calm snowflake embellishments are part of the Year End Blowout Sale!  They are only available for about another week, so grab then now so you can get started on your Holiday scrapbook pages or projects for next year!

    All is calm snowflake embellishments trim the tree designer paper stack

    NWstamper signature_thumb[9]

    order online button for sig 3_thumb[4]

    Project Supplies Used:
    (if you are reading this in email, click here to see the list of supplies)

  • Festival of Trees–a Christmas Card and a Gift Certificate Holder

    I thought I was done with my Christmas projects, but I found 4 more I wanted to share with you. Smile  I had been having fun the last week or so and thought I’d share them with you before Christmas is officially over!  Especially since some of the accents on the projects are part of the Year-End Clearance Sale!  Including:

    imageimageimage

    #1 – Festival of Trees Gift Certificate Holder

    Yes, there is still time to get a gift certificate if you need last minute stocking stuffer (just email me at jennifer@nwstamper.com).  It won’t come in the cute holder, but you could make your own if you are feeling crafty tonight!

    I had to pull out a lot of my Holiday Catalog goodies because I had been neglecting some of them… like the Trim the Tree designer paper stack and this AWESOME Red Satin Woven Ribbon.  And of course there is the easy and funky Festival of Trees stamp set.

    I mounted the trees on a Deco Label die cut that I popped up with Stampin’ Dimensionals so I could slide the ribbon underneath to allow it to be opened and closed as necessary.  Then on the inside I added more trim for the gift certificate by adhering a strip of cardstock on the bottom of the inside to form a pocket and then used the matching Trim the Tree designer paper to accent it.  What a fun present!

    And then, since this was an odd size (7” x 4”) I needed to figure out an envelope.  Then it hit me!  I have an Envelope Punch Board and can make my own custom envelope!  I reached for my Under the Tree specialty designer paper because it was made from Kraft cardstock and so it is heavier (ie – will hold up better in the mail) AND it is stiff enough that it helps smooth out the bumps to make sure bow and embellishments on the front of the holder don’t get caught up in the post office.   Plus it just looked cool. Smile

    Under the Tree kraft envelope for gift certificate

    Ok, then on to matching project #2

    #2 –  Festival of Trees Christmas Card

    I thought this coordinated so well, I’d share it today too.  This also uses the Festival of Trees stamp set but adds the sentiment from the Endless Wishes stamp set (sniff, sniff… so sad Endless Wishes didn’t make it onto the carry over list!  Love those snowflakes and sentiments!)

    I really liked the color and weight of the Under the Tree specialty designer paper, it added to the vintage feel I was going for, so I used that for the Red and Kraft trees pattern paper in the background.  Then I was back with more sparkle paper for the front tree and then the little Christmas tree from the Clearance Rack Merry Minis Punch Pack.  It is just such a cute accent!  I even had to use it for the inside as well.

    See the little green trees on the inside? Fun, right?

    I hope you have a wonderful Christmas eve full of fun Family and holiday traditions – or at least good times remembering some special Holiday memories!

    NWstamper signature_thumb[9]

    order online button for sig 3_thumb[4]

    Project Supplies Used:
    (if you are reading this in email, click here to see the list of supplies)


  • New Items Added to the Clearance Rack–See the Cute Things You Can Make!

    Nothing like waking up and seeing more goodies posted on the Clearance Rack including extra discounts on some Holiday Catalog items!

    Clearance Rack - Up to 80% Off!

    Lots of new items I’ve been having fun with including:

    • Fun Fall Stamp Set & Framelits 

      image
    • Many Merry Stars Kit & Coordinating Stamp Set

      image
    • Good Greetings Stamp Set

      image
    • Under the Tree Designer Paper

      image

    It not only makes great boxes, but cute cards and envelopes too!

    image

    Shop the Updated Year-End Sale Now!

    NWstamper signature_thumb[9]

    order online button for sig 3_thumb[4]

  • A Vintage Feel for a White Christmas Snow Scene Card

    Alright, are you ready for the last card in my Christmas card series?  I LOVE this card!  Seriously one of my favorites this year.  It was a mix and match of a few different cards using the White Christmas stamp set (which I’m SO SAD is not carrying over at this point).  But I really liked the vintage-y feel.

    Tips for making this card:

    • Start out with a Sahara Sand card base and base for your stamped image.  Then stamp the snow scene from White Christmas in black ink before you start covering it with snow.
    • Create the snow by sponging the ground with Whisper White craft ink (and YES! You can still get it from Stampin’ Up!) and stamp your falling snow with the same ink.
    • Add highlights and coloring in your snowman using the Chalk Pen.  It creates a bolder white, and while its not the best for coloring in large areas, the smaller space of the snowman is just the right size.
    • Punch out a star shape after you’ve stamped your trees so you can get it just where you’d like and then glue a piece of Gold glimmer paper behind it for just the right amount of sparkle.  And by gluing the paper behind the hole, it makes it a bit more subtle than when you punch out a gold star and glue it on top.
    • Add some sponging and emboss your card base to finish out the look!

    Need a last minute gift?

    There are 2 great last minute gift ideas that you can buy now and print out today!

    1. Give a Gift Certificate!
      Email me at jennifer@nwstamper.com and I can email you a gift certificate to print out today!  You can get it in any increment you choose and they can use it whenever they’d like for whatever they’d like!
    2. Give the gift of Monthly craft projects with Paper Pumpkin!
      Shop online for Prepaid Paper Pumpkin subscriptions and you will also receive a gift card you can print out to give the recipient with the code for them to redeem their monthly subscription.  You can get 1, 3, 6, or 12 month subscriptions and they get everything they need for fun projects each month!

    NWstamper signature_thumb[9]

    order online button for sig 3_thumb[4]

    Project Supplies Used:
    (if you are reading this in email, click here to see the list of supplies)

  • 2015 Occasions Catalog and Sale-a-Bration Sneak Peek Products Haul Video

    So, instead of playing with my new preorder as planned, I spent the time reorganizing my craft room – again- and made a trip to the amazing IKEA which is what my craft room is built upon. Smile  There I got a second table so I could have space permenantly set up for taking photos of projects and doing VIDEOS!!  YAY!!

    I decided to try it out yesterday and did a “see the haul” video where I shared all the goodies I got in my preorder and talked a little about each of them and even put together a treat bag!  So, if you are curious to see what the products that are coming out soon look like, check out this video:

    (note – if you are reading this in an email, the video may not show up, so click here to view the video)

    And if you want to get your hands of these goodies early, you can always get them as part of your starter kit!  Yep, you can get them NOW!  And as an added perk, you’ll be a part of my Fun n’ Crafter stampers group and get to see all the sneak peeks, join our fun conversation, and get a discount on everything you order through March!  Plus, when your friends see how awesome it all is, they can order from you and you get extra spending money too.  All with no obligation… just a chance to try it out while scoring a deal to get started!  Smile

    You can get started picking out your starter kit here or email me at jennifer@nwstamper.com for more details.

    NWstamper signature_thumb[9]

    order online button for sig 3_thumb[4]

  • A Simple Elegant Card Perfect for a Birthday, Wedding, or White Christmas!

    Today is my Birthday and I am so excited for an afternoon where I don’t have to do anything except kick back with some great music and pull out all my preorder goodies and craft, craft, craft!  But before I got elbows deep in paper and ink, I wanted to share with you a card I put together for Stamp Club this month!

    I had had someone ask about a birthday card and I had seen a card that used white embossed paper over a white cardbase that I loved and so I set out to replicate and tweak that idea using my Stampin’ Up supplies I had at home.  I just love how elegant it turned out and I was so excited to share it with everyone at my events this month!  I made mine be birthday but switch out the sentiment and it would be great for just about any occasion!

    Tips for making this card:

    • Emboss a smaller piece of cardstock (in this case 2-3/4”x 3-3/4”) with your favorite embossing folder.  I liked the Mosaic embossing folder because it was a simple repetitive design that felt elegant and gave the card some visual structure.) and then mat it on a 3”x4” piece of white cardstock.
    • Since everything is based in white, pick a contrasting ribbon to anchor your color.  I love Black & White and so this Black Chevron ribbon was just the thing!
    • Punch 6 Petite Petal flowers and crumple each one up into the smallest ball you can in your hand.  Don’t worry if the petals are smashed in all the wrong directions, that is good!  The important thing is getting them extra wrinkled and textured.
    • Adhere the flowers together using glue dots and add a rhinestone to the center for sparkle amongst the texture.
    • Need extra sparkle?  Add a strip of Dazzling Diamonds glitter paper for a mess-free glitz on your card.

    You don’t need a lot of supplies to make a card that will wow them everytime. So, grab some paper and a flower punch, and have fun creating!

    My Birthday Gift is a Gift for You!

    maestro%20clipart

    I love celebrating birthdays… all the fun, cheer, and even a few presents!  I’ve been so amazed to receive some very sweet gifts this year (some fun crafty goodies, some shopping money to get more, and even some pampering by my hubby!) So I wanted to share the joy by giving you all a gift as well!

    I’m giving YOU a $5 gift certificate to be spent starting January, for every $25 you order today and tomorrow!
    This even counts if you order gift certificates from me or Paper Pumpkin prepaid subscriptions!
    So you can finish up your holiday shopping and get a little something fun for you as well. Smile

    Shop online or email me your order to jennifer@nwstamper.com and I’ll get your certificate emailed out to you right away!
    If your order is less than $150, then please use hostess code XMUM7PJZ.
    To purchase a gift certificate
    , email me so I can make sure I have all the details.  If you are interested in giving a Paper Pumpkin Subscription, you have the option to order them online here.

    And can I just brag about my super hubby today?  In the past we haven’t done much for birthdays but he has been amazing today including this yummy breakfast in bed!  Eggs, sausage, and the oh so delicious Orange Rolls!  Talk about spoiling a girl! 2014-12-18 08.01.11

    So I hope you all have a wonderful day too!  Until tomorrow!

    NWstamper signature_thumb[9]

    order online button for sig 3_thumb[4]

    Project Supplies Used:
    (if you are reading this in email, click here to see the list of supplies)

  • Weekly Deals and Reminders!

    Oh my goodness, did you realize we have just over a week until Christmas!?  I keep forgetting as I try to get my Christmas cards finished and in the mail (thank goodness for last month’s Paper Pumpkin kit to give me a few extra Christmas cards quick!)

    It also means we are at the end of our guaranteed delivery by Christmas window!  TODAY is the last day to place an order and be sure to receive it before Christmas!  So if you were planning on getting any more gifts that require shipping, make sure you get shopping today! Smile   There are lots of great deals and here are a few ways you can get great gifts and save big at the same time!

    year end closeouts

    This sale is going on now and items are while supplies last – and we are seeing a lot of things selling out.  So check it out and maybe check a few more things off your shopping list!  Here are a few ideas for you:

    For the scrapbooker or someone who just wants to get their holiday photos in an album before NEXT holiday season!  This is what I used for my December album last year, only I didn’t get the crazy deal you can get this year Smile

    Year end closeout Christmas Album

    See these in the Year End Closeouts

    Or if you just want some stocking stuffers or fun gifts for people who want to be crafty but don’t have a ton of supplies — or, gift idea— get these card kits, and stamp them up yourself and then give them away as a pre-made card set!  Perfect for relatives who love sending handmade cards but aren’t as inclined to make them themselves.

    year end closeout kits

    See these in the Year End Closeouts

    And then on top of that, they’ve come out with new weekly deals this week.

    weekly deal 12-16-14

    All of these are 25% off and there is some fun stuff… for example, check out these projects by Patty Bennett which made me love the Ticket Duo Builder Punch just a little bit more!

    image

    Or the fact that the Vintage Faceted Buttons are so CUTE as the centers of flowers!

    Shop the Weekly Deals Here


    Don’t Forget!  Gift with Purchase right now!

    Shop online and use the hostess code XMUM7PJZ and I’ll get them in the mail to you ASAP or you can purchase a set or just the instructions.  Check out this post for more details.

    NWstamper signature_thumb[9]

    order online button for sig 3_thumb[4]

  • Brushed Gold Bright and Beautiful Star Christmas Card

    Yesterday I started sharing some of my Christmas cards from classes and today I’d thought I’d share another.  This was my first chance playing with the Brushed Gold cardstock, and let me tell you, it is Fabulous!

    I was playing with different ideas when I came up with this card, but in the end, I loved the simplicity of it with lots of pretty touches.

    Tips for making this card:

    • Die cut the larger star using the Star Framelits from Stampin’ Up directly from your card base.  Then fill the hole by gluing a piece of pretty cardstock (like this Brushed Gold) to the inside of your card.  It makes it pretty inside and out!

    • Tie around some glitzy baker’s twine and then fray the edges after you knot it to give it a softer touch.
    • Use the Bright & Beautiful stamp set to stamp and cut out with the Star Framelits, a central focus point to layer inside your star cutout in the card base.
    • Add a simple rhinestone to the center of the star and color it with Blendabilities for some subtle sparkle that coordinates!

    See, easy peasy!  But lots of shimmer and sparkle.  Oh, and I forgot to mention, the Brushed Gold cardstock is heavier weight than I was used to with cardstock, which makes it great as a layer or even a card base.  Really adds some feel good heft to your cards!

    Shop online and use the hostess code XMUM7PJZ and I’ll get them in the mail to you ASAP or you can purchase a set or just the instructions.  Check out this post for more details.

    Happy Monday!

    NWstamper signature_thumb[9]

    order online button for sig 3_thumb[4]

    Project Supplies Used:
    (if you are reading this in email, click here to see the list of supplies)