Northwest Stamper

Tag: heat embossing

  • Free Paper Promotion ends Tomorrow! Plus some Not-So-Scary Ghost Cards

    Reminder!  Tomorrow is the LAST DAY to take advantage of the free paper promotion! 
    Get $125 in your favorite craft supplies for only $99 and get free shipping on that order plus a pack of paper a month added to your orders for FREE for the next 6 months!  It’s a great deal and awesome way to get a great deal on your wishlist and get in some holiday shopping for friends and family at a discount too!

    free paper promotion

    So, I know Halloween is tomorrow, but I had a few more not-so-spooky cards that I wanted to share to help get us in the mood.  (Because I know the stores are already switching over to Christmas mode, so we have to help each other keep the Halloween fun going until tomorrow night, right? Smile)

    This was the card I created for my Fun n’ Crafty stampers Stamp & Share event I ran earlier this fall.  The Stamp & Share is our event we hold a few times a year to come together and share ideas, new stamping techniques, business tips, and of course, stamp together!  So much fun!  Anyway, I wanted to use the Fall Fest stamp set and framelits for our make & takes and so I knew I wanted to do something with that adorable ghost.

    Tips for making this card:

    • Turns out, he looks AWESOME when you stamp the ghost with versamark onto Basic Black cardstock and then heat emboss with white embossing powder!  Then just die cut out your ghost and he is perfect! 
    • Added some of the same ghost stamped in Smoky Slate onto the Lost Lagoon cardstock for his fellow ghost buddies.
    • Use the Holiday Invitation stamp set for those cute bats and the Be Scary sentiment for a finishing touch
    • Save with bundles!  This card uses a lot of the new 2014 in Color cardstock – get a little bit of all the colors without breaking the bank in the Family Pack of cardstock – or get the In Color ink pads and get the cardstock free with the In Color bundle!  Plus save 15% on the Fall Fest stamp set and framelits when you buy them at the same time in their bundle too!

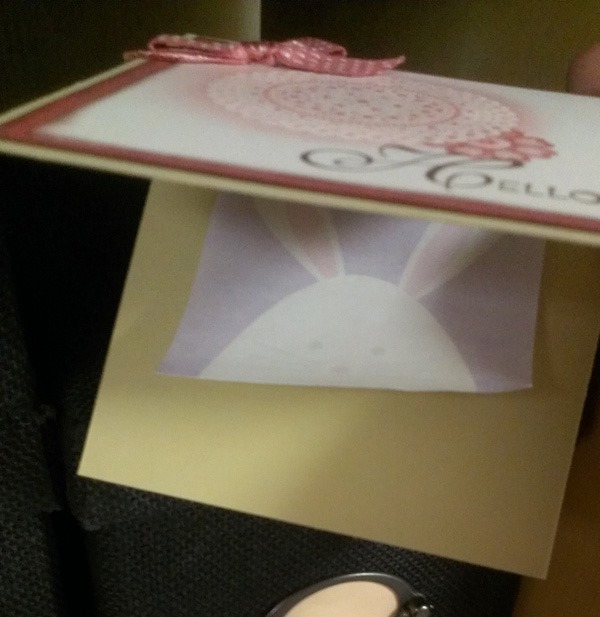
    Now, I thought I’d also share a card that was my first attempt at this general card idea.  I decided it didn’t quite work the way I wanted so I came up with the version above.  But I thought I’d share it in case it gives you some other inspiration.

    The main difference is that I stamped the ghost onto the Lost Lagoon cardstock and then cut him out and glued the die cut onto the other part of the Lost Lagoon cardstock.  Then in the hole that was cut out, I stamped the ghost directly onto the cardbase and glued the Lost Lagoon cardstock over the top.  Clear as mud?

    Hopefully that picture helps. Smile  So, enjoy the next couple days of haunting and if you have any questions about the details of being a demonstrator or joining my team, I’d love to chat with you!  Email me at jennifer@nwstamper.com and we’ll chat!

    NWstamper signature_thumb[9]

    order online button for sig 3_thumb[4]

    Card Supplies Used:
    (if you are reading this in email, click here to see the list of supplies)

  • A Bit of Merry with Seasonally Scattered

    It’s Monday and I’m still catching up from the weekend!  But I wanted to make sure to get a post up to share (I have sooo many projects to share I need to get crackin on getting them all posted and ready!)  Today is a quick Holiday card:

    This was another convention display board card and I was trying to come up with something different to do with the Seasonally Scattered stamp set.  So, this was one of my “experiment” cards

    Interesting things on this card:

    • I started by stamping the “Merry” sentiment from the Seasonally Scattered stamp set with Versamark ink and then heat embossing with white embossing powder on some patterned paper (from the Moonlight paper stack).  Then to make the word really pop, I sponged over just the letters with Cherry Cobbler ink.
    • Not sponging over all the embossed image allowed the words to stand out and keep some of the snow clean and white Smile
    • Use sponge daubers to create perfect inked circles on your paper but in random patterns
    • It’s hard to see, but I sponge daubered in Versamark, some circles and then embossed with Iridescent Ice for some sparkle circles too!
    • I tied some Silver baker’s twine and some White baker’s twine around the front and then take extra pieces of twine and tie them to your strands for your knots.  Fringe the ends and voila!

    It’s quick and easy and lots of little touches everywhere!

    A Few Updates

    Thank you to everyone who has already started shopping in my Online Craft Rummage Sale!  Yesterday I spent the entire day at the Washington State Fair with my family including staying late with the hubby for a Pentatonix concert (they are an amazing acapella group you should check out if you don’t know them yet!)

    2014-09-21 14.17.50

    Because who can resist a day with scones, huge pumpkins, strawberry shortcake, and petting goats?!  Nicholas even got to do the kid version of bull riding and try to ride and hang onto a sheep for 6 seconds as it ran across an arena.  It was such a hoot!

    2014-09-21 10.55.26

    So, this morning I’m working on catching up getting out Online Craft Rummage Sale shipping information and invoices. Smile

    • If you’ve already marked the items you want, I’ll be following up with you today!
    • If you haven’t shopped yet, there is still LOTS of great items to be had!

    Check out the Online Craft Rummage Sale here

    BONUS GIFT  – everyone who hops over to my facebook page and shops my online sale will get a gift of a Stampin’ Up gift certificate worth 25% of their total online craft sale purchase for use towards a Stampin’ Up catalog order with me in the future.

    Also, if you signed up for my Too Cute Curvy Keepsake Box kit by mail, I am working on the tutorial now and cutting all the kits.  I should have them ready by the end of the week!  If you haven’t signed up for one, you can check it out here.

    spaced shop now sig bar

    Hostess Code:  C2HYWWQM Use this Hostess Code and receive a free gift!
    (Please do not use the Hostess Code if your order is $150 or more)

    Card Supplies Used

  • A Monochromatic Thanks with Seasonally Scattered

    I was thinking last night about blog posts and realized that I had been so good about posting my display board projects from the 2014 convention, but then got sidetracked with other projects (and to be honest, I wanted to mix up the stamp sets I was featuring here) and completely forgot to finish sharing the display board projects!  I had saved some of my favorites for last and so I want to make sure to get them posted…. like today’s card!

    This was one of the first I did with the Seasonally Scattered stamp set that I LOVED.  It’s not flashy, but I like it’s understatedness.  What do you think?

    Tips for this card:

    • Did you know, the Lovely as a Tree has a leaf stamp that goes PERFECTLY with the Seasonally Scattered thanks stamp??  Stamp your thanks image and then start stamping some falling leaves in Versamark and heat emboss with gold ink for a pretty fall touch.

    • Wrap some linen thread around a few times to add some texture and a simple rustic touch to your card.
    • In keeping with the brown monotone look for the card, I sponged the edge of my Very Vanilla cardstock with Crumb Cake to help all of the cardstock pieces transition nicely with each other.

    Its delightfully simple and yet elegant to do… and you could mix and match your colors to get exactly the look you want.  For this card, I used:  Early Espresso, Crumb Cake, and Very Vanilla; but shake it up when you try it at home!

    spaced shop now sig bar
    Hostess Code:  C2HYWWQM Use this Hostess Code and receive a free gift! (Please do not use the Hostess Code if your order is $150 or more)

    Need a Holiday Catalog?  Check it out online or email me at jennifer@nwstamper.com to get your copy!


    Card Supplies Used:

    Heat Tool


    $29.95

    Linen Thread


    $4.50

  • Clean and Simple Card using Amazing Birthday–but NOT a Birthday Card!

    Alright, I’m back with more of the cards from the 2014 Stampin’ Up convention display board.  Today was one of my favorite cards because it was so clean and simple but I loved the color combination because it really makes an impact.

    Notes about this card

    • The thing that is cool about this stamp from the Amazing Birthday stamp set is that it has all these stacked elements in one stamp, so it is perfect for using your markers to color each part differently.  But if you are in a hurry, stamp the whole thing in one color (like Bermuda Bay here) and then stamp another copy on scratch paper using a different color and cut out select sections to adhere over the top:Use the sun image from the Kinda Eclectic stamp set to create a background that emphasizes the word Amazing.  Heat emboss with silver embossing powder for shine and texture that stands out in real life.

    • Ask anyone who was with me at convention, I was the goofball who couldn’t stop talking about the new mini stapler that is coming out from Stampin’ Up.  I loved the idea of having an easy handheld stapler to add something fun and different.  I really like using it to hold down ribbon run through the top of the Scallop Tag Topper punch.  I will tell you the Stampin’ Up stapler size is different than the Tim Holtz stapler.  So you will different mini staple size options if you end up with both.

    And I have to say, I really love this color combination – Bermuda Bay/Basic Grey/Very Vanilla!  Great for any type of card you need.  Don’t be surprised if you see more of this combo from me in the future.  Oh, and even better – the Bermuda Bay ink pad is on the weekly deals this week!  In fact, there are 3 ink pads on the weekly deals this week.  So it is a great time to supplement your ink collection.  Plus embossing folders and a set of framelits, there is lots of fun to be had. 

    Check out what’s new with the weekly deals here:

    weekly deal logo

    Check back tomorrow when the Fun n’ Crafty team will be doing a great blog hop giving you lots of ideas for using your Big Shot on your projects!  See you then!

    spaced shop now sig bar

    August Online Stamp Club Hostess Code – TT2NETD4
    Use this code to get free exclusive tutorials & project kit! Learn more

    Card Supplies Used:

  • Clean & Simple and BRIGHT Kinda Eclectic Card for the Stampin’ Up Display Boards

    Clean & Simple and BRIGHT Kinda Eclectic Card for the Stampin’ Up Display Boards

    Today is one of those quick and simple days… you know, when you need a card or want to get some crafting in but either don’t have the time or the mojo to come up with something elaborate or clever.  I thought I’d share one of the cards I created for the 2014 Stampin’ Up Convention display boards that fits the bill nicely! 

    All you need is a circle punch and some extra paper and you pretty much have a card!  The best part is this design works with pretty much any paper you have, though I really liked the bright colors and bold patterns from the Sweet Taffy designer paper to contrast with the white cardstock base.

    Tips for making this card

    • Cut a smaller piece of Whisper White cardstock to adhere your punched pieces so you can trim off the parts that hang over and have dimension and a clean border with that piece popped up off the card base.
    • Sponge the edges of your punched circles (I used a 1” circle punch and Basic Black ink) to help them be more defined and stand out from your base cardstock.
    • Glue your circles in a line and have full circles hanging off the ends to help you get the size and spacing right.  THEN, turn over your cardstock and trim off the extra parts of the circles.
    • Heat emboss your sentiment for an extra bit of shine and pizzazz.

    Mix and match different colors and papers for a different look each time!

    Card Supplies Used

    Need more inspiration?  Check out all the amazing display stampers I had the privilege of creating with for this year’s boards:

    2013-2014 Convention Display Stampers
    Cathy Caines
    Anja Beckmann
    Jennifer Blomquist
    Jeanna Bohanon
    Amy Bollman
    Erica Cerwin
    Chelsey Christenson
    Becky Cowley
    Ilina Crouse
    Lynda Day
    Shari Fritz
    Lyssa Griffin Zwolanek
    Mary Haugen
    Krista Jensen
    Jane Lee
    Nance Lempinen-Leedy
    Charlet Mallett
    Sarah Naber
    Allison Okamitsu
    Amy O’Neill
    Breelin Renwick
    Sarah Sagert
    Cindy Schuster
    Jennifer Timko
    Ashley Van Camp
    Kimberly Van Diepen
    Mercedes Weber
    Alanna Wharf

    spaced shop now sig bar

    July Online Stamp Club Hostess Code – 7RDHVEKR
    Use this code to get free exclusive tutorials & project kit! Learn more

  • Gorgeous Grunge Polaroid Birthday Card

    Gorgeous Grunge Polaroid Birthday Card

    One of the things I especially love about crafting is that two people can take the same supplies and turn out completely different cards with totally different styles.  As you may have noticed from my blog, my style tends to be more clean and simple cards that can be created pretty quickly.  That said, Rosemary Bryson is one of the gals in my downline and she can take the same products I have and seem to effortlessly turn them into stunning works of art!  For example, this card:

    I love how she combined the stamp sets and punches to create such a unique look!

    The hearts were stamped using the Perfect Pennants stamp set and then traced with a white gel pen and then covered in crystal effects.  she also added sequins and glimmer paper dots to add some extra sparkle and shine.  Such a fun idea!

    And it is really hard to tell, but she actually inked the entire paper (the polaroid frame) with versamark and embossed it with white embossing paper to give it that thick, shiny feel!  See, that is something I never would have thought to do.  And add some more embossing on the background paper with Gorgeous Grunge and you have a fun paint splatter effect to keep any part of the card from being boring. Smile 

    Stampin’ Up Supplies Used

    If you happen to be in the Pierce County (Tacoma/Bonney Lake/Puyallup), Washington area, you should definitely check out her classes she is starting up with a new meetup group called the Pierce County Paper Crafters.  I know I want to go myself and get to make some of her amazing creations!

    spaced shop now sig bar

    June Online Stamp Club Hostess CodeACANDKB4
    Use this code to get free exclusive tutorials & project kit!  Learn more

  • A Summery Emboss Resist Card plus LAST DAY for Free Shipping!

    A Summery Emboss Resist Card plus LAST DAY for Free Shipping!

    Before I get to the card for today, I wanted to remind everyone that today is the LAST DAY for Free Shipping on any Stampin’ Up order.  So, if you were thinking of grabbing your favorites from the retirement lists before they sell out, or you’ve been eyeing that big purchase – don’t miss out on the extra savings with free shipping! 
    Shop Online Now  |  View the Retiring Stamps list  |  View the Retiring Accessories list

    Ok, now on to the card!

    Have I mentioned how much I love doing emboss resist cards?  Today I thought I would quickly share another sample I made for my embossing class using the Petal Parade stamp set from the Sale-a-Bration catalog from this year.  See.. it is possible for me to do this technique with a stamp set other than Lovely & Lacy!  ha ha.

    I love how it looks like citrus and lemonade to me with the pinks and the yellows.  That is actually Crisp Canteloupe and Summer Starfruit as the inks for this card; they actually go together really well don’t you think?

    To make it, I recommend stamping your sentiment in the middle FIRST! 

    And then randomly stamp your images using versamark. 

    Heat emboss with clear embossing powder to give you your shapes. 

    Then take your yellow sponges and starting from the MIDDLE of each embossed shape, sponge in a spiral pattern to get the saturation of color that you want

    Once you have all your colors added, uses a little extra of one of the colors to sponge the in-between spaces to fill in all the white gaps.  That is it!

    Oh, the other thing I wanted to show you from this card… embossing ribbon!  That is right, you heard me…. embossing RIBBONSmile 

    image

    It’s a little hard to tell the texture from the photo, but this is piece of the Crumb Cake seam binding ribbon that I placed over a piece of Crumb Cake cardstock to give it a bit of stiffness.  Once it is glued down – and I recommend glue stick for adhering the ribbon – then you can run it through the Big Shot in an embossing folder.  It gives you the texture and fabric look of ribbon, customized to any embossing folder pattern you have!  It’s actually really cool.

    And don’t forget to get in on the FREE SHIPPING that is ending TODAY.  So if you have been looking at some items and want to save a little bit of money. Visit my online store and take advantage of the free shipping – especially combined with clearance rack and weekly deals!

    spaced shop now sig bar

    April Online Stamp Club Hostess CodeG4VQJ7VB
    Use this code to get free exclusive tutorials & project kit! Learn more

    Stampin’ Up! Supplies Used
    Stamps – Petal Parade, Petite Pairs
    Ink – Early Espresso, Summer Starfruit, Crisp Cantaloupe, Crumb Cake, Versamark
    Paper –Pool Party, Whisper White, Crisp Cantaloupe, Crumb Cake, Sweet Sorbet designer paper
    Accessories – Big Shot, Argyle embossing folder, Heat gun, embossing buddy, clear embossing powder, Stampin’ Dimensionals

  • Black & White Negative Heat Embossing with Pleasant Poppies

    Black & White Negative Heat Embossing with Pleasant Poppies

    I have had a card pinned on Pinterest for ages that used this cool split image with one half one color and the other half a different color.  So, when I was working on cards for my embossing class, I just had to give it a try and my Pleasant Poppies stamp set was the perfect choice to give it a go, since I knew it was a big stamp and the line art would make it easy to do.

    So this is what I came up with and love how it turned out!

    How do you do it?  It is easier than you think!  I started with two pieces of 2” x 4” cardstock – one in Basic Black and one in Whisper White.  Set them side by side to make a square and then ink up your image with Versamark ink. 

    Stamp your image across both pieces of paper at the same time and then separate the papers.  Use white embossing powder on the black cardstock and black embossing powder on the white cardstock.  Heat it up and then glue the pieces back down onto your card front so that the images are lined up.

    Easy Peasy!

    You will notice that my card has some embossed speckles.  That is because I didn’t use my embossing buddy.  So, as a reminder always use your embossing buddy!

    Give it a try with any color and have fun!

    spaced shop now sig bar

    April Online Stamp Club Hostess CodeG4VQJ7VB
    Use this code to get free exclusive tutorials & project kit! Learn more

  • Have You Seen This in my Thank You Cards?

    Have You Seen This in my Thank You Cards?

    I send out Thank You cards to everyone who places an order with me – sometimes I get a little behind (like in February when we had health issues at home) but I try to make sure I get caught up.  Well, yesterday, I was finishing up the last batch of Thank You cards and getting them ready to mail when I realized I do something that may seem strange to some folks.  So, I thought I’d share a little background today.

    So, what is it that I do that is odd?  Well, when I send out my thank you cards, instead of writing my note on the inside like I normally do for birthday cards, congrats, sympathy, etc, I write my note on a post-it note and put THAT inside the card!

    post it note in thank you card

    I always thought it was clear why I did that… I want to send you a Thank You for your order, but I also want to GIVE you a card that you can use for ideas or for giving away to someone else!  So, I write my note on a post-it so you can pull out and reuse the card.  If you want to keep it for ideas or for yourself, that is awesome.  If you want to share it with someone else, that is great too.

    I was talking with someone I gave a card to recently and when I mentioned I had written on the post-it note so she could re-use it if she wanted, she was surprised and shared that she hadn’t even thought of that.  Smile 

    So, thank you for ordering with me… please enjoy your card, however you choose!  Oh, and want to see the front of this card?  I can’t believe I haven’t shared it yet!

    lovely and lacy emboss resist

    Love, love, love this Lacy & Lovely stamp set!  Pair it with Primrose Petals and some emboss resist technique and it is a really pretty card.  I think I need to spend some more time with my Primrose Petals papers and ribbon before they go away next month! 

    spaced shop now sig bar

    April Online Stamp Club Hostess CodeG4VQJ7VB
    Use this code to get free exclusive tutorials & project kit! Learn more

    lovely and lacy emboss resistStampin’ Up! Supplies Used
    Stamps – Lacy & Lovely
    Ink – Versamark, Primrose Petals, Early Espresso
    Paper –River Rock (retired), Primrose Petals, Whisper White
    Accessories – Heat Gun, Clear embossing powder, embossing buddy, Primrose Petals stitched satin ribbon, glue dots, sponges


    Favorite Supplies:

    122887s
    102283s
    103083s
    109130s
    129053s
    126844s
    101610s
  • Lacy & Lovely Emboss Resist–Ombre Style!

    Lacy & Lovely Emboss Resist–Ombre Style!

    Heat embossing is one of those great techniques that always instantly makes a card just a little bit classier and more elegant.  That said, I totally forget about it a ton of the time!  Thankfully, I have my Lacy & Lovely stamp set which always gets me excited to do some embossing.  Especially because I LOVE doing the emboss resist technique with it.

    In the Seattle area?  Join me for my Embossing Technique class on Monday 3/31 at 7pm in Redmond, WA!  Get all the details here – I’d love to have you stamp with me!)

    Recently I was experimenting with some different card ideas and I ended up with this:

    It was supposed to be an ombre card – where the purples go from lightest to darkest – but I got too excited to start sponging and I forgot to make sure I knew which piece went where!

    So instead, you get something reminiscent of ombre… you get the idea. Smile

    How to make this card

    1. Start out with your Whisper White piece of cardstock and cut it into 3 pieces.  Lay them out on a piece of scrap paper so they form their origional rectangle.
    2. Stamp randomly with the large doily shape from your stamp set using Versamark
    3. Sprinkle clear embossing powder over the stamped images and heat with the heat tool
    4. Select 3 ink colors in different shades of the same color.  Grab one of the yellow sponges and start sponging each panel a different color.
      For best results – sponge in order from lightest to darkest!
    5. Randomly stamp different images from the stamp set in the colors you plan to sponge with.  (I stamped with Wisteria Wonder and Elegant Eggplant)
    6. Adhere your panels to a piece of cardstock for a matted frame.  Add embellishments, and you are done!

    The great thing is that the clear embossed areas will resist your sponged ink and so the white shows through no matter how dark of an ink you use to color with.

    Next time though, I’ll try to remember to sponge my colors in the right order!  Smile

    spaced shop now sig bar

    March Online Stamp Club Hostess CodeXEWP4DFD
    Use this code to get free exclusive tutorials & project kit! Learn more

    Stampin’ Up! Supplies Used
    Stamps – Lacy & Lovely
    Ink – Wisteria Wonder, Elegant Eggplant, Perfect Plum
    Paper –Crumb Cake, Chocolate Chip, Whisper White
    Accessories – Heat Gun, Clear embossing powder, embossing buddy, Crumb Cake seam binding ribbon, sponges

    Favorite Products

    122887s
    129053s
    103083s
    109130s
    122332s
    101610s
  • Quick and Easy Sweet Sorbet Birthday Card

    Quick and Easy Sweet Sorbet Birthday Card

    Today over on the Stylin’ Stampin’ Inkspiration blog, the design team girls have been putting together some quick and easy cards to share.  This is one that I put together recently to play with some of the free items from the Sale-a-Bration catalog.  I think it took me all of like 5 minutes to make…. and that is WITH die cutting and embossing! 🙂

    Sweet sorbet birthday card

    The card is your straightforward designer paper (isn’t that Sweet Sorbet so fun?!) matted with black cardstock… a piece of ribbon trimmed and sticking out from the back of a die cut piece.  Which was the only place I got fancy with the card…. remember, quick and easy!

    see ya later embossed birthday close up

    I stamped the sentiment from the See Ya Later stamp set (one of the free options when you place a $50 order) using versamark ink and then coated it in white embossing powder.  Heat it up… and it looks oh so nice.

    Then I cut that puppy out using my Deco Label framelits… sponged the edge… pop up on dimensionals… DONE!

    So, grab a fabulous designer paper, and really cute sentiment and you can be on your way to a great card in no time.  (Though if you want to grab this cute stamp set and designer paper, make sure you shop and order soon, because these won’t be around for that much longer!)

    spaced shop now sig bar

    Virtual Stamp Club Hostess Code – BNDDMDVU
    Use this code to get free exclusive tutorials & project kit! Learn more

    Sweet sorbet birthday cardStampin’ Up! Supplies Used
    Stamps – See Ya Later (**)
    Ink – Versamark, Sahara Sand
    Paper – Pistachio Pudding, Basic Black, Sahara Sand, Sweet Sorbet designer paper (**)
    Accessories – Big Shot, Deco Label Framelits, Chevron ribbon (Pear Pizzazz), Sponge Dauber, Heat gun, White embossing powder, embossing buddy
    ** FREE with a $50 order

  • Getting Out of a Crafting Slump w/ a Holiday Catalog Hop!

    I know me, and once I let life overwhelm me and I set my crafting aside because I’m busy trying to deal with the house, family, etc; I find myself getting into a crafting slump.  You know, that time when you look at your craft supplies, get so excited to create something cute (or find yourself needing that last minute birthday card) and you sit down at your table….. and just stare at your supplies.

    That was me.  I saw so many great ideas at convention, had some cool topics for blog posts, but was having the hardest time finding the mojo to get started.

    But – that is why I said YES! when I was invited to join the Stylin’ Stampin’ Squad and their monthly blog hops.  Because I know me and to get me out of my slump, I needed a theme to focus on and a deadline that I had to get it done by. Smile  And it worked for me!  I sat down with a few ideas, started pulling out some paper and by the time I was done with my first card I had ideas for a few more and couldn’t wait to have time to play more!

    August Blog Hop – Holiday Catalog Projects

    Card 1 – A Stenciled Halloween

    When I first checked out the Holiday Catalog, I wasn’t too excited by the Build-a-Banner kits.  But then I saw all the fun projects created with them at convention and I had a major change of heart.  I love the banners and can’t wait to make my first one, but I was even MORE excited by the stencils!  I know, I know, there isn’t anything new about stencils, but –hey- they are new to me! Smile 

    And for my first attempt with them, I figured why not try to do some heat embossing while I’m at it?  I don’t own any current halloween stamps but I loved the fact that I could still do spooky without even needing a stamp at all!

    So to make the “boo” on my cardfront, I tapped and smeared VersaMark ink over the stenciled opening (starting with the “b”) and quickly picked up the stencil, sprinkled white embossing powder, and heated with my heat gun.  Then repeat for each letter as you go through the word.

     how to heat emboss with stencils

    The rest of the card came together quickly as well because I used the new Witches Brew designer paper which had those cool orange spiders in the perfect spacing for me.  Sponge the edge with some White craft ink and layer over a Basic Gray cardbase and you are done! 

    Card 2 – Bow Tie Celebration!

    But one card just wasn’t enough for me.  I told you, when I was done I had more ideas I wanted to play with.  Well, this next card was using the new Gift Bow Bigz Die.  I had seen a card by Ronda Wade that had a more flat looking bow and I wanted to try to create one myself.  Ta-da!

    The neat thing about this bow is that all the pieces for it is cut out of 1-sheet of designer paper from the new Season of Style designer series stack (you know, those paper stacks that are 4.5” x 6.5”?)

    See, check it out

    gift bow cut outs

    Then all you have to do is cut that top die cut shape in half to make your two flat bow “loops”.  I found that if you lined up a flat edge at 2” you will cut straight down the middle too.

    cutting to make a flat bow


    I glued my bow together with sticky strip and Stampin’ Dimensionals and adhered it over some of the new Burlap Ribbon.  Finally, I stamped my sentiment from Seasonal Sayings but thought it needed some extra pop so I coated it with Crystal Effects.  Makes it feel more like a celebration to me. Smile 

    And with that, I even created one more card for tomorrow’s blog post and I’m back in the groove!

    So if you are in a mojo slump, here is my challenge to you!

    1. Visit the incredibly talented stampers participating in this month’s blog hop (see the full list below)
    2. Find 30 minutes this week and head to your craft room
    3. Pick an item you were excited to purchase, but haven’t even used it yet! 
    4. Create something, anything, even if you have no idea what to make, start cutting and stamping using the item you picked.  Copy a project you’ve seen on the hop or visit one of the many great challenge blogs and inspiration blogs out there to help get you started if you need it.
    5. Finish and share your project by 8/16! 
      Show it to a friend, post it on Facebook, or come back and leave a comment that you’ve completed the challenge and share it with me!  Feel free to link to your project too so we can see what creative project you’ve created.

    Ready to be inspired?

    Check out all of the great talent in this month’s line up!

    Blog Hop Participants:

    Enjoy and have fun creating!

    spaced shop now sig bar