Northwest Stamper

Tag: flip card

  • A Valentine’s Day Card Idea using the Label Flipcard Thinlit & All About Embossing Folders with the Weekly Deals!

    A Valentine’s Day Card Idea using the Label Flipcard Thinlit & All About Embossing Folders with the Weekly Deals!

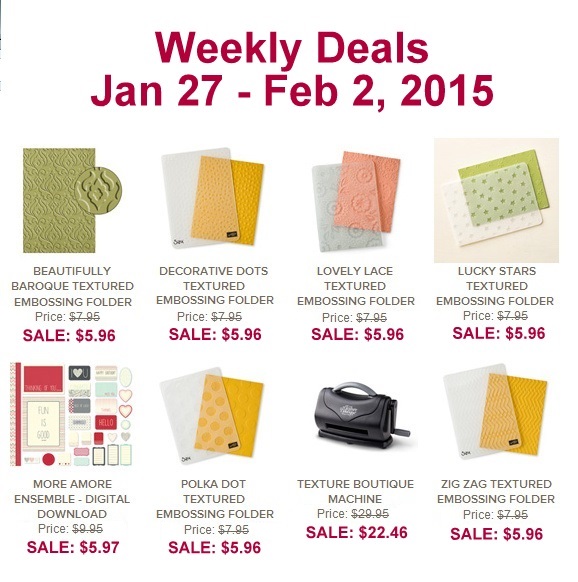
    Wow!  I checked out the Weekly Deals this morning and holy moly if you like embossing or have considered getting into Embossing folders, this is your week!

    weekly deals 1-27-15

    You can get

    • 6 Embossing Folders
    • the Texture Boutique machine to emboss your paper with them
    • a free stamp set, paper pack, or blendabilities of your choice from the Sale-a-Bration catalog

    All for only $58 this week!  Totally great deal!  Shop these deals online here.

    If you wanted an even better deal – consider getting the starter kit and you can get

    • 5 embossing folders
    • The Big Shot for embossing OR die cutting

    All for only $99 plus free shipping and then you’ll be a part of my Fun n’ Crafty demonstrator group and get a minimum of 20% off your future orders too!  Learn more here.

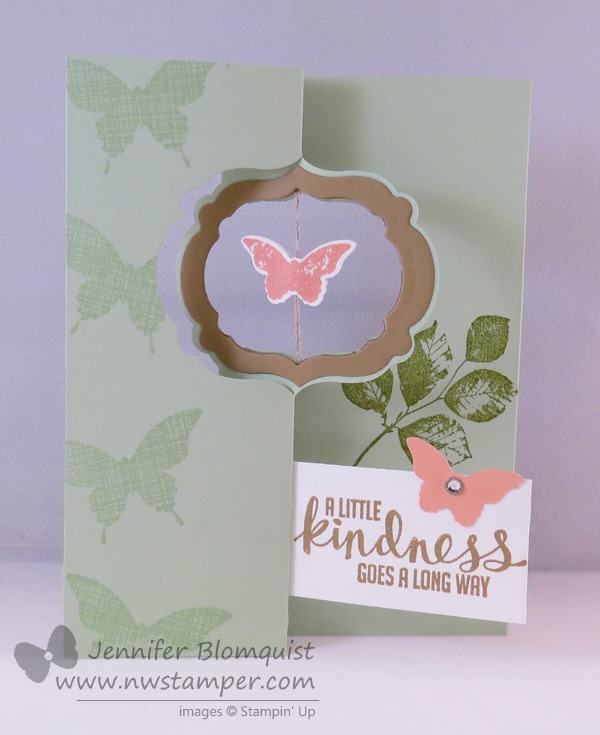
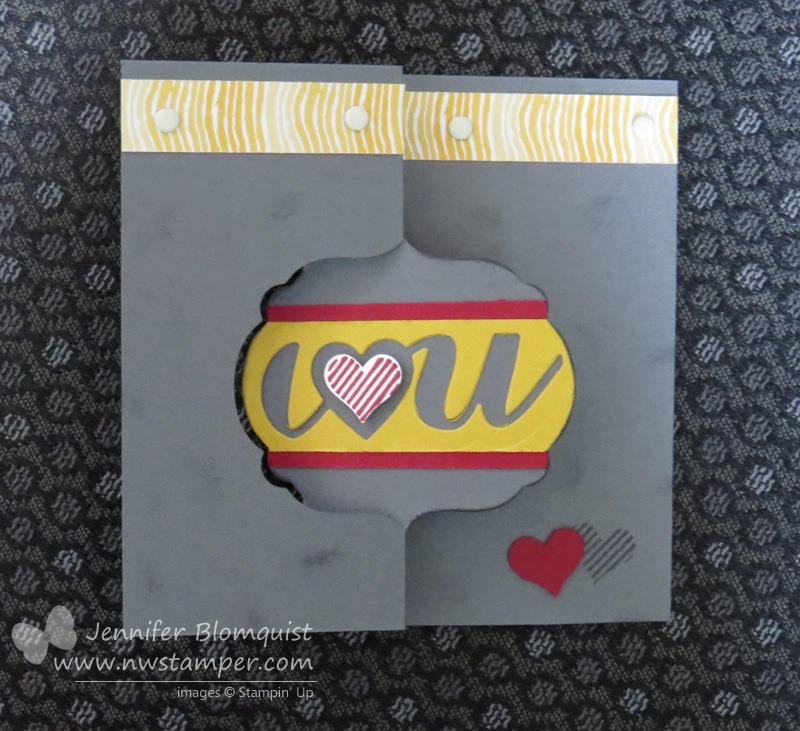
    Quick share today of a card I did in my Flip Card technique class where we used the different Flip Card thinlits.  For this sample, we used the Label Thinlit and the dies that came with it for this fun love card:

    Tips for making this card:

    • Start with a 5.5″x11″ piece of cardstock for your card base.
    • Place the thinlit die over the cardstock so that the left side of the die exactly matches the left side of the cardstock.  Then tuck the right edge of the cardstock OVER the right side of the die.  It will look like your paper is threaded through the die.  (under the left and the middle of the die, over the right end of the die).
    • After you run the paper through the Big Shot, you should have the flip part in the middle cut out and a score line on the right 1/3rd.  Fold in on that score line.
    • Use the Pictogram Punches stamp set to decorate the outside, and then the Perfect Pennants stamp set decorate the inside of the flip part.
    • Punch out a Crushed Curry scallop dotted ribbon and adhere along the INSIDE of the flipping edge so that half hangs over the edge (so you can see it when the card is closed).  Layer a white label die cut (that comes with the thinlit set) over the yellow ribbon cardstock to cover the middle.


    Well, tomorrow I leave for leadership… so watch for videos, pictures and more from me from the fun in Orlando!

    NWstamper signature_thumb[9]

    order online button for sig 3_thumb[4]


  • Spinning Butterfly Flip Card for Class

    Spinning Butterfly Flip Card for Class

    Have I mentioned how excited I am for class tomorrow night?  I am running my Beyond the Basic Flip Card class and showcasing some different variations on the Label and Circle Thinlit flip cards.  I thought today I would share one of the cards that they will be doing in class, so hopefully it will give you some inspiration as well!

    I had seen cards with the center circle punched out and a spinning element, and so I thought I would give it a go with the Label Thinlit.  Turns out the Bitty Butterfly punch is a perfect fit  to go inside! 

    All it takes is using the smallest label framelit (from the Label Framelit collection) to punch a hole in the center flip piece of the card and in a piece of contrasting cardstock (in this case – Baked Brown Sugar) and then using the label framelit that comes as an accessory to the Label Thinlit flip card die to cut around your Baked Brown Sugar hole to make a cute frame.  Add your spinning element to the middle with floss or linen thread (which is what I did)  and decorate!

    For my inside, I wanted to make sure I had room to write a note to the recipient of my card, and so I used a flap of whisper white cardstock to place my sentiment on the front, and to cover up a place for me to write on the inside of my card.

    It turns out really cute in person – its just really hard to photograph! Smile  Plus, with the framelit and thinlit dies, it makes it super quick and easy to put together too!

    Stampin’ Up Supplies Used

    This is another one of those dies/tools that the more you start using it, the more ideas start flowing (at least they did with me).  So, start playing and trying out all the combinations you can come up with with all the extra dies they include in the pack.  And if you want more ideas – you are invited to join me for my class tomorrow night (just please RSVP so I know your coming) or I’ll be putting together an online class soon with videos and pdf details and more soon! 

    spaced shop now sig bar

    June Online Stamp Club Hostess CodeACANDKB4
    Use this code to get free exclusive tutorials & project kit!  Learn more

  • SSI Friday Favorite–Label Thinlit Cards!

    SSI Friday Favorite–Label Thinlit Cards!

    Yay, I’m back with a project to share with you!  Over on Stylin’ Stampin’ Inkspiration some of the girls are sharing their favorite items from the Stampin’ Up catalog and I had to get in on the action and share a newly re-discovered favorite of mine – the Thinlit Flip Card Dies!

    See, I schedule these technique classes each month but usually have NO IDEA what samples I’m going to be doing in the classes until about a week or so out from the class.

    (Yes, I know I should get better that the whole idea of preplanning and premaking my class samples… I totally will…. someday….)

    But as I was working on the samples for Monday’s Beyond the Basic Flip Card class, I was creating different variations of default Label flip card and the Circle flip card – and holy cow was it super fun!!!

    I love that this type of card is so easy to make thanks to the dies.  I mean, seriously, you get this super crazy cool flipping action and all it takes is one run through the Big Shot?!  Scoring and detailed cutting is done —  SOLD!  Seriously, once I started playing with variations, I ran out of time before I could make them all. Smile

    This card was actually a left over “oops” card where I didn’t mean to cut it short the way I did.  So, when closed it is basically a 4-1/4” x 4-1/4” card.

    To make a Square Flip Card:

    • Cut your paper to 4-1/4” x 11”  (you are actually going to end up with a chunk cut off the end, but you can save it and use it in a different project, right? Smile )
    • Turn it so the short end is lined up in the upper, left corner of the framelit and the long edge is going along the top of the thinlit die.
    • There will be a gap between the bottom of your cardstock and the bottom of the thinlit die.
    • Run it through your Big Shot (or other die cutting machine) and it cuts and scores it all for you! 
    • Decorate and you are done!

    I had fun pairing my cut outs (the I <3 U comes with the flip card die) with the little heart stamp and punch from the Itty Bitty Accents punch pack and Pictogram Punches stamp set

    Stampin’ Up! Supplies Used:

    If you are coming to my Beyond the Basic Flip Card class (6/30 at 7pm), you’ll be doing a variation on this specific card, only with an added twist!  You’’ll love it!  Don’t forget to RSVP if you haven’t already.

    Not local?  I’m putting together an online class with videos and pdfs going over all the variations we’ll be talking about in class!  Shoot me a message if you want to be notified when the class is ready to go (hopefully very soon).

       ———————————————————

    And just a reminder… this weekend only.

    stampin up adhesive stock up sale

    View details here


    spaced shop now sig bar

    June Online Stamp Club Hostess CodeACANDKB4
    Use this code to get free exclusive tutorials & project kit!  Learn more

  • Fun w/ Thinlits & a Flip Card Class

    Fun w/ Thinlits & a Flip Card Class

    I normally forget to post here on the blog reminders about my upcoming classes and events until the day before, not always the best time to advertise, huh?  But today I’m actually remembering and so I wanted to share a little about my next class that is coming up on Monday June 30th that is all about using the Thinlit dies in fun ways!image

    Beyond the Basic Flip Card

    6/30/2014 – 7pm at Panera in Redmond ~OR~ get the TO-GO class kit my mail
    RSVP here or email me at jennifer@nwstamper.com

    So the idea is that you have your basic flip card (shown above) where you pull open the left flap and the center circle or label shape flips over to reveal a message on the other side.  They are really cute and can be fun to decorate – and did I mention SUPER EASY thanks to the die!  Honestly, I had never tackled this type of card because I was nervous exact-o knives would be involved.  Smile  But once they came out with a die that did it all for me…. heck ya!  I was all over it!

    image

    The cool part is there are lots of variations you can do with these cards that are really fun and give you lots of variety with the single die.  So, in the class we’ll walk through the basics of using the die for the base card and then jump right in to some fun variations.

    • like changing the orientation of the card
    • to have a spinner in the middle of your flip shape
    • having an extra flap for more space to write your sentiments
    • to even doing a double flip (or more!) card!

    In class we’ll be using both the dies:

    imageimage
    Circle Thinlit DieLabel Thinlit Die

    I’ll have extra samples of flip cards to give you more ideas, but you’ll go home with completed cards that you made doing the different variations.

    image

    It should be a lot of fun and a nice change from your typical cards!

    I hope you can join me either in the class or virtually through class videos for the TO-GO option!  RSVP here or email me at jennifer@nwstamper.com


    spaced shop now sig bar

    June Online Stamp Club Hostess CodeACANDKB4
    Use this code to get free exclusive tutorials & project kit!  Learn more

  • Getting Ready for a Card Bonanza!

    I stayed up last night to start sorting out my card kits for my upcoming Card Bonanza this weekend.  On Saturday, I’m hosting the event at my house and it is an All-You-Can-Stamp crafting event!

    I was shocked to discover that I have over 130 card kits ready to go based on over 50 card designs!  See, this event is what I do to use up all my extra card kits left over from my technique nights, card classes, swaps, and events.  I deeply discount the kits and invite everyone over to make as many cards as they want.

    Here is the scoop:

    • Come and stamp for only $1.50/card
    • Come and stamp as many cards as you want for $10  (you just have to let me know when you get started)
    • Pick up a premade card with envelope from my big stash for only $2

    Can’t attend in person?

    • Get a set of 5 card kits for $11 mailed to you to make at home
      (note – due to Stampin’ Up policy, kits will not include stamped images, but they will include all paper and accessories precut and portioned)

    Either way, that is WAY LESS than Hallmark for some really fun and cute cards!

    Here is a small sample of some of the cards available to make:

    Fun, right?!

    So, check your calendar and if you are free this Saturday (2/22) between 1pm- 5pm, let me know and plan on coming over for this fun event!  RSVP here

    Can’t attend in person but would love some kits?  Email me at jennifer@nwstamper.com or order here and I’ll get you hooked up with some cute card kits!

    Card Kit Grab Bag – 5 card kits shipped w/in the US for ONLY $11!


    Now I’m off to finish pulling all the supplies needed for all the different cards – that is going to take me a while! But it will be fun and I can’t wait to see everyone creating on Saturday.

    spaced shop now sig bar

    Virtual Stamp Club Hostess CodeBNDDMDVU
    Use this code to get free exclusive tutorials & project kit! Learn more

  • Playing with the New Labels Thinlits Flip Card

    When I ran a recent class about cards that flip and pop, I knew I had to share a card using the new Labels Thinlit die.  I mean, the fact that one run through the Big Shot and you have the card almost done, got to love the ease of that. 

    Since the thinlit die comes with a bunch of extra shape dies, I wanted to see what I could come up with that mostly uses those extra shapes.  Have you seen all the options?

    image

    So, this is what we made:

    I decided to try to experiment – and this is a little hard to see in the picture – but with the main label shape, we actually cut out a label in Coastal Cabana and then cut out a second label shape in So Saffron, but this time, we placed the “hi” die inside the label die so that it would cut out the “hi” leaving a hole in the shape of the word (does that make sense? Smile)  Then we glued the labels together so the Coastal Cabana peeked through!

    To decorate the rest of the card, we added a bit of Washi tape to the front of the card and then stamped an image from the Gorgeous Grunge stamp set.  We stamped the inside, just like the card from last month’s newsletter

    (if you missed it, you can sign up here and I’ll get you a copy of the past newseltter)

    So this is an idea to make a card using just a few supplies…. now I’m off to try out a few more ideas that incorporate more items from your craft room to step up the card even more. 

    Untill then, happy stamping!

    spaced shop now sig bar