Northwest Stamper

Category: Easter

  • Easter Bunny Box with the Curvy Keepsake Die (VIDEO TUTORIAL)

    As I was getting ready for my Stamp Club for March, my hostess asked for some cute Easter box or place setting.  Well… when it comes to cute animals and boxes, I knew just where to turn – the Curvy Keepsake Box!  I had made a bunny before, but as I was hopping around the interwebs, I found a cute variation by Wendy Lee and so I had to make some tweaks to my bunny and out came this Easter Bunny Box cutie!!

    Easter bunny box from the curvy keepsake die

    The best part is that it only takes the Curvy Keepsake die and a few punches to pull together this super adorable guy.  And if you want to see how it all comes together, just check out below because I have a video tutorial all ready to go for you!

    But what you will need to play along is:

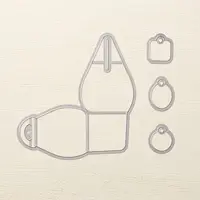
    • The curvy keepsake thinlit die  (base)
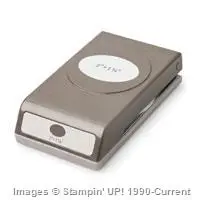
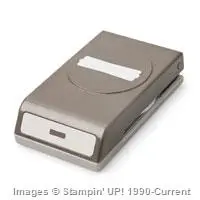
    • Large Oval Punch  (insides of ears and feet)
    • Extra-Large Oval Punch  (ears and feet)
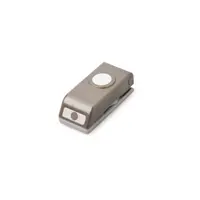
    • Owl Builder Punch  (cheeks, nose, eyes)
    • Fast Fuse adhesive
    • Stampin’ Dimensionals

    Curvy Keepsake Easter Bunny close up

    I also LOVED using the Perfectly Artistic designer paper (free for one more week with Sale-a-Bration, get it added to your order at no cost with any $50 order).  The watercolor wash side was super cute, but some folks in club used the marble side and it was awesome too!  Use that paper for the insides of the ears and feet… you are just layering your oval punches.

    Then glue the ears to the inside of the box flap so that you can open and close the box without hurting anything and you don’t see where the ears are glued on.  You just tuck them into the top slit of the box before gluing.

    Easter Bunny Curvy Keepsake Box Open

    And I just had to add a little bow over the ears with the 1/4” cotton ribbon in Blushing Bride to make my bunny extra cute. Smile

    Make It! – Curvy Keepsake Easter Bunny Box Video Tutorial

    If you want to see the video for this project, check out the VIDEO TUTORIAL below:

    (note – if you are reading this in email, click here to view the video)

    Curvy Keepsake Easter Bunny Treat Box

    Starting tomorrow!  The Final Week of Sale-a-Bration kicks off

    We are down to the final week of Sale-a-Bration if you can believe it!  I’ll be doing a countdown here on the blog and featuring a few more projects I haven’t posted before to remind you of all the cool projects you can make with the free choices during this great promotion.  Here is what is still available (all items are while supplies last) and I’ll be featuring most of them!

    Shop online and for every $50 pick one of these to get added for free!

    12901011_10207661677172460_561712037254347609_o (1)

    join the fun stampin up peeps

    Steal the deal and join our fun group – the Fun n’ Crafty Stampers!  Get started here – http://nwstamper.stampinup.net/jointhefun

    NWstamper signature_thumb[9]

    order online button for sig 3_thumb[4]

    ***Use Hostess Code MZ2REKD7 at check out to get a special thank you from me!***

    What I Used to Make This project
    (click any picture to get more product details)

  • Easter Punchart Throwback Card and a FREE SHIPPING announcement!

    I had remembered that I had a card that I LOVED that was a punch art bunny, and so I decided today to go digging it out to remind myself what it was.

    original blog post here

    Isn’t that bunny super cute??

    Well, since he uses some retired punches (like the small oval and the itty bitty punch pack) I thought I’d share how you could make this guy with punches that are still available.  He comes out a little bit larger, but still oh so cute.

    For a size comparison, here is how your new bunny is going to turn out:

    Easter bunny punch art

    I know, I’ll have to turn him into a completed card later, but I wanted to show you quick how to pull this bunny together!

    how to make a punch art bunny

    What you will need is the following:

    Punch out 3 of the ovals, two for the ears and one for the “feet”.
    Punch out one each of the circles for the head and body
    Punch out the smallest flower from the Boho Blossom punch for the tail

    You may notice in the bunny card at the top of the page, I sponged the edges of all the pieces to help them stand out a little better.  I like sponging with Sahara Sand for a subtle color that don’t look too dirty on the bunny.

    Layer together starting at the top of the bunny and finishing by tucking the last oval punch underneath the bottom of the bunny.  Easy and done!

    how to make a punch art bunny instructions

    It’s Coming!!  Free Shipping & my Spring Adhesive Sale!

    image

    Starting on Monday, Stampin’ Up will be giving ALL orders (except expedited orders) free shipping no matter the minimum amount!  So, make sure you get those wishlists ready!

    Plus on top of that, I’ll be running my Spring Adhesive Sale! Stock up on your favorite adhesives at big discounts!

    Make sure you are on my mailing list to get all the details first!  Sign up here

    NWstamper signature_thumb[9]

    order online button for sig 3_thumb[4]


  • Curvy Keepsake Easter Bunny Tutorial for the Fun n’ Crafty Blog Hop!

    Yay!  It’s time for another Blog Hop with the Fun n’ Crafty stampers, my lovely and talented downline that I’m blessed to have connected with and become friends with over the last few years!  (I told you SU is pretty awesome, right?)  Well, today we are doing our monthly blog hop a little bit early because we wanted to share with you some Easter ideas while you still had time to make them!  And while I had plans to make another card to show you, I got knocked out with a stomach bug over the last few days, so it was all I could do to get this little video tutorial filmed.  So I hope you like it!

    So here is my little bunny box for you.  I think I’m going to fill mine with jelly beans and put them in my kids Easter baskets this year – because that is what is so awesome about this, it is a treat box AND a cute decoration in one!

    I’ve also been making this in my card classes this month as a bonus project (I have one left coming up this Saturday if you are in the Seattle area Winking smile) and everyone have been having lots of fun with them and so I can vouch that ANYONE can make them.

    Tips for making this project:

    • When putting together your box and adhering your ears, make sure you are using VERY STRONG adhesive such as the Fast Fuse or Sticky Strip.  I wouldn’t trust snail or liquid glue to hold up over time.  In fact, my first couple boxes I made last year I used snail and they started popping apart a few weeks later.
    • I built my box first and then adhered all the punched elements – mostly with liquid glue.  I saved my inking with pen for last so I could see how it all had come together.
    • Here is a list of the punches used (see the supply list at the bottom of the page for pictures of each of these punches if you are more visual like me!)
      –  Extra Large Oval
      –  Large Oval
      –  Modern Label
      –  Owl Builder
      –  1/2” circle
      –  Mini treat back die
    • If you need any of these supplies, now is a great time to get them thanks to Sale-a-Bration!  For every $50 you spend, you’ll get to pick out something free… in fact, you can even pick out a refill for your Fast Fuse as a free item if you want!Check it out:  Original Sale-a-Braiton Items  |  March additions  |  Annual Catalog Choices

    I also put together a Video Tutorial for How to Make the Bunny– now the first few minutes are tips and tricks for the curvy keepsake box and then I start step by step walking through going from punches to bunny!

    (note – if you are reading this from email, you won’t see the video so click the link above)

    I’ll be back later with more fun Easter ideas but in the meantime, don’t wait!  Check out the great projects shared by these lovely ladies and don’t forget to give them some love along the way!
    **Blog hop starts at 7am PST on 3/25**

    Fun & Crafty Blog Hop

    Tobe B. of The Craft Sea

    Sarah G. of 1200 Some Miles

    Jennifer B. of Northwest Stamper <—YOU ARE HERE

    Pam W. of Stinky Tofu


    NWstamper signature_thumb[9]

    order online button for sig 3_thumb[4]

    Project Supplies Used:
    Easy shopping anytime!  Click the images below to see the item in the online store.

  • Easter Punch Art & Why You Should Buy the Clearance Easter Egg Dye Kits

    Easter Punch Art & Why You Should Buy the Clearance Easter Egg Dye Kits

    Happy Easter!  I hope you have a wonderfully bright and peaceful day!  Today we’ll be hoping for sunny skies, family easter egg hunts, and spending time with our extended family in the area.

    But while we are doing that, I wanted to share an idea with you to consider as you see the Easter supplies go on sale in the stores starting tomorrow (or maybe even today).  Consider grabbing those Easter Egg dying kits while they are on clearance, and here is why…

    So, last night we pulled out our eggs and coloring kit to start dying some eggs.  I needed something to cover our counter…. turns out my used Stampin’ Up grid paper made a nice lining. Smile  (See there is a reason I don’t throw them away after classes!)

    2014-04-19 20.01.03

    We made our eggs like normal… add 3 Tablespoons of Vinegar to a cup and drop the dye tablets in.  After they are done fizzing, add your 1/2 cup water to each cup.  Then dunk your eggs and let them soak and dye the shells.  I also couldn’t find the box the dye tablets came in, so I had to create my own egg holder!  I took a cereal box and kitchen scissors and cut 12 holes in the top of the box.  Then I could set each egg on top of a (poorly) cut hole to dry!

    2014-04-19 20.17.32

    Now, this is the fun part!  Once you are done with your eggs, you still have lots of dye left over.  So I grabbed some of my ribbon from my craft room and started throwing them in the cups and letting them soak up the color!

    2014-04-19 20.25.26

    In these cups, I have 4 pieces of the 7/8” Cotton Ribbon and 2 pieces of the White Organza Ribbon.

    And this is how they turned out:

    2014-04-20 10.46.35

    Pretty huh?  Now to create some fun projects with my custom colored ribbons! Smile

    I hope you have a wonderful rest of your weekend.  And a few quick reminders:

    Last Call for the Retirement List Prediction Contest!

    Don’t forget to get your guesses in by tonight for what 10 stamp sets you think will be retiring!  You have a chance to win your favorites from the retiring list for free.  Email me your guesses to jennifer@nwstamper.com and find out tomorrow who the winner is!

    FREE SHIPPING starts tomorrow!

    If you didn’t see on my Facebook page, Stampin’ Up will be offering Free Shipping tomorrow through Friday for all orders – which is perfect timing as the retirement list comes out on Monday!  So, get your orders ready and don’t forget to use hostess code G4VQJ7VB to received this month’s free online stamp club tutorials and if your order is over $40, you will receive the make & take project in the mail too!
    (note – if your order is going to be over $150, don’t use the hostess code so you can receive the hostess benefits!)

    spaced shop now sig bar

    April Online Stamp Club Hostess CodeG4VQJ7VB
    Use this code to get free exclusive tutorials & project kit!Learn more

  • Adorable Easter Class Projects, Punch Art, & a Blog Hop!

    It’s the first Thursday of the month and that means the Stylin’ Stampin’ Squad blog hop.  I lucked out because this month the theme is Easter/Spring and I just so happen to have my Everything Easter class coming up this weekend on Sunday!

    So I thought I would share some of the projects we’ll be doing in the class and give you some inspiration for what you could do for your own Easter baskets!


    Not-so-tiny Treat Pouch!

    I had been looking at some past projects and saw some old treat pouches that were made with a Big Shot die that retired a few years back.  It reminded me of the fun and easy idea of a no-sided bag that holds a pouch of treats in the middle.  Did that make any sense at all?  I bet not, so here – how about a picture to show you what I mean?


    Does that make more sense now?

    Ok, so this is really easy to make and you can change it up for any event or holiday.

    In this case, I took a 4”x12” piece of Certainly Celery cardstock and scored at 5” and 7”.  Then I used my new Ovals Framelits to cut out a piece of Pool Party core’dinations cardstock to make my top flap!  I then embossed the top flap and sanded down the dots for a subtle, textured effect.

    The stamped flowers are from the Madison Avenue stamp set that is only available as a free stamp set with a $50 order.  The flowers are separate from the leaves and it makes for some great stamping options.

    Tip:

    • Use Sticky Strip (red line tape) to attach the scallop oval flap to the back of your pouch.  This helps hold up with multiple openings of the pouch.
    • Use a slim velcro dot to keep your flap closed on the front of your pouch – this allows for easy reuse later.
    • Secure a clear envelope or card sleeve to the front-inside panel of your base cardstock.  (So in my picture, behind where my stamped flowers are).  This helps with the stability of the pouch and keeps the candy from getting away. Smile 

    Punch Art Easter Duck / Chick

    I’ll admit I don’t have many Easter stamps.  But that is usually ok because there are so many adorable punch art options that are perfect for Easter!

    Like take this duck punch art for example …  isn’t he CUTE!

    I just love this little guy and knew I had to share him with my friends for the class.  I tried to use as few punches as necessary but ended up with 6 punches used:

    • Ornament Punch
    • 1 3/4” Circle Punch
    • 1 3/4” Scallop Circle Punch
    • 1 1/4” Scallop Circle Punch
    • Large Oval Punch
    • Circle from Itty Bitty Punch Pack

    The funny thing about this sample card is that this duck was my “figure it out” version and then I made a “nice sample” version where I sponged the edges of the different body parts, made sure everything was on straight, etc.  But when I was putting together the card, I grabbed a duck….glued…. and then realized I had used my messy version instead of the “nice” one.  Smile  I guess it didn’t turn out too bad, huh?

    I have two more projects for the Everything Easter class on Sunday – a card and an awesome punch art bunny treat box!  Sadly, I didn’t get them photographed in time for today, but I’ll try to share them soon.

    Until then, if you want more inspiration for your Easter and Spring projects, check out the other talented stampers who are sharing their great ideas on our blog hop!  Click the “Next Blog” image or your favorite link below:

    1. Shellie G. of Craft Smashup
    2. Annie L. of Love Me Cards
    3. Nancy B. of Lady Stamps-A-Lot
    4. Rose C. of Stamp with Rose
    5. Tonya B. of Stampin’ with Tonya
    6. Dawn S. of Dawn’s Creative Chalet
    7. Darcy J. of DJ’s Stampin’ Place
    8. Pamela W. of Stinky Tofu
    9. Kim R. of Stamping with Kim
    10. Heidi B of Stuck on Stampin’
    11. Jennifer B of NW Stamper  <—YOU ARE HERE!
    12. Bree of Craft-somnia
    13. Diana E of Stampin’ Fun with Diana

    I hope you enjoyed my projects I shared today!

    I’d love to hear what you think – please leave me a comment and let me know what you think.


    To Order Stampin’ Up! Products Anytime, click here!

    Are you earning your Northwest Stamper Rewards?

    Every order gets you closer to your FREE stamp set!  Click here to learn more!