Northwest Stamper

Category: Christmas

  • A Christmas Card with a NEW Tree Punch for the NEW Holiday Catalog!

    Yay!  Today is the day!  The new Holiday Catalog is here!  Over at the Stylin’ Stampin’ Inkspiration blog, we are sharing some of our favorite new items from the Holiday Catalog.  Did I mention – Yay! It’s here!?  ha ha!

    image

    View the Holiday Catalog here

    Shop Online for all the new Goodies here
    (PS – I have some very special project kits using the Curvy Keepsake box that I’ll be sending out to anyone who orders from me using hostess code PA6NRD4S through 9/1!)

    But I don’t want to just tell you that the catalog is here… how about I share a project made from the catalog as well?

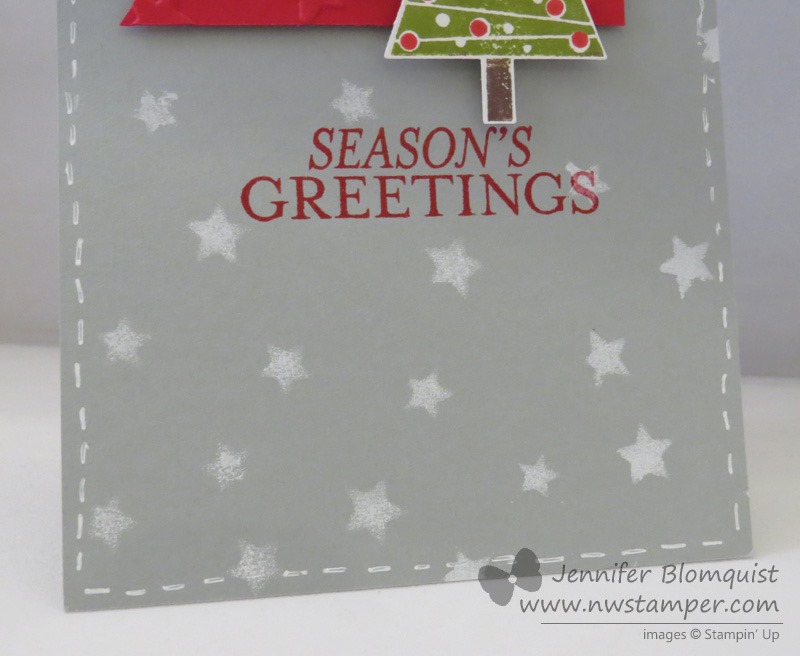
    This card uses a lot of new products from the holiday catalog and actually comes together really easily!  I was inspired by a card created by Rita Wright for this sample. 🙂

    Tips for making this card:

    • Use the new Stars mask from the Annual catalog and sponge over Smoky Slate cardstock with Whisper White craft ink.  I recommend using a Sponge Dauber because it helps your ink go on very solidly and smoothly.

    • When using a mask, make sure you “daub” – just tap down over the mask!  If you try to rub side to side, you risk bending up part of your mask and/or getting ink under the outline shape you want to be coloring.
    • Add some faux stitching with your white gel pen around the edge of the card to keep all those stars in Smile
    • Use the new stars embossing folder from the Holiday catalog to emboss some Real Red cardstock for your banner to tie into the masked stars
    • The Festival of Trees stamp set is AWESOME because (1) there is a PUNCH to match the tree!  And you know I’m a sucker for punches.  And (2) because this is a photopolymer set, you can stamp your main tree image in green & brown, and then it is super easy to stamp the red ornaments in the holes.  Seriously!!  I thought it was going to be a pain to line up but it was cake.  Ahhh, sometimes photopolymer is exactly the right way to go!

    So if you are thinking at all about holidays (halloween, fall, Hannukah, Christmas, etc) check out the Holiday Catalogand have fun!

    Shop online here & don’t forget!
    Use hostess code PA6NRD4S through Labor Day and I’ll be sending out adorable Santa and Pumpkin project kits using the new Curvy Keepsake boxes to everyone who orders.  I’ll have a peek at those tomorrow!

    LAST DAY for FREE PRODUCT too!

    Just a reminder that today is the last day for the Starter Kit special as well! I would love to have you be a member of my stamping community and join our fun swapping, sharing, chatting group as a demonstrator.  Whether you are looking to get a great deal on a chunk of your holiday catalog wishlist or want to earn extra money for holiday gift giving, now is a great time to do it!

    Photo: Just a reminder, only 2 more days of the starter kit bonus promotion!  I'd love to have you join my demonstrator family.  Have questions?  Post them here and I'll make sure to answer them all!

    Get $150 in products for only $99 and FREE shipping!  Get started picking your goodies now. Smile

    Have questions, I’m here to help!  Just email me at jennifer@nwstamper.com and I’ll get back to you asap.

    spaced shop now sig bar

    August Online Stamp Club Hostess Code – TT2NETD4
    Use this code to get free exclusive tutorials & project kit! Learn more

    Card supplies used:

  • Last Chance for Free Shipping & a Few More Stampin’ Up Convention 2014 Highlights

    Last Chance for Free Shipping & a Few More Stampin’ Up Convention 2014 Highlights

    Hey everyone!  I actually got a chance to sleep in after traveling late last night home from the Stampin’ Up! convention.  It was an awesome trip and fun weekend away with family and friends.  And when you add in stamping…. all the better!

    While I’m finishing uploading pictures from the last day (many are up on my Facebook page already), I wanted to remind everyone that TODAY is the LAST DAY for my Free Shipping special.


    NORTHWEST STAMPER CONVENTION SPECIAL

    Free Shipping on All Orders using hostess code 7RDHVEKR

    I wanted to do a little something-something while I was away playing at Convention, so I thought I would give you all free shipping this weekend! Place an order online using the hostess code 7RDHVEKR and when I get back from my trip I will send you a handmade thank you card and a refund of your shipping!

    Good through 7/20/2014


    Also, anyone who is ordering with me this month, will also be on my customer list for mailings of the new Holiday Catalog that come out at the end of August!  And believe me, you are going to LOVE it!

    Ok, I’m off to go out for a yummy breakfast with the family, so here are a few more highlight pictures from the last day – with more to come over the next week. Smile 

    Why I love convention:

    1.  Awesome Swaps

    2014-07-19 08.57.09

    2.  Awesome Announcements and Sneak Peeks

    2014-07-19 13.54.56

    2014-07-19 13.55.06

    3.  Awesome Class Ideas (I’m running this one soon – who wants to do it with me?!)

    2014-07-19 14.36.49-1

    2014-07-19 14.37.07

    2014-07-19 14.37.23

    4.  Awesome Prizes

    2014-07-19 16.08.54

    5.  Most of all – Awesome Friends!

    2014-07-18 07.33.59-1

    2014-07-18 07.35.14

    2014-07-18 12.51.32

    2014-07-18 13.45.08

    2014-07-19 08.52.25

    Up next is Leadership 2015, which anyone who is interested in learning about how you can grow your ability as a crafter and share it with others is invited to attend. If you would like to learn more about attending with me as part of my Fun n’ Crafty group, I would OVE to talk to you more about that.  Just email me at jennifer@nwstamper.com and I’ll give you all the scoop!  It is another awesome experience complete with stamping presentations, displays, prizes, laughter, and lots and lots of learning and fun!

    2014-07-19 16.11.51

    Then, we can grow together and hopefully by the end of June 2015 have earned the Grand Vacation – a Mediterranean Cruise! 

    Have a wonderful day and don’t forget to check out my Facebook page and Instagram for lots more photos from Convention weekend and more.

    spaced shop now sig bar

  • Christmas In July with a 2014 Holiday Catalog Sneak Peek!

    Christmas In July with a 2014 Holiday Catalog Sneak Peek!

    Now, I’ll admit, I’m one of those people that think I’m going to get my Christmas cards done early but then I keep putting it off until suddenly it is December 5th and I haven’t done a single one!  However, I know a lot of folks are really good about starting their Christmas cards in July – so that you’ll have plenty of time to actually get them done without madly crunching at the last minute.  So, if you are looking for some new inspiration, check out these brand new stamps that were just released to help get you started!

    beauty of the season

    Beauty of the Season – 2014 Holiday Catalog Sneak Peek set!

    We love our cardinals don’t we?  And this just looks so pretty watercolored!  I forget how a simple card base in watercolor paper lets you give the focus to your main element and then you don’t need lots of layers to have a beautiful card.  Add a sentiment and you are good to go!

    This will be coming out in the new Holiday Catalog at the end of August but you can actually get it right now if you love it and want to get going on your holiday cards.  Smile  

    Card Supplies Needed

    beauty of the season

    If birds aren’t your thing, then you can check out this more funky and modern stamp set that just came out in Photopolymer called Christmas Bliss!

    christmas bliss

    Christmas Bliss photopolymer stamp set

    This is one of those while supplies last stamps but I love how fun it is, especially with your non-traditional colors.  In this case, Pistachio Pudding, Baked Brown Sugar, and Calypso Coral!

    And isn’t that polka dot bag cute??  Gotta love things that make gift giving easy. Smile

    Supplies Needed

    christmas bliss stamp set_thumb

    So, pick your style and enjoy a little holiday cheer while you can still also enjoy the warm and sunny weather!

    oh.. and psst – make sure you are keeping your eye out on the Clearance Rack…. there may just be some new and fun stuff popping starting around Midnight MST tonight!!

    spaced shop now sig bar

    July Online Stamp Club Hostess Code7RDHVEKR
    Use this code to get free exclusive tutorials & project kit!  Learn more

  • Pretty Snowflake Fun with Vellum

    I recently held my Vellum technique class and one of the favorites from the class was this holiday card:

    One of my favorite things that I love to do with vellum is run it through the BigShot because it makes the coolest bright white image over the frosted white of the vellum cardstock.  Then I love sponging on the back side of my embossed image to add a pop of color.

    Turns out it is perfect for using with the Northern Flurries embossing folder for snowy snowflakes.  Though next time I think I would add a bit of glitter and sparkle to the front of the card for an extra magical touch!

    In this example, I attached a piece of embossed vellum to the top of a Whisper White cardbase with it only being adhered to the left edge of the card front.  By only adhering it to one side, the vellum pops up just a little and gives you a softer look.

    Project Supplies Used

    So give it a try and let me know what you think!

    spaced shop now sig bar

  • A Starry Christmas Wreath for a Card

    Yesterday I shared a post highlighting the 4 holiday different cards I made using this month’s Paper Pumpkin kit, which made some cute Christmas cards.  Well, I ended up with extra star garlands and I had seen a very simple card by Lyssa Zwolanek that used the star garland as a wreath and I thought it looked super cute, so I just had to make my own!

    My favorite thing about this type of card is that it is a perfect way to use up the odds and ends lying around your craft table.  This card used:

    If you didn’t get this month’s Paper Pumpkin, you could recreate this look by using the small star punch from the Merry Minis Punch Pack and then use a sewing machine or hand stitch … or if you aren’t much of a sewer, like me, you can do some faux stitching with a white pen for a similar effect!


    spaced shop now sig bar

  • Fun Ideas for Gift Giving for a Holiday Blog Hop!

    As promised in my 12 weeks of Christmas newsletter yesterday, today I’m back with a fun blog hop to give you even more ideas for the holiday season!  So sit back and enjoy the ideas!


    Thank you so much for joining us for the November Stylin’ Stampin’ Squad Blog Hop! This month our projects focus on Christmas. While we have yet to give thanks this month, some of us are already thinking about sending Christmas cards, what kind of packaging to present gifts in and how we want to deck our halls. On this month’s blog hop we are showcasing many of the Stampin’ Up! products that are available in the Holiday Catalog. You will see everything from cards to gift tags to 3-D décor and gift packaging. We hope you enjoy seeing how we use the products to create our projects and feel inspired to come up with some great projects of your own.  Remember you can order all of the products showcased from your Stampin’ Up! Demonstrator.

     You should have just left stop number 13 on the Stylin’ Stampin’ Squad blog hop – the oh so fabulous Pam Wu. If so, you are in the right spot. If a link doesn’t work or you get off track, you will find the full blog hop lineup below.

     Holiday Gift Box & Card

    So, my project set that I wanted to show you today was a neat way to use some of the latest from the Holiday catalog as well as taking advantage of the current specials (Holiday Tag It Bundle, which includes the box, Cherry Cobbler ribbon, and Baker’s Twine I used) and sales (Weekly Deals – Burlap Ribbon!) to make these gifts for an even better deal! 🙂  Because, seriously who doesn’t love the thrill of getting a deal on your holiday gifts?

    Anyway, so this is what I created:

    Window gift box with Best of Snow hedgehogs

    This is the very quick to assemble window gift box that has a belly band made of the Burlap ribbon (who knew this stuff was going to be this great to work with) a bow of the 1″ Cherry Cobbler ribbon (which I might add is way softer than you think it is going to be!!) and a tag made with favorite bundle right now, the Tags 4 you stamp set and Bracket Label punch.

    Now, one of the things I love doing with this Tags 4 You stamp set is to add a bit of Dazzling Details to make it super sparkly.  It is always super hard to photograph but I think I finally caught it. 🙂
    Dazzling details tags 4 you

    Can you see the sparkle?  I added the glitter to all of the white parts of the tag plus to the centers of the “o”s.  Just for a little pop.

    And on the side, this isn’t just any plain old burlap ribbon… oh no… this is CUSTOM baby!!  I grabbed my Chevron background stamp and Gumball Green ink and stamped some chevrons around the ribbon.  Isn’t it a fun touch?

    Window gift box with stamped burlap ribbon

    And in case you were wondering, those adorable hedgehogs in the window?  Those are actually from the new Best of Snow stamp set that came out this month.  I just had to get the set because not only does it have the hedgehogs, but it has a cute snowman, a snowflake (that fits the Festive Flurries framelits!) and a stamp that matches the Bracket Label punch!  Sweet, right?
    Best of Snow card with gift boxHere is what it looks like when you pull the card out, but I love how you can see them perfectly through the window of the card.  I again used the burlap ribbon and then had a background from the Season of Style designer paper pad.  Its quick, easy, and super cute.

    Now imagine that hedgehog circle on top of a cute belly band or gift inside the box.  A cool way to package up your gifts in a way that looks adorable in every stage.

    So I hope you enjoyed my ideas for you today and maybe found some gems in the Holiday catalog you hadn’t noticed before.  There are lots more ideas for you on the hop today so check them out and have fun!

    Blog Hop Participants:

    1. Pam S. of Stampin’ in the Sun
    2. Dawn S. of Dawn’s Creative Chalet
    3. Darcy J. of DJ’s Stampin’ Place
    4. Annie L. of Love Me Cards
    5. Cynthia R. of Ink-a-Doodle Creations
    6. Jamie H. of Unique Ink
    7. Kim R. of Stamping with Kim
    8. Tonya B. of Stampin’ with Tonya
    9. Diana E. of Stampin’ Fun with Diana
    10. Heidi B of Stuck on Stampin’
    11. Bree R. of Craft-Somnia
    12. Anastasia R. of Stampin’ Blondie
    13. Pamela W. of Stinky Tofu
    14. Jennifer B. of NW Stamper <—- YOU ARE HERE!
    15. Kristina M. of Mama’s Sanity
    16. Shellie G. of Craft Smashup


    spaced shop now sig bar

  • Weekly Deals to Help You Get Ready for Gifting!

    When I saw the specials that Stampin’ Up! released today, all I could think about was cute gifts and packaging! 

    Nov 12-18 weekly deals

    What can you make with these?

    I mean, imagine how fast and cute this decorated gift box would be:

    1. Stamp some cute snowflake or other image on the Gift Box
    2. Create a cute belly band with the Burlap ribbon
    3. Cut out a coordinating bow with the Gift Bow die to stick on top…
    4. Done!

    image

    -OR-

    If you need teachers gifts or classroom treats, or something to put at the table for Thanksgiving:

    1. Get one of the Goodie Gear kits (Pumpkin Pie for Thanksgiving/fall, Real Red for Christmas)
    2. Add chocolate or nuts to the bags and tie closed
    3. Done!

    -OR-

    Create stocking stuffers or get started on a cute advent calendar with the Mini Muslin bags:

    1. Stamp numbers on the muslin bags (I would recommend the Morning Post numbers stamp set)
    2. Fill with one activity or treat per day
    3. Place in a cute bucket or hang from clothespins on a ribbon
    4. Done!

    image

    Fun right?

    These deals are only available for a week, so make sure to hop over to the online store or email me at jennifer@nwstamper.com to get in on this weeks group order!


    spaced shop now sig bar

  • Another Great Idea for Gifts with Clearmount Stamp Cases

    In my last post, I shared an idea for using the half-height woodmount stamp cases to make Embellished Gift Sets.  So, I thought I would share another idea for you using stamp cases (I swear, I’ve been having too much fun with empty stamp cases lately!).

    Gift Idea #3 – Coordinated Journaling Sets

    This is a really fun way to create a pen and notebook set that you can take anywhere and toss in a purse or bag and not have to worry about crumbs in the pages or crinkled & torn pages.

    To get started, you want to grab:

    • Clearmount stamp cases
    • a mini composition notebook
    • a pen with a clear round barrel
    • a 12×12 piece of designer paper
    • Sticky strip
    • extra cardstock, stamps, ink, and embellishments as desired

    The outside is simply cutting a piece of designer paper to fit inside the plastic cover (like the movie cover on a DVD) and then embellishing it to fit your style and mood.

    Then on the inside, take a mini-composition notebook and using the extra scrap from the patterned paper from you cover, cut a piece that will fit over the front cover of the little notebook.  Decorate the notebook cover to coordinate with your box.

    We also found pens that we could unscrew the tip and fit a rolled up piece of the same designer paper around the ink barrel to make a coordinating set (we found ours in the dollar spot at Target with 2 pens for $1).  Fold your last bit of scrap into a hollow square to create a tube to hold your pen.

    Then adhere your notebook and the pen tube to the inside of the stamp case with Sticky Strip to ensure nothing will move – ever – and you have a great little notebook.  You even have room for a chapstick tube or a pack of gum if you need an emergency stash!

    We created a TON of these cases because they were so much fun to make and I have to say, I think this was my favorite:

    If you want to see more ideas and/or would like to buy one or more for gifts, I have all of extra inventory up on the blog so you can see the different ideas and purchase your favorites (or share with your family and friends and let them purchase your favorite for you Winking smile)

    See all the Journaling Kit designs & more Gift Boxes for sale here

    Between these blog posts and my 12 weeks of Christmas newsletter (you are on my mailing list and getting the email, right?  If not, you can fix that right now and get lots of great free project tutorials by signing up here!) its been holiday gift central!  But at least if you try to buy or make one of these now, you’ll be so ahead of the game!

    spaced shop now sig bar

  • Merry Little Christmas for a Holiday Stamp-a-Stack

    Coming up on Thursday I have a Holiday Card stamp-a-stack planned where everyone is going to make up to 4 different designs of cards including this one: 

    I was going for something that was easy to make a lot of without taking a ton of time or wearing out your arm, and this is one of the designs that came about.

    I loved the snowy/foggy forest look I got by stamping with Basic Grey ink and then re-stamping the tree (of course, from the amazing Lovely as a Tree), before I inked again.  And by having the trees stamped on a separate piece of Very Vanilla cardstock, I didn’t have to worry about what happened to the bottoms of the trees!

    Add some stitched grosgrain ribbon around the Very Vanilla layer for a pop of color and color in the sentiment with markers and you get just the right balance of color and snowy day. Smile 

    Stampin’ Up! Supplies Used
    Stamps – Lovely as a Tree, Merry Little Christmas
    Ink – Basic Grey, Basic Black marker, Real Red marker, Gumball Green marker
    Paper – Very Vanilla, Basic Black
    Accessories – Real Red stitched grosgrain ribbon

    Want to make some Christmas cards?

    Join me on Thursday (10/24/2013) for a night of stamping in Redmond, WA.  We’ll be making these cards plus one more super cute snowflake sparkle card!

    RSVP for the Holiday Stamp-a-Stack here

    Can’t make it in person, I offer kits as well!  Email me at jennifer@nwstamper and I’ll get you all set up!

    spaced shop now sig bar

  • Getting Creative with the Christmas Star Stamp

    Woo hoo!  Today is the day that I’m heading to Utah for Founder’s Circle and I don’t think I could be any more excited!  5 days to relax, stamp, explore, and socialize with some amazing stampers and demonstrators – what could be a better vacation? 

    I’ll be blogging from my trip in Utah as well as offering a Founder Circle special while I’m away!  So, be sure to stop back by the blog to catch all the excitement.


    But, while I’m traveling, I wanted to make sure to share with you some new project ideas using the Christmas Star holiday single stamp

    This stamp is an elegant way to decorate or create for the holidays.  And the coolest part is that it is super easy to make it pop-out into a 3D star!  But more on that in a minute. Smile 

    Now, first thing, I’ll warn you – this stamp is bigger than you think.  I ordered the stamp and didn’t really pay attention to what clear block the flyer listed that was required for it.  I assumed one of my medium blocks would work – NOPE!  It takes the biggest block (block F).

    Yup.  That is a 4.25” x 5.5” card base and the Christmas Star next to it!

    Now, you may be wondering what can I do with a stamp that big? 

    Why, make cute cards and home décor projects, of course!  Smile The first thing I did was make a Christmas card with the star.

    I decided to go for a more vintage-y feel and so I stamped on Crumb Cake paper with my Cherry Cobbler ink.  Sponge the edges with Crumb Cake ink and then add a touch of sparkle with some Silver Glimmer paper.  Pretty, no?

    Then I wanted to play with the fact that you could make the star into a 3D star.

    How do you make the Christmas Star pop up?
    1. Stamp your Christmas Star image on a piece of white cardstock
    2. Cut out the star (yes, you need to hand cut this, but it isn’t as bad as you think)
    3. Fold the star in half using the white lines that radiate out from the center of the star as guidelines.
    4. Use your bone folder to press each fold line (you should fold in half 5 times)
    5. Set your star on a table or flat surface and then gently squeeze the sides in to cause the center of the star to push up off the table. 
    6. Your star should stay dimensional and you can now add it to your projects!

    Once I made my star, I knew I had to put in on something, so I made this rosette ornament.

    I cut two strips of 1.75” x 11” pieces of Wild Wasabi cardstock and then scored it at 1/4” increments.  Then I could fold my paper back and forth to create the accordian look. 

    Glue the ends of each strip together to make one big circle and then push the center down flat to make my rosette.  Now, I haven’t made many rosettes before, and I’m a complete newbie to my hot glue gun…. so, when I had to hot glue the middle of my rosette together so it would stay flat, it got a bit messy!  But it works, and I covered it up, so you’d never know!

    Then I just added a circle of Silver Glimmer paper (adhering with hot glue again) and then added my star (adhering with glue dots) to the top.  Punch a hole in the rosette and run some of the new Silver 1/8” taffeta ribbon from the holiday catalog and you have yourself an ornament!

    Oh, and the rhinestone!  Don’t forget the rhinestone in the center of the star!

    So see, there are lots of cute things you can do with this stamp – even if it is big!

    Founders Circle Special – Double Rewards All Weekend Long!

    Since I can’t take you all with me to Founder’s Circle this weekend, I thought I would try to do something special to celebrate anyway.

    So, from 9/18–9/22, receive DOUBLE your reward punches for each purchase!

    That is right! For every $40 you order, you will receive two punches on your punch card and be that much closer to receiving a free stamp set of your choice!

    See how Northwest Stamper Reward Punches work

    and as an extra thank you,

    Everyone who places an order between now and 9/22 will be entered to win a free Christmas Star stamp and Rhinestones!

    So, have a great weekend and I’ll see you back on here soon!

    spaced shop now sig bar

  • Holiday Blog Hop with the Stylin’ Stampin’ Squad!

    Last month I was honored to be asked to join a group of very talented guys and gals for a monthly blog hop showcasing fresh ideas using Stampin’ Up! goodies.  Given how it feels like the last couple months have been crazy busy, I figured having a deadline and a theme to work with would be fun to try, so I had to say yes!

    First up, I was asked to show a 3D item and since I had recently bought this alterable kit for a Christmas countdown, I thought it would be a fun place to start.

    I LOVE the Christmas season and it is the one time of year that I for sure pull out decorations and try to get in to the season.  So, when I saw this kit for a wood Christmas countdown tree, I couldn’t wait to get it and take it home to decorate!

    This is what it looked like when I got it home (well, after I cut apart the number tags):

    raw christmas countdown tree

    I do have to say, this project got me well over my fear of Exacto knives!  I used mine A LOT in cutting apart the tags and trimming my paper to my cut out shape.  Now if only Stampin’ Up! still sold those big grid self healing mats that I see 10 yr+ demos using, I would be set!

    Anyway, I used a few of my holiday catalog toys to decorate my tree this year.

    Candlelight Christmas dsp sampleI used pattern paper from the elegant Candlelight Christmas specialty designer paper for my tree and some Chocolate chip cardstock for the base (and you can kind of tell in the picture, but I grabbed my trusty sponge daubers and inked up the edges of the wood so it would blend in a bit better – like the Chocolate Chip ink on the piece that is pointed at the camera).

    I used a different pattern from the same pack to cover my numbers tags which hang from hooks on the front of the tree.

    After all the paper was stuck to the wood, I went ahead and mod podged the whole thing.  I figured that if I coated the paper layer, then if I wanted to change up the decorations over the years, I could do that and the base tree would still look nice.  We’ll see if that is how it works in practice though over the next few years!

    Then, to decorate, merry minis punch pack sampleI strung some Rhinestone strands and punched out lights using the cute Merry Minis punch pack.  I also used the star from this punch pack to make the star for the top of my tree.  I punched the star out of the Champagne Glimmer paper (such AWESOME paper) and then put it on a 3/4” circle which was then placed in a 1 1/4” scallop circle – also new from the Holiday catalog. Smile

    The circle ornaments are actually just punched designs from the same Candlelight Christmas paper pack and then sponged around the edges for some definition.

    Finally, one of the rules of the blog hop was to use current Stampin’ Up! products only.  And while I cheated a little because I accidentally used a retired Big Shot alphabet set for the numbers on my countdown tags (it was Timeless Type for those of you that are interested), I needed to figure out what to do for my “title” on my tree.

    I knew I wanted it to says “days til Christmas” but I didn’t have a stamp that said that and I was too lazy to go upstairs to my computer to find something I liked on My Digital Studio. Smile So, I improvised from the stamps in my craft room and replicated the tiny letter stickers you see in scrapbooking stores.

    IMG_1707

    I grabbed my Made for You stamp set and got to work inking it up with my marker and stamping a million times to get the letters I wanted.  Then I just cut them out and pieced them together at the bottom of my tree.  The “Christmas” sentiment was from a different stamp set – Petite Pairs – and again, was just inking up part of the stamp and cutting it out.

    made for you

    I thought it was kind of clever! Smile

    Alright, and I think I’m supposed to share a card as well… and I know this post is getting super long, so I’ll try to be fast!

    Ok, so this card was put together using the Christmas tree countdown as inspiration.  I used the same colors and elements to create a quick 4.25” x 4.25” holiday card.  Just layer a few punches and you are good to go!

    So, I hope you enjoyed the projects I have to share with you today and if you want even more ideas, hop along and check out the other great stuff my “Stylin’ Squad” buddies have in store for you!  Since I’m the last person on the tour, click the button below to head to the start of the tour and hop away.


    Blog Hop Participants:

    1. Shellie G. of Creative Electica
    2. Annie L. of Love Me Cards
    3. Pam S. of Stampin’ in the Sun!
    4. Nancy B. of Lady Stamps-A-Lot
    5. Rose C. of Stamp with Rose
    6. Tonya B. of Stampin’ with Tonya
    7. Dawn S. of Dawn’s Creative Chalet
    8. Darcy J. of DJ’s Stampin’ Place
    9. Kim R. of Stamping with Kim
    10. Terry B. of Goin’ Over the Edge
    11. Justin K. of JK Cards
    12. Heidi B. of Stuck on Stampin’
    13. Jennifer B. of Northwest Stamperthat’s me!

    To Order Stampin’ Up! Products Anytime, click here!

    Its INK-REDIBLE December!
    Get a FREE set of 10 ink pads with a qualifying order or party; or get them free when you join the Stampin’ Up! family! Learn more

    Are you earning your Northwest Stamper Rewards?
    Every order gets you closer to your FREE stamp set! Click here to learn more!

  • Ornamental Elegance Kit — While Supplies Last!

    If you are on Facebook, you probably saw about this limited edition kit that Stampin’ Up! is offering to help you quickly make the ornament that is seen on the cover of the Holiday catalog.  You know, this one:


    If you bought the Ornamental Keepsake stamp set and matching framelits, you can make a number of cute variations of ornament type and color (for example, Blue and Silver look AMAZING!!)  But you can make other types like this cute gift tag made with one of the medium ornament images and die:

    tag designed by Kathy Thisted

    But if you don’t have the stamps and dies yet, this is a SUPER deal!  You get all of the images you need to make 10 full ornaments and all you have to do is pop them out of the cardstock sheet.  Plus you get linen thread, Cherry Cobbler Tulle, Faceted buttons, and Jumbo Pearls to make it complete!  You just need to provide the glue and the man-power to put it together. 🙂  All for only $14.95!  Didn’t I tell you this was a great deal??

    When I talked to demonstrator support yesterday because I was trying to put together a class with the kits and needed to know how soon to order them and learned that they started with 5,000 kits available but that they were going fast.  I was advised not to wait long to put in my order.  So if you like this idea, you may not want to wait either!

    Come to my Ornament Kit Class on Dec 16th!

    Want to join me in making these ornaments?  I’ll be holding a class on Dec 16th to make some of these ornaments in a group.

    You’ll get 1/2 a kit – so enough to make 5 ornaments – and I’ll provide the hot glue, adhesive, and tools you need to turn your die cuts into the cool ornament above.  Plus you get the fun atmosphere of crafting with some cool gals.  We’ll each make 1-2 of the ornaments in the kit and then you can take home the remaining supplies to make the rest of the ornaments or use them for other holiday projects and crafts!

    The class fee is only $15 or if you want a full kit – so you can make 10 ornaments – is only $23.

    Please rsvp to jennifer@nwstamper.com as soon as possible so I can make sure to order enough kits.

    To Order Stampin’ Up! Products Anytime, click here!

    Its INK-REDIBLE December!
    Get a FREE set of 10 ink pads with a qualifying order or party; or get them free when you join the Stampin’ Up! family! Learn more

    Are you earning your Northwest Stamper Rewards?
    Every order gets you closer to your FREE stamp set! Click here to learn more!