Northwest Stamper

Category: Thank You

  • Customer Thank You Cards with my New Favorite Color Combo!

    This weekend I needed to make some more thank you cards for Stampin’ Up orders this month.  I really appreciate all my customers and stamping friends who support me and my business, and so I like to send them a card they can use themselves (so if you get a card from me and wonder why I wrote my note to you on a post-it note, now you know!)

    I was looking around for inspiration and came across this card by Glenda Calkins and I just LOVED the color combination and knew I had to make my own!  So, here is what I am sending out to anyone who orders from me this month! 

    Tips for making this card:

    • First up, I LOVE LOVE LOVE this color combination.  If you haven’t tried it already, you should.  Especially since we only have a couple months left with the fabulous Coastal Cabana! 

      image
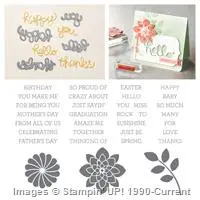
    • Use the Crazy About You bundle (save 15% off too when you get the stamp set and thinlit at the same time!) to use this same card design for almost any sentiment you want!  Birthday, thank you, Mother’s Day, Easter, you name it!  The fun combo of the die cut word with the stamped sentiment keeps it interesting.
    • When cutting out your word with the thinlit die, it will come out so much more easily if you put a piece of wax paper between the thinlit die and your cardstock!  Best trick ever!!
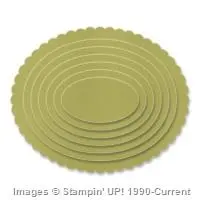
    • The Oval Framelits give you a perfect die cut for your focal point and a nice mat around it by just going up one size in framelit.
    • Adhere your patterned paper from the Sale-a-Bration Best Year Ever designer paper onto your Sahara Sand cardstock, and then wrap a piece of Coastal Cabana ribbon from the Sale-a-bration Best Year Ever accessory pack making sure to only glue the ends of the ribbon.  When you leave the middle of the ribbon unglued, it lays more nicely and lets you take a second piece of ribbon and slide it under your first ribbon and tie a knot.  So, you get a perfect faux bow everytime.

    And just in case you want to make your own, here are the dimensions:

    Card base – 4 1/4” x 11” folded in half
    Sahara Sand cardstock – 4” x 5 1/4”
    Best Year Ever striped designer paper – 4” x 2 5/8”

    Don’t forget, this designer paper and ribbon are while supplies last and only available until the 31st with your $50 order!  So, don’t miss out!

    Curious about the Starter Kit or have questions about becoming a Stampin’ Up Demonstrator?  Join me for a Live Chat this Saturday!

    I often get a number of questions from folks such as –

    • Can I join for the discount? 
    • Can I really earn money with Stampin’ Up?
    • What comes with the starter kit? 
    • Do you have recommendations for what I pick in my starter kit?
    • What are the minimums required for staying active as a Stampin’ Up demonstrator?
    • Do I have to actually sell anything?
      • Why would I want to sign up?
    • What do I get for signing up before Sale-a-Bration is over?

    So I thought I would put together a Live Chat as a chance to not only answer these questions but also give multiple folks a venue for asking YOUR questions!  So if you have been curious about what it means to be a Stampin’ Up demonstrator, register and join me on Saturday morning at 10am PST.  If you can’t make it, register anyway and I’ll make sure to send you the recording afterwards.

    *** Register for the I Love Stamping Live Chat here ***

    NWstamper signature_thumb[9]

    order online button for sig 3_thumb[4]

    Project Supplies Used:
    Easy shopping anytime!  Click the images below to see the item in the online store

  • 1 Month Only! NEW Sale-a-Bration stamps, paper, and accessories and Cute Samples!

    Yesterday marked the kick off of these cute new Sale-a-bration products.  I thought I’d share with you what you can get for THIS MONTH ONLY (and yes, you can still get the other Sale-a-Bration items, these are just the new set!)  Which is your favorite?

    Remember – Get your choice of one of the items below for FREE with a $50 order! 
    Shop online and use hostess code 9CYWBHVC and get a thank you gift from me!

    New Sale-a-Bration Stamp Set – For Being You

    image

    I love this super cute stamp set and sentiment.  Plus isn’t it perfect for coloring in with your blendabilities??  Use extra hearts that come out of the Hearts Confetti Border punch for extra accents.

    image

    New Sale-a-Bration Accessory Pack – In Color Twine and Buttons

    image

    You get SO MUCH with this option, because you get 25 yards of twine plus 30 buttons.  And we all LOVE LOVE that Blackberry Bliss color, why wouldn’t you want it in twine and buttons.  And think spring with the yellow, green, and blue!  They are all so pretty… this is my personal first choice of goodies!

    image

    foo

    New Sale-a-Bration Paper – Sheer Perfection Designer Vellum Stack

    image

    image

    These are so pretty and you can either color the vellum like the background in that top card using your blendabilities, or you can just use the vellum as a layer like in this treat bag above.  They used it for a pocket and for the base bag.  Adorable!  (and that butterfly and flower are stamped using the last new item and that ribbon is from the Sale-a-Bration Best Year Ever accessory pack!  So combine what you already have with the new cuteness!

    image

    NOTE – this vellum is 2 sheets each of the 12 patterns and is a 6×6 paper stack.  Honestly though, I think that makes it much more easy to manage on my projects. Smile 

    New Sale-a-Bration Stamp Set – Nature’s Perfection

    image

    Look how easy it is to make quick and cute cards with this set!  Just randomly stamp the images around the outside and color with your markers… done!  The stamp images coordinate with the Sheer Perfection Vellum… though I think the small flower and flowers on a stem would match up great with the Mother’s Love stamp set from the occasions catalog!

    image

    So, do you have a favorite yet? Smile

    Remember – Get your choice of one of the items below for FREE with a $50 order! 
    Shop online and use hostess code 9CYWBHVC and get a thank you gift from me!

    NWstamper signature_thumb[9]

    order online button for sig 3_thumb[4]

  • LAST DAY for the Holiday Catalog and one more Sneak Peek with the Hello You Thinlit Dies

    It’s true, it’s the last day of the Holiday Catalog. So if you were wanting some of the items from the catalog, now is the day to make sure you grab them!  Plus, it is also the last day of the Year-End Clearance Sale and many of these great deals will go away after tonight.  There are a few items that are carrying over from the Holiday Catalog and I’ll share that list at the end of this post. 

    In the meantime, I wanted to share one more project that came out of my “Use up all the scraps on my desk” project. Smile

    I had extras of the wreaths that I had stamped and die cut using the Wondrous Wreath bundle, back when I was experimenting with colors for a class this fall.  I kept them lying around and so I though I would finally use them.  I decided to pair them with the retiring Color Me Autumn designer paper (50% off through tonight!) and use the new Hello You thinlits that are available starting tomorrow to make my own unique thank you cards!

    Tips for making this card:

    • The Hello You thinlits include the words “Hello”, “Thanks”, “You”, and “Happy”.  Snip off the “s” on the Thanks and you can create your own custom Thank You sentiment!thank you sentiment from Hello You Thinlit die
    • Just because a paper pack’s name implies it is a “fall” or “christmas” pack… many of the papers can be used anytime!  Like this yellow painted looking paper from the Color Me Autumn pack.  It totally works for anytime of year.
    • When stamping your wreaths, not only mix and match the colors you use, but mix and match the ORDER you stamp them as well!  In the sample above, I stamped first with Hello Honey, then Soft Suede, and then Blackberry Bliss.  In this sample below, I stamped first with Crumb Cake and then did Hello Honey and Blackberry Bliss.  I still can’t decide which I like better. Smile 
    • Don’t want to hassle with a bow? Tie a knot in a piece of ribbon and trim the ends.  Attach to your project with a glue dot! Easy peasy!

    10646980_782080281839792_4434187347945494541_n

    I’m getting excited!  I’m going to try to film a catalog walkthrough tonight of the new Occasions Catalog so you can get the full scoop tomorrow.  So, if you have any questions, let me know and I’ll try to make sure to cover them!

    ———————————————-

    SAVE THE DATE – 4/20/2014!

    Earn your spot at the Saleabration CELEBRATION in April!


    Come to a very special event where I will spoil you!  Sweet treats, specials, sneak peeks, stamping make n takes, gifts, games, prizes and more!

    FREE! You can only EARN your way in!

    1. Host a Saleabration workshop or Private Class  (Hostesses earn 25.00 MORE for FREE! *must be min. 250 in sales)
    2. Purchase the Starter Kit  (Get 2 FREE Saleabration choices! Or a Project Kit!)
    3. Spend at least 150.00 during the months of Saleabration! (Jan.-March)

    Monday, April 20th. (If you qualify and can’t attend, I will mail you the make n takes and gifts that will be passed out!)  This is something new I’m doing this year and I can’t wait to start planning all the fun for this event!
    This is only available through me, Jennifer Blomquist – so shoot me an email at jennifer@nwstamper.com to get the details and save your spot!.

    ———————————————-

    NWstamper signature_thumb[9]

    order online button for sig 3_thumb[4]

    Project Supplies Used:
    (if you are reading this in email, click here to see the list of supplies)

  • Wondrous Wreath Gratitude Card for the Fun n’ Crafty Blog Hop

    Wondrous Wreath Gratitude Card for the Fun n’ Crafty Blog Hop

    Fun n Crafty Blog Hop badgeIn keeping with the theme of Gratitude this month, a few of us from the Fun n’ Crafty Stampin’ Up! demonstrator team put together a mini-blog hop based around the theme of Gratitude.  This was my card I wanted to share with you today!


    I LOVE this Wondrous Wreath stamp set and matching framlits, especially because you can easily cut out your wreath both outside AND IN and have all the little leaf shapes. Smile

    For this card, I used more “Fall” colors instead of the reds and greens like I did on my Christmas Wreath card.  I used the following colors:

    • Hello Honey ink for the full wreath stamp with all the leaves
    • Soft Suede ink for the partial wreath stamp with about 1/4 of the leaves
    • Blackberry Bliss ink for the berries and the bow

    And speaking of the bow, how awesome is it that you don’t have to hand cut that either! Smile  I stamped my bow and cut it out with the matching die but I’ve seen super pretty cards using glimmer paper for the bow or just plain cardstock as well.  Gotta love having options.

    Then you can kind of see the card base is stamped as well.  I used the Hardwood background stamp ….
    (TIP – I love my clearmount stamps, but when it comes to background sized stamps, I ALWAYS recommend to my customers to get them in wood.  Sure, you save a little space when you get it in clear, but then you have to get the $17 clear block to use with it, and in the case of a stamp like this, it is pain in the rear to get the sticker on right onto the back of the stamp!  I just think it is way easier and often more economical to get the background stamps in woodmount.  Though I’ll still love you if you decide you want it in clear. Smile )

    but anyway, I used the Hardwood background stamp in the same color as the paper, which in this case was crumb cake.

    I also made this card the same except for using Sahara Sand as my background instead of Crumb Cake.  Both are pretty… not sure which I like better, actually.  Swing by my Facebook page and cast your vote which paper you like better!

    And now, check out a few more ideas for sharing gratitude this month!:

    10353106_10204078100138887_7954284539736439010_n

    We don’t have a long list this this month so it’s easy to check everything out and enjoy the inspiration!  And please leave Sara and Pam some love on their blogs… I know it would mean a lot to them. Smile

    NWstamper signature_thumb[9]

    order online button for sig 3_thumb[4]

    Gratitude Month Week 1 Free Tutorial – Kinda Eclectic Thank You Card

    use hostess code UCJDBQH4
    See the Catalogs online – Annual Catalog  |  Holiday Catalog  |  Holiday Supplement
    Save more when shopping – Weekly Deals  |  Clearance Rack

    Card Supplies Used:
    (if you are reading this in email, click here to see the list of supplies)

  • Gratitude Month–Thank You Card using Kinda Eclectic and In Colors

    Gratitude Month–Thank You Card using Kinda Eclectic and In Colors

    Happy November!  As I mentioned yesterday, I’m kicking off my Month of Gratitude with a free gift for you and a project tutorial.  Today I’m sharing a card I created as a different way to use your Kinda Eclectic stamp set and have a neat thank you card that you can use for guys, girls, and any time of the year.

    November Gratitude PDF Tutorial – Kinda Eclectic Thank You Card

    Project Tips:

    • Stick with a color family or In Color set (in this case the Stampin’ Up 2014-2016 In Colors) to make your background and for complimentary cardstock colors.  This gives you a variety of colors but you know the tones will work together no matter how wild you get with you stamping.
    • Use the starburst stamp from Kinda Eclectic to make a great background layer to your cards or projects.
    • Use the starburst framelits to cut out on of the stamped starbursts and do it off center.  This makes it more visually interesting, especially when you add an accent like the wooded elements.
    • When stamping on wooden pieces, use STAZON ink to prevent yucky bleeding and fuzzing of the ink.

    So, click the link above if you would like the full tutorial for this project.  And if you would like to order anything, don’t forget I have a special gift for you each week with orders.  This week, you get a cool ribbon sampler from the Holiday Catalog as my thank you to you!

    image

    Just shop in my online store or email me your order at jennifer@nwstamper.com and use hostess code UCJDBQH4 and when I start mailing out Thank You gifts you’ll receive this special bundle free in your mailbox! Smile

    Gratitude Month Gift

    And check back on Wednesday when my Fun n’ Crafty stampers are putting together a small blog hope focused on gratitude projects!  It should be great!

    NWstamper signature_thumb[9]

    order online button for sig 3_thumb[4]

    Card Supplies Used:
    (if you are reading this in email, click here to see the list of supplies)

  • A Monochromatic Thanks with Seasonally Scattered

    I was thinking last night about blog posts and realized that I had been so good about posting my display board projects from the 2014 convention, but then got sidetracked with other projects (and to be honest, I wanted to mix up the stamp sets I was featuring here) and completely forgot to finish sharing the display board projects!  I had saved some of my favorites for last and so I want to make sure to get them posted…. like today’s card!

    This was one of the first I did with the Seasonally Scattered stamp set that I LOVED.  It’s not flashy, but I like it’s understatedness.  What do you think?

    Tips for this card:

    • Did you know, the Lovely as a Tree has a leaf stamp that goes PERFECTLY with the Seasonally Scattered thanks stamp??  Stamp your thanks image and then start stamping some falling leaves in Versamark and heat emboss with gold ink for a pretty fall touch.

    • Wrap some linen thread around a few times to add some texture and a simple rustic touch to your card.
    • In keeping with the brown monotone look for the card, I sponged the edge of my Very Vanilla cardstock with Crumb Cake to help all of the cardstock pieces transition nicely with each other.

    Its delightfully simple and yet elegant to do… and you could mix and match your colors to get exactly the look you want.  For this card, I used:  Early Espresso, Crumb Cake, and Very Vanilla; but shake it up when you try it at home!

    spaced shop now sig bar
    Hostess Code:  C2HYWWQM Use this Hostess Code and receive a free gift! (Please do not use the Hostess Code if your order is $150 or more)

    Need a Holiday Catalog?  Check it out online or email me at jennifer@nwstamper.com to get your copy!


    Card Supplies Used:

    Heat Tool


    $29.95

    Linen Thread


    $4.50

  • Holiday Catalog Sneak Peek–Seasonally Scattered Thank You Card

    I know, I know… I’ve been super slow about getting more Holiday Catalog sneak peeks up!  Eek, my bad!  Well, I have one for you today and I’m sure I will have more for you next week – my holiday catalog preorder just arrived!  In the meantime, here is a card I put together for the Stampin’ Up 2014 convention display boards using one of the sets we were given at convention called Seasonally Scattered.  This is one of the new sets from the Holiday catalog and has this Thanks image along with a “Merry” and a “Love” image with background images speckled behind the letters.

    Tips for making this card:

    1. When I got this set, the first thing I wanted to do was heat emboss (which I did… a lot) but then I wanted to do something different and this image screamed at me to color with my markers. 
      Which I admit took a little bit of time, but it comes out soooo pretty.  The only thing is that there is no outline for the letters.  So I found that to make them extra readable, I outlined the letters with my Hello Honey marker for a subtle emphasis and separate of the letters from the rest of the image.
    2. Add your own little flower element too by punching out a couple flowers using the Itty Bitty Accent Punch Pack and offsetting them for a pretty dimensional touch.
    3. Grab the Autumn Leaves Bigz Die to finish out the fall look and layering them behind your image.
    4. By keeping it all in the 2014-2016 In Color family, you can add lots of accents but not have them get too busy because you know the colors will all coordinate!

    I have lots more projects where this came from with this set and while this set was a little hard to get started with, let me just say there are no end to the ideas and inspiration I saw that make me not sad at all that I have it. Smile 

    Special Invitation to Seattle Area demonstrators

    If you are a demonstrator in the Seattle area and like the idea of getting together with other demonstrators to chat, share ideas, get some new tools and class ideas, then I’d like to invite you to my teams Stamp & Share.  This year I’ve started a new event for my group called a Stamp & Share where we get together for essentially a mini-regional (on a much smaller scale).  We hang out for an entire afternoon (12:30-5pm) and there are stamping demonstrations and presentations, a business presentation, card contest, games, make & take that you can use as a class idea, and of course, Prizes!!  I always feel the more people there to share the better but as I’m getting this started I’m confined a bit on space.  That said, we have room for a few more folks join us and I’d love for you to join us. 

    We’ll be meeting August 23rd at 12:30 in the Newcastle/South Bellevue area.  If you’d like to join us, just register here and I’ll make sure you have all the info!

    spaced shop now sig bar

    August Online Stamp Club Hostess Code – TT2NETD4
    Use this code to get free exclusive tutorials & project kit! Learn more

    Card Supplies Used:

  • Check out that NEW Fun n’ Crafty Blog Hop!

    10383580_10204078098778853_972456530417495748_nWelcome to the Fun n’ Crafty Blog Hop for June! I’ve been seeing the amazing talent of the folks in my Fun n’ Crafty group of demonstrators and I thought it would be fun for us to start a monthly hop to showcase everyone’s work and give you lots of ideas around different themes.

    I’m so excited for this inaugural blog hop and hope you enjoy all the inspiration.  This month we will be showcasing project ideas from the NEW Stampin’ Up annual catalog. So make sure to check out the list of stops on the hop at the bottom of this post to see them all!

    So, here is my contribution… a lovely catalog CASE only my card is using the new Blended Blooms stamp.

    Here is my inspiration for the card… you can find it on page 170 in your catalog.  It is showing the new Sweetbriar Rose stamp, which I don’t have…and I don’t have the paper yet either.  But that is ok, you just make it work with what you have!image

    There were lots of cards and projects that I saw that I really wanted to try but this one jumped out at me and I had to give it a go.   I liked the idea of coloring directly on a non-white cardstock and I figured it was a good excuse to bust out my Blendabilities markers.  (Stampin’ Up’s new alcohol ink markers ~ available now to demonstrators and coming soon to everyone later this summer)

    And I’m pretty excited because this is my first real attempt using my Blendabilties and I think it turned out pretty well.  Now imagine how this would look on white cardstock!

    I loved all the little touches in this card too.  From the bit of White Tea Lace Doilies to the faux stitchiing at the edge of each piece of designer paper… because you KNOW I don’t have a sewing machine or the time to do much of any hand stitching. 🙂

    Now one thing you’ll learn from using Blendabilities is that they do bleed through the paper.  Thankfully, in some cases, it actually looks pretty pretty on the inside. Don’t you think?

    I made one more card but in the interest of time, I’ll share it later this week so you can move on to see some of the other great projects in the hop!

    So make sure you visit the links below and make sure to leave them some love by commenting and letting them know what you think of their interpretations!

    Blog Hop Participants:


    And if you are thinking of joining Stampin’ Up (or just want to get your hands on Blendabilities now!) take advantage of the $50 Starter Kit promotion through the end of June.  And if you join with myself or one of the folks on the blog hop, we’d love to welcome you into our Fun n’ Crafty stampers group and invite you to participate in our hop too!

    spaced shop now sig bar

    June Online Stamp Club Hostess CodeACANDKB4
    Use this code to get free exclusive tutorials & project kit!  Learn more

     vintage-Blended-Blooms-thank-you-card.jpgStampin’ Up Supplies Used
    Stamps – Blended Blooms, Hip Notes

    Ink – Memento Black, Mossy Meadow, Blendabilities Marker sets (Daffodil Delight, Pumpkin Pie), Crumb Cake marker
    Paper – Crumb Cake cardstock, Whisper White cardstock, Regals Designer Series Paper Stack
    Accessories – Banner punch, Tea Lace Doilies, Essentials Piercing Pack, Piercing Pad, Piercing tool

  • Watercolor Notecard Weekend–Day 1 Fun with Happy Watercolor

    Watercolor Notecard Weekend–Day 1 Fun with Happy Watercolor

    Ok, I know I’ve been sharing a lot with Happy Watercolor and even the Watercolor Wonder Notecards, but I’ve been having a lot of fun playing with them and I want to share them since I know a lot of folks have ordered the stamp set and the notecards.  I figure more idea for how to use your stuff is always better, right?  : )

    So in case you didn’t realize it with my past pictures, the cards come preprinted with different colors or patterns to get you started.  And they are all on watercolor paper… which means you can have fun watercoloring and adding your own personal touch as well.  So, here are two cards I made from the same base card, just with different stamping and embellishing.

    I would like to add, that I was not excited AT ALL when I was given these sequins a while back.  But turns out, they are a fun touch to add sometimes.  Since they come on a strand, I’ve been using them by pulling off sequins or tucking the strand partially behind a stamped layer.  But in this case, I think they actually are just right as a strand out in the open, all on their own!

    And then I wanted to figure out some different ideas to try on the other card styles… so this is my modified version of the spotlight technique.  Though, I think it almost looks like a bar across the colored background stamps… so maybe it is a “censored technique” because it looks like a censor bar. Smile

    And the last one for today I call my “Artsy Poppy”.  I started mixing and matching the stamps in the set as an experiment.  I actually kind of like it. 

    (PS – did you notice, this card base is the same as the card above?)

    If you look close up, you can see that the center of the poppy needed something, so I took an extra sequin and glued it down with a glue dot.  It still was missing something, so I added a little pearl and it suddenly was just right!

    So see, lots of different ideas and ways to spruce up these cards.  You have one more week to grab them – and 20 cards for $12.95 isn’t a bad deal at all!  See all the watercolor wonder coordinating supplies here.

    I have one more set of cards using these notecards that I’ll post tomorrow.  So you will have LOTS of ideas to play with with your supplies.

    spaced shop now sig bar

    May Online Stamp Club Hostess CodeZUBHUEK6
    Use this code to get free exclusive tutorials & project kit!Learn more

    Stampin’ Up! Supplies Used
    Stamps – Happy Watercolor
    Ink – Stazon, Gumball Green, Calypso Coral, Daffodil Delight, Tangerine Tango, Crushed Curry
    Paper –Watercolor Wonder Notecards, Whisper White
    Accessories – Scallop Tag Topper punch, Pearls, Gold Sequins, Aqua Pen

  • Background of Butterflies using Wheel Stamps

    Today’s card share is an idea for how to use your wheel stamps.  It is a simple idea and just involves using a jumbo wheel to create a background for your card.  Hope you like butterflies!

    In this case, I wanted to use the Butterfly Collection Jumbo Wheel.  I thought it would be a great set of images for the background of a card.  Here is what the wheel looks like:

    image

    So, to cover the entire front of my card, you only have to roll the wheel twice!  Not too hard, huh?  I used the same color ink as my cardstock to let you see the butterflies without it being too busy.  If you wanted it even subtler, then I would use Versamark as your ink.

    Wheel Stamp Techniques:

    1. Start rolling your wheel before you get to your paper where you want the stamp to show up.  This headstart makes sure you are getting the right pressure and direction that you want.
    2. Ink up your wheel using ink pads for more color options.  Ink them up by rolling in one direction, like you were inking up a paint roller for your home.
    3. Use a thick plastic ruler to help guide your wheel when doing a second pass so you keep it going the direction you want it to go.

    Want to see what I mean and more tips for Wheel Stamping?  I have a video on Wheel Stamp basics to talk about the different types of wheels and share a number of tips for successful stamping.  (if you are reading this in email, click here to see the blog post with the embedded video)

    Stampin’ Supplies used

    Stamps – Butterfly Collection jumbo wheel, Oh Hello
    Ink – Wisteria Wonder, Primrose Petals, Chocolate Chip, Pear Pizzazz
    Paper – Wisteria Wonder, Whisper White
    Accessories- Corner Rounder punch, Bitty Butterfly Punch, Crushed Curry Chevron ribbon, Stampin’ Dimensionals, Pearl basics

    Order any of the supplies and more in my online store

    I’ll admit wheels are a bit neglected in my stamp collection, but they can be a lot of fun to use and perfect for the job.  So, grab your wheels and give them another go!

    spaced shop now sig bar

  • Birthday Celebration–Day 2 with Simply Sketched on Vellum

    Woo hoo! It’s day 2 of my celebration and I have another card to share with you today.  This is a card that I made for my Fun n’ Crafty demo team swap.  Each month, everyone in my downline is invited to participate in a card swap… sort of like a secret santa – only for cards.  You are given one or more names to send a card to.  You know you will get a card for each one you send, but you don’t know from whom or when in the month it will arrive.  It’s pretty fun!

    Anyway, while I was working on samples for my Vellum class, I was inspired to try out heat embossing on the vellum and then coloring in between the embossed lines with some bold marker colors.  Check it out:

    I reached for a bunch of supplies that I love but don’t use nearly enough (lets hear it for vellum, candy dots, and core’dinations cardstock!) and started mixing and matching using a simple card design.

    I made a couple in this AWESOME Cherry Cobbler colors and then one in the Island Indigo color. 

    To make this card, it is simple to do. 

    1. Stamp your image on Vellum cardstock using Versamark ink
    2. Cover with White embossing powder and heat
    3. Color in between the raised embossed lines using a marker
    4. Glue Vellum to the front of your card or designer paper mat using candy dots (if you paper starts curling, you may need to secure the corners with glue dots and then cover with the candy dots)

    Oh, and that core’dintations cardstock?  It makes a great textured background and if you grab your handy dandy sanding block, it distresses beautifully and gives it a velvety feel.  (seriously, sand some of this paper and feel it!)

    Card Supplies Used

    Stamps – Simply Sketched
    Ink – Versamark, Chocolate Chip
    Papers – Very Vanilla, Cherry Cobbler or Island Indigo core’dinations cardstock, Vellum cardstock, Soho Subway designer paper
    Accessories – Cherry Cobbler or Island Indigo marker, Garden Green marker, White embossing powder, Embossing Buddy, Sanding Block, Neutrals Candy Dots

    And we can’t forget!  It’s Day 2 of Birthday Celebrations!

    So, today’s presents for the giveaway are a cool combo goodies to make a project like this yourself.  If you haven’t already checked out the CUTE punch art birthday penguins I posted yesterday and entered yesterday’s giveaway, you should!  Then come back and get in on today’s prizes.

    Northwest Stamper Birthday Weekend Giveaway – Day 2

    imageimage

    Neutrals Candy Dots

    Candy Dot Brad Bases

    Each day I’ll post a new giveaway and you’ll be able to enter up 3 ways (and yes! you can get multiple entries each day!) each day and I’ll draw names on Sunday.

    Enter to win today’s giveaway by any combination of the following:

    • Leave a comment on this blog post sharing what was the last type of card you’ve made. 
    • Visit my facebook page and leave a comment today’s card post sharing what is your favorite crafting accessory?
      While you are there, don’t forget to make sure you’ve liked my page and are getting notifications to ensure you catch all the fun!
    • Place an order online or by emailing me at jennifer@nwstamper.com and get 2 extra entries


    spaced shop now sig bar

  • Favorite Cards using Oh, Hello

    As I was looking through the 25% off Stamp sets with a customer last week, I spotted the Oh, Hello stamp set and remembered how when I originally saw this stamp set in the catalog, I thought it looked like a pretty boring stamp set.  I couldn’t picture how it would come together into anything particularly cute….

    image

    and then we were given the set at Leadership last year and I saw some samples with it….. and I totally changed my tune!

    So, I thought I would share some of my quick and easy cards I’ve made with this set to show how it is a bit more fun than it may seem at first!

    Almost no-layer card with Oh, Hello

    Masking with the Oh, Hello stamp set

    Using up your scraps with sentiments from Oh, Hello

    Press clay flowers and it coordinates with the Oval framelits too!


    I’m also realizing that I use the Thank You sentiment A LOT! ha ha ha.  But I guess I have a lot to be thankful for, so I need them. Smile

    And don’t forget, tomorrow is the LAST DAY of the 25% off Sale and my Anniversary Week giveaway!

    If you’d like to enter the giveaway, all you need to do is:

    • Visit my Online Store to grab these great deals and use the hostess code R2XQXU3
    • Email me which of the goodies above you want to order and I’ll be putting together a group order.
    • On monday, if we have enough orders placed, I will draw a name for at least $25 in hostess benefits and let you get more free goodies!

    spaced shop now sig bar