Northwest Stamper

Tag: wonderous wreath

  • ICS Fall Fun Blog Hop

    It is fully October, if you couldn’t tell from all the Pumpkin Spice EVERYTHING that is in the stores and restaurants!  And that means that we are ready to head out of summer and jump into fall.  To help get you in the spirit and thinking of changing leaves, pumpkins, and all things warm and cozy… the gals at the Inspire, Create, Share blog hop group have put together another fun hop to share with you lots of Fall themed projects!

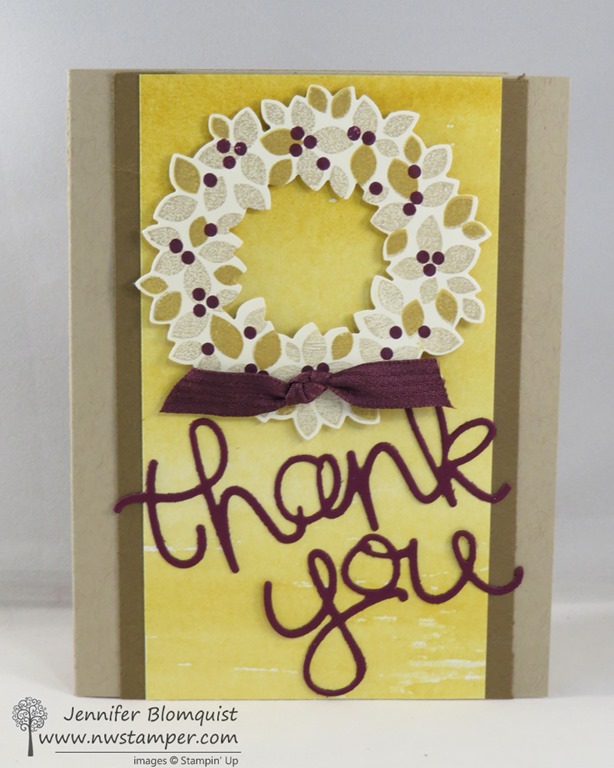
    I wanted to break out some of the great designer paper I had ordered from the Holiday catalog and break out those fall color combinations.  And while I was thinking about what to create, I suddenly remembered this oldie but goodie stamp set – Wonderous Wreath!  Check it out:

    Usually you see the wreath with Christmas or winter colors, but there is no reason why it can’t be fall instead!  I just grabbed my Petals & Paisleys designer paper and flipped it over to the back to look at the label where the professionals at Stampin’ Up have already come up with a great color combination.  I just use it as my crib sheet! Smile  Try this combo on for size:

    TAMS Color Builder (1)

    So, I just used those colors to create my wreath!  The coordinating wreath and bow dies made it a cinch to cut out and then I just needed to start layering it onto my card. 

    Since I had used the colors from the Petals and Paisley designer paper, it was a no brainer to pick my favorite patterns to layer on the left of the card.  Then I wanted to add just a touch of texture so I cut a piece of Crumb Cake cardstock and embossed it with the Woodgrain embossing folder for the perfect backdrop for the wreath itself (don’t forget to sponge the edge of the embossed paper with Soft Suede ink to really distress it!)

    Then I just needed a sentiment and I’m so super in love with this one from the Suite Seasons stamp set in the Holiday Catalog.  You’ve seen me use this sentiment on Very Vanilla cardstock and color in the decorative piece.  But since I didn’t want that accent to take away from the wreath, I left it simple and subtle with Soft Suede ink.

    This card showcases a fun way to use some of your favorite patterns from the designer series paper.  Right now many of the papers are buy 3 get 1 free!  Woo hoo!  I totally spaced and forgot this was a specialty paper, so it isn’t in this sale, but change this up for the Presents and Pinecones designer paper that IS on sale, and make the wreath holiday and you are good to go!

    I hope you have enjoyed this Fall inspiration idea!  Keep on hopping and check out what Candy has in store for you, for even more fun fall ideas.

    Thanks for hopping!

    NWstamper signature_thumb[9]

    order online button for sig 3_thumb[4]

    October Online Stamp Club Hostess Code – YG62GG6C
    Get free exclusive tutorials each month and even get the supplies in a Make & Take kit with your order over $40 when you use the monthly hostess code!

    Project Measurements:

    • Crumb Cake cardstock – 5 1/2″ x 8 1/2″, 2 3/4″ x 2 3/4″
    • Very Vanilla cardstock –3 1/4″ x 3 1/4″, 2″ x 2″
    • Petals & Paisleys designer paper  – 1″ x 5 1/2″, 1 1/4″ x 5 1/2″

    Product List

  • LAST DAY for the Holiday Catalog and one more Sneak Peek with the Hello You Thinlit Dies

    It’s true, it’s the last day of the Holiday Catalog. So if you were wanting some of the items from the catalog, now is the day to make sure you grab them!  Plus, it is also the last day of the Year-End Clearance Sale and many of these great deals will go away after tonight.  There are a few items that are carrying over from the Holiday Catalog and I’ll share that list at the end of this post. 

    In the meantime, I wanted to share one more project that came out of my “Use up all the scraps on my desk” project. Smile

    I had extras of the wreaths that I had stamped and die cut using the Wondrous Wreath bundle, back when I was experimenting with colors for a class this fall.  I kept them lying around and so I though I would finally use them.  I decided to pair them with the retiring Color Me Autumn designer paper (50% off through tonight!) and use the new Hello You thinlits that are available starting tomorrow to make my own unique thank you cards!

    Tips for making this card:

    • The Hello You thinlits include the words “Hello”, “Thanks”, “You”, and “Happy”.  Snip off the “s” on the Thanks and you can create your own custom Thank You sentiment!thank you sentiment from Hello You Thinlit die
    • Just because a paper pack’s name implies it is a “fall” or “christmas” pack… many of the papers can be used anytime!  Like this yellow painted looking paper from the Color Me Autumn pack.  It totally works for anytime of year.
    • When stamping your wreaths, not only mix and match the colors you use, but mix and match the ORDER you stamp them as well!  In the sample above, I stamped first with Hello Honey, then Soft Suede, and then Blackberry Bliss.  In this sample below, I stamped first with Crumb Cake and then did Hello Honey and Blackberry Bliss.  I still can’t decide which I like better. Smile 
    • Don’t want to hassle with a bow? Tie a knot in a piece of ribbon and trim the ends.  Attach to your project with a glue dot! Easy peasy!

    10646980_782080281839792_4434187347945494541_n

    I’m getting excited!  I’m going to try to film a catalog walkthrough tonight of the new Occasions Catalog so you can get the full scoop tomorrow.  So, if you have any questions, let me know and I’ll try to make sure to cover them!

    ———————————————-

    SAVE THE DATE – 4/20/2014!

    Earn your spot at the Saleabration CELEBRATION in April!


    Come to a very special event where I will spoil you!  Sweet treats, specials, sneak peeks, stamping make n takes, gifts, games, prizes and more!

    FREE! You can only EARN your way in!

    1. Host a Saleabration workshop or Private Class  (Hostesses earn 25.00 MORE for FREE! *must be min. 250 in sales)
    2. Purchase the Starter Kit  (Get 2 FREE Saleabration choices! Or a Project Kit!)
    3. Spend at least 150.00 during the months of Saleabration! (Jan.-March)

    Monday, April 20th. (If you qualify and can’t attend, I will mail you the make n takes and gifts that will be passed out!)  This is something new I’m doing this year and I can’t wait to start planning all the fun for this event!
    This is only available through me, Jennifer Blomquist – so shoot me an email at jennifer@nwstamper.com to get the details and save your spot!.

    ———————————————-

    NWstamper signature_thumb[9]

    order online button for sig 3_thumb[4]

    Project Supplies Used:
    (if you are reading this in email, click here to see the list of supplies)

  • Wondrous Wreath Gratitude Card for the Fun n’ Crafty Blog Hop

    Wondrous Wreath Gratitude Card for the Fun n’ Crafty Blog Hop

    Fun n Crafty Blog Hop badgeIn keeping with the theme of Gratitude this month, a few of us from the Fun n’ Crafty Stampin’ Up! demonstrator team put together a mini-blog hop based around the theme of Gratitude.  This was my card I wanted to share with you today!


    I LOVE this Wondrous Wreath stamp set and matching framlits, especially because you can easily cut out your wreath both outside AND IN and have all the little leaf shapes. Smile

    For this card, I used more “Fall” colors instead of the reds and greens like I did on my Christmas Wreath card.  I used the following colors:

    • Hello Honey ink for the full wreath stamp with all the leaves
    • Soft Suede ink for the partial wreath stamp with about 1/4 of the leaves
    • Blackberry Bliss ink for the berries and the bow

    And speaking of the bow, how awesome is it that you don’t have to hand cut that either! Smile  I stamped my bow and cut it out with the matching die but I’ve seen super pretty cards using glimmer paper for the bow or just plain cardstock as well.  Gotta love having options.

    Then you can kind of see the card base is stamped as well.  I used the Hardwood background stamp ….
    (TIP – I love my clearmount stamps, but when it comes to background sized stamps, I ALWAYS recommend to my customers to get them in wood.  Sure, you save a little space when you get it in clear, but then you have to get the $17 clear block to use with it, and in the case of a stamp like this, it is pain in the rear to get the sticker on right onto the back of the stamp!  I just think it is way easier and often more economical to get the background stamps in woodmount.  Though I’ll still love you if you decide you want it in clear. Smile )

    but anyway, I used the Hardwood background stamp in the same color as the paper, which in this case was crumb cake.

    I also made this card the same except for using Sahara Sand as my background instead of Crumb Cake.  Both are pretty… not sure which I like better, actually.  Swing by my Facebook page and cast your vote which paper you like better!

    And now, check out a few more ideas for sharing gratitude this month!:

    10353106_10204078100138887_7954284539736439010_n

    We don’t have a long list this this month so it’s easy to check everything out and enjoy the inspiration!  And please leave Sara and Pam some love on their blogs… I know it would mean a lot to them. Smile

    NWstamper signature_thumb[9]

    order online button for sig 3_thumb[4]

    Gratitude Month Week 1 Free Tutorial – Kinda Eclectic Thank You Card

    use hostess code UCJDBQH4
    See the Catalogs online – Annual Catalog  |  Holiday Catalog  |  Holiday Supplement
    Save more when shopping – Weekly Deals  |  Clearance Rack

    Card Supplies Used:
    (if you are reading this in email, click here to see the list of supplies)

  • Sweet and Simple Christmas Card with Wondrous Wreath

    Nothing like some Christmas cards to start getting me in the mood for the holiday season!  The late fall/winter time is my favorite time of the year!  Yes, there is Christmas and even my birthday, but I just love all the joy that is everywhere, the twinkling lights, the shimmer and sparkle that you see everywhere.  Today the Stylin’ Stampin’ Inkspiration girls are sharing some Christmas card joy and this is my card I wanted to share:

    Isn’t it so cheery?!  I love how easy this stamp set is to make these fun wreaths.  You get three stamps that each add a little bit more to the wreath:

    1. The leaves of the wreath
    2. A few accent leaves of the wreath
    3. The berries for the wreath

    Plus there are handle guides ON THE STAMP that help you line up everything just right!

    I was going to try to explain lining it all up, but I realized you would be so much better served by a video, so I’ll put one together for you very soon!

    Tips for making this card:

    • I like to start with a white 3.5”x3.5” piece of white scrap paper and stamp your image with all the leaves so that the guide (an extra “tail” of the photopolymer stamp) is pointed towards one corner.
    • Stamp your second image with the accent leaves over the top with it’s guide pointing towards the same corner (using the corners helps you remember how to line up your stamps)
    • The berries, just stamp however looks nice to you!

    • Keep it simple by using the matching framelits (Wonderful Wreath – and you might as well get the bundle, because you know you will want it and then you get 15% off both!) to cut out the wreath with both the inside and outside cutting at the same time.
    • And just cut out some cardstock with the included bow framelit to make a pretty bow!  Add a pearl for extra bling.
    • The sentiment even fits inside the fabulous Decorative Label punch.
    imageimage

    Make this at my Holiday Card Stamp-a-Stack!

    If you are coming to my Holiday Card Stamp-a-Stack, you’ll get to make 3 of this card; so you’ll get lots of practice lining up your wreaths. Smile   There is still time to RSVP if you’d like to come!

    Holiday Card Stamp-a-Stack #1
    Jennifer’s House in Bellevue, WA
    10/18/2014 at 1pm
    Make 12 cards – 3 each of 4 designs with envelopes for only $25
    They will be lots of ideas that you can replicate if you want to make more! 
    (Holiday Card Stamp-a-Stack #2 with more card ideas will be Nov 15th)
    RSVP here


    And don’t forget to check out the Stylin Stampin’ Inkspiration blog for even more fun holiday card ideas!

    spaced shop now sig bar

    Card Supplies Used:
    click on any of the photos below for more details and easy shopping!

  • Holiday Catalog Project Inspiration from the Fun n’ Crafty Stampers

    I am so incredibly grateful for my Fun n’ Craft team of demonstrators.  They are an awesome group of crafters and just overall wonderful people.  In our group, we have Pam Wu who has started organizing card swaps for our team each time a new catalog comes out.  We usually have a good amount of people participate and let me say… the cards are off the charts awesome!  So today we thought we would do a little mini-blog hop to share them with you.

    Here is my simple card that I swapped:

    Tips for creating this card:

    • The new Fall Fest stamp set makes this card quick and easy to create because the leaves and pumpkins are all part of the same set.  Plus, with matching framelits, cutting them out is a snap!  So, definitely grab the bundle and save 15% while you are at it.
    • Use the same color ink as your card base for stamping the little leaves randomly all over the front of the card.  This gives you a nice tone-on-tone look without being too busy or overwhelming your card.
    • Cut out both pumpkins with the framelits and pop them up on dimensionals for dimension to your card while still keeping it super simple


      Use a small strip of the Burlap Ribbon to give it a real fall look.

    And for the sentiment, I used the Host Special stamp set – Good Greetings!

    Good_Greetings

    This set is fabulous, especially for holiday cards and you still have time to get it free!  Host a party (it can be in person or an online only party) or place a $300 order and you’ll get it free on top of your regular hostess benefits.  Email me at jennifer@nwstamper.com if you would like to set something up so you can get it! Smile

    See more amazing Holiday Catalog samples here –

    We had 4 more people participate in the swap (just for one reason or another, they weren’t able to participate in our little blog hop) , so I’ll be sharing their cards here on the blog tomorrow!  I hope you can come back and join me!

    spaced shop now sig bar

    Hostess Code:  C2HYWWQM Use this Hostess Code and receive a free gift!
    (Please do not use the Hostess Code if your order is $150 or more)

    Card Supplies Used: