Northwest Stamper

Category: Die Cutting

  • Blended Season Bundle – Sweet Friend Card

    Blended Season Bundle – Sweet Friend Card

    We are on Day 4 of my anniversary celebration – hopefully you’ve stopped by days 1, 2, and 3 and left comments to enter to win on each day. 🙂  So, today I wanted to share a pretty card that uses the August exclusive Color Your Season Bundle.

    color your season grapefruit and lime wreath friend card

    This has the beautiful color combination – Grapefruit Grove, Lemon Lime Twist, Granny Apple Green!

    Stamp with the Blended season stamp set and then color in the leaves (stamped in a circle to make them a wreath) using the new Watercolor Pencils assortment 2.  Color at the base of each leaf and blend the color out using a Blender Pen or an Aqua Painter.  It makes beautiful bright color.

    The sentiment is stamped with StazOn onto Vellum and adhered over the stamped image to allow the image to peek through and soften the look of the card.

    Add some die cuts from the matching Stitched Season dies to make a pretty accent in the corner.  Isn’t it pretty?!

    Check out the Color Your Season Exclusive items online

    Anniversary Celebration – Day 4 of Giveaways and Gifts! 

    To celebrate my 10 years with Stampin’ Up, I’m going to be doing 10 days of giveaways!  Its like a week and a half party.

    Each day I’ll have a one-day only gift with purchase, PLUS a free giveaway of the day just by leaving a comment on the blog.  You will have until 8/8/2018 to leave your comments – winners for all 10 days will be announced on 8/9/2018.

    DAY 4 GIFT– Free gift with a $40+ order – Wink of Stella Glimmer Brush!
    you must use host code 3XPZF4KW for orders under $150
    Shop here

    Wink of Stella Glimmer Pen

    DAY 4 GIVEAWAY – WIN A FREE PACK OF SHARE WHAT YOU LOVE ARTISAN PEARLS!

    TO ENTER – Leave a comment on this blog post sharing your favorite type of card or project to create when you have time to be entered to win!  Winner drawn randomly on 8/9/2018.

    Share What You Love Artisan Pearls

    Thanks so much for stopping by!

    Don’t forget you can still enter the Day 1 – 3 giveaways!

    enter to win the Day 1 giveaway | enter to win the Day 2 giveaway. | enter to win the Day 3 giveaway

    Come back tomorrow to check out the Day 5 celebration giveaway!

    Thanks for reading! Shop Stampin' Up by clicking here

  • Wednesday Walkthrough: Birthday Card with the Hello You Thinlits

    In an effort to help encourage myself to stick to the plan to do at least one video a week, and since folks seem to be liking the tutorial videos I’ve posted lately, I’ve decided to start a new feature on my blog – Wednesday Walkthroughs!

    The idea is that each Wednesday, I’ll walk you though a card…start to finish…in a video giving you tips and technique tricks along the way.  So this is the card I’m kicking things off with:

    It is a bright and cheery birthday card that you can make in any color that fits your recipient, especially when you use the retiring Chevron Background stamp!

    Featured Retiring Products:

    Get them before they are gone by the end of the month!

    Tips for making this card:

    • First off, I have to say, this stamp uses a Background stamp, which I love… but I’ve discovered that I don’t love these big stamps in Clearmount Rubber.  They are a pain to put the stickers on the back, if you are like me and have to do a sticker that is perfectly lined up, and I like the comfort of knowing that the rubber won’t move around as I’m doing different techniques with the stamp.  Now, the clear mount stamps work totally fine… I just wanted to share that I *always* recommend getting my background stamps in wood mount.  They make take up a little more room, but I think it is worth it in this case.
    • When stamping along the edge of the paper like I did here, turn your stamp upside down on the table so the rubber is facing up and then ink it up.  Press your paper onto the upright stamp and burnish with a bone folder to make sure you get a solid image.

    • I wrapped my taffeta ribbon around the entire card and glued it down on the FRONT of the card.  I know it sounds strange, but since you will be covering up a large portion of the front with the sentiment, hide your ribbon ends under that paper for a clean look on the rest of the card!
    • Check out the video below if you haven’t used wax paper with your thinlit dies.  It makes getting your die cut out so easy and everything looking perfect!
    • Don’t forget some extra accents, I LOVE my candy dots and they are just the perfect touch for this card, don’t you think?  Use your paper piercer to make sure they are aligned exactly how you want them with ease!  (also shown in the video below)


    Wednesday Walkthrough Video

    Want to make this card with me?  Check out this video and you can do just that!

    (ps – if you are reading this in email, click here to view the video)

    Quick Links:

    So, if you like this idea for a new video feature on my blog, let me know!  Leave a comment here or on the video!  Or shoot me a note over on Facebook.  I love hearing from you and hope to keep bringing you more fun projects soon!

    NWstamper signature_thumb[9]

    order online button for sig 3_thumb[4]

    Project Supplies Used:


  • Non-Christmas Partridge and Pears Card with NEW Sale-a-Bration stamp–Simply Wonderful

    When I first saw this Partridge and Pears stamp set, I knew I wanted to use my Blendabilities to color it – but it took until now to actually color the entire tree!  Turns out it is great for cards anytime of the year, don’t you think?

    I mixed and matched retiring stamps (Partridge and Pears) with upcoming stamps (Simply Wonderful from Sale-a-Bration).  Not at all Christmas-y!  Smile

    Tips for making this card:

    • Stamp the tree image from Partridge and Pears using Memento ink onto White cardstock.  Then color with blendabilities to match the colors and feel you want for your card.  In this case, I used:  Old Olive, Daffodil Delight, Calypso Coral, Crumb Cake, and the Skin Tones.
    • Stamp the sentiment from the Simply Wonderful stamp set to make this an anytime card (starting January 6, it will be FREE with a $50 order or if you join my Stampin’ Up team)!
    • Add the “hi” die cut from the Label Flipcard Thinlit for a fun touch to your sentiment, with a pearl for the dot of the “I”.
    • Use Stampin’ Dimensionals under the center of the sentiment to help make a rippling banner look.

    10885462_782080301839790_8262101909808401812_n

    Yay!  4 more days until the Sale-a-Bration promotion starts and the Occasions Catalog kicks off!  I have more projects to share each day and can’t wait to show you the entire catalog on the 6th!  If you have any questions, feel free to send them in now and I’ll not only answer you now but will make sure to include the answers in my upcoming video.

    Need a catalog?  I’m putting more in the mail and would be glad to send you a copy.  Just email me at jennifer@nwstamper.com and I’ll get you set up!

    NWstamper signature_thumb[9]

    order online button for sig 3_thumb[4]

    Project Supplies Used:
    (if you are reading this in email, click here to see the list of supplies)

  • Wondrous Wreath Gratitude Card for the Fun n’ Crafty Blog Hop

    Wondrous Wreath Gratitude Card for the Fun n’ Crafty Blog Hop

    Fun n Crafty Blog Hop badgeIn keeping with the theme of Gratitude this month, a few of us from the Fun n’ Crafty Stampin’ Up! demonstrator team put together a mini-blog hop based around the theme of Gratitude.  This was my card I wanted to share with you today!


    I LOVE this Wondrous Wreath stamp set and matching framlits, especially because you can easily cut out your wreath both outside AND IN and have all the little leaf shapes. Smile

    For this card, I used more “Fall” colors instead of the reds and greens like I did on my Christmas Wreath card.  I used the following colors:

    • Hello Honey ink for the full wreath stamp with all the leaves
    • Soft Suede ink for the partial wreath stamp with about 1/4 of the leaves
    • Blackberry Bliss ink for the berries and the bow

    And speaking of the bow, how awesome is it that you don’t have to hand cut that either! Smile  I stamped my bow and cut it out with the matching die but I’ve seen super pretty cards using glimmer paper for the bow or just plain cardstock as well.  Gotta love having options.

    Then you can kind of see the card base is stamped as well.  I used the Hardwood background stamp ….
    (TIP – I love my clearmount stamps, but when it comes to background sized stamps, I ALWAYS recommend to my customers to get them in wood.  Sure, you save a little space when you get it in clear, but then you have to get the $17 clear block to use with it, and in the case of a stamp like this, it is pain in the rear to get the sticker on right onto the back of the stamp!  I just think it is way easier and often more economical to get the background stamps in woodmount.  Though I’ll still love you if you decide you want it in clear. Smile )

    but anyway, I used the Hardwood background stamp in the same color as the paper, which in this case was crumb cake.

    I also made this card the same except for using Sahara Sand as my background instead of Crumb Cake.  Both are pretty… not sure which I like better, actually.  Swing by my Facebook page and cast your vote which paper you like better!

    And now, check out a few more ideas for sharing gratitude this month!:

    10353106_10204078100138887_7954284539736439010_n

    We don’t have a long list this this month so it’s easy to check everything out and enjoy the inspiration!  And please leave Sara and Pam some love on their blogs… I know it would mean a lot to them. Smile

    NWstamper signature_thumb[9]

    order online button for sig 3_thumb[4]

    Gratitude Month Week 1 Free Tutorial – Kinda Eclectic Thank You Card

    use hostess code UCJDBQH4
    See the Catalogs online – Annual Catalog  |  Holiday Catalog  |  Holiday Supplement
    Save more when shopping – Weekly Deals  |  Clearance Rack

    Card Supplies Used:
    (if you are reading this in email, click here to see the list of supplies)

  • Elegant Gold Stamping with the Curvy Keepsake Box

    Wanna a peek at one of the boxes we’ll be making in my Too Cute Curvy Keepsake box class?  I had said that we would be making 4 boxes including one that was stamped… but when I went to go actually make the stamped box I stalled out.  I had wanted to use my Endless Wishes stamp set, but had forgotten I had loaned it to a downline member.  So I needed an alternate option and this is what I came up with:

    Turns out Mixed Bunch is a great substitute!  Especially when you use gold and Early Espresso.  Didn’t it turn out nice?

    I used the KRAFT cardstock – it is sturdier and a bit heavier than the Crumb Cake cardstock.  We’ll use Early Espresso ink and Encore Gold ink and then sponge with some Soft Suede ink.  But I really loved the extra touches to add to the bling – like the stamped sentiment which I stamped directly onto the Gold Foil sheets and then die cut out with the Starburst framelits.  Then add some gold sequins and 1/4” cotton ribbon to the top and you are set.

    I think these could be cute favors for events or just nice little gifts.  Can’t you imagine a pretty pile of these?  Smile

    If you would like to try out the fun boxes that you can make with this die, check out this fun class & class by mail I’m running tomorrow!  (Yes! You can still RSVP if you hurry)

    Tuesday 9/30 at 7pm, Panera in Redmond – RSVP here
    $15, save $5 with purchase of the Curvy Keepsake box die
    (Bonus kit – bring a friend and you both get to make the Turkey box for free!)
    Kit by mail option available!

    KIT BY MAIL – Get all the pieces precut and mailed to you in a kit to make all 4 boxes we make in class plus instructions for all of the boxes and the Turkey box!
    Cost is only $15+$3 shipping  (only $10 if you have purchased the die from me!)
    BONUS – have a friend sign up for the class too and I’ll include the Turkey kit for each of you!


    INSTRUCTIONS ONLY – Get access to the instructions for all 5 boxes so you can use your dies and punches at home to make these cute projects.
    Instructions will include all the dimensions, supplies used, and tips for making them as easy as possible!
    Cost is only $4.95  (that is only $1/box!)


    spaced shop now sig bar

    Hostess Code:  C2HYWWQM Use this Hostess Code and receive a free gift!
    (Please do not use the Hostess Code if your order is $150 or more)

    Project Supplies Used

  • Fall Pumpkin Curvy Keepsake Box

    I LOVE the Curvy Keepsake box… it is like punch art in a box!  I showed a quick pic of this project last week but I thought I would share a little bit more about how to make it today!

    The base part of the box and the tag are all created using the pieces that come with the Curvy Keepsake box.  And all it took was a few bits of stamping and inking and I suddenly had a pumpkin!

    Tips for making this box

    • AFTER you die cut out the pieces for the box but BEFORE you assemble them, stamp each side with the long skinny stamp from the Work of Art stamp set using the same color ink as the paper (I used Tangelo Twist from the new In Colors).
    • Make sure when stamping you let some stamped images wrap onto the bottom of the box.
    • To make the “stem”, I tapped my Early Espresso ink pad directly onto to the handles to make them a dark brown BEFORE pulling them through and making the box.

    • Stamp and die cut the leaves using the Fall Fest stamp set and framelits and then adhere to the handle using liquid glue or glue dots.

    I finished out my tag using the new hostess promotion set – Good Greetings.  I just took the “Thankful for You” and only stamped the Thankful!

    Good_Greetings

    Now until Oct. 31,  you will be able to earn an exclusive Good Greetings Stamp Set when your order reaches $300 – that’s in addition to the other benefits you receive ($50 in free product as hostess rewards plus you’ll get at least 7 punches towards a free stamp set from me as part of my Northwest Stamper Rewards program!)  You can do this as a catalog party (where you share your catalog with friends and collect orders), a private class, a home party, an online/Facebook party, or just fill a lot of your wishlist in one big order!  Email me at jennifer@nwstamper.com for more details.

    spaced shop now sig bar

    Supplies Used:

  • Holiday Catalog Sneak Peek–Seasonally Scattered Thank You Card

    I know, I know… I’ve been super slow about getting more Holiday Catalog sneak peeks up!  Eek, my bad!  Well, I have one for you today and I’m sure I will have more for you next week – my holiday catalog preorder just arrived!  In the meantime, here is a card I put together for the Stampin’ Up 2014 convention display boards using one of the sets we were given at convention called Seasonally Scattered.  This is one of the new sets from the Holiday catalog and has this Thanks image along with a “Merry” and a “Love” image with background images speckled behind the letters.

    Tips for making this card:

    1. When I got this set, the first thing I wanted to do was heat emboss (which I did… a lot) but then I wanted to do something different and this image screamed at me to color with my markers. 
      Which I admit took a little bit of time, but it comes out soooo pretty.  The only thing is that there is no outline for the letters.  So I found that to make them extra readable, I outlined the letters with my Hello Honey marker for a subtle emphasis and separate of the letters from the rest of the image.
    2. Add your own little flower element too by punching out a couple flowers using the Itty Bitty Accent Punch Pack and offsetting them for a pretty dimensional touch.
    3. Grab the Autumn Leaves Bigz Die to finish out the fall look and layering them behind your image.
    4. By keeping it all in the 2014-2016 In Color family, you can add lots of accents but not have them get too busy because you know the colors will all coordinate!

    I have lots more projects where this came from with this set and while this set was a little hard to get started with, let me just say there are no end to the ideas and inspiration I saw that make me not sad at all that I have it. Smile 

    Special Invitation to Seattle Area demonstrators

    If you are a demonstrator in the Seattle area and like the idea of getting together with other demonstrators to chat, share ideas, get some new tools and class ideas, then I’d like to invite you to my teams Stamp & Share.  This year I’ve started a new event for my group called a Stamp & Share where we get together for essentially a mini-regional (on a much smaller scale).  We hang out for an entire afternoon (12:30-5pm) and there are stamping demonstrations and presentations, a business presentation, card contest, games, make & take that you can use as a class idea, and of course, Prizes!!  I always feel the more people there to share the better but as I’m getting this started I’m confined a bit on space.  That said, we have room for a few more folks join us and I’d love for you to join us. 

    We’ll be meeting August 23rd at 12:30 in the Newcastle/South Bellevue area.  If you’d like to join us, just register here and I’ll make sure you have all the info!

    spaced shop now sig bar

    August Online Stamp Club Hostess Code – TT2NETD4
    Use this code to get free exclusive tutorials & project kit! Learn more

    Card Supplies Used:

  • Wonderful Word Bubbles for a I Love You Card

    Today I have to share a card that I created for a set of Pictogram Punches stamp set focused display board cards for our Stylin’ Stampin’ Inkspiration convention board.  I knew I had to get this set when I first saw it in the catalog, but when I had to create 4 different cards AND make sure they were cute enough to have on display next to some other very talented ladies… well, I knew I had to get creative.  And somehow this came out:

    YAY!  Isn’t it a fun card?  I often feel like I’m in a design rut when I’m staring at stamps and cardstock on my craft table and so I always get excited when I get my brain going in a totally different direction and something that isn’t a hot mess comes out! Winking smile

    Insight into the design process for this card:

    1. I started out with the idea that it would be fun to use the Word Bubble framelits (which by the way happen to be one of the dies that you can get FREE or discounted this month with the Big Shot special… just saying!)
      Anyway, I knew I wanted to use the framelits, but I had to use the Pictogram Punches stamp set, so I set out figuring out which image would work and I liked how the I {heart} U image looked and fit in the squarish word bubble.  So that settled that as my central image.
    2. Then I decided to use more word bubbles to emphasis my sentiment.
      So I pulled them all out and started experimenting with how to layer them together.  I ended up with something like this:

    3. Awesome…. now to figure out paper.
      I decided to use the Back to Black designer paper since I wouldn’t have to worry about it being too busy color-wise.  I could just focus on mixing and matching patterns.  I pulled out all the papers and picked 4 patterns that I thought would work in the small format of the die cuts and would go together ok.
    4. Somewhere in here I decided that I needed to add some texture to the card… either that or I had an extra piece of Sahara Sand that had already been embossed with the Stylish Stripes embossing folder and I decided to use that.
      I have a tendancy to do that… see something laying on my desk and jamming it into whatever project I’m working on at the moment.  You might say I’m desperate to use up scraps that I can’t bear to recycle or toss!
    5. I also thought that I needed a pop of color to break up the black and white, so here comes the Silver Baker’s Twine and then a splash of Real Red taffeta ribbon.
    6. Then I started putting down my die cut pieces.  Here is what it looks like before the sentiment got added.
      Yeah, I’m too lazy to actually trim off parts of the word bubbles so they just get flipped around so extra bits are hidden by the main sentiment. Smile

    7. Finally, I stamped the sentiment and cut it out using my Word Bubble framelits.  And for a final touch of color, I stamped again with Real Red ink and punched out the heart using the Itty Bitty Accent Punch Pack and layered that on top with yet another dimensional.


    Each card is like a puzzle, you just have to keep moving and turning the pieces until they suddenly all fit!  Eventually – and with a big enough hammer – they will fit for you. Smile

    And if you want to try this at home, don’t miss out on getting these framelits and the Somethin’ Somethin’ stamp set for FREE with the purchase of a BigShot or get the bundle for 15% off through the end of the month.


    Thanks for stopping by and congrats to everyone with Stylin’ Stampin’ Inkspiration for making to 1 year of regularly awesome projects, ideas, and inspiration!
    Now you can follow us on Pinterest or even like Stylin’ Stampin’ Inkspiration on Facebook!

    spaced shop now sig bar

    August Online Stamp Club Hostess Code – TT2NETD4
    Use this code to get free exclusive tutorials & project kit! Learn more

    Card Supplies Used:

  • Friday Favorite–Amazing Birthday the Display Board Swap Card

    Friday Favorite–Amazing Birthday the Display Board Swap Card

    Today over on the Stylin’ Stampin’ Inkspiration blog, the girls are sharing some of their favorites items.  I thought I would do a spin on that and share one of my favorite Convention Display Board cards and the stamp set that I loved working with – Amazing Birthday.  Like I’ve said before, I really like that this set is not just about Birthday but can be used for thanks, guys, or anything in between.  But in this case, I stuck to birthday and my favorite shape of the season – STARS!! No joke, I am so digging the stars thing right now and when I finished this card, it was the first one from the set of display board projects that I really got excited about.  So much so that I used it for our group swap where we picked on of our cards from the board to create and trade.

    (SPOILER ALERT! If you love stars, get excited because in the upcoming Holiday Catalog, there is a stars embossing folder & a stars confetti border punch!!! Um, yes please!!)

    Tips for creating this card:

    • Pick a neutral color and then two contrasting colors (I picked Crumb Cake, Pacific Point, and Hello Honey) and then repeat them all over your card.  Don’t be afraid to use a non-traditional color for your shape like blue for stars.
    • Offset your die cut images for a more interesting look.  You’ll notice that I had the Hello Honey banner aligned with the edge of the Crumb Cake whereas the Pacific Point is aligned to the edge of the card base.
    • Sponge the edge of bigger cardstock elements (like the the bigger star) to help them have more dimension even if you don’t pop them up on a dimensional.  Often just using the same color as the cardstock is enough.
    • When die cutting a shape with the matching framelit, like I did here with the banners, USE the Magnetic Platform!  Yes, you can use a post-it note… or the hope really hard methods Winking smile  but you will have a better time getting an even edge around your images when you use the magnetic platform because it is strong enough to keep the framelit where you set it!

    Card Supplies Used

    Oh, I forgot to mention, the sentiment is actually hand cut out… and yes, that Happy doesn’t have the dark line to the left of the “H”… that is intentional. Smile When I was doing this for a swap, I cut long strips for Whisper White cardstock (around 1.25” wide) and stamped my sentiment on the strip and then trimmed down with my snips to the narrower width. But this is a fun color combination, so grab some cardstock and give it a try with your projects.  I hope you enjoy it as much as I did!

    spaced shop now sig bar

    July Online Stamp Club Hostess Code – 7RDHVEKR Use this code to get free exclusive tutorials & project kit! Learn more

  • Amazing Birthday Thank You Card–Display Board Sample

    Amazing Birthday Thank You Card–Display Board Sample

    I’m back!  Display Board Stamper logoI made it home from the 2014 Stampin’ Up convention and had a great time.  As I mentioned before, I was honored to be invited to create samples for the display boards this year.  Everyone coming to convention received 3 stamp sets – Amazing Birthday, Kinda Eclectic, and Seasonally Scattered (coming soon in the 2014 Holiday Catalog).  So, as display stampers, we received our sets early and were asked to make 8 projects for each stamp set.  I will admit, this was an intimidating task, especially when I learned the caliber of stampers who were joining me with creating for the boards.  I eventually decided to just think of it as “they will make the stunning over the top cards and I’ll make the simpler card class versions” Winking smile.

    I wasn’t allowed to post or share my samples until after Convention, so here we are and I’m excited to start sharing with you!

    Thank You card with Amazing Birthday

    When I first saw this stamp set, I kept thinking I needed to make birthday cards.  But then it hit me, there is this sentiment that doesn’t need to be birthday at all!  So, I started pulling different colors and stamped images together to create this card.

    But you want to know the best part?  I mailed this card in to Stampin’ Up in the beginning of June (so they could get the Display Boards together in time) and then on the last day of convention, Shelli Gardner showed this card during her main stage presentation!

    Sure they aren’t exactly the same, but my the similarities are there!  It made me feel extra proud of my card that I could have had a little moment where my design idea overlapped with the creative inspiration from the head of Stampin’ Up!

    In both cases, we used the striped banner stamp to form a layer between the Starburst pieces – hers pointed out and mine pointed in (you can’t see the banner tips because they are under the Pumpkin Pie starburst.  Plus that super fun Surprise circle for our center element.  With everything popped up on dimensionals of course!

    Oh, here is the stamp set we were both working form so you can see what we were using!image

    Amazing Birthday stamp set (wood mountclear mount)

    Card Supplies Used:

    Also, many of the Display Board stampers are sharing their convention projects up on a Convention 2014 Display Board Stampers board on Pinterest.  So, watch that board for lots more great ideas over the next month or two!

    spaced shop now sig bar

    July Online Stamp Club Hostess Code – 7RDHVEKR
    Use this code to get free exclusive tutorials & project kit! Learn more

  • Quatrefancy Window Sheets for Scrapbooking

    Stylin Stampin Inkspiratin DT badgeOk, so I know I promised to share some projects with the Christmas Star single stamp today… but that was before I remembered that today was the Stylin’ Stampin’ Inkspiration’s scrapbook sketch for the month!  I love playing along with sketches and I don’t scrapbook nearly enough…. so design team duties came first today.  But, I do have my Christmas Star projects and post ready for you… it is just moved to Wednesday now.  I promise this time. Smile 

    But, I still have a fun project to share today!  The amazing Jennifer Campbell put together a great sketch this month and I love it because it was so easy to put together an interesting layout with it.  In fact, this page came together from looking at the sketch to done in less than an hour!!

    September Scrapbook Sketch Layout

    September 2013 SSI scrapbook sketch layout


    I have a stash of photos that I know I want to scrap that I got printed at Costco a couple months ago, and so I grabbed the pile and started flipping through until I found the perfect photos I wanted to scrap.

    It was so special to me this year at convention that I had a group of downline who were able to attend with me and share the awesome experience.  And it was so fun to have some friends to cheer with, lounge with, or just share ideas we saw or heard around the convention center.  I really am lucky to be able to call these gals my friends!

    Once I found the pictures and looked at the sketch, I knew I wanted to recreate the group bag tag for my main embellishment.  I used the Fun Flower die to create the same shape, added the Fancy Flower punch, and then a 1-1/4” circle punch out of designer paper.  Then, instead of our group name, I used the Banner Greetings hostess set to create my sentiment and as a throwback to the banner shape in the original sketch.

    My other fun variation was to use the Quatrefancy window sheet that comes with the Quatrefancy Specialty designer series paper.  This is one of those papers that often you look at and think,” how in the heck am I going to use this?”  Well, I loved the subtle pattern effect it gave and thought it would be a great accent to pull out the pattern from the Convention backpack we received this year.  Since the pattern was the same, it was a great way to tie together the photos, designer series paper (from the same pack) and the background paper.

    Using window sheet papers this way is great because it is EASY to figure out adhesive.  If nothing else, you have a HUGE piece of cardstock (from your photo mat) that will be covering up parts of the window sheet strip, and so you can happily put adhesive in that area.  And in this case, I decided to layer some Pear Pizzazz taffeta ribbon over the top, and so I could also run a strip of adhesive across the window sheet to glue it to the base cardstock and then just adhere the ribbon over the top of the window sheet to hide the glue.  Sneaky, huh?!

    So, there you go.  A fun, easy sketch and some ideas to get you started.  If you want to play along and try it out yourself, you can use the sketch above and then hop on over to the Stylin’ Stampin’ Inkspiration blog to add your finished photo to the Linky there.  Or just visit to see other great takes on the basic sketch.  Have fun!

    Card Supplies Used
    Stamps – Banner Greetings
    Ink – Midnight Muse
    Paper – Pool Party Core’dinations cardstock, Quatrefancy designer paper, Pear Pizzazz cs, Whisper White cs
    Accessories – Big Shot, Fun Flower die, Fancy Flower punch, 1-1/4” circle punch, Pear Pizzazz taffeta ribbon, Rhinestones

    spaced shop now sig bar

  • Getting Out of a Crafting Slump w/ a Holiday Catalog Hop!

    I know me, and once I let life overwhelm me and I set my crafting aside because I’m busy trying to deal with the house, family, etc; I find myself getting into a crafting slump.  You know, that time when you look at your craft supplies, get so excited to create something cute (or find yourself needing that last minute birthday card) and you sit down at your table….. and just stare at your supplies.

    That was me.  I saw so many great ideas at convention, had some cool topics for blog posts, but was having the hardest time finding the mojo to get started.

    But – that is why I said YES! when I was invited to join the Stylin’ Stampin’ Squad and their monthly blog hops.  Because I know me and to get me out of my slump, I needed a theme to focus on and a deadline that I had to get it done by. Smile  And it worked for me!  I sat down with a few ideas, started pulling out some paper and by the time I was done with my first card I had ideas for a few more and couldn’t wait to have time to play more!

    August Blog Hop – Holiday Catalog Projects

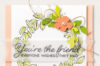
    Card 1 – A Stenciled Halloween

    When I first checked out the Holiday Catalog, I wasn’t too excited by the Build-a-Banner kits.  But then I saw all the fun projects created with them at convention and I had a major change of heart.  I love the banners and can’t wait to make my first one, but I was even MORE excited by the stencils!  I know, I know, there isn’t anything new about stencils, but –hey- they are new to me! Smile 

    And for my first attempt with them, I figured why not try to do some heat embossing while I’m at it?  I don’t own any current halloween stamps but I loved the fact that I could still do spooky without even needing a stamp at all!

    So to make the “boo” on my cardfront, I tapped and smeared VersaMark ink over the stenciled opening (starting with the “b”) and quickly picked up the stencil, sprinkled white embossing powder, and heated with my heat gun.  Then repeat for each letter as you go through the word.

     how to heat emboss with stencils

    The rest of the card came together quickly as well because I used the new Witches Brew designer paper which had those cool orange spiders in the perfect spacing for me.  Sponge the edge with some White craft ink and layer over a Basic Gray cardbase and you are done! 

    Card 2 – Bow Tie Celebration!

    But one card just wasn’t enough for me.  I told you, when I was done I had more ideas I wanted to play with.  Well, this next card was using the new Gift Bow Bigz Die.  I had seen a card by Ronda Wade that had a more flat looking bow and I wanted to try to create one myself.  Ta-da!

    The neat thing about this bow is that all the pieces for it is cut out of 1-sheet of designer paper from the new Season of Style designer series stack (you know, those paper stacks that are 4.5” x 6.5”?)

    See, check it out

    gift bow cut outs

    Then all you have to do is cut that top die cut shape in half to make your two flat bow “loops”.  I found that if you lined up a flat edge at 2” you will cut straight down the middle too.

    cutting to make a flat bow


    I glued my bow together with sticky strip and Stampin’ Dimensionals and adhered it over some of the new Burlap Ribbon.  Finally, I stamped my sentiment from Seasonal Sayings but thought it needed some extra pop so I coated it with Crystal Effects.  Makes it feel more like a celebration to me. Smile 

    And with that, I even created one more card for tomorrow’s blog post and I’m back in the groove!

    So if you are in a mojo slump, here is my challenge to you!

    1. Visit the incredibly talented stampers participating in this month’s blog hop (see the full list below)
    2. Find 30 minutes this week and head to your craft room
    3. Pick an item you were excited to purchase, but haven’t even used it yet! 
    4. Create something, anything, even if you have no idea what to make, start cutting and stamping using the item you picked.  Copy a project you’ve seen on the hop or visit one of the many great challenge blogs and inspiration blogs out there to help get you started if you need it.
    5. Finish and share your project by 8/16! 
      Show it to a friend, post it on Facebook, or come back and leave a comment that you’ve completed the challenge and share it with me!  Feel free to link to your project too so we can see what creative project you’ve created.

    Ready to be inspired?

    Check out all of the great talent in this month’s line up!

    Blog Hop Participants:

    Enjoy and have fun creating!

    spaced shop now sig bar