Northwest Stamper

Tag: thank you card

  • Get Cards Done Fast with the Happenings Card Kit

    Do you ever find yourself thinking,” I really want to get crafty… but I’m not creative”  or “I would love to sit and stamp but I don’t want to pull everything out”?

    Or maybe you love the idea of relaxing and creating but have no brain cells left to come up with a project to do!  (**raises hand…this is me most nights right now!**)

    Well, I wanted to help give you hope and share some ideas that will help you get the fun and fire for creating back without too much thinking or supplies required!  I know, awesome, right? Smile 

    Fun n Crafty Blog Hop badgeToday is the monthly blog hop for the Fun n’ Crafty stampers and we are sharing projects created using some of the fabulous kits available from Stampin’ Up.  So, make sure you stop by everyone’s blog so you can see even more ideas (and super cute ideas!) that are made so much easier thanks to the power of kits.

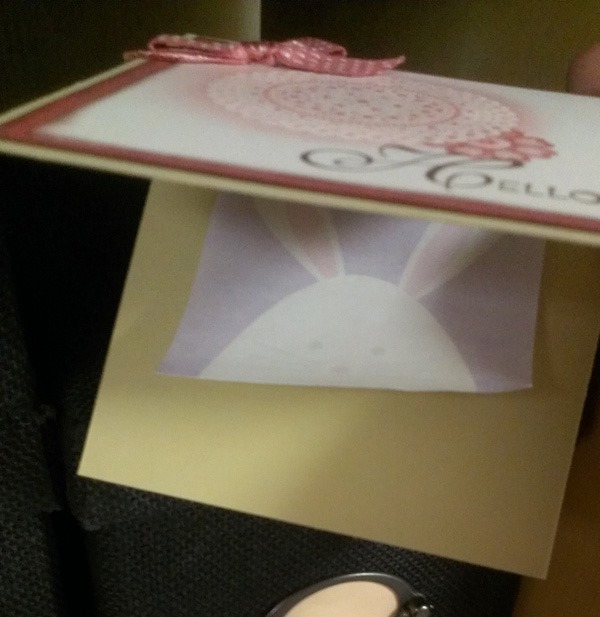
    Today I’m sharing the Happenings Card Kit

    happenings card kit

    In this kit, you get all the paper, envelopes, and accessories to make 15 cards!  All for only $14.95… beat that Hallmark! Winking smile

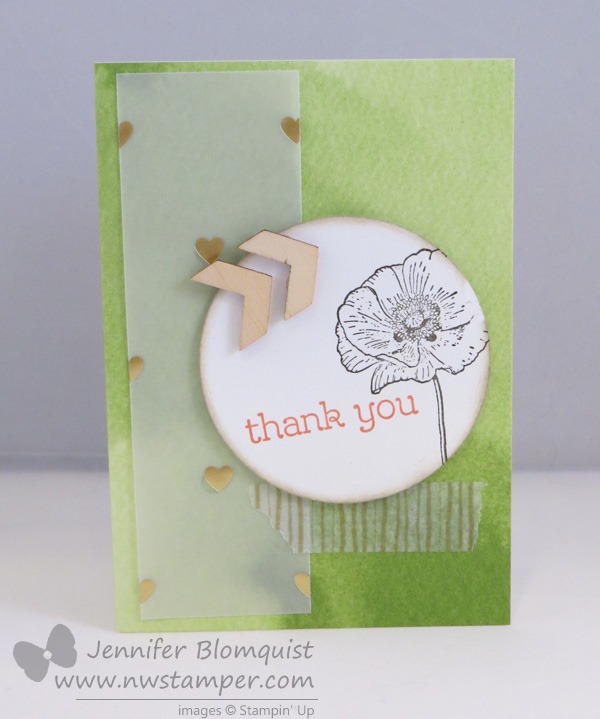
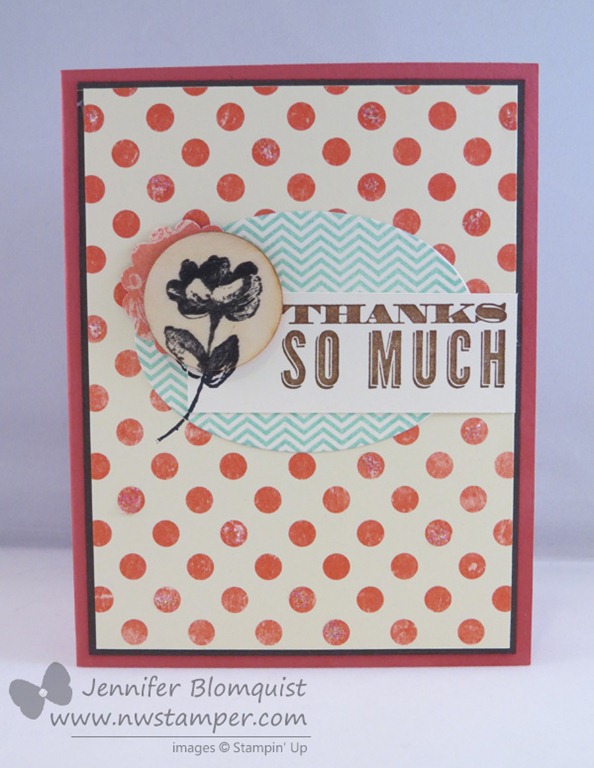
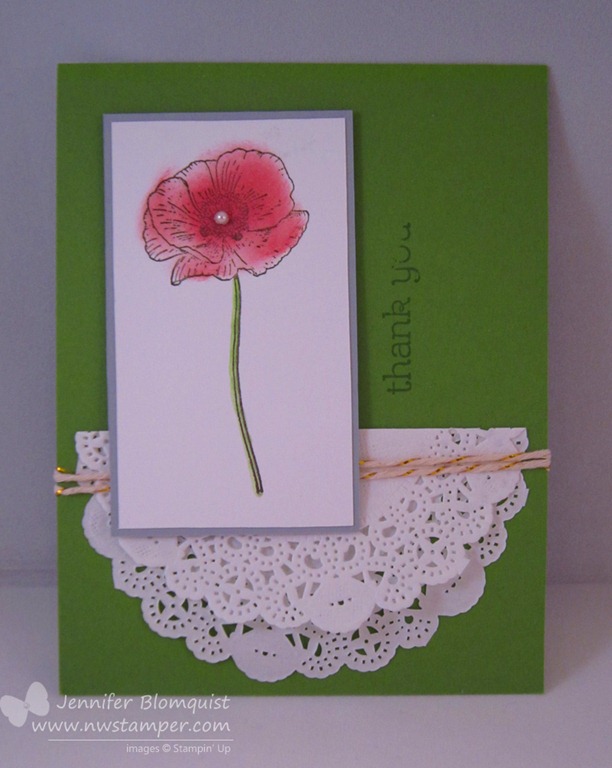
    So, in the kit they give you 3 examples to work with, but I thought today I’d share a few of my own.  I only use supplies from the kit no supplementing, no extra scraps from my craft room.  All I added was some ink and a Thank You stamp!

    or go vertical like these:

    or this:

    See you can totally do that!  And it is cute and fun to give to someone… which is the whole point of making cards, right?  Well, at least one of the main points.  I mean there is something to be said for experimenting with paper and for getting your hands messy!

    And this is only one of the many kits available to make your crafting fun and easy! 

    For example, the Hip Hip Hooray kit lets you make 20 fun cards and actually INCLUDES a stamp set!  Wanna hear the bonus???  It is on the Weekly Deals this week and so is only $14.96!!! No way, right?  Total score.

    But check out what the other Fun n’ Crafty ladies are making this month and see what other awesome inspiration you find!


    Join our Fun n’ Crafty Group & Get Free Paper for 6 months!

    For real!  If you can’t tell, our Fun n’ Crafty group loves creating and loves sharing our crafting journey with each other and with you.  And if you want to come celebrate your love of crafting with us, you can get a SWEET BONUS for picking up the starter kit and joining us – a pack of designer paper of your choice for FREE each month for 6 months! 

    1. First – Pick out $125 in your favorite items from your wish list and order them as your demonstrator starter kit.  You only pay $99 plus tax… the shipping & extra $26 in goodies is FREE!
    2. Next – starting in November, each month as you place an order, add on the pack of paper that strikes your fancy and add it to your order for FREE  (excluding specialty or paper stacks)
    3. Repeat for the next 5 months!

    You’ll get all the fun and perks of being a demonstrator plus free paper on top!  If you have any questions, let me know as I’d love to share with you more about how it works and why I love what I do. Smile  You can email me at jennifer@nwstamper.com.

    Get Started Here

    Stamp, Stock, and Save starts today!

    Stampin’ up is a sponsor of World Cardmaking Day which is October 4th this year.  To help with the celebration, and to encourage you to actually mail the cards you create, you can save 15% on select ink pads, cardstock, adhesive, and envelopes!  Plus, there are a few stamp sets that you can get for 20% off!  Sweet right?!  See everything on sale here.

    spaced shop now sig bar
    Hostess Code:  C2HYWWQM Use this Hostess Code and receive a free gift! (Please do not use the Hostess Code if your order is $150 or more)

    Need a Holiday Catalog?  Check it out online or email me at jennifer@nwstamper.com to get your copy!

  • Holiday Catalog Sneak Peek–Seasonally Scattered Thank You Card

    I know, I know… I’ve been super slow about getting more Holiday Catalog sneak peeks up!  Eek, my bad!  Well, I have one for you today and I’m sure I will have more for you next week – my holiday catalog preorder just arrived!  In the meantime, here is a card I put together for the Stampin’ Up 2014 convention display boards using one of the sets we were given at convention called Seasonally Scattered.  This is one of the new sets from the Holiday catalog and has this Thanks image along with a “Merry” and a “Love” image with background images speckled behind the letters.

    Tips for making this card:

    1. When I got this set, the first thing I wanted to do was heat emboss (which I did… a lot) but then I wanted to do something different and this image screamed at me to color with my markers. 
      Which I admit took a little bit of time, but it comes out soooo pretty.  The only thing is that there is no outline for the letters.  So I found that to make them extra readable, I outlined the letters with my Hello Honey marker for a subtle emphasis and separate of the letters from the rest of the image.
    2. Add your own little flower element too by punching out a couple flowers using the Itty Bitty Accent Punch Pack and offsetting them for a pretty dimensional touch.
    3. Grab the Autumn Leaves Bigz Die to finish out the fall look and layering them behind your image.
    4. By keeping it all in the 2014-2016 In Color family, you can add lots of accents but not have them get too busy because you know the colors will all coordinate!

    I have lots more projects where this came from with this set and while this set was a little hard to get started with, let me just say there are no end to the ideas and inspiration I saw that make me not sad at all that I have it. Smile 

    Special Invitation to Seattle Area demonstrators

    If you are a demonstrator in the Seattle area and like the idea of getting together with other demonstrators to chat, share ideas, get some new tools and class ideas, then I’d like to invite you to my teams Stamp & Share.  This year I’ve started a new event for my group called a Stamp & Share where we get together for essentially a mini-regional (on a much smaller scale).  We hang out for an entire afternoon (12:30-5pm) and there are stamping demonstrations and presentations, a business presentation, card contest, games, make & take that you can use as a class idea, and of course, Prizes!!  I always feel the more people there to share the better but as I’m getting this started I’m confined a bit on space.  That said, we have room for a few more folks join us and I’d love for you to join us. 

    We’ll be meeting August 23rd at 12:30 in the Newcastle/South Bellevue area.  If you’d like to join us, just register here and I’ll make sure you have all the info!

    spaced shop now sig bar

    August Online Stamp Club Hostess Code – TT2NETD4
    Use this code to get free exclusive tutorials & project kit! Learn more

    Card Supplies Used:

  • Amazing Birthday Thank You Card–Display Board Sample

    Amazing Birthday Thank You Card–Display Board Sample

    I’m back!  Display Board Stamper logoI made it home from the 2014 Stampin’ Up convention and had a great time.  As I mentioned before, I was honored to be invited to create samples for the display boards this year.  Everyone coming to convention received 3 stamp sets – Amazing Birthday, Kinda Eclectic, and Seasonally Scattered (coming soon in the 2014 Holiday Catalog).  So, as display stampers, we received our sets early and were asked to make 8 projects for each stamp set.  I will admit, this was an intimidating task, especially when I learned the caliber of stampers who were joining me with creating for the boards.  I eventually decided to just think of it as “they will make the stunning over the top cards and I’ll make the simpler card class versions” Winking smile.

    I wasn’t allowed to post or share my samples until after Convention, so here we are and I’m excited to start sharing with you!

    Thank You card with Amazing Birthday

    When I first saw this stamp set, I kept thinking I needed to make birthday cards.  But then it hit me, there is this sentiment that doesn’t need to be birthday at all!  So, I started pulling different colors and stamped images together to create this card.

    But you want to know the best part?  I mailed this card in to Stampin’ Up in the beginning of June (so they could get the Display Boards together in time) and then on the last day of convention, Shelli Gardner showed this card during her main stage presentation!

    Sure they aren’t exactly the same, but my the similarities are there!  It made me feel extra proud of my card that I could have had a little moment where my design idea overlapped with the creative inspiration from the head of Stampin’ Up!

    In both cases, we used the striped banner stamp to form a layer between the Starburst pieces – hers pointed out and mine pointed in (you can’t see the banner tips because they are under the Pumpkin Pie starburst.  Plus that super fun Surprise circle for our center element.  With everything popped up on dimensionals of course!

    Oh, here is the stamp set we were both working form so you can see what we were using!image

    Amazing Birthday stamp set (wood mountclear mount)

    Card Supplies Used:

    Also, many of the Display Board stampers are sharing their convention projects up on a Convention 2014 Display Board Stampers board on Pinterest.  So, watch that board for lots more great ideas over the next month or two!

    spaced shop now sig bar

    July Online Stamp Club Hostess Code – 7RDHVEKR
    Use this code to get free exclusive tutorials & project kit! Learn more

  • Watercolor Wonder Notecards Ideas–Day 2 with Wood Chips and Vellum

    Watercolor Wonder Notecards Ideas–Day 2 with Wood Chips and Vellum

    So, I was planning on finishing posting these cards this weekend… but then the family decided to do an impromptu holiday trip to Portland, OR, so we took off and I completely forgot to schedule these before I went.  But now I’m back and have a lot to share with you in the next few couple weeks!

    Today, I was going to share with you the rest of the designs I put together for the Watercolor Wonder notecards.  With these cards, I started pulling in some different elements from around my craft room.  So, here is one of my favorites:

    I started out with the Gold foil vellum and then added the stamped circle with the poppy and sentiment from Happy Watercolor.  But it was just too plain…. so then I added some of the gold Watercolor Wonder washi tape.  And that was better, but it still needed something.

    And that is when I decided to grab my Wood Elements embellishment pack….. They were just the right addition of texture and dimension for me.  LOVE them!

    But these cards don’t have to have lots of layers to be cute.  Like I also really like this card too…. the chevrons come preprinted on the card, so all I had to do was stamp my flower and thank you.  I watercolored the flower with my aqua pen and just to add something to the card, I wrapped some linen thread around and add a subtles designer button, and DONE!

    Can you tell yet that I’m a fan of things that are cute but very quick and easy?  Smile  Seriously, with my two hyper heads running around, I have to squeeze in what crafting I can so while I love lots of layers and intricate projects, I can’t do them that often.  Thankfully I don’t think my friends and customers mind the quick and cute ideas!  (or if they do, they have a great poker face, ha ha!)

    Ok, so here are the last two cards.  They are the same card base (the polka dot background and the flowers come preprinted on the cards).  This was actually the most challenging for me to design with because the flowers are so pretty I didn’t want to completely cover them up, but I also needed to figure out how to have something balanced in the non-flower part of the card.  So, I started with just a simple thank you.

    But since just thank you isn’t enough… gotta have some pizzazz, I added some gold sequins and a daffodil bitty butterfly so I had my beloved dimension to everything.

    They are both pretty much the same except for the sequins…. So what do you think?  Random sequins or straight sequins are better?

    And just to end on a fun note, I thought I would share one of the photos from my trip to Portland.  Near downtown is a mall called Lloyd Center where there is a big ice rink enclosed in the mall.  A couple years ago we were in Portland and we took Nicholas on the rink, so this time Caitlin got her first chance to go ice skating… see, this is a novel thing in the Northwest. Smile  She did awesome and have fun on her one trip around the rink (both kids were ready to be done after one trip around).  I, of course, was the only one from our family to fall over on the ice and I did it in style! Flat on my back, landing head first.  But it was still a great trip!  I hope you had a wonderful holiday weekend as well!

    image

    Quick Dates Reminders:

    So I realized that the dates for when some of these items are no longer available are a little confusing so I wanted to give everyone a quick reminder of how it works this year:

    • The Occasions Catalog items (like the Happy Watercolor stamp and the Watercolor Wonder Notecards used above) are available until June 1st
    • The NEW Annual Catalog items are available starting June 2nd
      (need a catalog?  Fill out my request form here)
    • The Retiring items (everything on the discountinued Stamp list or discontinued Accessory list) is available WHILE SUPPLIES LAST through June 4th

    Make sense?  If you have any questions just shoot me a note to jennifer@nwstamper.comSmile 

    spaced shop now sig bar

    May Online Stamp Club Hostess CodeZUBHUEK6
    Use this code to get free exclusive tutorials & project kit!Learn more

    Stampin’ Up! Supplies Used (for all cards in this post)
    Stamps – Happy Watercolor
    Ink – Stazon, Gumball Green, Calypso Coral, Daffodil Delight, Tangerine Tango
    Paper –Watercolor Wonder Notecards, Whisper White, Gold Vellum, Daffodil Delight
    Accessories – Watercolor Wonder washi tape, 2-1/2” circle punch, Wood Elements accessories, Gold Sequins, Aqua Pen, Bitty Butterfly punch, linen thread

  • A Quick Thank You With Oh Hello

    A Quick Thank You With Oh Hello

    I know yesterday I promised a post today with more variations of the Rainbow Happy Watercolor card I shared yesterday… but then I remembered this afternoon that I was supposed to be sharing a card using the soon-to-be retired Oh Hello stamp set as part of the Stylin Stampin’ Inkspiration blog team!  Oops!

    So, I gave the stamp set some love this afternoon and here is my card to share with you:

    You see, I also have a TON of designer paper to get through, so why not enjoy it by using it as the big background of my card?  This is from the Etcetera designer paper pack.

    And because I thought the polka dots needed a little extra something, I used my Dazzling Details for some extra bling….

    Can you see it?  I always have the hardest time taking pictures that really show off the sparkle. Smile 

    And finally, did you notice my FAVORITE part of the card?  I’ve had these Wood embellishments for a while but its only recently that I’ve really started reaching for them and man they are a fun way to do something different with your project!

    You see, I love dimension and I love texture… so something that gives me both is always fab.

    I stamped my flower from the Oh Hello set on the wood chip using Stazon so it wouldn’t feather and bleed in the woodgrain.  Then I stamped again on the front of the card – BEFORE – I glued down the wood piece so I could use if for a new take on the old Spotlight technique.

    And in case you are curious, the chevron oval is actually the stamp from the Oh Hello stamp set and I cut it out with an Oval Framelit because, well, I had them and so why not?

    Don’t Forget – Check out the NEW weekly deals that were released today!

    Enjoy and I’ll be back tomorrow with those extra Happy Watercolor Rainbow card variations. Smile 

    spaced shop now sig bar

    May Online Stamp Club Hostess CodeZUBHUEK6
    Use this code to get free exclusive tutorials & project kit!Learn more

    Stampin’ Up! Supplies Used
    Stamps – Oh Hello
    Ink – Pool Party, Soft Suede, Stazon Black
    Paper –Etcetera designer paper, Primrose Petals, Early Espresso, Very Vanilla
    Accessories – Big Shot, Oval Framelits, Retro Fresh wood accents, Dazzling Details, 1-1/4” Scallop Circle punch

  • A Quick Thank You Card with a Beautiful Butterfly

    A Quick Thank You Card with a Beautiful Butterfly

    I’ve been making a concerted effort to actually use up my scraps.  You know, instead of having bags and boxes stuffed full of scraps…. because I’m a hoarder, I’ll admit it.  I have a good system for managing my scraps but even that can only take so much and so when I have extra punch out or die cuts, I have a new “Use it or Lose it” policy.   And thus, this card was born –

    Yup!  Totally a scrap card!  Smile

    I started with the extra lattice that I had created when I was trying to figure out the technique for a recent class card.  All it takes is the Chevron border punch and some weaving and you are done!  (I have a full tutorial here if you want to try it at home.)

    So, I stamped the Hardwood image on the back of my card and layered on the white cardstock lattice.  Then I needed something to go over my lattice, and that is when my eye caught the butterfly scraps!  The butterflies were left over for a different ombre butterfly card I created (see that card here) and I ended up having an extra of each of the colors, so I stacked them up only this time making sure to stagger them a bit so you could easily see each color.

    Then I added my sentiment for the fabulous So Very Grateful (I’m shedding a tear that this stamp isn’t carrying over into the new catalog!) and it needed something else to ground it, so I added the scrap strip of Crumb Cake cardstock. 

    Psst- if you look closely, you can see that I put it on as an afterthought because I had to tuck it into each side of the lattice… see the empty space in the middle. Smile 

    Quick Reminder:  The butterfly I used here is from the Beautiful Butterflies Bigz die, which is retiring at the end of the month.  I loved it because for my classes, I was cutting up to 6 pieces of cardstock at a time!  Which makes cards like this much easier because you can do one run through the Big Shot to cut out all of your butterflies!  Gotta love things that make your life easier.  See the remaining retiring stamps and accessories online here.

    spaced shop now sig bar

    May Online Stamp Club Hostess CodeZUBHUEK6
    Use this code to get free exclusive tutorials & project kit!Learn more

    Stampin’ Up! Supplies Used
    Stamps – So Very Grateful, Hardwood
    Ink – Soft Suede, Early Espresso
    Paper – Whisper White, Sahara Sand, Crumb Cake, Blushing Bride, Crisp Canteloupe, Calypso Coral
    Accessories – Big Shot, Beautiful Butterflies Bigz die, Chevron Border Punch, Pearls

  • Have I mentioned I Love Happy Watercolor?

    Have I mentioned I Love Happy Watercolor?

    Last September when I was at Stampin’ Up’s Founder’s Circle retreat (seriously, I was so blessed with amazing downline and customers to help get me there!), they gave us the Happy Watercolor stamp set.  When I saw it, I wasn’t quite convinced, but after looking at samples and then playing with it, I was hooked!

    The thing that is awesome is that you can use each little piece in different ways to suit your style and then mix it up for a new-to-you look. 

    In this case, I was playing around with a few ideas including sponging the flower head using a sponge dauber!

    I also busted out my surprise favorite from the catalog, the Gold Baker’s twine to hold down my folded lace doily.

    I’ll be honest, this gold baker’s twine seems to be something people either love or don’t…. mainly because the gold foil bits like to unwind from your cut end of the twine.  But since I usually tack down my ends or only have a little bit of tail for my knots, it doesn’t bother me and it adds just the right amount of glitz.

    Either way, I am so sad this stamp set doesn’t seem to be carrying over into the new catalog.  Guess I need to give it lots of love in the next few weeks! Smile 


    spaced shop now sig bar

  • Fun with Window Sheets and Rainbows for a Card

    Fun with Window Sheets and Rainbows for a Card

    Today I wanted to share another card I created for the Scrapyard Chicks Weekend Workshop (save 10% off your registration by using the coupon code NWstamper).  I’ll be teaching 6 different cards and I was trying to come up with designs that were fresh and a bit different than I’ve done before.  And I just love how this one turned out.

    So, you can make this card with any paper you have at home but I went for some fun rainbow colors that I punched out with a 1” circle punch and adhered to a Baked Brown Sugar cardbase.  But here is where it gets a bit different –

    We add a window sheet over the top and stamp it with White Craft ink!

    I cut my window sheet to 4” x 5-1/4” so it was a little smaller than the front of my card (and more efficient for cutting up your 12×12 sheet that they come in from Stampin’ Up).  I laid it over my card front and then stamped each flower using the Mosaic Madness stamp set on top of each circle and the White ink.  Then I stamped the “and I’m so very grateful” on the card base itself in brown ink.  I found it useful to stamp the “inside” sentiment first because then I could stamp the window sheet just above that brown stamped image.

    Finally, I glued down my window sheet and hid my adhesive by wrapping white baker’s twine around the top of the window sheet.  Add some tiny pearls in the middle of each flower and you are done!

    Tip:  I found that using the White Craft ink on the window sheets take a really long time to dry.  So the sample above is using White craft ink, but for my class I’ll be switching out for White Stazon ink instead!

    spaced shop now sig bar

    April Online Stamp Club Hostess CodeG4VQJ7VB
    Use this code to get free exclusive tutorials & project kit! Learn more

    Stampin’ Up! Supplies Used
    Stamps – So Very Grateful, Mosaic Madness
    Ink – White Stazon, Early Espresso
    Paper –Baked Brown Sugar, Calyspo Coral, Real Red, Pumpkin Pie, Daffodil Delight, Pistachio Pudding, Gumball Green, Midnight Muse, Tempting Turquoise, Raspberry Ripple, Window Sheets
    Accessories – White baker’s twine, pearls, heat gun


    Favorite Products:

  • A Masculine Card with Six Sided Sampler

    A Masculine Card with Six Sided Sampler

    Quick, name a stamp set that you just had to have but have since used once – or not at all!  For me, that has been the Six Sided Sampler stamp set.  I saw lots of cool things done with this set and I loved the hexagon punch that coordinated, so I picked it up last fall.  and I think I’ve used it about twice!  Thankfully, my friend Sarah Naber came to my rescue with this awesome inspiration that is great for guys or gals!

    You know me, I love clean and simple cards – especially if they have lots of great details that are subtle but really add to the card.  And boy does she deliver!

    It is a little hard to see in the first picture, but I like how she stamped the Cherry Cobbler cardstock with the Woodgrain stamp  and then she embossed the Island Indigo cardstock with the Alphabet Press embossing folder

    Add a touch of Linin Thread for one last bit of texture.  Such a great color combination (Crushed Curry, Cherry Cobbler, Island Indigo, Crumb Cake) and use of those hexagons.  I think I have some inspiration to play with again!

    spaced shop now sig bar

    April Online Stamp Club Hostess CodeG4VQJ7VB
    Use this code to get free exclusive tutorials & project kit! Learn more

    Stampin’ Up! Supplies Used
    Stamps – Six Sided Sampler, Teeny Tiny Wishes, Woodgrain
    Ink – Cherry Cobbler, Island Indigo, Crushed Curry, Crumb Cake
    Paper –Cherry Cobbler, Island Indigo, Crushed Curry, Crumb Cake, Whisper White
    Accessories – Big Shot, Alphabet Press embossing folder, Hexagon Punch, Linen Thread


    Favorite Supplies:

    132725s
    128763s
    127802s
    113439s
    130916s
    104199s
  • Have You Seen This in my Thank You Cards?

    Have You Seen This in my Thank You Cards?

    I send out Thank You cards to everyone who places an order with me – sometimes I get a little behind (like in February when we had health issues at home) but I try to make sure I get caught up.  Well, yesterday, I was finishing up the last batch of Thank You cards and getting them ready to mail when I realized I do something that may seem strange to some folks.  So, I thought I’d share a little background today.

    So, what is it that I do that is odd?  Well, when I send out my thank you cards, instead of writing my note on the inside like I normally do for birthday cards, congrats, sympathy, etc, I write my note on a post-it note and put THAT inside the card!

    post it note in thank you card

    I always thought it was clear why I did that… I want to send you a Thank You for your order, but I also want to GIVE you a card that you can use for ideas or for giving away to someone else!  So, I write my note on a post-it so you can pull out and reuse the card.  If you want to keep it for ideas or for yourself, that is awesome.  If you want to share it with someone else, that is great too.

    I was talking with someone I gave a card to recently and when I mentioned I had written on the post-it note so she could re-use it if she wanted, she was surprised and shared that she hadn’t even thought of that.  Smile 

    So, thank you for ordering with me… please enjoy your card, however you choose!  Oh, and want to see the front of this card?  I can’t believe I haven’t shared it yet!

    lovely and lacy emboss resist

    Love, love, love this Lacy & Lovely stamp set!  Pair it with Primrose Petals and some emboss resist technique and it is a really pretty card.  I think I need to spend some more time with my Primrose Petals papers and ribbon before they go away next month! 

    spaced shop now sig bar

    April Online Stamp Club Hostess CodeG4VQJ7VB
    Use this code to get free exclusive tutorials & project kit! Learn more

    lovely and lacy emboss resistStampin’ Up! Supplies Used
    Stamps – Lacy & Lovely
    Ink – Versamark, Primrose Petals, Early Espresso
    Paper –River Rock (retired), Primrose Petals, Whisper White
    Accessories – Heat Gun, Clear embossing powder, embossing buddy, Primrose Petals stitched satin ribbon, glue dots, sponges


    Favorite Supplies:

    122887s
    102283s
    103083s
    109130s
    129053s
    126844s
    101610s
  • A Rugged Thank You Card

    A Rugged Thank You Card

    As I was working on Thank You cards recently, I decided to take a break from all the flowers and pinks that I seemed to be using lately and try to come up with a card that could be useful for a guy or a girl.  I wanted to use my new Starburst Sayings stamp set and framelits and so I grabbed a few stamps and ink colors and started mixing and matching.

    Turns out, I really liked the combination of Elegant Eggplant, Garden Green, So Saffron, and Island Indigo…. what do you think?

    I stamped and cut out two of the images and then cut out an extra piece of cardstock with a bigger starburst shape.  And just to add a bit of something to the cardstock piece, I decided to grab my Chalk pen to add a some faux stitching.

    Oh and my favorite accessory for more masculine cards – Burlap Ribbon!  I love the rugged texture it provides.  So glad it got carried over from the holiday catalog!

    Are you part of the club?
    Did you hear that I’ve started an online stamping club?

    I’ve been running my stamp clubs locally each month and I decided to expand it to my stamping friends who are not able to attend in person.  How does it work, you ask?

    1. Place an order in my Online Store that is at least $25 by the 25th of the month.
    2. Make sure you use the Virtual Club hostess code when you check out (I’ll post the code each month at the bottom of my blog posts)
    3. Within 48hrs, I will send you the password for an exclusive club page with links for PDF tutorials for the 2-3 projects we are making in Stamp club that month with full supply lists for all of the projects.
    4. If your order is $40 or more, then I will mail you a free class kit packet for the club projects so you can make them at home!  Class kits will start going out by the 2nd Thursday of the month.
    5. PLUS – every time you spend $40 you also are getting a punch towards a free stamp set with my Northwest Stamper Rewards program!

    There is no commitment and you can participate one month and skip the next!

    And if you’ve been in the club at any time in the prior 4 months when a new catalog comes out, you will be sure to get one in the mail from me for free!

    If you have questions, shoot me an email at jennifer@nwstamper.com.

    Ready to go? Shop online and use the hostess code XEWP4DFD

    spaced shop now sig bar

    March Online Stamp Club Hostess CodeXEWP4DFD
    Use this code to get free exclusive tutorials & project kit!
    Learn more

    Stampin’ Supplies Used:

  • Sale-a-Bration KickOff Cards–Sweet Sorbet, Banners, & More

    You may have noticed that earlier this week, was the start of Stampin’ Up’s big spring promotion – Sale-a-Bration.  It is a really fun promotion that basically gets you free stuff no matter what you do!  You can

    So yeah, basically everyone wins!

    Anyway, I always like to throw a party when a new catalog comes out and at the beginning of Sale-a-bration.  It is a great excuse to hang out with friends, share samples I go at recent events, let everyone see and try out a TON of new products from the Occasions and Sale-a-bration catalogs, and STAMP!  (what kind of party would it be if there was no stamping? Winking smile )

    Wanna see what we made?  Here you go!

    This was the first card we made and inspired loosely by a card I saw from a German demonstrator named Ines.

    I’ll admit, when I saw Petal Parade in the Sale-a-bration catalog it looked a little boring to me, but let me just say I have been having a blast playing with it and think it may be my favorite stamp set from SAB!  Plus, got to add in that little detail with the cork and the twine from the Sweet Sorbet Accessories bundle.

    Stampin’ Up Supplies Used
    Stamps – Petal Parade (SAB), Perfect Pennants
    Ink – Summer Starfruit, Baked Brown Sugar, Pool Party, Pistachio Pudding, Crisp Canteloupe
    Paper – Whisper White, Baked Brown Sugar, Pool Party
    Accessories – Sweet Sorbet Accessories – Crisp Canteloupe twine & cork stickers (SAB)

    I also really wanted to use the Banner Blast stamp set and Banner punch and so we made this card:

    This card is a more direct CASE from my friend and look-alike, Julie Davison.  I made a few adjustments like changing up the sentiment, making it a standard size card, and using the Decorative Dots embossing folder for the starfruit trim.

    So cute, huh?!

    Stampin’ Supplies Used
    Stamps – Banner Blast (SAB), Sweet Essentials
    Ink – Pool Party, Basic Black, Summer Starfruit, Crisp Cantaloupe
    Paper – Sweet Sorbet designer paper (SAB), Crisp Cantaloupe, Whisper White, Summer Starfruit
    Accessories – Banner punch (SAB), Big Shot, Decorative Dots embossing folder (SAB), stampin’ dimensionals

    The girls who made it to the party enjoyed them and hopefully they give you some ideas to try when you order and get your free Sale-a-Bration goodies too!


    spaced shop now sig bar