Northwest Stamper

Tag: stitched satin ribbon

  • A Card Sketch Thank You Card for SSInkspiration

    A Card Sketch Thank You Card for SSInkspiration

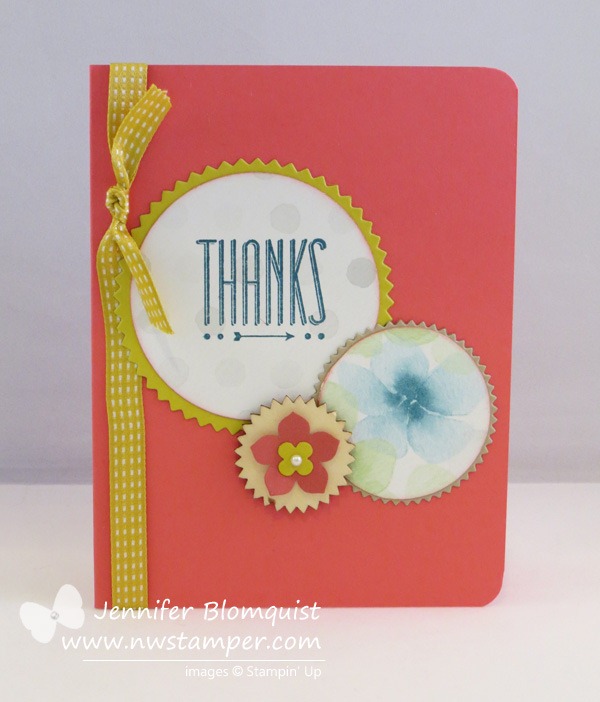
    Today I’m getting back in the saddle with the girls over at Stylin Stampin’ Inkspiration and made a card for today’s card sketch. I actually got some time to do a little crafting yesterday and I thought It would be fun to show some of the retiring 2012-2014 In Colors some love.  So, with a Primrose Petals card base and some Summer Starfruit cardstock, I ended up with this:

    Who knew starbursts could be so pretty!  This is the sketch we are all using, so you can see what I started from….

    I started out knowing I was going to use my framelits for the two bigger pieces, but when it came to the smallest shape, I really wanted to use the wood chip accent from the Occasion Catalog.  I didn’t want it to be plain but I couldn’t figure out what to put on it… then suddenly I realized some punched flowers were the perfect size!  (In this case the Petite Petals punch and the Itty Bitty Punch Pack flower that is retiring at the end of the month!)

    But got to love those starbursts!  And of course, using punches to fill in the centers with some Watercolor Wonder designer paper.  (If you are curious, that is the 2-1/2″ circle punch and the 1-3/4″ circle punch)

    I hope you enjoyed this idea!  It was quick and fun to make. Smile  And lets hear it for those hard working 2012-2014 In Colors as they get ready to ride off into the sunset in a few weeks!

    spaced shop now sig bar

    May Online Stamp Club Hostess CodeZUBHUEK6
    Use this code to get free exclusive tutorials & project kit!Learn more

    Stampin’ Up! Supplies Used
    Stamps – Hip Notes
    Ink – Island Indigo
    Paper –Watercolor Wonder designer paper, Primrose Petals, Summer Starfruit, Crumb Cake
    Accessories – Big Shot, Starburst Framelits, Retro Fresh wood accents, Summer Starfruit stitched satin ribbon, Petite Petals punch, Itty Bitty Punch Pack, Pearls
  • Saying Goodbye to Oh Hello & the 2012-2014 In Colors

    Saying Goodbye to Oh Hello & the 2012-2014 In Colors

    I knew it was coming…. the 2012-2014 In Colors were destined to be retired at the end of May this year, but it always takes seeing the retirement list come out for me to suddenly have this burst of new found love for the colors!  So, as I was trying to decide what card to share with you today, I saw this swap from last year and knew it was a perfect way to send off the In Colors and the stamp I’m going to miss – Oh Hello!

    I was one of those people who didn’t love Summer Starfruit as a color at first.  But doesn’t it look nice when you pair it with other colors?  From the designer series paper (which I need to use more of in general!) to the ribbon…. they are nice touches without it being too overwhelming.

    So that is a tip for you!  If you have a color that you don’t love as a big piece of cardstock or ink… mix it up with some other strong colors and add it to your project in pieces, especially pieces that are patterned!  It helps break it up and make it a great accent piece!

    Yes, pretty much everything about this card is retiring – from the In Color Dahlias (that cute resin flower in the corner!), to the cardstock, markers to color the stamps, designer paper, ribbon, and the stamp!  While the In Color cardstock is sold out, everything else is still available for now!

    View the Retiring Stamps HERE

    View the Retiring Accessories HERE

    Make sure you use the hostess code G4VQJ7VB to received this month’s free online stamp club tutorials


    Retiring Items at a discount with Weekly Deals!

    We’ve been guessing that the weekly deals were a way for Stampin’ Up manage extra inventory or get ready to clear out items that they were going to be retiring.  Turns out that was the case as many of the items that were on the weekly deals showed up on the retirement lists.  This week is no exception!

    weekly deals 4-22-14

    Just a reminder that these items are all retiring and so they are only available while supplies last.  But hey!  You get free shipping and they are 25% off, so SCORE!  Check out any of the items in the online store to grab them before they are gone:

    And just a reminder that the free shipping counts towards anything in your order…. so non-retiring items, clearance rack, online only stamps, as well as the retiring items!  So, enjoy the deal!

    spaced shop now sig bar

    April Online Stamp Club Hostess CodeG4VQJ7VB
    Use this code to get free exclusive tutorials & project kit!Learn more

  • Have You Seen This in my Thank You Cards?

    Have You Seen This in my Thank You Cards?

    I send out Thank You cards to everyone who places an order with me – sometimes I get a little behind (like in February when we had health issues at home) but I try to make sure I get caught up.  Well, yesterday, I was finishing up the last batch of Thank You cards and getting them ready to mail when I realized I do something that may seem strange to some folks.  So, I thought I’d share a little background today.

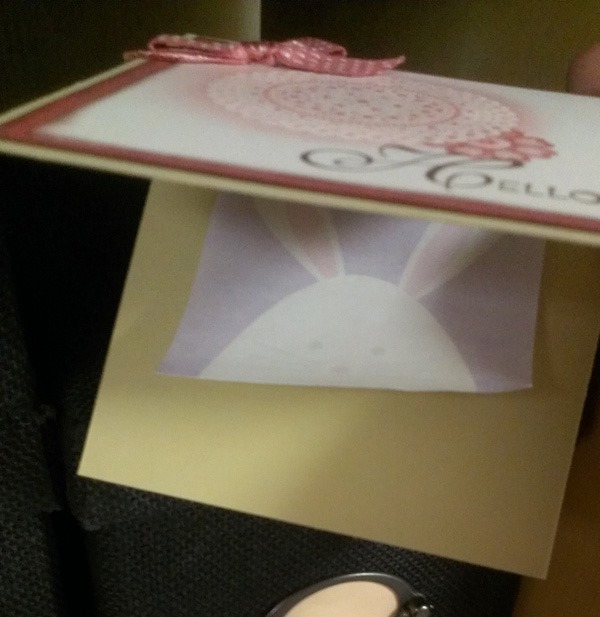
    So, what is it that I do that is odd?  Well, when I send out my thank you cards, instead of writing my note on the inside like I normally do for birthday cards, congrats, sympathy, etc, I write my note on a post-it note and put THAT inside the card!

    post it note in thank you card

    I always thought it was clear why I did that… I want to send you a Thank You for your order, but I also want to GIVE you a card that you can use for ideas or for giving away to someone else!  So, I write my note on a post-it so you can pull out and reuse the card.  If you want to keep it for ideas or for yourself, that is awesome.  If you want to share it with someone else, that is great too.

    I was talking with someone I gave a card to recently and when I mentioned I had written on the post-it note so she could re-use it if she wanted, she was surprised and shared that she hadn’t even thought of that.  Smile 

    So, thank you for ordering with me… please enjoy your card, however you choose!  Oh, and want to see the front of this card?  I can’t believe I haven’t shared it yet!

    lovely and lacy emboss resist

    Love, love, love this Lacy & Lovely stamp set!  Pair it with Primrose Petals and some emboss resist technique and it is a really pretty card.  I think I need to spend some more time with my Primrose Petals papers and ribbon before they go away next month! 

    spaced shop now sig bar

    April Online Stamp Club Hostess CodeG4VQJ7VB
    Use this code to get free exclusive tutorials & project kit! Learn more

    lovely and lacy emboss resistStampin’ Up! Supplies Used
    Stamps – Lacy & Lovely
    Ink – Versamark, Primrose Petals, Early Espresso
    Paper –River Rock (retired), Primrose Petals, Whisper White
    Accessories – Heat Gun, Clear embossing powder, embossing buddy, Primrose Petals stitched satin ribbon, glue dots, sponges


    Favorite Supplies:

    122887s
    102283s
    103083s
    109130s
    129053s
    126844s
    101610s
  • Getting Ready for a Card Bonanza!

    I stayed up last night to start sorting out my card kits for my upcoming Card Bonanza this weekend.  On Saturday, I’m hosting the event at my house and it is an All-You-Can-Stamp crafting event!

    I was shocked to discover that I have over 130 card kits ready to go based on over 50 card designs!  See, this event is what I do to use up all my extra card kits left over from my technique nights, card classes, swaps, and events.  I deeply discount the kits and invite everyone over to make as many cards as they want.

    Here is the scoop:

    • Come and stamp for only $1.50/card
    • Come and stamp as many cards as you want for $10  (you just have to let me know when you get started)
    • Pick up a premade card with envelope from my big stash for only $2

    Can’t attend in person?

    • Get a set of 5 card kits for $11 mailed to you to make at home
      (note – due to Stampin’ Up policy, kits will not include stamped images, but they will include all paper and accessories precut and portioned)

    Either way, that is WAY LESS than Hallmark for some really fun and cute cards!

    Here is a small sample of some of the cards available to make:

    Fun, right?!

    So, check your calendar and if you are free this Saturday (2/22) between 1pm- 5pm, let me know and plan on coming over for this fun event!  RSVP here

    Can’t attend in person but would love some kits?  Email me at jennifer@nwstamper.com or order here and I’ll get you hooked up with some cute card kits!

    Card Kit Grab Bag – 5 card kits shipped w/in the US for ONLY $11!


    Now I’m off to finish pulling all the supplies needed for all the different cards – that is going to take me a while! But it will be fun and I can’t wait to see everyone creating on Saturday.

    spaced shop now sig bar

    Virtual Stamp Club Hostess CodeBNDDMDVU
    Use this code to get free exclusive tutorials & project kit! Learn more

  • Little Bit of Love

    Little Bit of Love

    I have a few more cards to share that have a love theme and so as we work our way to Valentine’s Day in a few days I thought I would post them here for last minute ideas.  Today’s card uses the stamp set that I was so excited to get at leadership and have been woefully slow at using – Love You to the Moon!  I mean, look at these cute images:

    image

    Love You to the Moon – #133143 (clear)/ #133140 (wood)

    I origionally started this card for a Stylin’ Stampin’ Inkspiration design team project themed on using your markers – but I had a little love/hate relationship with the card and ended up doing something completely different.  But, I still like some of the details of this card so I thought I would share it anyway. Smile

    The very first thing that started this whole card off was the diagonal rows of “Love you” on the bottom half of the card.  I stamped most of them in Midnight Muse and YES, I used the stamp-a-ma-jig!  I am an imperfect stamper and am ok with things not being totally straight, but in this case I don’t think even I could have handled the randomness if I didn’t use the stamp-a-ma-jig!  The lone red Love you was colored with markers.  I used Raspberry Ripple for the “Love”, Midnight Muse for the “you” and even Chocolate Chip for the head and tail of the arrow.  Then, to help pull it together, I used my Summer Starfruit maker to create little dots between each of the sentiments.

    After I had the stamping done, I looked at the card and it wasn’t quite sitting right with me.  I loved the look, but I didn’t have a plan for layering anything else on.  So, I started by creating a border using the Watercolor Wonder gold washi tape (both the solid and the stripe patterns).

    Great, that looked good, but now what?

    Well, this is where things started getting haphazard!  I started grabbing scraps of paper and ribbon and stamps and started playing around.  In the end, I liked the pennant idea coming down from the corner so I put those one.

    But they looked too plain, so I tried some faux stitching with my markers.  That was ok, but it still needed something, so I added an additional sentiment to the Raspberry Ripple pennant for a final touch.


    I won’t go so far as to say this is a favorite card of mine, but like I said, I think there are some fun elements to it.  If you have any suggestions for tweaks or improvements, I’d love to hear!  Leave me a comment and when I redo this card, maybe that will help make it look better. Smile

    On a side note –

    If you don’t already get copies of my blog posts each day in email, you may consider Following my blog with Bloglovin.  I currently help people get subscribed using Feedburner but Google has stopped supporting it and so it may stop working when I don’t expect it.  So in the meantime, I’m checking out other options and one option I know a lot of people are liking is Bloglovin.  I’m going to try as well and hopefully love it!

    spaced shop now sig bar

    Stampin’ Up! Supplies Used
    Stamps – Love you to the Moon
    Ink – Midnight Muse, Raspberry Ripple, Markers (Midnight Muse, Summer Starfruit, Raspberry Ripple, Chocolate Chip)
    Paper – Whisper White, Summer Starfruit, Raspberry Ripple
    Accessories – Watercolor Wonder washi tape, Stitched Satin Ribbon (Midnight Muse)

  • A Starry Christmas Wreath for a Card

    Yesterday I shared a post highlighting the 4 holiday different cards I made using this month’s Paper Pumpkin kit, which made some cute Christmas cards.  Well, I ended up with extra star garlands and I had seen a very simple card by Lyssa Zwolanek that used the star garland as a wreath and I thought it looked super cute, so I just had to make my own!

    My favorite thing about this type of card is that it is a perfect way to use up the odds and ends lying around your craft table.  This card used:

    If you didn’t get this month’s Paper Pumpkin, you could recreate this look by using the small star punch from the Merry Minis Punch Pack and then use a sewing machine or hand stitch … or if you aren’t much of a sewer, like me, you can do some faux stitching with a white pen for a similar effect!


    spaced shop now sig bar

  • A Fun Christmas Card and Coloring Tip for Embossed Images

    So, this started out as me trying to figure out the answer to a question for my downline, Liz, about how to get rich color on the top of the flowers from the Petals-a-Plenty embossing folder.  I thought I knew what to tell her, but I wanted to try it out first so I could make sure I told her the right technique (since there are quite a few ways to color with your embossing folder).  Plus it was a great excuse for me to get back into creating videos too!  Yay!

    Anyway, I finally figured it out and then thought I ought to do something with the finished colored and embossed paper, so this is what I came up with:

    Christmas Card with Petals a Plenty and Tag It

    Isn’t he cute?  I finally busted out my Tag It stamp set and used the coordinating Chalk Talk framelits to create the center tag.  Plus I accented it with my beloved Stitched Satin Ribbon in Gumball Green.  It makes it so happy, no?

    Want to know how easy it is to color the flowers on this embossing folder?

    Check out this quick video I made to show you how I did it.  (if you are reading this in email, click here to view the video on my blog)


    Thank you, Liz!!

    Now that I have this technique figured out, you can be sure I’m going to use it a lot.  It is so fast and I love the look.

    I’m also thinking of including this card in my upcoming Holiday Card stamp-a-stacks.  What do you think?  Would you want to make this card? Smile

    And check back tomorrow for another card idea using this same folder and technique.  See you then!

    spaced shop now sig bar

  • The Right Way to Get-away & an Idea for a One Layer Card

    2013-08-30 17.30.12Ever have one of those months where you swear you can’t keep up and yet you look back and try to figure out why you were so swamped?  Well, August apparently was that month for me!  Everytime I thought I was about to get caught up, I had something else that was starting to run behind and needless to say I felt like the proverbial headless chicken running around my house.  Thankfully, I got most of my major projects done before the Holiday weekend and my awesome hubby planned the perfect Anniversary getaway!

    You see, Sept 1st is our wedding anniversary and this year he planned a secret getaway… I had no idea where we were going until we got there!  Plus he was extra awesome and told me to pack some craft stuff to take with us!  Isn’t he the best!

    So we packed up our kids and turned out he had rented a house on the Washington Coast and while the whole family would be there Friday night, Saturday the kids would head off to Grandma’s house and we would have the place to ourselves to relax and enjoy the quiet until Monday.  And relax we did!  Check out my view from the dining room table where I did some crafting: 2013-09-01 15.29.56

    Anywhoo – the trip was fantastic and exactly what I needed to relax and get re-energized!  Hopefully, you were able to enjoy your holiday weekend as well and get some “you” time in as well! 

    I was going to share one of the cards we’ll be making at my Cute and Classic card class this Friday, but I discovered that the photo quality was pretty bad.  So, that will be my post for tomorrow and in the meantime, I thought I’d share an idea for an almost-one-layer card using the Wildflower Meadow stamp.

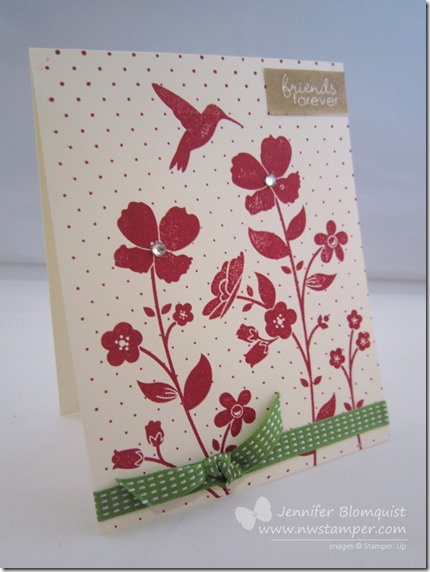
    Since the Wildflower Meadow stamp is basically a background stamp, it does most of the heavy lifting for you in this card.  I just stamped the front of a Very Vanilla cardbase and then added a couple rhinestones for bling on the flowers, some ribbon around the bottom of the card, and a cut out snippet from the Banner Greetings hostess stamp set for the sentiment in the corner.

    If you wanted to step it up a bit, without adding layers, you could use the Wildflower Meadow embossing folder to dry emboss the flowers on the front for a little extra oomph!

    Card Supplies Used
    Stamps – Wildflower Meadow**, Banner Greetings
    Ink – Raspberry Ripple, Baked Brown Sugar
    Paper –Very Vanilla
    Accessories – Gumball Green Stitched Satin Ribbon, Rhinestones

    ** available in a discounted bundle with the coordinating embossing folder


    spaced shop now sig bar

  • Sketched Birthday Card for the Birthday Bash!

    Ahhh… back in the blogging saddle again.  I’ll admit I’m feeling a little rusty (I know it hasn’t really been that long but it feels like ages to me!), but kicking back off with a blog hop is a great way to get the blogging and creative mojo happening again – for sure!

    Summer has finally hit and I’m getting super excited for the Stampin’ Up! convention next week (yay!!!  And yes, like prior years, I’ll be sharing my pictures, excitement, and info while at convention on my facebook page – so watch there for the good stuff Winking smile)

    But that also means this month’s Blog Hop theme – Birthday Bash – is a perfect way for me to get out my enthusiasm because you know birthdays are fun and exciting, filled with clapping and cheering…. or is that just me at parties? hee hee

    This is the card I had to share with you for the hop this month:

    I LOVE this Sketched Birthdays stamp set.  The images are a perfect blend of not quite vintage-y, not too cutesy, not too real…. just kind of funky and perfect for any age… and guy cards!

    Ok, so I used a lot of pink in this card, so maybe it isn’t the most manly… but squint and pretend those are red and brown, or other guy colors and it would totally work!

    I tried doing a close up to show you a fun details that is really cool in person but apparently is impossibly to photograph well, which is adding some Silver Dazzling Details to the scallop around the Happy Birthday, Cupcake image.  I put a dot of Silver Dazzling Details in each scallop and it adds some subtle sparkle that is really nice!

    And YES!  That birthday hat patterned paper is hand stamped paper!  I just grabbed the hat image and stamped it multiple times in different colors until I was happy with the look.  Do that on a full sheet of white paper and you can make a ton of cards lickety-split!


    Have you heard?  A new DAILY inspiration blog for you is coming and I’ll be on the design team!  Join me and some of the very talented monthly Blog Hop Demonstrators as we help give you more daily doses of crafting inspiration! This site will go live the day of our August Blog Hop, August 8th.

    But if you want more inspiration now check out more birthday celebrations at the rest of the folks on this month’s blog hop:

    Blog Hop Participants:


    So thanks for visiting and I hope you come back soon!


    spaced shop now sig bar

  • Vintage Cards for Mother’s Day

    Ok, so these cards don’t actually say “Happy Mother’s Day” on them… but the vintage feel and pretty colors just makes me want them to be Mother’s Day cards!

    Both of the samples I’m sharing with you today came from some amazing creators that I had the privilege of swapping with at Leadership this year.  I love how Whisper White, Crumb Cake, and Primrose Petals come together to make such a pretty combo!

    card created by Jessica Brigden


    card created by Twila Mooneyham

    Which one would you pick for your mom? Smile

    To Order Stampin’ Up! Products Anytime, click here!

    See the Latest Availability & PDFs of all the retiring stamps and accessories here

  • When You Need A Bright And Cheery Card

    how about this one? All you need is some scraps and a couple punches and you have a sunshiney card for someone.  I always seem to make 4.25” x 5.5” cards (since they fit so nicely in envelopes that the post office will mail with a standard stamp) but sometimes just a little card you can tuck into a gift bag, someone’s backpack, or just surprise someone with, is fun to play to with different sizes and shapes.

     Mixed Bunch Oh hello thanks

    This 3×3 card comes together super fast too!  For this card I used:

    Stamps:  Oh Hello
    Paper: Brights Collection Designer Paper Stack, Pumpkin Pie cs, Very Vanilla CS
    Ink:  Early Espresso
    Accessories:  Blossom punch, 1 1/4” circle punch, 1” circle punch, Gumball Green stitched satin ribbon, Snail adhesive

    So, try different colors or sentiments and you can have a rainbow of spring flowers brightening up your crafting space. Smile 


    To Order Stampin’ Up! Products Anytime, click here!

  • Our Snowy Snowy Vacation

    Just when I was sad that we didn’t get any snow in Seattle this year, I learned the day before our trip to Kansas that a winter storm was due shortly after we arrived in town.  And we got in, went to bed, and woke up to tons of snow!

    While Caitlin wasn’t too sure about it (when the snow is above your knees, it’s kind of hard to get around!); Nicholas loved stomping around!

    So, we’ve been a bit busy watching and playing in the snow and visiting family this week. 

    For all of you in the Midwest being affected by this storm, I hope you are all safe and staying nice and warm!  And if you are on the coasts…. well, I’ll throw a snowball on your behalf.  Smile 

    In the meantime, I thought I’d share a bright and cheery card I received at a swap at Leadership.  I love how Kim mixed and matched the bright colors and did the super pretty emboss-resist technique with the Secret Garden stamp set!

    So, enjoy!  And I’ll be back tomorrow with a fun treat box idea for you!


    To Order Stampin’ Up! Products Anytime, click here!

    Are you earning your Northwest Stamper Rewards?

    Every order gets you closer to your FREE stamp set!  Click here to learn more!