Northwest Stamper

Tag: starburst sayings

  • Elegant Gold Stamping with the Curvy Keepsake Box

    Wanna a peek at one of the boxes we’ll be making in my Too Cute Curvy Keepsake box class?  I had said that we would be making 4 boxes including one that was stamped… but when I went to go actually make the stamped box I stalled out.  I had wanted to use my Endless Wishes stamp set, but had forgotten I had loaned it to a downline member.  So I needed an alternate option and this is what I came up with:

    Turns out Mixed Bunch is a great substitute!  Especially when you use gold and Early Espresso.  Didn’t it turn out nice?

    I used the KRAFT cardstock – it is sturdier and a bit heavier than the Crumb Cake cardstock.  We’ll use Early Espresso ink and Encore Gold ink and then sponge with some Soft Suede ink.  But I really loved the extra touches to add to the bling – like the stamped sentiment which I stamped directly onto the Gold Foil sheets and then die cut out with the Starburst framelits.  Then add some gold sequins and 1/4” cotton ribbon to the top and you are set.

    I think these could be cute favors for events or just nice little gifts.  Can’t you imagine a pretty pile of these?  Smile

    If you would like to try out the fun boxes that you can make with this die, check out this fun class & class by mail I’m running tomorrow!  (Yes! You can still RSVP if you hurry)

    Tuesday 9/30 at 7pm, Panera in Redmond – RSVP here
    $15, save $5 with purchase of the Curvy Keepsake box die
    (Bonus kit – bring a friend and you both get to make the Turkey box for free!)
    Kit by mail option available!

    KIT BY MAIL – Get all the pieces precut and mailed to you in a kit to make all 4 boxes we make in class plus instructions for all of the boxes and the Turkey box!
    Cost is only $15+$3 shipping  (only $10 if you have purchased the die from me!)
    BONUS – have a friend sign up for the class too and I’ll include the Turkey kit for each of you!


    INSTRUCTIONS ONLY – Get access to the instructions for all 5 boxes so you can use your dies and punches at home to make these cute projects.
    Instructions will include all the dimensions, supplies used, and tips for making them as easy as possible!
    Cost is only $4.95  (that is only $1/box!)


    spaced shop now sig bar

    Hostess Code:  C2HYWWQM Use this Hostess Code and receive a free gift!
    (Please do not use the Hostess Code if your order is $150 or more)

    Project Supplies Used

  • Blendabilities Technique Fun with Starburst Sayings

    Last week I had my Blendabilities technique class and it was a lot of fun.  As I’ve mentioned before, one of my favorite things about running a technique class is not only to I get to share some really fun ideas and tips with others, but I also spend a lot of time reminding myself and learning more about the technique and really spending a lot of time playing around.  And let me tell you… playing around with Blendabilities is AWESOME!

    You do have your Blendabilties already, right?

    This was one of the cards everyone did and it showed off using Blendabilities 3 different ways including:

    1. coloring in a stamped image using shading (the flower)
    2. coloring in white space on a black stamped image (words in the starburst sentiment)
    3. and coloring in designer paper for a really great effect (the pattern paper strip across the card front).

    BAM!  3 techniques – 1 card!

    Tips for this card:

      • When coloring with Blendabilities, I like to start with the lightest color first and color in all or almost all of the image and then start building up with the darker colors to shade in and get tone and dimension to your image.
      • Don’t forget you can color in stamped images – just scribble over the black ink and white spaces… the marker coloring will fade into the black image and pop out on the white spaces.
      • And if you have designer paper that seems a bit plain or boring to you, spice it up by grabbing your Blendabilties and start shading!  I started with this black and white pattern:
        image
        Then I shaded half of the diamond shape with the lightest color of the Coastal Cabana Blendabilities and then shaded about 1/4 of the shape from the right with the medium shade.  And then finally just added a dab of the darkest color.

    I’m also sharing this card as part of the Stylin’ Stampin’ Inkspiration Stamp Set Spotlight!  They are sharing a number of cards using the Starburst Sayings stamp set which is what I used for that fabulous main greeting.  Plus, don’t you think the starburst is just so much more fun and interesting on a card than a plain circle?  Sometimes you just need those spikey bits. Smile

    Enjoy all the ideas!


    spaced shop now sig bar

    Hostess Code:  C2HYWWQM  Use this Hostess Code and receive a free gift! (Please do not use the Hostess Code if your order is $150 or more)

    Card Supplies Used:

  • Bright Retro Fresh card with Starburst Sayings

    Bright Retro Fresh card with Starburst Sayings

    It’s funny. I tell myself that I’m going to focus on getting caught up on some other tasks I’m behind on (like making sure the last few people who participated in my Online Stamp Club at the end of the month have their project passwords & make and take packets in the mail!)  So, I’m going to wait to edit photos and post on my blog for a few days.  But then after I haven’t posted for 2 days, suddenly I feel like its been AGES and I have the itch to get something to share. Smile 

    So, here I am, pulling out a card to share that I received from my fabulous friend Annie Lee, because YOU need something bright and cheery to send off your Friday! 

    Now, I normally shy away from orange as a main color… I don’t wear it, I rarely buy it…. but times like these remind me that it isn’t as bad as I think!  Smile  In fact, I think it actually makes the card.  It helps the patterns in the Retro Fresh designer paper and the sentiment stand out without needing them to be super bright themselves.

    And she reminded me about those Vintage buttons that have been sitting on my desk for the last 9 months and never been touched… remember those?  I swear, I never would have though to grab a “frilly”, vintage button to go with a modern retro card – but it works!

    And that, my friends, is why doing card swaps and sharing ideas is so great.  It helps you see the supplies you have in a whole new light and give you great ideas to try. 

    Want to swap and share ideas online with me and other crafters?

    I’ve been thinking of putting together a group for sharing ideas and possibly swapping (most likely a group on Facebook).  You wouldn’t have to be a Stampin’ Up demonstrator to participate as I’d love as many people to share ideas as possible.  If you are interested in joining a group like this, leave me a comment, post on my facebook page,000 or shoot me a mail.  If I have enough interest, I’ll get it going and make sure you are invited!

    spaced shop now sig bar

    April Online Stamp Club Hostess CodeG4VQJ7VB
    Use this code to get free exclusive tutorials & project kit! Learn more


    Supplies Used:

    134818s
    132993s
    129327s
    133520s
  • A Rugged Thank You Card

    A Rugged Thank You Card

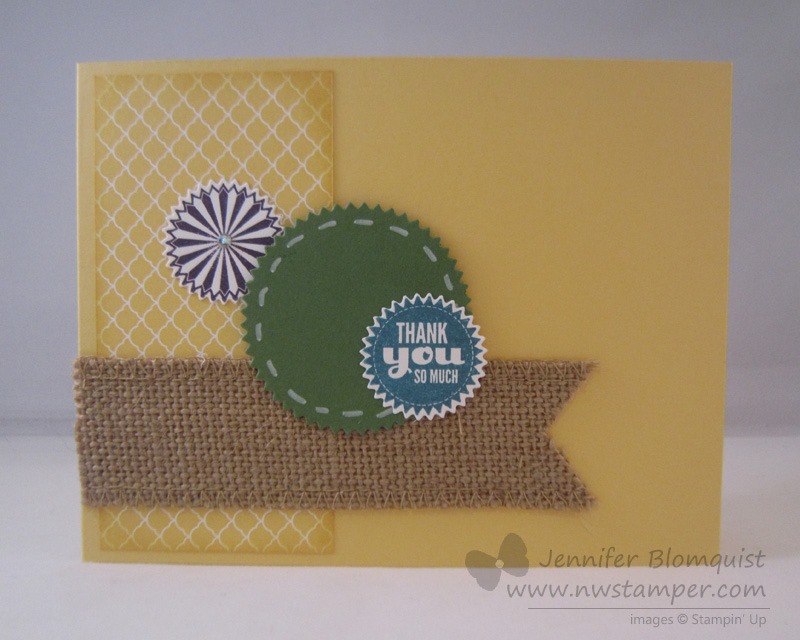
    As I was working on Thank You cards recently, I decided to take a break from all the flowers and pinks that I seemed to be using lately and try to come up with a card that could be useful for a guy or a girl.  I wanted to use my new Starburst Sayings stamp set and framelits and so I grabbed a few stamps and ink colors and started mixing and matching.

    Turns out, I really liked the combination of Elegant Eggplant, Garden Green, So Saffron, and Island Indigo…. what do you think?

    I stamped and cut out two of the images and then cut out an extra piece of cardstock with a bigger starburst shape.  And just to add a bit of something to the cardstock piece, I decided to grab my Chalk pen to add a some faux stitching.

    Oh and my favorite accessory for more masculine cards – Burlap Ribbon!  I love the rugged texture it provides.  So glad it got carried over from the holiday catalog!

    Are you part of the club?
    Did you hear that I’ve started an online stamping club?

    I’ve been running my stamp clubs locally each month and I decided to expand it to my stamping friends who are not able to attend in person.  How does it work, you ask?

    1. Place an order in my Online Store that is at least $25 by the 25th of the month.
    2. Make sure you use the Virtual Club hostess code when you check out (I’ll post the code each month at the bottom of my blog posts)
    3. Within 48hrs, I will send you the password for an exclusive club page with links for PDF tutorials for the 2-3 projects we are making in Stamp club that month with full supply lists for all of the projects.
    4. If your order is $40 or more, then I will mail you a free class kit packet for the club projects so you can make them at home!  Class kits will start going out by the 2nd Thursday of the month.
    5. PLUS – every time you spend $40 you also are getting a punch towards a free stamp set with my Northwest Stamper Rewards program!

    There is no commitment and you can participate one month and skip the next!

    And if you’ve been in the club at any time in the prior 4 months when a new catalog comes out, you will be sure to get one in the mail from me for free!

    If you have questions, shoot me an email at jennifer@nwstamper.com.

    Ready to go? Shop online and use the hostess code XEWP4DFD

    spaced shop now sig bar

    March Online Stamp Club Hostess CodeXEWP4DFD
    Use this code to get free exclusive tutorials & project kit!
    Learn more

    Stampin’ Supplies Used: