Northwest Stamper

Tag: stampin’ up

  • Get the full scoop on the 2016 Stampin’ Up Online Extravaganza!

    Online Extravaganza promo

    With Thanksgiving around the corner here in the US, that means that Black Friday sales and the kick off to Holiday specials!  Well, Stampin’ Up is no exception to the great deals!  They are running their Online Extravaganza for an entire WEEK with bonus deals on the first and last day.  And even better, they actually shared what is on sale to demonstrators early which means I can pass along the sneak peeks to you!

    Also a couple quick reminders:

    • Use the hostess code DSUGDGH4 when shopping online with me to be eligible for your free copy of the Premium Tutorial pack with a qualified order, PLUS everyone who orders using the hostess code between 11/21-11/28 will receive a free sheet of dimensionals from me in one of my handmade thank you cards!image
    • Save even more by purchasing the Starter Kit during the Sale!
      That’s right!  Join my Fun n’ Crafty Stampers team during the sale and you’ll be able to add the sale-priced items to your kit and get a total of $125 worth of product (after the discounts) for only $99 plus get free shipping!  Then you’ll be able to immediately see the upcoming Occasions Catalog on the demonstrator website and be eligible for free copies each month of the new Premium Tutorial Packs!
    • Sale prices start Monday, 11/21 and go through Monday, 11/28.  Some marked items are while supplies last, and retiring items discounted in this sale will not be discounted deeper later in December.
    • Stitched Shapes Framelits will be unavailable starting 11/21 at 10am MST, so you may be able to take advantage of the sale AND the Stitched Shapes dies if you jump on it quick!

    Email me your order early to make sure you don’t miss out on anything! 

    If you know you’ll be busy Monday morning, check out the list below and then send me your order early and forget about it!  I will contact you for your payment details and then make sure to get the order in first things on Monday so you don’t miss a thing.  Email me at jennifer@nwstamper.com.

    Online extravaganza list

    >>> View the full Online Extravaganza list as a PDF here (US items and pricing) <<<

    As always, if you have any questions, I’m here to answer them for you!  Just send me an email or give me a call.

    NWstamper signature_thumb[9]

    order online button for sig 3_thumb[4]

    Premium tutorial pack hostess code_thumb[1]

    Get your free exclusive Tutorial pack from our amazing International demonstrator design team featuring the stamp sets that are on sale this month!  You can get your free copy of this SET of great project ideas by either:

    Placing a $50 Stampin’ Up order with me (either directly or in my online store using the hostess code DSUGDGH4) in the month of November
    Join my Fun n’ Crafty Stampers!  My team gets a copy of this Tutorial Pack for FREE!

  • Foxy Friend Fabulously Fun Birthday Card

    Last Friday was my monthly Creative Cards class – we normally meet the first Friday of the month, but with OnStage Local happening that first weekend of the month, I had to push it back a week.  Well, I was so glad I could because it gave me a chance to play with my new Stitched Shapes framelits (SO FUN!!) and since we had Christmas Cards and Tags classes scheduled for Saturday, I was free to play with all the other fun non-holiday items in my craft room.

    So out came the Foxy Friends stamp set and the coordinating A Little Foxy designer paper, and don’t they come together so cute for a birthday card?!

    I just love how cute and festive this card turned out.  It is perfect for kids or anyone who loves something cute. 🙂  I used the stitched squares to cut out each of the patterns as well as a piece of Whisper White cardstock – the stitching is a little touch but it really adds a lot, I think.

    Tips for making this card:

    • Order makes a difference! First stamp the body of the fox in the middle of the white die cut square.  Then, punch out the body shape using the Fox Builder punch from a piece of computer paper or post-it note.  You’ll use that punch out as a mask – just lay it on top of where you stamped the body before you stamp the tree stump to make it look like he is in the middle of the stump.
    • Lighten Up your stamping!  I didn’t want the tree stump to be too dark and take away from the bright cheery fox, so I inked it up with Smoky Slate ink and stamped first on scrap paper and THEN onto the bottom of the white die cut square.
      Make sure the mask you punched out is over your stamped body before you stamp the stump to make sure no lines go through the middle of his feet. 🙂
    • Little touches bring lots of fun and whimsy – Once you have all the layers put together, add a few extra touches and have them cross over the edges of your layers for a more whimsical look.  Like punching out a head and popping it up on a Stampin’ Dimensional so that it crosses over the edge of the squares.
      Or add a balloon where all the corners meet to make your fox a party fox!
      Or simply add a little epoxy accent like the star from the Subtles enamel shapes to add a touch of color to your sentiment.

    If you want to make this at home, I have the measurements listed for you at the bottom of the post.  But mix and match your colors and patterns for a ton of fun cheery options guaranteed to bring a smile to anyone’s face!

    News Updates and Specials to know about

    stitched shames framelits low inventory copy

    I just learned yesterday that the Stitched Framelits are so popular that Stampin’ Up ran through a couple months inventory in a couple WEEKS! So, while they are still accepting orders now for delivery at the end of the month, they will be making the dies unorderable starting at 10am on 11/21 while they work with the supplier to get more! So, if you had been wanting to get a set, I recommend ordering soon. Get yours here  – Stitched Shapes Framelits

    Also, the Online Extravaganza is coming!

    Online Extravaganza promo

    This weeklong sale kicks off on Monday (11/21) with a set of special 24hr only deals in addition to the weeklong specials.  I just got to see the list this morning before I had to run off to some appointments.  But I want to make sure to share with you so you can be checking your wishlist or telling family which items are great holiday gifts for you!  😉

    If you are on my mailing list, I’ll send out an email this evening with all the details of everything on sale (if you aren’t on my list, sign up here – http://eepurl.com/ueYCf). Then I should have it up in a blog post and here on Facebook tomorrow so we can all start planning.

    NWstamper signature_thumb[9]

    order online button for sig 3_thumb[4]

    Premium tutorial pack hostess code_thumb[1]

    Get your free exclusive Tutorial pack from our amazing International demonstrator design team featuring the stamp sets that are on sale this month!  You can get your free copy of this SET of great project ideas by either:

    Placing a $50 Stampin’ Up order with me (either directly or in my online store using the hostess code DSUGDGH4) in the month of November
    Join my Fun n’ Crafty Stampers!  My team gets a copy of this Tutorial Pack for FREE!

    Project Measurements:
    • Whisper White cardstock – 5 1/2″ x 8 1/2″, 3 3/4″ x 3 3/4″, 2″x2″, scrap
    • Smoky Slate cardstock – 4″ x 4″
    • Pool Party cardstock – scrap
    • A Little Foxy designer paper – 2″x2″ piece in 3 different patterns
    Project Supply List:

  • Sweet Christmas Card with Suite Seasons for the Fun n’ Crafty Blog Hop!

    Today is a fun post for me because not only am I going to share the swap card that I created for OnStage Local in Vancouver, BC last weekend – but it is also the Fun n’ Crafty Blog Hop!  That is right!  Some of the stampers from my group have gotten the band back together again and we are showcasing some holiday project ideas including many using the stamp sets that are in the 25% off sale this month!  So, make sure to check them all out.

    Keeping it Simple with the Suite Season stamp set

    So, for OnStage this year, I made the poor choice of not working on my display board project particularly early, which meant as we were getting into the last week before the event, I still needed to finish up display board projects AND create a card to bring as a swap card.  Thankfully, the Suite Season stamp set and the Candy Cane Lane designer paper made it easy for me to pull together a cute card with time to spare!

    Now, I’ve had some people ask where the house came from, and if you missed it, it was cut straight from the Candy Cane Lane designer paper!  And before you start thinking “oh man!  That is a pain to cut”, let me tell you, it goes WAY faster than you might think!  I thought that was going to be the thing that was going to be the biggest pain for me with this card, but nope!  Turns out, trying to pick up and glue the little hearts were a more tedious challenge than cutting. Smile  I cut for 20 cards out of a sheet of the designer paper.

    The houses were a great balance for the size of the sentiment from the Suite Season stamp set.  I wanted the sentiment to hold it’s own and then just decorate up the other side of the card as an accent to the saying.

    And speaking of accents, if you do cut these houses out – make sure to grab your Clear Wink of Stella!  I painted it onto the snow topped portions of the house and it was super cute!

    Then it was as simple as layering over the fabulous stitched edge Real Red ribbon and one of the White Doilies (cut in half) to finish out the card.  Oh and before I forget the other touch… that little red heart at the bottom of the sentiment.  Can you guess where I got that from? huh? huh?  Smile

    It is from the Hearts Confetti Border punch!  How fun is that?!  I punched out some hearts from scrap paper and then just glued them down over the stamped heart in the sentiment.  That little extra touch of red on the right side just finishes it off, don’t you think?

    Now, like I said, this stamp set is one of the 9 sets that are available for 25% off in the month of November.  Stampin’ Up picked stamp sets that would coordinate with the NEW Stitched Edge Framelits and makes it easy to create cute projects!  They are featured in this blog hop as well as in the Premium Tutorial Pack for November!  See what stamp sets made the list:

    14915692_10209460606704574_1687961715808046413_n

    Get even more great ideas with these stamps on the Fun n’ Crafty Blog Hop!

    Ready to see more project ideas with these stamp sets and other great holiday sets?  Well, hop along to the blogs below – the links will take you directly to their post highlighting a great project using one of these sets.

    Don’t forget to leave comments along the way!  I’d love to hear what you think of my swap card or just to hear you say hello. Smile

    Fun n’ Crafty Blog Hop stops:

    14690833_10153855469435776_5104429926217567235_n         14729389_10153855469270776_7732995536275389575_n

    Enjoy the hop and if you’d like to join us next month on the hop, consider joining our fun group of Stampin’ Up demonstrators by purchasing the Starter Kit!  You’ll not only get to see the Occasions Catalog NOW, but you’ll get to order from it in December… and best of all, you’ll be part of our awesome crafty community and we can’t wait to welcome you there.  Then you can join us and be featured in our blog hop next month!

    Have questions?  Just let me know or get started here.

    NWstamper signature_thumb[9]

    order online button for sig 3_thumb[4]

    Premium tutorial pack hostess code_thumb[1]

    Get your free exclusive Tutorial pack from our amazing International demonstrator design team featuring the stamp sets that are on sale this month!  You can get your free copy of this SET of great project ideas by either:

    Placing a $50 Stampin’ Up order with me (either directly or in my online store using the hostess code above) in the month of November
    Join my Fun n’ Crafty Stampers!  My team gets a copy of this Tutorial Pack for FREE!

    Project Measurements:

    • Sahara Sand cardstock – 5 1/2″ x 8 1/2″
    • Early Espresso cardstock – 3 3/4” x 5”
    • Very Vanilla cardstock – 3 1/2” x 4 3/4”

    Project Supply List:

  • Stampin’ Up OnStage Local Recap–November 2016

    Stampin’ Up OnStage Local Recap–November 2016

    2016-11-04 14.51.35I’m back after an amazingly inspiring and refreshing weekend up to Vancouver, BC Canada for the November OnStage Local event by Stampin’ Up!  This is the new event that replaces the traditional convention and happens every 6 months around the world.  This time, the closest location was up in Canada for the one day regional style event; and since that is only a few hours away, I just had to go!  I love these events because not only is it a chance to get my creative batteries recharged, but I always get to meet wonderful new people and reconnect with friends I don’t get to see very often because of distance.  And getting free stuff and a copy of the upcoming Spring (Occasions) catalog doesn’t hurt either! Winking smile

    So, now that I’m back, I thought I’d share a little bit from the event – and don’t worry there are lots of sneak peeks to come during the upcoming weeks!  And if you’ve been considering signing up as a demonstration – you know you can see the Occasions and Sale-a-Bration catalogs NOW on the demonstrator website, right?  Just saying, you wouldn’t even have to wait to see all the peeks.  Plus I’ve posted every picture I took at the event to my team page to help them get inspired and planning for the new year.  So, if you are on the fence, consider hopping off and joining my Fun n’ Crafty Stampers!

    OnStage (November) 2016 – Celebrating You

    Each event we get a back and this was the cutest one yet since they started the OnStage events!  I LOVE the Hot Air Balloon motif (a sneak peek of things to come!) and the colors were oh so cute.

    2016-11-04 16.10.30

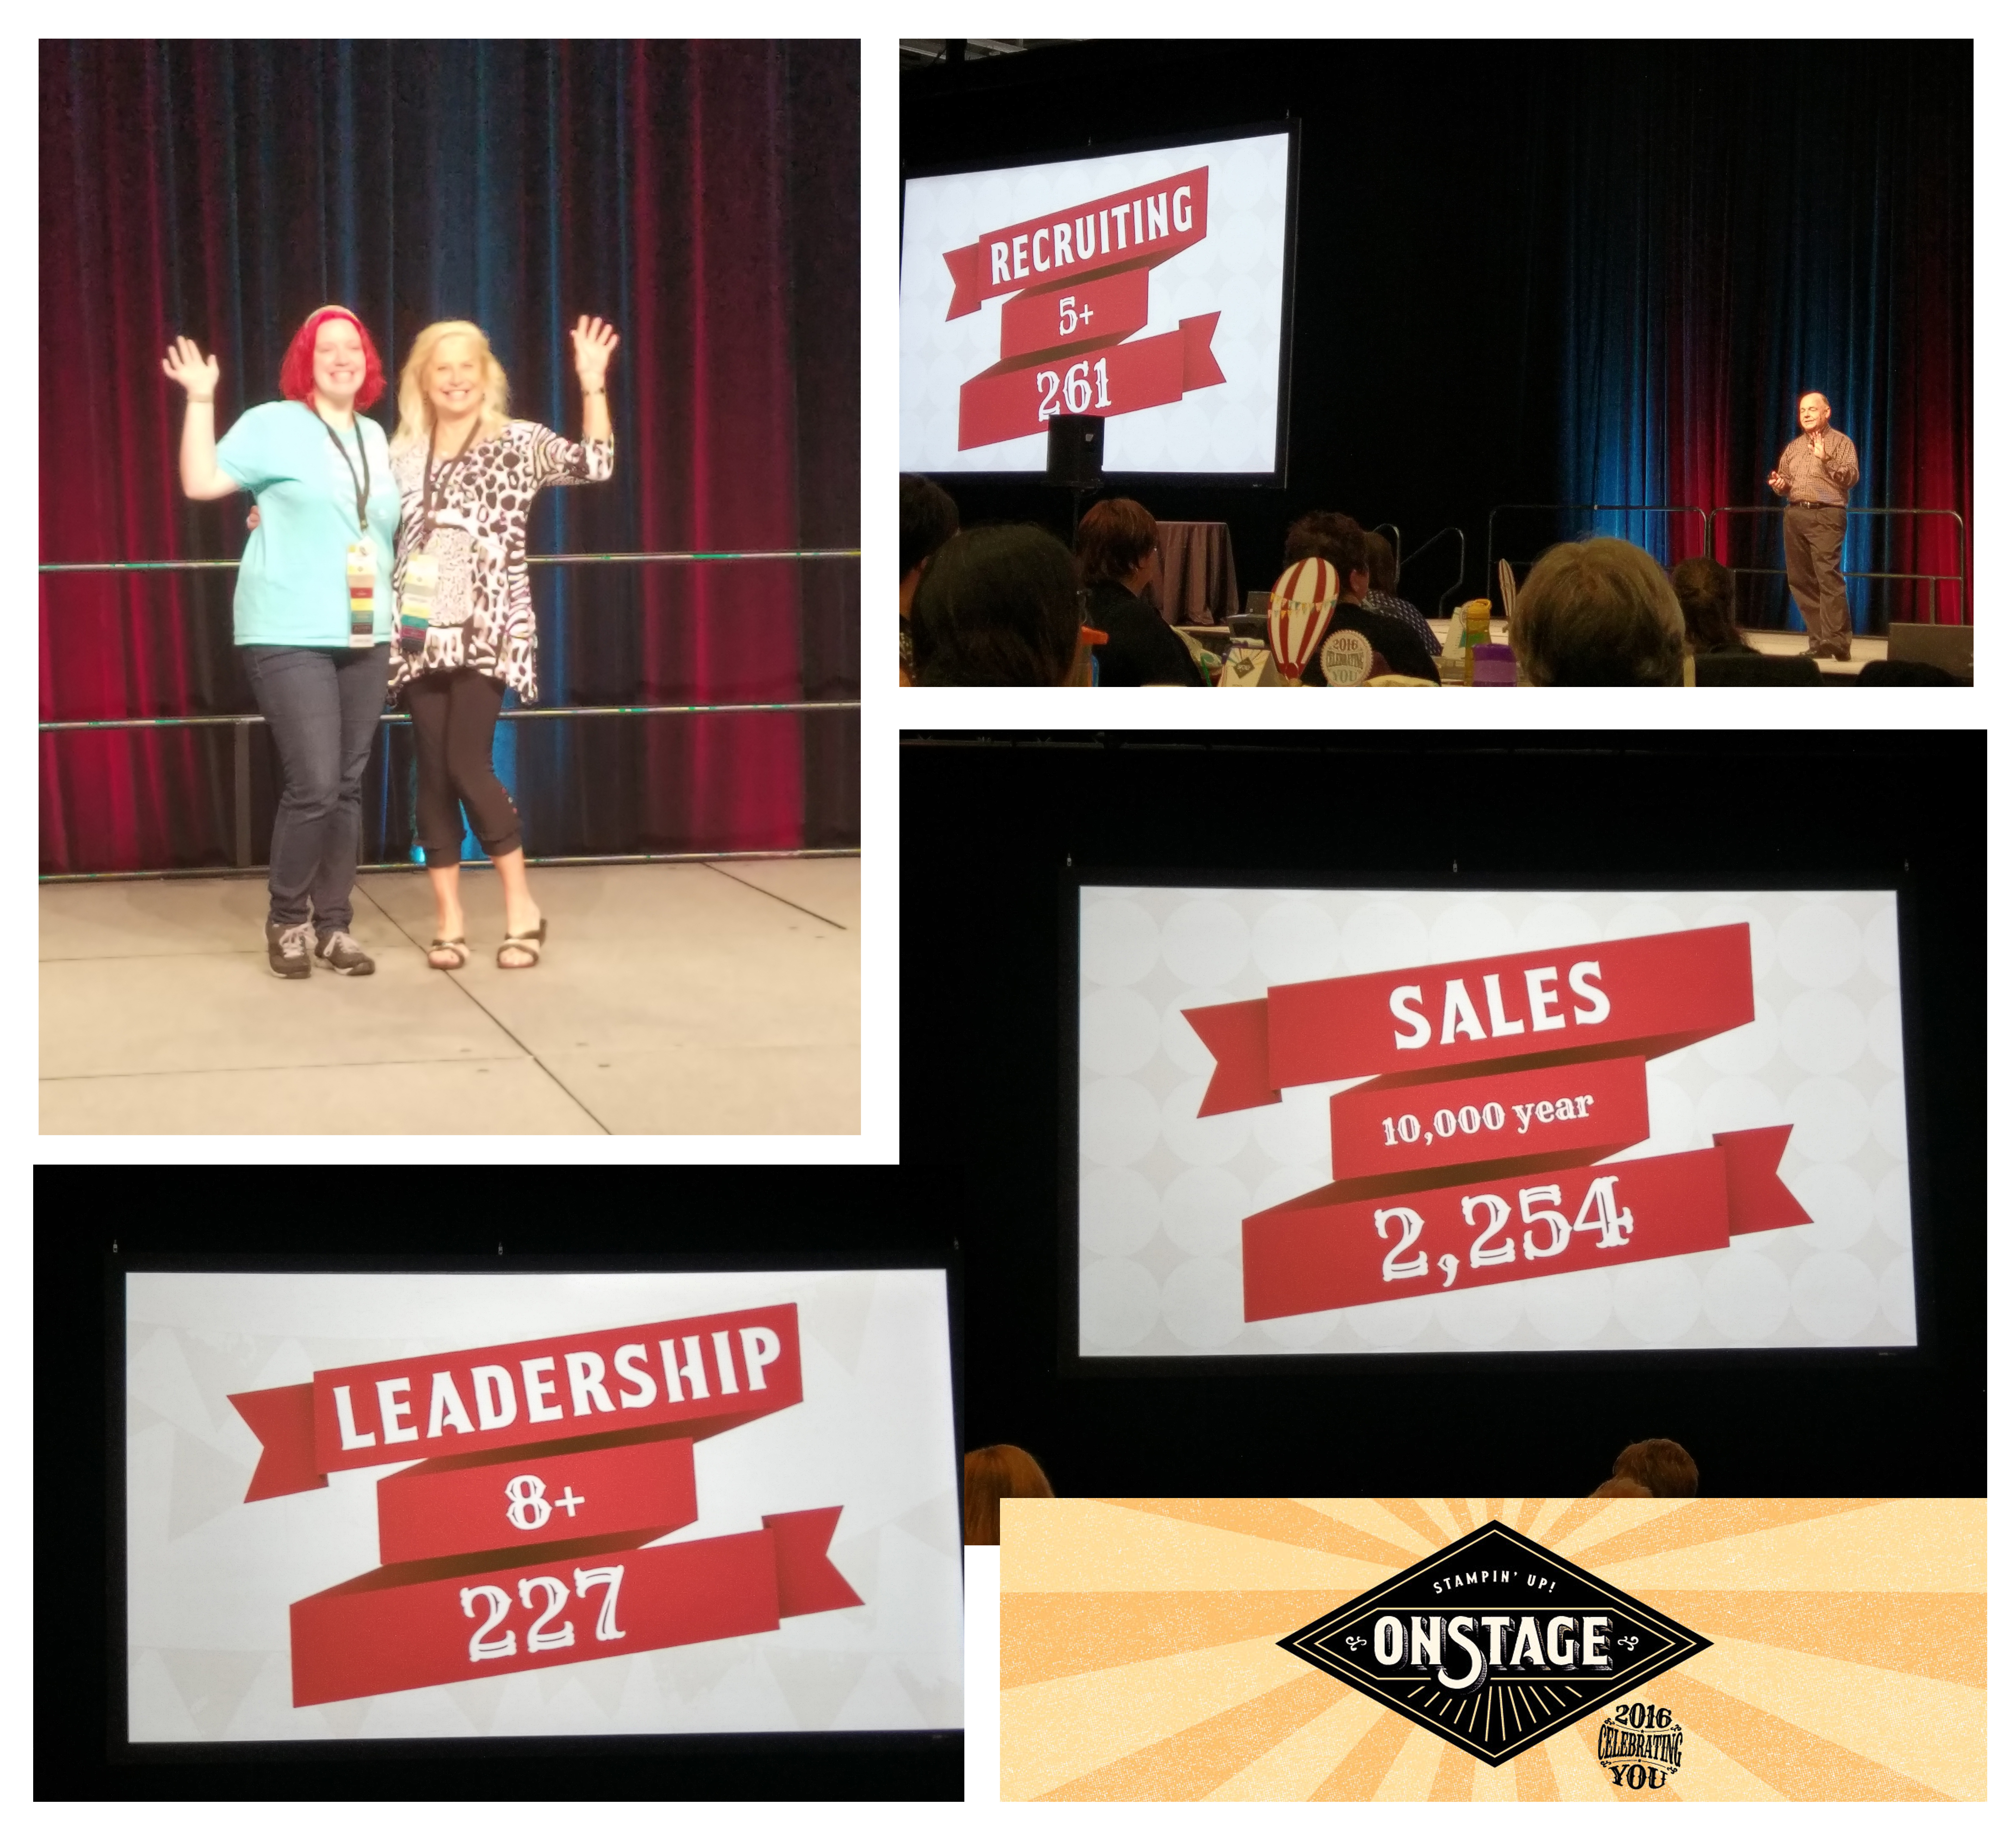
    The theme was Celebrating You because this was the time of year where they did recognition for achievements by demonstrators for the 2015-2016 SU year.  So, things like folks who recruited and had the team members successfully get started with their demonstratorship, folks who had a number of title promotions in their team, yearly sales, personal promotions, anniversaries with SU, etc.  One piece of recognition was a nice sit down dinner and training on Friday night (before the event on Saturday) for anyone with the title Silver Elite or above.

    2016-11-04 19.26.52

    Thanks to my awesome team, I was able to attend and really felt spoiled! Plus we got a super cute bag as a gift to boot –

    2016-11-04 19.32.29

    Then it was back to the hotel room to hang out with the gals from the Fun n’ Crafty Stampers group for a while before heading to bed… and by heading to bed, I mean staying up super late because I hadn’t finished gifties for everyone yet and I wanted to have something special for them the next day when the event kicked off!  I think they turned out super cute and the ladies seemed to like them too.  Each one had a card with a personal note inside, a pen decorated with Candy Cane Lane paper, and some chocolate.

    2016-11-05 02.40.15

    Then it was time to finally get some rest before getting up WAAAY too early to get in the room and get ready for the presentations.  Isn’t the notebook they gave us super cute?!?

    2016-11-05 07.55.20

    We started off with a video presentation from Sara Douglass with such a great message that wasn’t about how we can sell more Stampin’ Up product or build our team… but instead, about how we can become better people and have happier lives by focusing on what makes us unique and great and finding our success in being the best we can be.  I always come away from these events feeling like the company really cares about us as people, not as selling robots.  <3 this company!

    2016-11-05 08.46.19

    Of course, there was the catalog reveal, and lots of stamping presentations and tips for the new dies, stamps, accessories, and more from the upcoming Occasions Catalog.  Eeek!!!!  Can’t wait to do my preorder on December 1st!  But I was lucky enough to be asked to be a display board stamper for the event as well, which meant I got my hands on some new product in advance and start working on a bunch of ideas with it.  We put them up the night before and it was so fun to watch everyone check them out.  2016-11-05 10.06.51

    I also had to laugh because one of my projects that I wasn’t sure if I should even put it up on the boards turned out to be one of the favorites!

    2016-11-04 16.08.34

    And I’ll give you one more sneak peek today and tell you this is one of my FAVORITE suites coming out in the new catalog.  Those are STAMPS!  and dies of course, and those sequins…squee!  I’m so ready to order them now, but I guess waiting until December 1st will have to do.

    IMG_3848

    I was honored to get to walk across the stage for recognition three times – for recruiting, for team title promotions, and earning Thailand.  The crazy thing though, was learning that those were only achieved by a small percent of the almost 50,000 demonstrators!  See those numbers, that is the number of demonstrators ACROSS THE WORLD who achieved that.  Makes me even more appreciative of my tribe – my friends, family, customers, and Fun n’ Crafty Stampers team!

    onstage2016-recognition

    OnStage Local Swapping!

    And of course, while you are at events like this, you have to swap!  It is always incredible to see what others come up with.  Especially with stamp sets or accessories that you didn’t think you liked all that much or had no idea what to do with.  I’ll be sharing more of the swap cards this week, but thought I would share a few of my favorites with you today –

    Like this awesome card that mixes and matches from a few different stamp sets and die sets.  I love how products you don’t think of as being at all related can go together so fabulously.

    Or talk about an amazingly elegant Christmas card that is so simple to pull together!  You just need some glimmer paper, basic cardstock, and one framelit set!

    And this card was just so adorable I couldn’t get over it!  Wouldn’t this make such a perfect birthday card for that sweet girl in your life?  I have often passed this cupcake set by, but it looks so fabulous in the Sweet Sugarplum colors!

    Well, I hope this gave you some fun ideas to try and gave you a little bit of a glimpse into the new OnStage events.  They are wonderful to attend and always exciting.  The next OnStage events are coming up in April and while I haven’t decided which location I may be attending, I know I have folks from my group planning on going to at least a couple of them.  So if you would like to join us – let me know!

    join my team 2

    Plus, if you join my Fun n’ Crafty Stampers team now, you’ll still be eligible to attend in April!  Since you have until then to meet your first minimum sales goal to stay active.  Sweet!

    NWstamper signature_thumb[9]

    order online button for sig 3_thumb[4]

    Premium tutorial pack hostess code

    Get your free exclusive Tutorial pack from our amazing International demonstrator design team featuring the stamp sets that are on sale this month!  You can get your free copy of this SET of great project ideas by either:

    Placing a $50 Stampin’ Up order with me (either directly or in my online store using the hostess code above) in the month of November
    Join my Fun n’ Crafty Stampers!  My team gets a copy of this Tutorial Pack for FREE!

    Save 25% on Selected Stamp Sets plus get the NEW Stitched Framelits!  Click the image to get yours!
    ShareableImage_1_NA

  • ICS Blog Hop–Season of Gratitude

    Welcome to November and fun new blog hop with the Inspire, Create, Share gals!  We’ve decide to do something a little bit different this month and we are pulling out our Paper Pumpkin boxes for this month (technically they are from October, but hey, November’s kits don’t ship until after November 10th, so you have time to sign up for yours!)

    As I often do, I create the design the way the instructions tell us to for the first project, and then I start exploring what other options I can do to change things up!  I usually stick with trying to figure out ideas that you can make using ONLY WHAT IS IN THE BOX.  So I don’t grab extra ink, paper, or punches when I’m starting out.  I want to give folks ideas of what they can do even if they don’t have a bunch of other supplies in their craft room.  So, check out what my favorite alternative turned out to be:

    October 2016 Paper Pumpkin Alternative Card Design

    Now, I’ll share what the cards in the kit are “supposed” to look like.  This is my first card created using the instructions as they were written for the kit.  You end up making a fall shaker card when you are done.  And it is kind of hard to tell, but that Vanilla paper is actually dry embossed, so those grooves are part of the paper.  Which made me want to bust out my sponges and try coloring it, which led to the second card version:

    It wasn’t my favorite, but I thought I would share it anyway.  Also, it leads me to a tip or reminder… depending on who you are.

    Paper Pumpkin Project Tip

    • When you are adhering the Window Sheet to the back of the leaf cut-outs don’t worry about putting adhesive on all sides of the window sheet!  I did that with my first one and totally ruined the window sheet because there wasn’t enough room without the adhesive being exposed through the die-cut holes.  And let me just say, an Adhesive Eraser is magic, except not so much on acetate sheets. Smile  They still smear all over the place!  So just put adhesive on the Vanilla Die Cut Sheet around the holes and press the window sheet onto that.  You just need to make sure the holes are covered, it doesn’t have to be perfect.
    • The instructions say to use the foam strips (to contain the sequins) on all 4 sides of the embossed Vanilla piece; and while that works, you often won’t see your sequins!  So, in the card above, I made my foam strips make a small rectangle just around where the die cut holes are.  That way, the sequins are almost always viewable.  Then I just added some extra foam along the far left edge to keep the paper balanced and steady.
    • Don’t forget to put your sequins on the bottom paper (in this case the card base) and NOT onto the window sheet.  By making little piles on the bottom sheet, you can place the top layer (with the holes) exactly where you want and still see what you are doing.

    But now, back to my final alternative that I really like!

    I switched away from the Shaker card idea and instead started cutting out my favorite elements.  I cut out the die cut leave holes and then trimmed down some of the background colored paper to fit behind them.  I loved the crackle stamp for the cool effect that you get for the leaves, so I had to keep that in there – and now you can see it even better because you don’t have to look through sequins!

    I used Stampin’ Dimensionals to raise the die cut holes over the stamped paper, and then glued those down directly to the card base.  Then it was time to figure out the sentiment.  I used the same die cut shapes and just layered them a little bit differently:

    But I didn’t want it to be too plain, so I layered back in one of the die cut pieces that popped out to make my shaker card and added a stamped acorn from the stamp set that comes with this month’s Paper Pumpkin kit.  And you may remember me telling you that when I do these alternative cards, I don’t grab extra papers and inks from my stash, so want to know where I got the paper for that acorn?  Check it out – it’s the left over paper in between the Cajun Craze tags!

    2016-11-02 15.24.35

    Then just add a few extra sequins and you are done!

    I hope you have enjoyed this Paper Pumpkin kit alternative idea!  Keep on hopping and check out what Andrea has in store for you, for even more great ideas.

    And don’t forget, if you like these ideas – you can always get MORE of the kits by purchasing refills in the Online Store!

    • If you are a current Paper Pumpkin subscriber, you get exclusive access to refill kits for past months as a great price.  see them here
    • And if you weren’t a subscriber before, you can always join now and get immediate access to be able to purchase refill kits, plus you’ll be all good to go to get this cute Holiday Exclusive box in your mailbox for November!

    14917149_1784322711825603_4425822216026875299_o

    Thanks for hopping!

    NWstamper signature_thumb[9]

    order online button for sig 3_thumb[4]

    14947527_10153874106165776_4026858921570814699_n

    November Premium Tutorial Pack Hostess Code – YG62GG6C

    NEW! I’ve joined with a group of amazing talented demonstrators – many of whom have been designers for the Stampin’ Up display boards at the Conventions with me, plus Artisan Design team members, and other talented folks, to create a set of great project tutorials just for you featuring the stamp sets that are on sale this month!  You can get your free copy of this SET of great project ideas by either:

    Place a $50 Stampin’ Up order with me (either directly or in my online store using the hostess code above) in the month of November

    Join my Fun n’ Crafty Stampers!  My team gets a copy of this Tutorial Pack for FREE!

  • Bright Birthday Card with a Swirly Scribbles Thinlits Bouquet

    When I start working on a project, sometimes I have a plan in mind, but often I turn to pinterest or google image search to give me a starting point for my project.  Most of the time, I end up mixing and matching my favorite ideas from multiple cards into one card.  But sometimes I come across a card that I love so much that I just have to make it exactly as I see it.  Today is one of those cards!  Check out how fun and cheery it is:

    I saw this card by Shannon Kay on Pinterest and loved the colors and layout, I just needed to change up the sentiment since I thought this would be the perfect birthday card!

    Tips and Tricks for this card:

    • Pick the perfect color palatte!  When trying to figure out what colors to use on cards, I usually start by looking at color combos from designer paper or start from a color family.  In this case, you can start with the Subtles color family and grab Calypso Coral, Pear Pizzazz, and So Saffron. But then the perfect third color comes from the 2016-2018 In Colors – Peekaboo Peach!  Aren’t they great together?

      TAMS Color Builder (2)
    • Swirly Flowers from the Swirly Scribbles Thinlits – these swirls are great for decorative accents, birds nests, and in this case… flowers!  When you look at your dies as they come in the packaging, you will see the little swirl die is sitting inside the larger swirl.  So, that big Saffron flower is actually two dies, the larger swirl and the smaller swirl stacked together.

    • Tie in a pop of color in your backgrounds with monochromatic designer paper – This is one of those times where the color family Designer Paper Stacks are great.  They are sets of monochromatic paper that is perfect for adding an interesting background paper without being so busy as to take away from your main image.
    • Pick the perfect sentiment! I love sentiment sets that give you a variety of fonts and phrases since it gives you lots of options on your cards.  In this case, I’m using the Better Together stamp set and it is one that I totally overlooked in the catalog for the longest time, but turns out it really adds some fun to your cards.  I mean, who wouldn’t smile getting this card and the happy “Happy Birthday!”?

    Who do you know who could use a smile like this on their birthday?

    And if you want to make fun cards like this with me (we did this one in stamp club a little while back), consider joining me for one of my monthly card making classes here in Redmond, WA!  We have lots of fun and there are multiple options a month to come get your crafty on.  Check us out over on my meetup here – the Bellevue-Redmond Card Makers

    NWstamper signature_thumb[9]

    order online button for sig 3_thumb[4]

    October Online Stamp Club Hostess Code – YG62GG6C
    Get free exclusive tutorials each month and even get the supplies in a Make & Take kit with your order over $40 when you use the monthly hostess code!

    Stock up on those pretty papers!  Click the image to get yours!
    B3G1DSP_DemoHeader_NA

    Project Measurements:
    • Whisper White cardstock – 5 1/2” x 8 1/2”, 3 3/4” x 5”
    • Peekaboo Peach designer paper – 1 1/2” x 5 1/2”
    • Scraps of So Saffron, Calypso Coral, Peekaboo Peach, Pear Pizazz cardstock

    Product List

  • Beautiful Backgrounds from Moroccan Nights

    Way back at Stampin’ Up OnStage in April, I was given the Moroccan Nights stamp set (love the perks of getting free stamps when you go to demonstrator events! Smile ).  But the problem was, it wasn’t a stamp set I had really looked at before or thought was my style.  Which meant it sat on my shelf for a loooong time.  But sometimes we all need a challenge to grab that stamp set that is collecting dust and see what we can create with it.  You may be surprised, like I was, at what cool things can result.

    Moroccan Nights Thank You card w title_thumb[2]

    Turns out, this stamp set makes AWESOME backgrounds for your cards.  I kept it really simple for this card and used the large image from the set for my central image in Crushed Curry and then turned it and stamped the corners using the SAME IMAGE only this time with Cajun Craze.  Turns out pretty cool, huh?  I just eyeballed it because I have the sticker on the back of my cling mount stamps, but if you wanted to get really precise, I would grab the Stamp-a-ma-jig and use that for exact placement.

    Moroccan Nights Thank You card close up_thumb[1]

    Tips and Tricks for this project:

    • Banner sentiments made easy!  I grabbed my Thoughtful Branches stamp set and matching banner punch (yes! you can get them as a discounted bundle as well!) to quickly stamp the outline shape, the sentiment, and 1-2-punch you are done!
    • Grab those markers to create perfectly matched accents – I used my Cajun Craze and Dapper Denim markers to color in one of the lanterns from the same Moroccan Lights stamp set to match the colors of the card. Then just some quick snips to fussy cut it out and I can layer it with a Stampin’ Dimensional over the sentiment.
    • Pearls are perfect for stepping it up!  It doesn’t stand out and grab your attention, but those little pearls I added to the Curry image, really makes a BIG difference when you are holding this card in person.  Make placement even easier when you pick up the pearls off the accent sheet with the tip of a paper piercer, no pearls flying willy-nilly!

    Moroccan Nights Thank You card side view_thumb[1]

    Finally, I just sponged the edges of the stamped cardstock with Soft Suede to help distress it just enough to all come together.  Well, and the fact that you know me and you know I can’t do a card without reaching for my Stampin’ Dimensionals OR my sponge daubers! Smile

    Moroccan Nights Thank You card 2_thumb[1]


    NWstamper signature_thumb[9]

    order online button for sig 3_thumb[4]

    October Online Stamp Club Hostess Code – YG62GG6C
    Get free exclusive tutorials each month and even get the supplies in a Make & Take kit with your order over $40 when you use the monthly hostess code!

    Stock up on those pretty papers!  Click the image to get yours!
    B3G1DSP_DemoHeader_NA

    Project Measurements:
    • Very Vanilla cardstock – 4”x4”, scraps
    • Dapper Denim cardstock – 4 1/4” x 4 1/4”

    Product List

  • Cheery Thanks Peek-a-Book card with Pop of Pink Washi

    Are you like me and after you’ve taken a little bit of time off from getting into your craft room, you return to sit and stare at your supplies thinking, “I really want to make something cute, but have NO IDEA what to make or where to get started!”

    I swear, getting my groove back on can be the hardest thing for me in crafting.  Well, today, I wanted to share with you a project idea that is quick, easy, and is a great way to get over that missing mojo hump and get your crafting groove on.  The always fun, washi peek-a-boo card!

    When you do a card like this, start with your basic white card base and then grab your favorite set of washi tape.  In this case, I grabbed the Pop of Pink Washi Tape pack.  It has 5 coordinating patterns, but since they all go together, you can just pick your favorite 3 patterns and lay them out on a white layer of cardstock.  See… super easy so far!

    Then it is just a matter of creating a fun layer with a cutout for that pattern to peek out through!

    In this case, I grabbed the Layering Square framelits and the Elegant Butterfly punch to create my accent piece.  I picked out a square from the Layering Squares dies that was just a little bit bigger than my punch and then using that selected a matching scalloped square that would give me a reasonable sized border.  Then it was as simple as cutting out a piece of Whisper White cardstock with the square and a Gold Foil piece with the scallop square and glue them together.  Then I could punch out the butterfly from the center.  Fun, huh?

    Once you have that, just place over your washi tape with the foam Stampin’ Dimensionals, and add a sentiment (from one of my favorite sentiment sets – Suite Sayings) in the corner.  Then you can just mount it all onto your white cardbase and you are done!

    And just like that, you’ve made something cute and you are ready to keep the momentum going onto your next project!

    Looking for more ideas and tutorials?  Don’t miss the details below about my 12 Weeks of Christmas.

    12 Weeks of Christmas FREE Exclusive Tutorials – are you on the list?

    12 weeks of christmas

    Last week was the first week of the 12 Weeks of Christmas program I do each year, and TODAY the second tutorial is being sent out!  I wanted to make sure to remind everyone that you’ll want to get signed up on my newsletter list to make sure you are getting all of these great project and card ideas that are perfect for setting you up for awesome holiday crafts.   These are projects I don’t post on my blog or on Facebook, plus you’ll get step by step instructions and a downloadable PDF so you can print it out and save it for later!

    ** Get on the Email List Here **

    NWstamper signature_thumb[9]

    order online button for sig 3_thumb[4]

    October Online Stamp Club Hostess Code – YG62GG6C
    Get free exclusive tutorials each month and even get the supplies in a Make & Take kit with your order over $40 when you use the monthly hostess code!

    Project Measurements:
    • Whisper White cardstock – 5 1/2″ x 8 1/2″, 4 3/4” x 3 1/2”, scrap (2 1/2”-3” square)
    • Gold Foil –scrap (3”x3” ish)


    Product List

  • ICS Fall Fun Blog Hop

    It is fully October, if you couldn’t tell from all the Pumpkin Spice EVERYTHING that is in the stores and restaurants!  And that means that we are ready to head out of summer and jump into fall.  To help get you in the spirit and thinking of changing leaves, pumpkins, and all things warm and cozy… the gals at the Inspire, Create, Share blog hop group have put together another fun hop to share with you lots of Fall themed projects!

    I wanted to break out some of the great designer paper I had ordered from the Holiday catalog and break out those fall color combinations.  And while I was thinking about what to create, I suddenly remembered this oldie but goodie stamp set – Wonderous Wreath!  Check it out:

    Usually you see the wreath with Christmas or winter colors, but there is no reason why it can’t be fall instead!  I just grabbed my Petals & Paisleys designer paper and flipped it over to the back to look at the label where the professionals at Stampin’ Up have already come up with a great color combination.  I just use it as my crib sheet! Smile  Try this combo on for size:

    TAMS Color Builder (1)

    So, I just used those colors to create my wreath!  The coordinating wreath and bow dies made it a cinch to cut out and then I just needed to start layering it onto my card. 

    Since I had used the colors from the Petals and Paisley designer paper, it was a no brainer to pick my favorite patterns to layer on the left of the card.  Then I wanted to add just a touch of texture so I cut a piece of Crumb Cake cardstock and embossed it with the Woodgrain embossing folder for the perfect backdrop for the wreath itself (don’t forget to sponge the edge of the embossed paper with Soft Suede ink to really distress it!)

    Then I just needed a sentiment and I’m so super in love with this one from the Suite Seasons stamp set in the Holiday Catalog.  You’ve seen me use this sentiment on Very Vanilla cardstock and color in the decorative piece.  But since I didn’t want that accent to take away from the wreath, I left it simple and subtle with Soft Suede ink.

    This card showcases a fun way to use some of your favorite patterns from the designer series paper.  Right now many of the papers are buy 3 get 1 free!  Woo hoo!  I totally spaced and forgot this was a specialty paper, so it isn’t in this sale, but change this up for the Presents and Pinecones designer paper that IS on sale, and make the wreath holiday and you are good to go!

    I hope you have enjoyed this Fall inspiration idea!  Keep on hopping and check out what Candy has in store for you, for even more fun fall ideas.

    Thanks for hopping!

    NWstamper signature_thumb[9]

    order online button for sig 3_thumb[4]

    October Online Stamp Club Hostess Code – YG62GG6C
    Get free exclusive tutorials each month and even get the supplies in a Make & Take kit with your order over $40 when you use the monthly hostess code!

    Project Measurements:

    • Crumb Cake cardstock – 5 1/2″ x 8 1/2″, 2 3/4″ x 2 3/4″
    • Very Vanilla cardstock –3 1/4″ x 3 1/4″, 2″ x 2″
    • Petals & Paisleys designer paper  – 1″ x 5 1/2″, 1 1/4″ x 5 1/2″

    Product List

  • Bring on the Pink for Breast Cancer Awareness Month & the Ultimate Pink Blog Hop!

    Bring on the Pink for Breast Cancer Awareness Month & the Ultimate Pink Blog Hop!

    ultimate-pink-blog-hop-badge

    Welcome to the first ever Ultimate Pink Blog Hop – a collection of ideas from Stampin’ UP! demonstrators all over the globe featuring shades of pink in honor Breast Cancer Awareness Month.  Having had a grandmother who had to battle breast cancer, this is a cause that I know can affect anyone at anytime, and I loved the chance to participate in this fun way to play with all things PINK while raising awareness for this.

    I started by grabbing all my pink papers and had planned a “Thinking of You” card, but as things started coming together, it took a little bit of a turn and ended up here… 🙂

    baby-girl-card-with-cookie-cutter-christmasI had a lot of fun mixing all my pink papers with some of the new items in the Stampin’ Up Holiday catalog to create an anything but Holiday card!

    Not just “Holiday” items:

    • Use the bear in the Cookie-Cutter Christmas stamp set to make an adorable bear for a new baby!  Just pick your color to suit the gender or parents…
    • Fancy Frost Designer paper has many great anytime designs and is a quick way to add texture without having to pull out an embossing folder and BigShot.
    • Matching Glitz comes from the Fancy Frost Sequins – I shared a Frosted Medallions card recently using them for New Years or bust them out for Christmas, but the sequins are perfect for a baby too.

    baby-girl-card-with-cookie-cutter-christmas-side-view I mixed and matched my colors for this too.  Good thing there are lots of pinks to choose from in Stampin’ Up’s color palette and they all go great together!  I had

    • Melon Mambo for the card base,
    • Pink Pirouette and Blushing Bride cardstock for the stripes,
    • and Blushing Bride glimmer paper for just that extra sparkle.  Gotta love sparkle!

    baby-girl-card-with-cookie-cutter-christmas-close-up Now if you missed this bear (it’s easy to do!), she comes from the Cookie-Cutter Christmas stamp set.  You stamp the bear body first and then add in the ears (thankfully both ears are together on ONE photopolymer stamp so you don’t have to worry about spacing and you can see what you are doing!) .  Finally, add in the fun face and you are good to go.

    If you want, stamp the bow and then punch it out with the coordinating Cookie-Cutter punch!  (And yes-siree, they are offered together in a discounted bundle!)

    PS – I have all the project dimensions below if you want to make this for yourself.  🙂

    Thank you so much for checking out my PINK idea and don’t miss out on even more great ideas on this blog hop – To continue to be inspired whether you’ve come from the person previous to me or after me (#4 – Jennifer Blomquist) on the list below, all participants are listed to help you as you journey among us being filled with pink inspiration.


    Happy hopping!

    NWstamper signature_thumb[9]

    order online button for sig 3_thumb[4]

    October Online Stamp Club Hostess Code – YG62GG6C
    Get free exclusive tutorials each month and even get the supplies in a Make & Take kit with your order over $40 when you use the monthly hostess code!

    Project Measurements:

    • Melon Mambo cardstock – 4 1/4″ x 11″
    • Pink Pirouette cardstock – 2 1/2″ x 4 1/4″
    • Blushing Bride cardstock – 1″ x 4 1/4″
    • Fancy Frost designer paper – 1″ x 4 1/4″
    • Whisper White cardstock – 2″ x 2 3/4″
    • Blushing Bride glimmer paper – 1/2″ x 4 1/4″

    Product List

  • Festive New Years Card with Frosted Medallions

    Today I wanted to share another card from my Stamp & Share event which shows off a fun other color palette –

    I used them with the new Frosted Medallions stamp set to create a pretty card that can be used for the winter holidays.

    Most of this card is pretty straightforward, but the one piece that you may not recognize is the pinky/purple patterned strip on the left side of the card.  That is actually the Fancy Frost specialty paper from the holiday catalog.  Now, if you are like me, I thought when it said the paper was embossed that it was a glossy embossing for emboss resist projects.  But NOPE!  It is dry embossed in 6 different patterns, so the pattern is raised up from the paper.  So you can either leave it as is, or you can do like I did and color it in with a sponge or sponge brayer.  It tends to color all of the paper, but the raised pattern comes out darker than the rest of the paper.  Fun, huh?!

    I mixed in some of the super popular new glitter ribbon (you get Silver and Sweet Sugarplum in the pack) to peak out from underneath my sentiment.  And then just a few of the new Fancy Frost sequins attached with some glue dots for just a touch of glitz.

    Then, let the large snowflake from the stamp set as your centerpiece and when you use a light ink like the Soft Sky, you can layer your sentiment right over the top!

    Don’t forget to order your Holiday Catalog Product Samplers!

    I started offering my Holiday Catalog product samplers last week and thank you to everyone who already let me know you were in!  As I got the set of supplies in for the first orders, I decided to put together a video to share what all the products are that you’ll find in the product samplers, plus extra project ideas at the end where I share some of the holiday catalog stamp sets and cards and projects that you can make with them!

    >>>Reserve your Product Sampler here<<<

    NWstamper signature_thumb[9]

    order online button for sig 3_thumb[4]

    Project Measurements:

    • Soft Sky cardstock – 5 1/2″ x 8 1/2″
    • Fancy Frost designer paper – 1 1/2″ x 5 1/2″
    • Whisper White cardstock – 3″ x 3″
    • Glimmer ribbon – 5 1/2″

    Product List

  • Clean & Simple Elegant Thank You card with Suite Seasons

    So, last month, I ran a big event for Pacific Northwest Stampin’ Up demonstrators.  It wasn’t limited to my team, but anyone who wanted to come connect, share, and learn.  As part of the event, I created 4 make & take projects for them to get to play with new goodies from the 2016 Holiday Catalog.  So, I thought I’d share one of those projects with you today!  Because really, we all need a card idea that is quick to make when our Mojo just isn’t feeling it… that we know will turn out fabulous every time!  Give this layout a try –

    I loved this sentiment from the Suite Seasons stamp set, and love the little details art touch below the sentiment.  It was just perfect for coloring in with my markers.  Again, I wanted that handmade touch without an hour of color on each card.  Sometimes, the coloring is super relaxing… sometimes, I just want to be done with my card and still love how it looks. Smile 
    TIP –  When coloring in small spaces like this, even if you *can* use the brush tip of your marker, start with the pen tip of the marker instead.  The pen tip colors just a little bit lighter than the brush tip because less ink is coming out on the paper at one time.  So, in an image like this, you want it to be a little bit lighter so you can see the line art accents instead of it all getting covered up by dark ink.

    Since the sentiment was so pretty, I wanted the leave the rest of the card simple to let the words and the coloring stand out.  So, I grab the FABULOUS Copper Foil paper and used it as a large mat for my center.  Now, I was worried that the Very Vanilla cardstock I used had too stark of an edge, but turns out sponging some Delightful Dijon ink around the edges with a sponge fixes that problem right up!

    Then just add a strip of the Delightful Dijon ribbon from the 3/8” Ribbon Trio Pack from the Holiday Catalog (it includes Rich Razzleberry, Delightful Dijon, and Mint Macaron ribbons) where the border of the Rich Razzleberry cardstock ends on the cardbase and you have a sweet and elegant card that you can pull together in a pinch!

    I also wanted to share that Product Samplers are back by popular demand!  Instead of feeling like you have to choose which paper or accessory you want to get from the Holiday Catalog, why not try them all?! 

    Holiday Catalog Sampler image

    I give you at least 1 yard of all the ribbons and twines in the Holiday Catalog, some of all the accessories, and 6×6 sheets of the designer papers (one of each pattern).  So you have enough to create that project you saw on Pinterest that you love so much, without having to buy full packs of everything!

    Check out the full details and all the options for the Holiday Catalog Product Sampler here

    NWstamper signature_thumb[9]

    order online button for sig 3_thumb[4]

    Project Supply List
    Click any of the pictures below to see them in the Online Store