 Welcome to November and fun new blog hop with the Inspire, Create, Share gals! We’ve decide to do something a little bit different this month and we are pulling out our Paper Pumpkin boxes for this month (technically they are from October, but hey, November’s kits don’t ship until after November 10th, so you have time to sign up for yours!)
As I often do, I create the design the way the instructions tell us to for the first project, and then I start exploring what other options I can do to change things up! I usually stick with trying to figure out ideas that you can make using ONLY WHAT IS IN THE BOX. So I don’t grab extra ink, paper, or punches when I’m starting out. I want to give folks ideas of what they can do even if they don’t have a bunch of other supplies in their craft room. So, check out what my favorite alternative turned out to be:
Now, I’ll share what the cards in the kit are “supposed” to look like. This is my first card created using the instructions as they were written for the kit. You end up making a fall shaker card when you are done. And it is kind of hard to tell, but that Vanilla paper is actually dry embossed, so those grooves are part of the paper. Which made me want to bust out my sponges and try coloring it, which led to the second card version:
It wasn’t my favorite, but I thought I would share it anyway. Also, it leads me to a tip or reminder… depending on who you are.
Paper Pumpkin Project Tip
- When you are adhering the Window Sheet to the back of the leaf cut-outs don’t worry about putting adhesive on all sides of the window sheet! I did that with my first one and totally ruined the window sheet because there wasn’t enough room without the adhesive being exposed through the die-cut holes. And let me just say, an Adhesive Eraser is magic, except not so much on acetate sheets.
 They still smear all over the place! So just put adhesive on the Vanilla Die Cut Sheet around the holes and press the window sheet onto that. You just need to make sure the holes are covered, it doesn’t have to be perfect.
 - The instructions say to use the foam strips (to contain the sequins) on all 4 sides of the embossed Vanilla piece; and while that works, you often won’t see your sequins! So, in the card above, I made my foam strips make a small rectangle just around where the die cut holes are. That way, the sequins are almost always viewable. Then I just added some extra foam along the far left edge to keep the paper balanced and steady.
- Don’t forget to put your sequins on the bottom paper (in this case the card base) and NOT onto the window sheet. By making little piles on the bottom sheet, you can place the top layer (with the holes) exactly where you want and still see what you are doing.
But now, back to my final alternative that I really like!
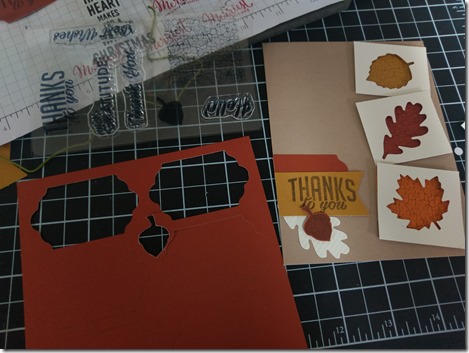
I switched away from the Shaker card idea and instead started cutting out my favorite elements. I cut out the die cut leave holes and then trimmed down some of the background colored paper to fit behind them. I loved the crackle stamp for the cool effect that you get for the leaves, so I had to keep that in there – and now you can see it even better because you don’t have to look through sequins!
I used Stampin’ Dimensionals to raise the die cut holes over the stamped paper, and then glued those down directly to the card base. Then it was time to figure out the sentiment. I used the same die cut shapes and just layered them a little bit differently:
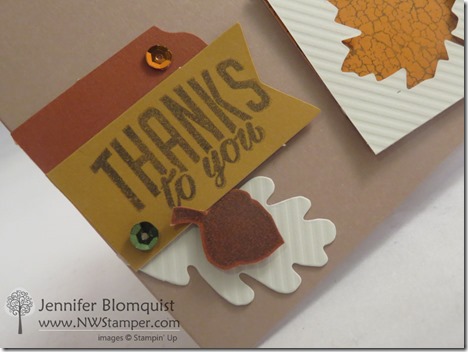
But I didn’t want it to be too plain, so I layered back in one of the die cut pieces that popped out to make my shaker card and added a stamped acorn from the stamp set that comes with this month’s Paper Pumpkin kit. And you may remember me telling you that when I do these alternative cards, I don’t grab extra papers and inks from my stash, so want to know where I got the paper for that acorn? Check it out – it’s the left over paper in between the Cajun Craze tags!
Then just add a few extra sequins and you are done!
I hope you have enjoyed this Paper Pumpkin kit alternative idea! Keep on hopping and check out what Andrea has in store for you, for even more great ideas.
And don’t forget, if you like these ideas – you can always get MORE of the kits by purchasing refills in the Online Store!
- If you are a current Paper Pumpkin subscriber, you get exclusive access to refill kits for past months as a great price. see them here
- And if you weren’t a subscriber before, you can always join now and get immediate access to be able to purchase refill kits, plus you’ll be all good to go to get this cute Holiday Exclusive box in your mailbox for November!
Thanks for hopping!
![NWstamper signature_thumb[9] NWstamper signature_thumb[9]](https://i0.wp.com/www.nwstamper.com/wp-content/uploads/ad87b4046c1e_C9F6/NWstamper-signature_thumb9_thumb.png?resize=322%2C118)
November Premium Tutorial Pack Hostess Code – YG62GG6C
NEW! I’ve joined with a group of amazing talented demonstrators – many of whom have been designers for the Stampin’ Up display boards at the Conventions with me, plus Artisan Design team members, and other talented folks, to create a set of great project tutorials just for you featuring the stamp sets that are on sale this month! You can get your free copy of this SET of great project ideas by either:
Place a $50 Stampin’ Up order with me (either directly or in my online store using the hostess code above) in the month of November
Join my Fun n’ Crafty Stampers! My team gets a copy of this Tutorial Pack for FREE!


10 responses to “ICS Blog Hop–Season of Gratitude”
I really like the popped up squares you created. Cute!
Jennifer, it’s beautiful!
Your card is lovely! I really like that you cut apart the leaf die cut areas!
Love the card…I wouldn’t have thought to cute the leaf template apart…great idea!
I love it! The card is very festive!
I just love the fun squares on your first card!
Very pretty Alternative Card Jennifer! Thank you so much for sharing!
great layout on your card!
Love your twist on the kit!
Super cute and love how the leaves really pop!