Northwest Stamper

Tag: silver baker’s twine

  • Another Sneak Peek with Simply Wonderful and Tip for Using Your Patterned Paper Scraps

    If you are like me, you have a pile of paper scraps on your desk… some punch outs, some larger cut pieces, some stamped images.  And I have a heck of a time convincing myself to recycle them because I just know they will be useable in another project.  Unfortunately, I don’t actually use them most of the time and they just pile up.  Like so –

    2015-01-01 15.18.40

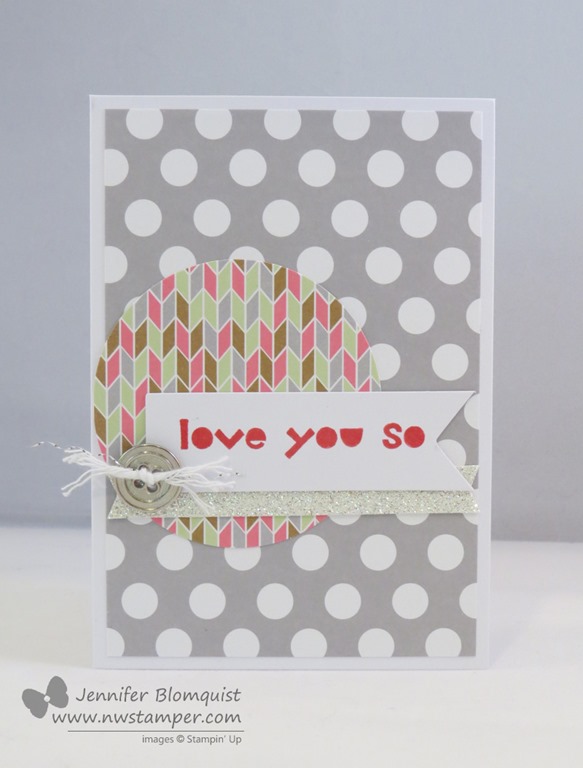
    So, I decided to spend some time this week using them up!  I’ve been sharing some of my progress on my Facebook page – www.facebook.com/nwstamper – but I just loved how this card turned out and so I had to share it here.

    This is also a sneak peek of the Sale-a-Bration set Simply Wonderful.  I can already tell I’m going to have LOTS of fun with this one.

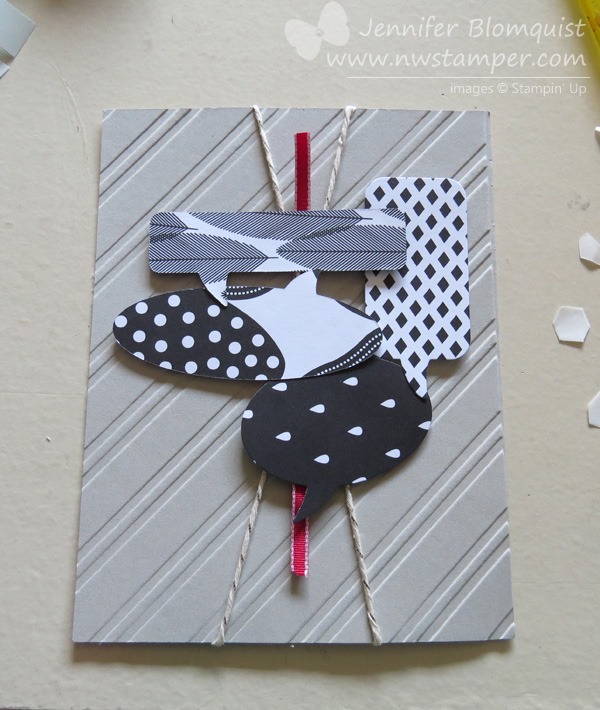
    But the thing I really wanted to share was the technique for using up your scraps of paper to create this diagonal pattern for the card.

    Tips for making this card:

    • This is perfect use for 6×6 paper packs or pieces from my Paper Samplers!  New Occasions Catalog Paper Sampler is coming soon!  Watch HERE for more details.
    • Cut your strips of paper to 3/4” x 3” and adhere at an angle across a scrap piece of cardstock.  (I did two at a time and had two 1-1/4” x 4” pieces next to each other when glueing)
    • Trim the excess paper off the edges to get your final piece of patterned paper
    • The All is Calm specialty designer paper makes a pretty backdrop but it is only available until January 5th!
    • Add some baker’s twine and some Sequins (like the In Color Sequins) to add some coordinating bling to your card.

    Check out a video for how I put this card together –

    (viewing this post in email, click here to see it on my blog)

    10881524_782080278506459_9149890569407734836_n

    Did you know?  There are extra perks beyond placing your order during Sale-a-Bration!

    1. Get your friends together for a crafting night or host an online party, and when you and your friends together spend $250 at your event, you’ll get a BONUS $25 to spend ON TOP of the $40 you get free in hostess perks!  That is $65 in freebies just for getting together with your friends!  You invite the people, I’ll provide the projects.  Smile  Email me at jennifer@nwstamper.com for details.
    2. Purchase the starter kit for only $99 and not only will you get products of your choice worth up to $125 and free shipping, but you’ll also get to pick out 2 Sale-a-Bration items to get FREE too!  I host a wonderful community of demonstrators and would love for you to join us.  (Plus ask me about the bonus perks you can earn throughout Sale-a-Bration!)

    Start working on your wishlist and get ready for the launch in only 3 more days!  Yay!

    NWstamper signature_thumb[9]

    order online button for sig 3_thumb[4]

    Project Supplies Used:
    (if you are reading this in email, click here to see the list of supplies)

  • Friday Favorites–Partridge and Pears, Good Greetings, and Blendabilities!

    So, this post is supposed to be highlighting my favorite thing (since this is for the Friday Favorites over at the Stylin’ Stampin’ Inkspiration design team blog) but man if I don’t have a heck of a time picking a favorite!  It’s kind of like being asked to pick a favorite child.  But there are a few things I’m loving right now in this card and so I thought that I’d just expend into my favorite things – plural – Partridge & Pears stamp set, Good Greetings stamp set, and of course, blendabilities!

    This is one of the cards we made in Stamp Club this month and so we kept it simple for the coloring so that everyone could actually get all of their projects done before it was too late!  I’m sure I’ll do another with the tree completely colored, but for now, I’ll let the bird get all the attention. Smile

    Tips for this card:

    • Just because a line art image has lots of space to color, don’t feel like you have to do it all!  Pick a few elements and let them shine by only coloring them.
    • Extend your color palatte by using the Skin Tone Assortment of Blendabilities to color other things like this partridge’s wing and face.

    • Use the Good Greetings hostess set to add a sweet sentiment to your holiday cards.
      NOTE – this stamp set is only available until Oct 31st to hostesses!  Email me at jennifer@nwstamper.com to talk about earning yours!
    • Tuck a piece of the Silver Baker’s twine just under the edge of the tree image for a little hint of glitz on your card for some subtle sparkle.

    This stamp set just LOVES to be colored with the Blendabilities markers and it is so fun to do. 

    Seattle/Bellevue Folks –  if you aren’t already signed up, you can come learn more about coloring with Blendabilities with my Technique Class on Tuesday 10/28!  RSVP today!

    NWstamper signature_thumb[9]

    order online button for sig 3_thumb[4]

    Card Supplies Used:

  • Wonderful Word Bubbles for a I Love You Card

    Today I have to share a card that I created for a set of Pictogram Punches stamp set focused display board cards for our Stylin’ Stampin’ Inkspiration convention board.  I knew I had to get this set when I first saw it in the catalog, but when I had to create 4 different cards AND make sure they were cute enough to have on display next to some other very talented ladies… well, I knew I had to get creative.  And somehow this came out:

    YAY!  Isn’t it a fun card?  I often feel like I’m in a design rut when I’m staring at stamps and cardstock on my craft table and so I always get excited when I get my brain going in a totally different direction and something that isn’t a hot mess comes out! Winking smile

    Insight into the design process for this card:

    1. I started out with the idea that it would be fun to use the Word Bubble framelits (which by the way happen to be one of the dies that you can get FREE or discounted this month with the Big Shot special… just saying!)
      Anyway, I knew I wanted to use the framelits, but I had to use the Pictogram Punches stamp set, so I set out figuring out which image would work and I liked how the I {heart} U image looked and fit in the squarish word bubble.  So that settled that as my central image.
    2. Then I decided to use more word bubbles to emphasis my sentiment.
      So I pulled them all out and started experimenting with how to layer them together.  I ended up with something like this:

    3. Awesome…. now to figure out paper.
      I decided to use the Back to Black designer paper since I wouldn’t have to worry about it being too busy color-wise.  I could just focus on mixing and matching patterns.  I pulled out all the papers and picked 4 patterns that I thought would work in the small format of the die cuts and would go together ok.
    4. Somewhere in here I decided that I needed to add some texture to the card… either that or I had an extra piece of Sahara Sand that had already been embossed with the Stylish Stripes embossing folder and I decided to use that.
      I have a tendancy to do that… see something laying on my desk and jamming it into whatever project I’m working on at the moment.  You might say I’m desperate to use up scraps that I can’t bear to recycle or toss!
    5. I also thought that I needed a pop of color to break up the black and white, so here comes the Silver Baker’s Twine and then a splash of Real Red taffeta ribbon.
    6. Then I started putting down my die cut pieces.  Here is what it looks like before the sentiment got added.
      Yeah, I’m too lazy to actually trim off parts of the word bubbles so they just get flipped around so extra bits are hidden by the main sentiment. Smile

    7. Finally, I stamped the sentiment and cut it out using my Word Bubble framelits.  And for a final touch of color, I stamped again with Real Red ink and punched out the heart using the Itty Bitty Accent Punch Pack and layered that on top with yet another dimensional.


    Each card is like a puzzle, you just have to keep moving and turning the pieces until they suddenly all fit!  Eventually – and with a big enough hammer – they will fit for you. Smile

    And if you want to try this at home, don’t miss out on getting these framelits and the Somethin’ Somethin’ stamp set for FREE with the purchase of a BigShot or get the bundle for 15% off through the end of the month.


    Thanks for stopping by and congrats to everyone with Stylin’ Stampin’ Inkspiration for making to 1 year of regularly awesome projects, ideas, and inspiration!
    Now you can follow us on Pinterest or even like Stylin’ Stampin’ Inkspiration on Facebook!

    spaced shop now sig bar

    August Online Stamp Club Hostess Code – TT2NETD4
    Use this code to get free exclusive tutorials & project kit! Learn more

    Card Supplies Used:

  • A Couple Quick Creations Thanks to the Happenings Card Kit

    A Couple Quick Creations Thanks to the Happenings Card Kit

    With the release of the new Stampin’ Up catalog, it is always fun to chat with folks after they have had a little bit of time to flip through it a time or two (or four or twenty… ha ha!)  Always there is a stamp set or accessory or something that has been around for a while that we have TOTALLY MISSED and think are so stinkin’ cute.  And then there are the few items that you see but can’t really picture how cute they can be until you see someone else using them.  For example, this Happenings Card Kit.

    happenings card kit

    I remember completely skimming past it in the Occasions Catalog (yep, this has been around since January) but it wasn’t until they gave us a kit at the Leadership conference in TX that I started to notice it.

    Then finally the last weekend in May I put together a class using this kit which turned out to be a TON of fun!  Everyone got their own card kit- I brought the stamps, ink, and lots of samples for ideas; and we sat around creating our own versions of the 15 cards in the kit.  For example:

    Did you know that the sentiments from the Geometrical stamp set fit really well in the banners?  Since the circle, the banner, and the glimmer paper piece were all die cut – this card was as easy as stamping the sentiment and then assembling!

    Or you can get extra creative with what is left over once you punch out your die cut shapes.  Like this:

    I popped out the big green banner piece and set it aside for another card.  Then there was a little bit left of the green pattern printed on the die cut sheet and so I just grabbed my scissors and started trimming around the patterned shape to get that banner outline!  Totally fun, huh?

    And seriously, multiple people finished all 15 of their cards – each one being unique, I might add, in the 2 or so hours we had allotted!  So, kits can be great for that time saver crafting.

    Stampin’ Up Supplies Used

    I’ll have more projects to share with you using this kit… or if you order this kit from me, I’ll email you a PDF with all 15 of my unique samples!  Gotta make sure you have some fun inspiration to get you started.  Smile

    And if you want some more inspiration, here is one set created by Tanya Cabral at that stamping afternoon:

    Happenings Kit project ideas

    Enjoy and Happy Friday the 13th!

    spaced shop now sig bar

    June Online Stamp Club Hostess CodeACANDKB4
    Use this code to get free exclusive tutorials & project kit!  Learn more