Northwest Stamper

Tag: sequins

  • Faux Watercolor Writing Made Easy with the Stamparatus {Blog Hop)

    Faux Watercolor Writing Made Easy with the Stamparatus {Blog Hop)

    2018 Holiday Catalog Cover

    Woo hoo!

    It is the first day of the new Stampin’ Up Holiday Catalog and I’m here with a few of my team members to share with you some really cute ideas from the new catalog.

    I mean, gotta kick it off right with some inspiration for you!

    Don’t forget! If you earned Bonus Days certificates in August, you are now able to use them!  You have until the end of September to use your certificates.  You can use them on any order and as many as you want in the order! So, if you see something you love from the ideas we share, take advantage of those $5 credits to get a deal on them in September!

    Fun n Crafty Blog Hop Badge

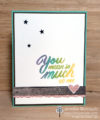
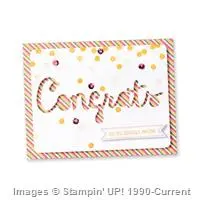
    Ok, now back to today’s project.  One of the things I love doing with my group is swapping when a new catalog is being released.  Many of us preorder some of the new product and then create cards to swap with each other so we have more ideas and samples to share.  So, my project I’m posting today is the card I created for our swap.  I know this is the “holiday” catalog and so there are lots of great Christmas, Halloween, and Thanksgiving/fall sets.  But I spotted this Mean So Much stamp set and love how it is unique and perfect for any time of year.

    Mean So Much Faux Watercolor Lettering

    Mean So Much Bright Color with Woodgrain Card

    One of the things I love about this stamp set is how neat the sentiment looks with all the different colors of ink.  I’ve seen this type of coloring – Watercolor Lettering – before and it often takes inking a stamp partially, cleaning it off, inking it up in a different area stamping again, rinse and repeat.  Or you can brush the lettering with an aqua painter and then tap in liquid ink.  However,  this stamp set breaks it up for you and makes it much easier!

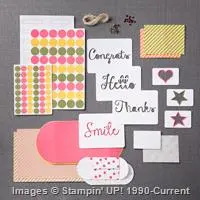
    Here is what the stamp set looks like:

    Mean So Much Stamp Images

    You see those strange faded partial letters?  Well, they actually layer surprisingly easily to create this sentiment!  So you end up with Faux Watercolor Lettering!

    Mean So Much faux watercolor sentiment close up

    Tips for getting the letters to line up
    1. Use the Stamparatus!  With the Stamparatus, you can place all 4 images on the 2 clear plates included with it and this allows you to place each stamp and try it out on scrap paper so you can make sure you like your alignment before stamping your final project.  Because once you like it, you know the stamps are always going to stamp in that same spot.
    2. Start with stamping the last part of the sentiment first (“uch to me”).  If you stamp the last part first, it will leave a large enough image on your paper, that you can easily see where you need to position the next part of the sentiment (“u mean so uc”).
    3. Work your way from right to left on stamping the sentiment. Stamp the first image, and then set the next stamp over your first image.  Since these are photopolymer stamps, you can see through to know exactly where to line up your image.
    4. Play with color combinations. I spent a while trying out different color sets until I found the combination I liked best for this card. Start by looking at patterned papers or embellishments to see which colors go together well and then branch out into what calls to you.
      For this card I used the following colors:

    Add Other Fun Accents like WoodGrain Textures paper, sequins, and ribbon!

    So, once I had the sentiment how I liked it, I pulled together the rest of the card.  I cut out the heart from the same stamp set and added one of the small stars from the Twinkle Adhesive Backed Sequins.  And because one star or sequin is never enough, I added more to the upper left corner as well!

    Mean So Much woodgrain and star sequins card

    Finally, for the bottom, I used scrap strips of the Woodgrain Textures designer paper and layered a bit of the Powder Pink Mini Ruffled Ribbon underneath so a hint peeked out.

    So I hope you enjoyed the idea I shared with you today.  Remember, just because it is in a holiday catalog doesn’t mean it isn’t useful all year round!  Now, I invite you to check out even more fun ideas from more of the Fun n’ Crafty Stampers:

    1. Stacey – A Work of Carte
    2. Christine – Artful Musings
    3. Merit – MB Squared Designs
    4. Nicole – Inky Fingers Stamping
    5. Jennifer – NW Stamper<— YOU ARE HERE
    6. Tobe – The Craft Sea
    7. Pamela – Stinky Tofu

    *** Please leave a comment at the end of this post and on the blog hop stops, and let us know what you think!***

    Fun N Crafty Blog Hop - Visit Previous Blog
    Fun N Crafty Blog Hop - Visit Next Blog

    Want to make this project at home?  Here is what you’ll need.  Click any picture to find it in the online store –  

    Thanks for reading! Shop Stampin' Up by clicking here

  • Congratulations or Birthday Card – You Decide!

    Congratulations or Birthday Card – You Decide!

    I recently held my first Creative Cards class of the year with my local stampers. And, since it was right after the Stampin’ Up Occasions catalog launched, I HAD to play with all the new stuff I had gotten from that catalog! I am so glad I had this class on the books because I hadn’t taken much time to get my new stamps inky before then.

    Let me give you a little back story – see, my family is FULL of December babies.  My birthday is in mid-December, both of my kiddos are in December (one at the beginning of the month, one at the end of the month) plus there is my Sister in Law’s birthday and Christmas, not to mention my Mother-in-Law and niece who both have birthdays around Thanksgiving.  So, you see… the end of the year is a busy time for me around here! 🙂   Add to that the fact that it looked like a tornado had thoroughly gone through most of the rooms in our house; well, lets just say that I spent most of the month cleaning up in preparation for parties or holiday get togethers, prepping for those events, and then cleaning up afterwards!

    So, now things are getting back into a routine and I’m excited to start stamping more and sharing more here on my blog and over on my Facebook page. 🙂  Like this fun card using the Amazing You stamp set and Celebrate You thinlits from the Sale-a-Bration catalog!  I love that these can be Congrats or Birthday… which do you think this card would be good for?

    Mix & Match for a fun Celebration card

    This card started out as the idea of having the half sunburst behind the sentiment on a plain white cardbase.  But I got excited and stamped my images and then realized the idea that was in my head just was not working out in real life!  So, I started grabbing bits and pieces from around my craft table to add a little bit of color, a little bit of pop, and some extra sequins for balance; and I ended up loving how it turned out!

    So don’t be afraid to grab unrelated embellishments and papers and experiment with popping them onto your project!


    Need some pieces to play with?  Check out my 2018 Occasions Catalog product samplers to get a little bit of all the new papers, ribbons, and embellishments – so you can try them out and see which ones you like!

    Amazing You Sale-a-bration card idea side view

    Tips for making this card:
    • Neutral pattern papers are great! Take advantage of the Petal Passion designer paper being all black and white designs. Use them add some weight to your card without having to worry about conflicting colors.  I added this 3/4″ x 5 1/2″ strip to the left side of my card to anchor all my different elements.
    • Coordinate the stamps and dies – Coordinate the sentiments from the Amazing You stamp set with the die cut sentiments from Celebrate You thinlits.  They are both free with a purchase during the Sale-a-Bration promotion (Jan-Mar 2018).  The stamp set is free with a $50 purchase, the dies are free with a $100 purchase.  *Or get them BOTH* with a $150 order, PLUS you’ll become the host of your own party and get an extra $15+ in free goodies to add on to your order.  And who doesn’t love free?
      Create your own Amazing You Bundle
    • Pick your Pop of Color – If you stick to one or two light or neutral colors (in this card, I used Basic Black, Basic Grey, and Daffodil Delight), then add in one bright color to add a pop to brighten things up!  I LOVE LOVE LOVE this Berry Burst metallic edge ribbon, and so used that behind my sentiment for that extra pop!
    • Customize your stamps!  I wanted to add the flower from the Amazing You stamp set but it turned out it was just too big for how the card was turning out.  So just cut off the leaves!  I colored in the flower using my Daffodil Delight Stampin’ Blends, trimmed out, and ready to pop on the card.

    Amazing You Sale-a-bration card idea coloring with blends close up

    • Sequins made easy! Finally I needed just one more touch – and it was the Tutti Frutti adhesive back sequins!  You get 5 pretty colors (Berry Burst, Daffodil Delight, Lemon Lime Twist, Pool Party, Pumpkin Pie).  And they already have glue on the back so they are a snap to add on to your projects and they don’t fall off later! 🙂

    Wanna make this at home? Here is what you need:

    Thanks for stopping by! Shop online here


  • Festive New Years Card with Frosted Medallions

    Today I wanted to share another card from my Stamp & Share event which shows off a fun other color palette –

    I used them with the new Frosted Medallions stamp set to create a pretty card that can be used for the winter holidays.

    Most of this card is pretty straightforward, but the one piece that you may not recognize is the pinky/purple patterned strip on the left side of the card.  That is actually the Fancy Frost specialty paper from the holiday catalog.  Now, if you are like me, I thought when it said the paper was embossed that it was a glossy embossing for emboss resist projects.  But NOPE!  It is dry embossed in 6 different patterns, so the pattern is raised up from the paper.  So you can either leave it as is, or you can do like I did and color it in with a sponge or sponge brayer.  It tends to color all of the paper, but the raised pattern comes out darker than the rest of the paper.  Fun, huh?!

    I mixed in some of the super popular new glitter ribbon (you get Silver and Sweet Sugarplum in the pack) to peak out from underneath my sentiment.  And then just a few of the new Fancy Frost sequins attached with some glue dots for just a touch of glitz.

    Then, let the large snowflake from the stamp set as your centerpiece and when you use a light ink like the Soft Sky, you can layer your sentiment right over the top!

    Don’t forget to order your Holiday Catalog Product Samplers!

    I started offering my Holiday Catalog product samplers last week and thank you to everyone who already let me know you were in!  As I got the set of supplies in for the first orders, I decided to put together a video to share what all the products are that you’ll find in the product samplers, plus extra project ideas at the end where I share some of the holiday catalog stamp sets and cards and projects that you can make with them!

    >>>Reserve your Product Sampler here<<<

    NWstamper signature_thumb[9]

    order online button for sig 3_thumb[4]

    Project Measurements:

    • Soft Sky cardstock – 5 1/2″ x 8 1/2″
    • Fancy Frost designer paper – 1 1/2″ x 5 1/2″
    • Whisper White cardstock – 3″ x 3″
    • Glimmer ribbon – 5 1/2″

    Product List

  • Making Kites on Cards with the Swirly Bird stamp set

    If you have seen the Swirly Bird stamp set in the Stampin’ Up catalog, you may have thought to yourself that it didn’t look like much… or, like I did, what the heck am I going to do with these shapes?!

    But the amazing thing you’ll see if you start looking at cards using this set, is that you end up seeing so many different options and opportunities!  Kind of like life, right?  You look at the jumble of people and situations and wonder how it all comes together and yet, usually you end up being pleasantly surprised by some of the cool and unexpected ways things come together!  So, today I thought I’d share one of the first cards I made with the Swirly Bird stamp set… did you see those weird triangle shapes in the stamp image above?  Check it out… they turn into kites when used together!!!

    Tips for making this card:

    • Two stamps means lots of opportunity to play with color – Mix and match your colors for the striped part of the kite and the solid part.  I was focusing on Delightful Dijon as this was a card for the OnStage displays using that color, but play around with your favorite colors to find new and fun color combinations!
    • Cut out some shapes to help your kites float on the breeze – While there is a coordinating thinlit set, it doesn’t cut out the kite image or the little bows.  But don’t be dissuaded from adding this pop of dimension!  Here are a few of my tips for cutting out stamp shapes so they look great:
      Always leave some white space around the outside of your images! 
      When I first started cutting out stamped images, I tried to cut exactly on the outline of the image.  The problem with that is that I’m an imperfect cutter and so sometimes I would cut right on the line and sometimes I’d cut OFF the line, or leave a little bit of white.  Which in the end, didn’t look so great.  But when I would cut and always try to leave a little bit of white around the edges, you don’t notice when I’m slightly closer in one spot or a little farther away in others.  Plus, it keeps the clean edge of the stamped image in tact, so the image always looks great!
      Move your paper NOT your scissors! 
      This is another trick that blew my mind when I first started cutting things out.  If
      you are like me, you learned in kindergarten to open and close the scissors in the direction of where you want to cut.  And that works great if you are cutting strips of paper or other mostly straight lines.  It doesn’t work so well when you are cutting curves or in little detail areas.  So, now, I always start with my scissors open and slowly close them for my cutting, but with my other hand, I move my paper to change direction of the cut.  Moving the paper allows for smooth curves and can make it a lot easier to get in to those tight little spaces.
    • Cut up your dimensionals (and the edges of the foam dimensional sheets!) to pop up even the littlest pieces – I wanted my kites to be floating on the breeze, but then I had to figure out what to do with the tails.  Ended up being easy to just cut up some of the edges of dimensional sheets so I could pop up the thin lines behind a few of the bows on each string.  Seriously, it is easier than it sounds!
    • Try the other stamps in unexpected ways!  I thought the swirly images in the stamp set looked like birds nests or artsy flowers, but when working on this card, I suddenly saw clouds!  That is the beauty of it, you can make them whatever you want!  I used Soft Sky ink and then for fun, added a white sequin from the Metallic Sequins assortment to the middle of each with a glue dot.

    I loved how this card came together and hope it inspires you to give this stamp set a second look and maybe you’ll see some fun and unexpected combinations for an amazing project!

    And speaking of fun and amazing new products and projects, if you missed it over on my YouTube channel, I posted an “unboxing” video to walk through all the new ribbons, papers, accessories, kits, and many many new stamp sets!  In fact, I had so much I couldn’t keep it all in one box!  So, check it out and see if you find any unexpected favorites in there Smile

    Annual Catalog Unboxing and New Product Preview

    So, what do you think?  Have a favorite stamp or paper?  I love your comments and would love to hear from you on what your thoughts are Smile .

    NWstamper signature_thumb[9]

    order online button for sig 3_thumb[4]

    Use Hostess Code WKVC92UY at check out to get a special thank you from me!

    Project Supply List

  • Thanks to all the Moms out there! Happy Mother’s Day!

    Happy Mother’s Day to you and your Mom!  I’m hoping to have a relaxing day with my family and hope you are close enough to yours to do the same.  And if not, then at least a day to sit back, relax, and enjoy happy memories of your loved ones. Smile 

    I wanted to share this fun card from a past Paper Pumpkin kit as my thanks to my Mom, Kathy Thisted, who truly is seriously amazing. Smile  Especially because she has had to put up with me and my wild, determined, independent ways as I was growing up!!  And that she fostered a love of creating and continues to share it with me as we share our experience with Stampin’ Up together!

    2014-07-18 13.45.08

    So here is to all the moms out there!  And all the crafty families.

    Here is a little bit more about the project too:

    • I told you the Paper Pumpkin kits were improving, didn’t I? Smile  This is the “Seriously Amazing” kit and it has all kinds of fun sentiment options from Thanks, Hello, Smile, and Congrats.  AND you can still get it as a Paper Pumpkin subscriber too (or if you just want to sign up to try it and pick up some awesome extra kits along the way!)
      Check them out:  Seriously Amazing Full Kit  |   Seriously Amazing Refill Kit
    • Make this same style of card by die cutting out your letters from a white piece of cardstock and add some stamped flair (like the Hello Honey dots here) around your cut out word.

    • Layer your die cut word over some patterened paper, and keep up up with Stampin’ Dimensionals for a cute look.
    • Add a few sequins for a different style of sparkle and shine… attach with a glue dot – easy peasy!
    • Layer your sentiment with a banner to tell her how you really feel.


    And if you aren’t a Paper Pumpkin subscriber yet, it is an fun way to get projects in the mail each month and you can pause or cancel anytime, plus have immediate access to purchase some of the awesome past kits.  So consider giving it a try! 

    Try Paper Pumpkin Today

    Have a wonderful day and thanks for sharing some of it with me. Smile

    NWstamper signature_thumb[9]

    order online button for sig 3_thumb[4]

    Project Supplies Used:

  • Another Sneak Peek with Simply Wonderful and Tip for Using Your Patterned Paper Scraps

    If you are like me, you have a pile of paper scraps on your desk… some punch outs, some larger cut pieces, some stamped images.  And I have a heck of a time convincing myself to recycle them because I just know they will be useable in another project.  Unfortunately, I don’t actually use them most of the time and they just pile up.  Like so –

    2015-01-01 15.18.40

    So, I decided to spend some time this week using them up!  I’ve been sharing some of my progress on my Facebook page – www.facebook.com/nwstamper – but I just loved how this card turned out and so I had to share it here.

    This is also a sneak peek of the Sale-a-Bration set Simply Wonderful.  I can already tell I’m going to have LOTS of fun with this one.

    But the thing I really wanted to share was the technique for using up your scraps of paper to create this diagonal pattern for the card.

    Tips for making this card:

    • This is perfect use for 6×6 paper packs or pieces from my Paper Samplers!  New Occasions Catalog Paper Sampler is coming soon!  Watch HERE for more details.
    • Cut your strips of paper to 3/4” x 3” and adhere at an angle across a scrap piece of cardstock.  (I did two at a time and had two 1-1/4” x 4” pieces next to each other when glueing)
    • Trim the excess paper off the edges to get your final piece of patterned paper
    • The All is Calm specialty designer paper makes a pretty backdrop but it is only available until January 5th!
    • Add some baker’s twine and some Sequins (like the In Color Sequins) to add some coordinating bling to your card.

    Check out a video for how I put this card together –

    (viewing this post in email, click here to see it on my blog)

    10881524_782080278506459_9149890569407734836_n

    Did you know?  There are extra perks beyond placing your order during Sale-a-Bration!

    1. Get your friends together for a crafting night or host an online party, and when you and your friends together spend $250 at your event, you’ll get a BONUS $25 to spend ON TOP of the $40 you get free in hostess perks!  That is $65 in freebies just for getting together with your friends!  You invite the people, I’ll provide the projects.  Smile  Email me at jennifer@nwstamper.com for details.
    2. Purchase the starter kit for only $99 and not only will you get products of your choice worth up to $125 and free shipping, but you’ll also get to pick out 2 Sale-a-Bration items to get FREE too!  I host a wonderful community of demonstrators and would love for you to join us.  (Plus ask me about the bonus perks you can earn throughout Sale-a-Bration!)

    Start working on your wishlist and get ready for the launch in only 3 more days!  Yay!

    NWstamper signature_thumb[9]

    order online button for sig 3_thumb[4]

    Project Supplies Used:
    (if you are reading this in email, click here to see the list of supplies)

  • Speedy Scrapbooking with Seasonally Scattered

    I realized this weekend that I haven’t done traditional scrapbooking in what feels like a long time.  And I really do miss it!  So, after I get all caught up with the samples for my next few events, I will be for sure doing more scrapping.  And I may just have to plan a cropping day too… anyone want to join me?

    Today’s share however is a page I created for the Stampin’ Up convention display boards using the new Seasonally Scattered stamp set from the Holiday Catalog (which I’m finishing mailing out this week, so if you need a copy, let me know!)

    Tips for this project:

    • Keep it quick by using the designer paper packs, like the Moonlight pack here, and just overlap full sheets of the paper to make your background.  No cutting means fast designs!
    • Use up your ribbon scraps by trimming the ends and then adhering them in a group behind one of your layers of paper.  I mixed 1/8” Taffeta in Melon Mambo and Satin Ribbon in Hello Honey & Blackberry Bliss.

    • After stamping your sentiment in Melon Mambo and then outline the letters of the stamped image in a contrasting marker – in this case Blackberry Bliss.
    • Use vellum for a subtle way to add journalling to your project without the journalling block dominating your scrapbook page.
    • Add a few sequins for some bits of color and shine along the top of your page.

    The fun part about scrapbooking is that you get to enjoy the memories while you are working because you are looking at your pictures… plus you get to have fun will all your tools and techniques as you build your page.  It is like a really big card to play and experiment with!

    Scrapbook even faster with Project Life!  If you have tons of pictures you want to get documented but don’t feel like you have time to scrapbook, don’t forget to check out Project Life.  All you need is a few essentials:

    image

    See all the options with Project Life here

    Drop your photos in the pocket pages – no cutting required! Add the cute cards from the card collections and just write in your notes about what was happening and you are done!  Easy Peasy!  Learn more about Project Life and see a video of how fast it is to create a set of pages in this blog post.

    spaced shop now sig bar

    August Online Stamp Club Hostess Code – TT2NETD4
    Use this code to get free exclusive tutorials & project kit! Learn more


  • Quick and Easy Thank You card with Kinda Eclectic

    I hope you don’t mind one more card using Kinda Eclectic but I think this one is pretty different from a lot of the other cards I showed you.  I’m sharing it as part of the Stylin’ Stampin’ Squad’s Quick & Easy Cards post for today.  So check out my contribution:

    See, quick… easy… and just a little bling to keep it sparkly fun!  It was another display board card and I was sad to see it didn’t make it up on the boards this year… but I noticed another card that had a similar design so I can understand why they had to pick one.  So this is mine and if you order from me in the next month or two, don’t be surprised if one of these guys makes it to your mail box as a thank you for your order!

    Tips for making this card:

    • The green polka dots are the polka dot image from the Kinda Eclectic stamp set, stamped twice on the card front.  If you have the clear-mount version of the stamp set, you can “best guess” line up the images (which is what I did for this card… total eyeballing and luck!) or get precise by grabbing your Stamp-a-ma-jig (see it here).
    • Use In Color Sequins to add a little sparkle to your dots (and help cover up any that didn’t stamp perfectly!).  I used a glue dot to hold them down which gives you a little dimension as well!
    • Wrap some linen thread  around the inside edge of your card (right next to the red cardstock) to add some subtle texture and keep everything from blending together.

    As you can tell, this card comes together quick with very few layers (yeah, like 1 – ha ha) and just a few of those embellishments you get because they are so cute but you always forget to use!  Pull them out and enjoy them.  Smile

    LAST DAY for the Buy 3 Get 1 Free Paper promotion

    So, since I’m the one who is totally prone to remember a sale is ending the day after the sale is finished, I thought I would try to help you not be me and let you know that TODAY is the LAST DAY for this promotion.  You can check out Tuesday’s post where I shared my 3 favorite designer paper packs and card samples for each one.  So, check them out and you can pick them up before 11:59pm MST tonight using the following link:

    See all the paper on sale here

    Join me tomorrow when I promise to share a project that is NOT Kinda Eclectic or Amazing Birthday… you know, because I gotta keep mixing it up for you, right?  Winking smile  But I will tell you that they will help give you an idea for a new promotion starting tomorrow!!  (Lets just say if you’ve been wanting a BigShot, you are going to be getting a sweet package in the month of August!)

    spaced shop now sig bar

    July Online Stamp Club Hostess Code – TT2NETD4
    Use this code to get free exclusive tutorials & project kit! Learn more

    Card Supplies Used:

  • Watercolor Notecard Weekend–Day 1 Fun with Happy Watercolor

    Watercolor Notecard Weekend–Day 1 Fun with Happy Watercolor

    Ok, I know I’ve been sharing a lot with Happy Watercolor and even the Watercolor Wonder Notecards, but I’ve been having a lot of fun playing with them and I want to share them since I know a lot of folks have ordered the stamp set and the notecards.  I figure more idea for how to use your stuff is always better, right?  : )

    So in case you didn’t realize it with my past pictures, the cards come preprinted with different colors or patterns to get you started.  And they are all on watercolor paper… which means you can have fun watercoloring and adding your own personal touch as well.  So, here are two cards I made from the same base card, just with different stamping and embellishing.

    I would like to add, that I was not excited AT ALL when I was given these sequins a while back.  But turns out, they are a fun touch to add sometimes.  Since they come on a strand, I’ve been using them by pulling off sequins or tucking the strand partially behind a stamped layer.  But in this case, I think they actually are just right as a strand out in the open, all on their own!

    And then I wanted to figure out some different ideas to try on the other card styles… so this is my modified version of the spotlight technique.  Though, I think it almost looks like a bar across the colored background stamps… so maybe it is a “censored technique” because it looks like a censor bar. Smile

    And the last one for today I call my “Artsy Poppy”.  I started mixing and matching the stamps in the set as an experiment.  I actually kind of like it. 

    (PS – did you notice, this card base is the same as the card above?)

    If you look close up, you can see that the center of the poppy needed something, so I took an extra sequin and glued it down with a glue dot.  It still was missing something, so I added a little pearl and it suddenly was just right!

    So see, lots of different ideas and ways to spruce up these cards.  You have one more week to grab them – and 20 cards for $12.95 isn’t a bad deal at all!  See all the watercolor wonder coordinating supplies here.

    I have one more set of cards using these notecards that I’ll post tomorrow.  So you will have LOTS of ideas to play with with your supplies.

    spaced shop now sig bar

    May Online Stamp Club Hostess CodeZUBHUEK6
    Use this code to get free exclusive tutorials & project kit!Learn more

    Stampin’ Up! Supplies Used
    Stamps – Happy Watercolor
    Ink – Stazon, Gumball Green, Calypso Coral, Daffodil Delight, Tangerine Tango, Crushed Curry
    Paper –Watercolor Wonder Notecards, Whisper White
    Accessories – Scallop Tag Topper punch, Pearls, Gold Sequins, Aqua Pen