Northwest Stamper

Tag: satin ribbon

  • Festival of Trees–a Christmas Card and a Gift Certificate Holder

    I thought I was done with my Christmas projects, but I found 4 more I wanted to share with you. Smile  I had been having fun the last week or so and thought I’d share them with you before Christmas is officially over!  Especially since some of the accents on the projects are part of the Year-End Clearance Sale!  Including:

    imageimageimage

    #1 – Festival of Trees Gift Certificate Holder

    Yes, there is still time to get a gift certificate if you need last minute stocking stuffer (just email me at jennifer@nwstamper.com).  It won’t come in the cute holder, but you could make your own if you are feeling crafty tonight!

    I had to pull out a lot of my Holiday Catalog goodies because I had been neglecting some of them… like the Trim the Tree designer paper stack and this AWESOME Red Satin Woven Ribbon.  And of course there is the easy and funky Festival of Trees stamp set.

    I mounted the trees on a Deco Label die cut that I popped up with Stampin’ Dimensionals so I could slide the ribbon underneath to allow it to be opened and closed as necessary.  Then on the inside I added more trim for the gift certificate by adhering a strip of cardstock on the bottom of the inside to form a pocket and then used the matching Trim the Tree designer paper to accent it.  What a fun present!

    And then, since this was an odd size (7” x 4”) I needed to figure out an envelope.  Then it hit me!  I have an Envelope Punch Board and can make my own custom envelope!  I reached for my Under the Tree specialty designer paper because it was made from Kraft cardstock and so it is heavier (ie – will hold up better in the mail) AND it is stiff enough that it helps smooth out the bumps to make sure bow and embellishments on the front of the holder don’t get caught up in the post office.   Plus it just looked cool. Smile

    Under the Tree kraft envelope for gift certificate

    Ok, then on to matching project #2

    #2 –  Festival of Trees Christmas Card

    I thought this coordinated so well, I’d share it today too.  This also uses the Festival of Trees stamp set but adds the sentiment from the Endless Wishes stamp set (sniff, sniff… so sad Endless Wishes didn’t make it onto the carry over list!  Love those snowflakes and sentiments!)

    I really liked the color and weight of the Under the Tree specialty designer paper, it added to the vintage feel I was going for, so I used that for the Red and Kraft trees pattern paper in the background.  Then I was back with more sparkle paper for the front tree and then the little Christmas tree from the Clearance Rack Merry Minis Punch Pack.  It is just such a cute accent!  I even had to use it for the inside as well.

    See the little green trees on the inside? Fun, right?

    I hope you have a wonderful Christmas eve full of fun Family and holiday traditions – or at least good times remembering some special Holiday memories!

    NWstamper signature_thumb[9]

    order online button for sig 3_thumb[4]

    Project Supplies Used:
    (if you are reading this in email, click here to see the list of supplies)


  • A Sweet Spring Scrapbooking Layout & Some Cards

    A Sweet Spring Scrapbooking Layout & Some Cards

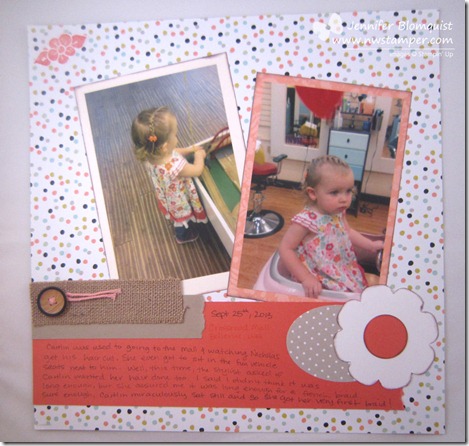
    Ok, it is officially the next to last day for Sale-a-bration.  So, as promised, I’m sharing my last few projects using my Sale-a-bration freebies.  I realized that the Sale-a-bration flyer doesn’t do the best job giving you a feel for the different stamps and papers so hopefully seeing them in person gives you some ideas for what you like and how to use what you have!

    First up, a sweet scrapbook page that took me about 20 minutes to complete!

    Seriously – only about 20 minutes, if that!  And that includes the journalling. Smile 

    Sorry the photo isn’t the best… I’m still trying to figure out the best way to photograph 12×12 layouts (if you have any tips, PLEASE leave me a comment and let me know what you do!)

    Ok, so here is the real reason why this came together so quickly – it is made up of entirely scraps!  Aside from the button, and cutting down the Calyspo Coral designer paper for one of the photomats (from a scrap).  Everything else on the page is used exactly as is from my scrap pile! 

    Alright, I did a little sponging… but NO CUTTING!

    I guess sometimes saving those scraps and die cuts is a good thing.

    This page is for Caitlin’s first (and so far, only) time getting her hair done in a salon.  She barely lets me brush her hair and so trying to attempt a braid is a little too ambitious.  Smile  So I wanted to capture the moment when I had the chance!

    Stampin’ Supplies used

    And I have a few extra cards to share with you today as well.  Just some bonus inspiration!


    I love the Vivid Vases stamp set and turns out it kind of works with that crazy pattern from the Sweet Sorbet designer paper (can you believe this pattern come from the same pack as the paper used in the scrapbook page above?)

    And then there is this super sweet and simple card I was given by Holly Jones:

    This uses the Petal Parade stamp set for the focal flowers and then a simple small circle punchout of Silver Glimmer paper for the centers!

    So, hope these gave you some ideas and I’ll be back tomorrow with two more simple ideas to finish out your Sale-a-bration season!  Smile 


    spaced shop now sig bar

    March Online Stamp Club Hostess CodeXEWP4DFD
    Use this code to get free exclusive tutorials & project kit! Learn more

  • Finishing Up Christmas with Some Beautiful Cards

    Its been such a whirlwind month around here with 2 birthdays down and Christmas behind us – only one more birthday in our family to go!  But I was fortunate enough to receive a few Christmas cards from my friends and I loved them so much that I just had to share!

    First up, I love this vintage feel that Tanya created by her color choices of Very Vanilla naturals paper, Chocolate Chip, and Old Olive.  Plus the sponging around the edges to create a cool Christmas card.

    created by Tanya Cabral


    I also received this cool Christmas card from Liz.  I loved the idea of using the Dazzling Details to make the glimmery dots around the Tulip Frame embossing folder.  I know the picture is a little dark, but it is so sparkly in person.

    created by Liz Mitchell

    Plus she did her embossing on the Shimmer White paper.  I tried to catch it in the light…. can you see the shimmer? Smile


    Well, I guess that wraps up Christmas projects for the year!  Now on to spring projects and new goodies from the Spring Catalog and Sale-a-Bration exclusive event!

    Do you need a Spring Catalog or Sale-a-Bration catalog?

    Just send me your name and mailing address to jennifer@nwstamper.com and I’ll get you all hooked up!


    To Order Stampin’ Up! Products Anytime, click here!

    Are you earning your Northwest Stamper Rewards?
    Every order gets you closer to your FREE stamp set!Click here to learn more!

  • Making a Perfect Mini Bow the Easy Way!

    For years, I’ve been running classes where one of the cards may have a bow on it.  And I’ve watched folks struggle with trying to make a smaller bow without either getting your fingers caught or one side of the bow threatening to come out.  Now, it is totally possible to tie it like normal, but I’ve finally put together a video on how to do it the quick and easy way that comes out perfect everytime!  No, seriously! 🙂 I have it at the bottom of this post.

    So, here is a card I made with the sample bow from the video.  Isn’t it cute?  It uses the retiring satin ribbon (seriously, I think this is the product I’m most sad about losing!) for a border and bow.

    easy events fork bow card


    Now if you are curious about the scallopy Saffron circles under the ribbon – surprise!  It is the retiring Pocketful of Posies designer paper and I just cut along the white lines in the paper.


    See, just cut and flip it over and here you go!  Oh, and another close up of the bow.perfect fork bow closeup


    Alright, so if you’ve made it this far, check out the video for how I made this bow using a fork… that is right, a fork.  Then leave me a comment and let me know what you thought of it!


    To Order Stampin’ Up! Products Anytime, click here!

    Get them before they are gone! Items are selling out so don’t miss out!

    Retiring Stamps  |  Retiring Accessories  |  Retiring Décor Elements

    Hello Easy Bow Card Recipe:

    Stamps: Easy Events
    Ink: Early Espresso Classic, Soft Suede Classic, Crumb Cake Classic, Old Olive Classic
    Paper: Pocketful of Posies designer paper, Perfect Plum cardstock, Whisper White cs
    Accessories: 2-3/8” Scallop Circle punch, Basic Pearls, Old Olive 5/8” Satin Ribbon, Blender pen, glue dots, Sponge Daubers

  • Clean and Simple Scrapbook Layout

    I will admit, I spend most of my crafting time making cards.  They are practical…they are fun…they don’t take too much time if I’m in a rush.  But that said, I have a ton of pictures that I take and keep that I want to scrapbook.  So, I’ve started trying to make an effort to catch up on my scrapbooking backlog.  This is a page I completed recently and I love how it turned out.

    If you can’t tell from the picture, my son is pushing the sand out of the play tube and onto the ground.  Just keeping it clean. 🙂

    So, I used the “vintage-y” paper Love Letter and when I first saw this paper when it came out I thought I would never use it but turns out it works great even for non-Valentines, non-girly pages.  Yay!  I also made the red embellishment on the bottom right by just layering two punchouts using the decorative label punch (layer so that they are perpendicular to each other).  I think it turned out pretty cool and kind of different.

    What do you think, do you think the paper works for a layout like this?

    Click here to shop online 24/7


    Keeping It Clean Scrapbook Page:
    Ink: 
    Chocolate Chip (for sponging of the label)
    Paper:  Love Letter designer paper, Chocolate Chip cardstock, Sahara Sand textured cardstock, Riding Hood Red cardstock
    Accessories:  BigShot die cutting machine, Billboard alphabet die cuts, Chocolate Chip satin ribbon (retired), Decorative Label punch, Large oval punch, Wide oval punch, silver brads

  • Watercoloring Techniques: Watercolor Pencils

    Alright, today is the last day of my Watercolor Technique card shares.  At least for now.  But with this last card,  I wanted to show you the 5th technique we are doing in my watercolor technique class.  So without further ado:

    Watercoloring with Watercolor Pencils

    You may think, “yeah, yeah, I know what it is like to color in an image with colored pencils. I did that back in school.”  But have you seen the magic that is watercolored pencils? Smile The cool thing about watercolor pencils is that you have the control to color in fine details and spaces because you have the fine tip of the pencil.  And coloring with colored pencils is very pretty.  But you are left with pencil stroke marks that maybe you would rather not have.  Simply wave your magic wand (aka Blender pen or Aqua pen) over the places where you colored with the pencil and voila!  You get this beautiful, smooth watercolored look.  Here is an example… though I’m having the hardest time taking a good picture to really show you what I mean.  But in the image below, the flowers are colored using the same colored pencils and amount of coloring.  But the one on the right has been gone over with a blender pen.  You can at least see that the color gets more saturated and maybe see that it has a smoother look.

    That said, here is the sample for the card we are making in the class:

    Like I said, the pencils are great for detail work.  Especially things like the stamp border and the tiny flower bud.

    This technique is so pretty and so easy at the same time.  It was also probably the favorite the last time I ran this class.

    Well, I hope you enjoyed checking out some of the different ways to add watercoloring looks to your cards.  This is a good introduction to just the surface of what you can do and I’d love to hear what your favorite techniques are as well!  Leave a comment and let me know how you like to do watercoloring.

    Interested in trying these cards & techniques out yourself?

    In Person
    Do to multiple requests, I’m running my class again on March 28th in the Mountain View, CA area.  I’d love to have you join us. Check out the full details on my meetup site.

    Online
    Or, if you are not local, purchase the supplies for these techniques from my online store and send me an email.  I’ll send you written tutorial instructions for these cards for FREE!  Not sure what you need, email me at jennifer@nwstamper.com and I’ll send you a basic supply list and you can see what you have in your stash and what you would still need.

  • A Pretty Card Purse Hostess Gift

    This last friday I had a fun workshop with some ladies I met recently.  I wanted to make something nice for the hostess who organized the evening and so I decided to make her a purse with a variety of cards inside.  I knew she loved purple and I remembered the awesome purples in the Lap of Luxury Designer Paper.  I swear, the first time I saw this pattern I said,”it looks like velvet!”.  It really does look luxurious in person!

    hostess luxury purse front view

    So, to go with the luxury theme, I used black (more posh, don’t you think?) and made the handles out of Black Satin ribbon (I love this stuff!!).  The inside opens up and I put in four cards with envelopes, oh, and some yummy chocolates, but it could hold a ton more. 

    hostess luxury purse open

    This purse is actually remarkably easy to make and only uses 1 sheet of designer paper and 1/2 a sheet of cardstock!  I may have to make a few more for extra gifts. Smile 

    hostess luxury purse side view

    Thanks for visiting! 

    Luxury Card Purse Recipe:
    Paper: 
    Lap of Luxury DSP, Basic Black CS
    Accessories:  Basic Black satin ribbon, Round Tab punch, Kraft corduroy buttons (clearance rack item), Pewter Jumbo Eyelets, Crop-a-Dile, Sticky Strip, Velcro circles, Corner Rounder punch

    Want to make your own purse?  Get the supplies now in my Online Store!

  • Birthday Butterflies and a Get Well Card

    Alright, so last time I shared with you the Love card we made at my card night.  So, today I wanted to share the other two cards we made that night.  Both are inspired by cards I found in an old Stampin’ Up! Idea Book & Catalog.  Of course they turned out pretty different, and I wish it wasn’t against Stampin’ Up! copyright rules or I would show you a picture of the originals next to the version below.  Oh well, you just get to enjoy the version I made then. Smile 

    First was a clean and simple get well card.  I love this stamp from the Wellness Wishes set.  It just makes me want to hug the puppy and say,” Awwwww”.  So, we used watercolor pencils to color him in (and I’ll admit the girls that night did a much more artistic and cool version of watercoloring than I did).  We wrapped around some Black satin ribbon and then added a Circle brad.  The So Saffron cardstock was popped up using dimensionals and its as simple as that!

    Tip:  If you are going to use watercolor pencils on Whisper White paper, I recommend using a blender pen to moisten the pencil coloring.  You can use a water pen, but I find that it is too easy for there to be extra water, which causes your paper to wrinkle up a bit.

    Finally, we did a birthday card.  Well, really it was a neutral card and I put out the entire Sincere Salutations set so some people did birthday, some did thank you, while others did Thinking of You.  Got to love a sentiment set that has it all in interchangeable sizes.  We used a background stamp (Pretty Petals) to add a pattern to the base Crumb Cake layer.  Then, stamped the butterflies from the Dreams Du Jour set and sentiment on a Very Vanilla piece.  Tear off a corner of your Vanilla paper and add a Designer Button and you are ready to go.

    Tip:  Crumb Cake ink makes a great subtle color on your neutral papers like in this case.  You can get a great shadow effect by stamping your image on the paper in Crumb Cake and then stamping your image with a darker ink (in this case Concord Crush) on a piece of scrap paper and layering it over one of the Crumb Cake images.  Slightly offset your cutout and the base image will show enough to look like a shadow!

    Interested in making cards like these?

    If you like these cards and are in the San Francisco area, I’d love to have you join me at one of my upcoming events.  Check out my calendar or contact me to set up your own private event for free with you and your friends!  I’d love to show you how to make more fun cards and scrapbook layouts!

    Thanks for visiting!

  • Day of Gratitude Scrapbook Page

    I made this scrapbook page before the craziness of the December Holidays and wanted to share it with you as my farewell to the Holiday Mini.  The Day of Gratitude stamp set was one that didn’t catch my eye when I first looked at the mini but after making a few samples at the Portland Regional in the fall I completely fell in love with this set.  I’m so sad to see it go but I’m sure will keep playing with it for a while.

    So this layout was the first scrapbook page I had made in many many months since I had been so busy with a new baby I had been focused more on cards (quick, easy, and functional!).  However, I did a workshop focused on scrapbooking and when I saw a layout on the Rubber Redneck blog, I just had to CASE it.

    In the workshop we did the 6×6 layout using Old Olive, Very Vanilla and Chocolate Chip cardstock.  We stamped using the Day of Gratitude stamp set and left room to add a 3”x4.75” photo.  Oh, and I had to through in an adhesive backed basic pearl to add a little fun to the saying.

    I think turn it into an 8 1/2”x11 layout by adding the More Mustard  cardstock as a base with accent stamping using More Mustard classic ink and Autumn Spice designer paper.  Throw in some Antique Brads and the chipboard word “fall” cut out using the BigShot (for those of you who have attended a SU convention or regional before, I always save the cardboard/chipboard that is used as a backing for the make and take packets.  I used one of those pieces to make my “fall”).

    Finally, to turn it into a 12×12, I used a base of Autumn Spice dsp, added some textured Chocolate Chip cardstock, some stamped elements and another Antique Brad, with some Old Olive satin ribbon for a final touch of color.

    Makes me almost wish fall wasn’t over yet. Smile This is a pretty easy layout with lots of fun accents.  I loved making it and hope you enjoyed the ideas.

  • A CASE’d Hello from Conventions Past

    Today I thought I’d share a card that is a direct CASE of a card we made at Convention in 2009.  I was asked yesterday if I came up with my project designs on my own or find them from somewhere else.  The answer is both.  And often I look at projects I’ve created in the past and switch up the colors or embellishments to suit what I have on hand at the time.  This is one of those examples. 

    So, here is the card we made at convention:


    And so I switched out the Crushed Curry base and ribbon for Old Olive.  Used Melon Mambo, So Saffron, and Soft Suede markers; and added some of the adhesive rhinestone bling to create this version:

    It’s a bit more subdued than the first version but I like it just as much.  I think it’s also a great card to do at a workshop too.  If you are in the San Francisco Bay Area, I’d love to show you and your friends how to make this card for free.  Send me an email and we’ll pick a fun day for at girls night in!

    Until then, Happy Stamping!

  • Clean and Simple Just Believe Card

    Happy December everyone!  Can you believe it is already here?  I swear I was just making plans for Halloween, but I guess that is how it is every year. 

    I just spent the last week visiting friends and family in Oklahoma, which was tons of fun I might add, and while I was there I had the chance to stamp with a few different wonderful folks.  In fact, a couple of the folks I stamped with decided to take advantage of the starter kit special and joined my team – so welcome Debbie and Kally! 

    I wanted to share with you today one of the cards I made while goofing off with the limited supplies I had brought with me.  This was one of those cards that starts off with one idea (having the grass and flowers be stamped off the edge of the card) and then you make a “mistake” aka “opportunity for embellishment” (I didn’t get the stamp over the edge of the paper and so the grass and flowers stopped 1/2” before the edge of the card); and so a new concept is born.  In the end, I like the simplicity of this card.

    I can’t decide if it needs something else like some bling or glitter on the Razzleberry flower.  What do you think?

    Just For You Recipe:
    Stamps: 
    Just Believe
    Ink:  Old Olive, Rich Razzleberry marker
    Paper:  Whisper White CS, Basic Black CS
    Accessories:  Stampin’ Dimensionals, Old Olive Satin Ribbon, Paper Snips

  • A Curly Cute Congratulations

    So, to continue the celebratory mood, I thought I would post a fun little Congratulations card.  I actually made this card while traveling in Portland and so I was limited to mostly scraps and a small amount of supplies I had on hand.  However, having limited resources can sometimes bring out some cool combinations you wouldn’t have thought of before.

    For example, in this card, I wanted a hint of color and had some scraps of the Elegant Soiree DSP and the Greenhouse Gala DSP.  Mix them together and you get a neat collage of patterns.  Plus, they were mellow enough colors that I thought they would do well to accent a piece of Elegant Eggplant cardstock for the base (oohh… did you see what I did there?  Elegant Soiree and Elegant Eggplant!  Ok, yeah, that was totally accidental, but I’ll still call it fate.)  🙂

    I added some adhesive backed pearls to the corners for a little extra flair and finished it off with a box from Old Olive satin ribbon.  And let me just say, this is the easiest bow you will ever make! 

    To make the bow:
    Cut one length of ribbon and adhere the ends together making a loop.  Then, cut a second piece of the ribbon and wrap it around your first loop, adhering the ends of that second piece together to make the cinch in the middle of your box.  Stick to your card with glue dots and you’re done!  No tying required!