Northwest Stamper

Tag: pennant parade

  • A Valentine’s Day Card Idea using the Label Flipcard Thinlit & All About Embossing Folders with the Weekly Deals!
    A Valentine’s Day Card Idea using the Label Flipcard Thinlit & All About Embossing Folders with the Weekly Deals!

    Wow!  I checked out the Weekly Deals this morning and holy moly if you like embossing or have considered getting into Embossing folders, this is your week!

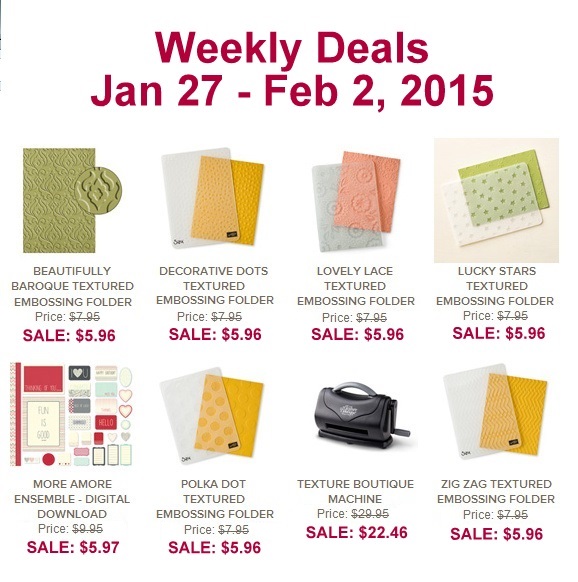
    weekly deals 1-27-15

    You can get

    • 6 Embossing Folders
    • the Texture Boutique machine to emboss your paper with them
    • a free stamp set, paper pack, or blendabilities of your choice from the Sale-a-Bration catalog

    All for only $58 this week!  Totally great deal!  Shop these deals online here.

    If you wanted an even better deal – consider getting the starter kit and you can get

    • 5 embossing folders
    • The Big Shot for embossing OR die cutting

    All for only $99 plus free shipping and then you’ll be a part of my Fun n’ Crafty demonstrator group and get a minimum of 20% off your future orders too!  Learn more here.

    Quick share today of a card I did in my Flip Card technique class where we used the different Flip Card thinlits.  For this sample, we used the Label Thinlit and the dies that came with it for this fun love card:

    Tips for making this card:

    • Start with a 5.5″x11″ piece of cardstock for your card base.
    • Place the thinlit die over the cardstock so that the left side of the die exactly matches the left side of the cardstock.  Then tuck the right edge of the cardstock OVER the right side of the die.  It will look like your paper is threaded through the die.  (under the left and the middle of the die, over the right end of the die).
    • After you run the paper through the Big Shot, you should have the flip part in the middle cut out and a score line on the right 1/3rd.  Fold in on that score line.
    • Use the Pictogram Punches stamp set to decorate the outside, and then the Perfect Pennants stamp set decorate the inside of the flip part.
    • Punch out a Crushed Curry scallop dotted ribbon and adhere along the INSIDE of the flipping edge so that half hangs over the edge (so you can see it when the card is closed).  Layer a white label die cut (that comes with the thinlit set) over the yellow ribbon cardstock to cover the middle.


    Well, tomorrow I leave for leadership… so watch for videos, pictures and more from me from the fun in Orlando!

    NWstamper signature_thumb[9]

    order online button for sig 3_thumb[4]


  • Getting Creative with the Christmas Star Stamp

    Woo hoo!  Today is the day that I’m heading to Utah for Founder’s Circle and I don’t think I could be any more excited!  5 days to relax, stamp, explore, and socialize with some amazing stampers and demonstrators – what could be a better vacation? 

    I’ll be blogging from my trip in Utah as well as offering a Founder Circle special while I’m away!  So, be sure to stop back by the blog to catch all the excitement.


    But, while I’m traveling, I wanted to make sure to share with you some new project ideas using the Christmas Star holiday single stamp

    This stamp is an elegant way to decorate or create for the holidays.  And the coolest part is that it is super easy to make it pop-out into a 3D star!  But more on that in a minute. Smile 

    Now, first thing, I’ll warn you – this stamp is bigger than you think.  I ordered the stamp and didn’t really pay attention to what clear block the flyer listed that was required for it.  I assumed one of my medium blocks would work – NOPE!  It takes the biggest block (block F).

    Yup.  That is a 4.25” x 5.5” card base and the Christmas Star next to it!

    Now, you may be wondering what can I do with a stamp that big? 

    Why, make cute cards and home décor projects, of course!  Smile The first thing I did was make a Christmas card with the star.

    I decided to go for a more vintage-y feel and so I stamped on Crumb Cake paper with my Cherry Cobbler ink.  Sponge the edges with Crumb Cake ink and then add a touch of sparkle with some Silver Glimmer paper.  Pretty, no?

    Then I wanted to play with the fact that you could make the star into a 3D star.

    How do you make the Christmas Star pop up?
    1. Stamp your Christmas Star image on a piece of white cardstock
    2. Cut out the star (yes, you need to hand cut this, but it isn’t as bad as you think)
    3. Fold the star in half using the white lines that radiate out from the center of the star as guidelines.
    4. Use your bone folder to press each fold line (you should fold in half 5 times)
    5. Set your star on a table or flat surface and then gently squeeze the sides in to cause the center of the star to push up off the table. 
    6. Your star should stay dimensional and you can now add it to your projects!

    Once I made my star, I knew I had to put in on something, so I made this rosette ornament.

    I cut two strips of 1.75” x 11” pieces of Wild Wasabi cardstock and then scored it at 1/4” increments.  Then I could fold my paper back and forth to create the accordian look. 

    Glue the ends of each strip together to make one big circle and then push the center down flat to make my rosette.  Now, I haven’t made many rosettes before, and I’m a complete newbie to my hot glue gun…. so, when I had to hot glue the middle of my rosette together so it would stay flat, it got a bit messy!  But it works, and I covered it up, so you’d never know!

    Then I just added a circle of Silver Glimmer paper (adhering with hot glue again) and then added my star (adhering with glue dots) to the top.  Punch a hole in the rosette and run some of the new Silver 1/8” taffeta ribbon from the holiday catalog and you have yourself an ornament!

    Oh, and the rhinestone!  Don’t forget the rhinestone in the center of the star!

    So see, there are lots of cute things you can do with this stamp – even if it is big!

    Founders Circle Special – Double Rewards All Weekend Long!

    Since I can’t take you all with me to Founder’s Circle this weekend, I thought I would try to do something special to celebrate anyway.

    So, from 9/18–9/22, receive DOUBLE your reward punches for each purchase!

    That is right! For every $40 you order, you will receive two punches on your punch card and be that much closer to receiving a free stamp set of your choice!

    See how Northwest Stamper Reward Punches work

    and as an extra thank you,

    Everyone who places an order between now and 9/22 will be entered to win a free Christmas Star stamp and Rhinestones!

    So, have a great weekend and I’ll see you back on here soon!

    spaced shop now sig bar

  • Tie it Up for Cute Card Thursday!

    Have you been playing along with Cute Card Thursday?  I have been having a blast as guest designer this month with them and this week we have a great challenge for you:

    Tie It Up!

    I had a lot of ideas for this theme and I really wanted to do one that involved lacing.  Somehow, though, my lacing turned into a few stitches.  But I really did get my needle out and was sewing through my card!


    I tried adding a bow to the card but I just couldn’t make it work without it feeling too over the top.  So I reminded myself that keeping it sweet and simple can be exactly the right way to go sometimes. Smile

    For those of you who are Stampin’ Up! fans, this is your chance to get a peek at all 5 of the new In Colors that will be coming out in June.  I finally started playing with my new papers and love how pretty they look when you mix them together.  Almost a pastel without being too faded or “baby”.

    I have to admit, I’m kind of digging the Crisp Canteloupe (orange) and Pistachio Pudding (green) the most right now… though a lot of people are big fans of the Strawberry Slush (pink).  And then there is the Coastal Cabana and Baked Brown Sugar.

    So, get inspired and try out something new!  If you have an idea for the “Tie it up!” theme – head on over to Cute Card Thursday and submit your fabulous creations for their challenge!


    Get You Copy of the NEW Stampin’ Up! Catalog – Request yours here!

    To Order Stampin’ Up! Products Anytime, click here!

    See the Latest Availability & PDFs of all the retiring stamps and accessories here

    Stampin’ Up! Supples Used
    Stamps
    – Pennant Parade
    Paper – Very Vanilla, Baked Brown Sugar, Crisp Cantaloupe, Strawberry Slush, Pistachio Pudding, Coastal Cabana
    Ink – Baked Brown Sugar, Strawberry Slush
    Accessories – Paper Piercer, Paper Piercing Mat, Early Espresso Baker’s Twine, Sponges, Blender Pen

  • A Summertime Card for Cute Card Thursday

    cct-logo-GD

    I was invited to be a guest designer this month for a fun site called Cute Card Thursday.

    Each week they post a challenge and projects based around the theme of the week.  There is some serious talent over there and I am honored to get to share some ideas with their visitors.


    This week the theme is:

    Come Fly With Me

    Now, don’t ask me why, but everytime I say the theme to myself, I see kites in the air (for the flying theme) and I hear that song from the 80’s or 90’s… “Come Sail Away… come sail away, come sail away with me….”.  LOL!  I know the theme says nothing about sailing, but apparently my brain thinks that way anyway!

    But here is the card I came up with based on this theme:

    CuteCardThursday Wish Big Card

    Now, where are the kites? You may be asking…. yeah, well, about that.  I apparently couldn’t cut a kite worth a darn!  Seriously!  I hacked away at a piece of designer paper trying to make squares and triangles and diamond shapes and lets just say it never looked pretty. Smile

    So I resorted to balloons instead.  They float in the air like kites.  So that counts, right?

    The boy stamp image is from Lean on Me from Stampin’ Up! (I just didn’t ink up the paper airplane or sentiment) and is on the retiring list.  So if you think he is cute, you have through this month to grab him.

    And if you want to try out the challenge for this week.  Create something that you are inspired to make based on the theme “Come Fly With Me” and hop over to CuteCardsThursday to link your project up!

    To Order Stampin’ Up! Products Anytime, click here!

    See the Latest Availability & PDFs of all the retiring stamps and accessories here

    Supples Used
    Stamps
    – Lean on Me**, Pennant Parade
    Paper – Whisper White, Certainly Celery**, Twitterpated designer paper**
    Ink – Basic Grey, Baja Breeze**, Certainly Celery**, Blush Blossom Marker**
    Accessories – Basic Grey two tone ribbon, Pearls, Ovals Framelits, Big Shot, White Baker’s twine, sm Oval Punch, white gel pen, Stampin’ Dimensionals
    **Item retiring June 3rd or when supplies run out

    Lean on Me stamp set

  • Pennant Parade “Framed” Christmas Card

    I hear from almost everyone I meet when stamping the infamous phrase “I’m not creative”… so I thought for this month’s team meeting, I’d share an idea for a card that was completely inspired by a card in our demonstrator magazine Stampin’ Success.  It was all about taking an idea you see somewhere, getting inspired by the idea, and then making it your own.

    In this case, the idea was to punch or die cut a hole in a piece of cardstock and popping it up on dimensionals (foam dots) to give you a frame.  Then placing a cut or punched element in the middle of the frame.  In my case, I was inspired to pull out my Pennant Parade stamp set!

    Pennant Parade Christmas Tree full card


    So, all the folks who attended my meeting in person got to make one of these cards themselves and everyone else I shared how to make the card via webcam.  But the key elements is to take a piece of Gumball Green cardstock (in this case a 4”x4” piece) and slide the 2 1/2” circle punch as far in as it will go towards the center of the cardstock.  Punch out your hole and run the remaining square through your Big Shot to add texture.

    Pennant Parade Christmas Tree card

    I added a piece of patterned paper from the Festival of Prints designer paper stack behind the circle cut out – directly on the card base.

    Then everything else was popped up for dimension.  It looks like a lot but is actually a really fast and easy card since the tree is punched out with the Pennant Builder punch and the Merry was punched out with the Word Window punch.

    But try this card idea with layering other punch shapes or your favorite framelit for different looks and styles!


    New Updates in the Clearance Rack! ~ they are going fast!

    Everyone loves a great deal right?  Well, I just wanted to make sure everyone knew that the Clearance Rack in the online store has been updated with a lot of awesome stuff including new Big Shot dies, new paper, ink spots, and more!

    Remember items are limited and while supplies last.  I know a number of items have already sold out, so if you see something you really want, make sure to grab it.

    Check out what is left in the Clearance Rack


    Shop for Stamps and More Online, click here!

    Are you earning your Northwest Stamper Rewards? Every order gets you closer to your FREE stamp set! Click here to learn more!


    Pennant Parade Framed Christmas Card Recipe
    Stamps:
    Pennant Parade
    Ink: Gumball Green, Soft Suede, Cherry Cobbler
    Paper: Gumball Green, Whisper White, Festival of Prints designer series paper
    Accessories: Big Shot, Perfect Polka Dots embossing folder, Cherry Cobbler Scallop dotted ribbon, 2-1/2” Circle punch, Pennant Builder punch, Word Window punch, Stampin’ Dimensionals

  • One More Princess Birthday Card

    If you are looking at this project sample today and think it looks familiar, you are right! 🙂

    While working on my Make & Take at convention using this Quinceanera stamp set, I had the white diecut cut out, the edges pierced, the princess stamped, the paper pieced dress cut and adhered, and most of the coloring done…. then I colored in the girl’s skin itself.  Lets just say I was a little confused about the directions and everytime I tried to fix things she just kept getting darker and darker!  But that sort of thing has never happened to you has it? 😉

    Long story short, I started over and tried again and got the version I used on my treat bag.  But that meant I came home with this main image all done and it would have been silly just to throw it away.  So, I decided to put together a card so you could see how you might use this stamp set even if you didn’t know someone celebrating a Quinceanera.  (Next up, I think I’m going to make a wedding card or bridal shower card with this set!)

    I also used the new 1 1/4” Scallop circle punch from the new Holiday catalog (Yay for more nesting punches, right?!) and more Pool Party ruffled ribbon.

    So, what do you think?  What do you think this stamp set would be good for?  Leave me a comment and I may try to make samples for some of your ideas!


    To Order Stampin’ Up! Products Anytime, click here!

    Check out the 2012 Holiday Catalog

    Are you earning your Northwest Stamper Rewards? Every order gets you closer to your FREE stamp set! Click here to learn more!

    Quinceanera Princess Birthday Card Recipe
    Stamps:
    Quinceanera, Pennant Parade
    Ink: Stazon Black, Primrose Petals, Crumb Cake
    Paper: Crumb Cake, Whisper White, Primrose Petals, Pool Party
    Accessories: Basic Rhinestones, Essential Piercing Pack, Paper Piercer, Piercing Pad, Apothecary Accents Framelits, Big Shot, 1-1/4” Scallop circle punch, 3/4” Circle punch, Blender Pen, Paper Snips, Stampin’ Dimensionals

  • Make a Cake & Patio Party Sneak Peek

    Ever have one of those patterned papers that needs space to show off?  Well, when playing with my Patio Party designer paper that is coming out in the new catalog, I really liked this print but it just doesn’t show off very well in a small piece.  So when I found this sketch, I thought it would be perfect for this paper!


    The lanterns reminded me of a party, so I grabbed my new Make a Cake stamp set to help finish it off (and every cake needs a little bling, don’t you think).  I also have my Whisper White stitched grosgrain ribbon as an accent.  I have to say, it doesn’t really show up in pictures, but the stitching is a nice touch to just make the ribbon a bit more interesting.

    And yep! Both of these (the ribbon and the paper) are available in my New Catalog Product Share along with the Stitched Satin ribbon and In Color Dahlias!

    To Order Stampin’ Up! Products Anytime, click here!

    Get them before they are gone! Items are selling out so don’t miss out!

    Retiring Stamps | Retiring Accessories | Retiring Décor Elements

    Need a copy of the 2012-2013 Stampin’ Up! catalog? Click here!


    Wish Big Make a Cake Card Recipe:

    Stamps: Make a Cake, Pennant Parade
    Ink: Midnight Muse, Summer Starfruit, Raspberry Ripple
    Paper: Patio Party designer paper, Summer Starfruit cs, Pool Party cs, Whisper White cs
    Accessories: Corner rounder punch, Whisper White stitched grosgrain ribbon, decorative label punch, basic rhinestones, sponge daubers, stampin dimensionals

  • Fun with Pennant Parade and the New Pennant Punch!

    I don’t know about you, but I LOVE stamp sets that go with punches.  See I love my punches (you can never have enough punches), but when you can stamp cute images in different colors and textures and then can punch them out instead of cutting them out by hand – Brilliant!  That is why I was so excited to see Stampin’ Up! come out with this Pennant Parade stamp set and the matching Petite Pennant builder punch.

    If you haven’t seen them, this is what the stamp set looks like and the shapes the punch cuts out:

    image  image

    So, when you look at the stamp set, you think… that is cool, it matches the punch so there must be cute stuff you can do with it.  But what?  Let me say, convention was FULL of inspiration with this stamp set courtesy of some awesome stamper’s swap cards.   Check out all these fun things people came up with!


    card by Krissie O’Donnell

    card by Jessi Mann
    card by Jackie Tucker
    card by Jackie White

    Totally adorable, right?  I know I’m super inspired and can’t wait to get my stamps inky!  Have you used this stamp set or punch yet?  Leave a comment and let me know what you think!

    Shop now and start earning your free stamps with NW Stamper rewards!