Northwest Stamper

Tag: jennifer blomquist

  • Elegant Gold Stamping with the Curvy Keepsake Box

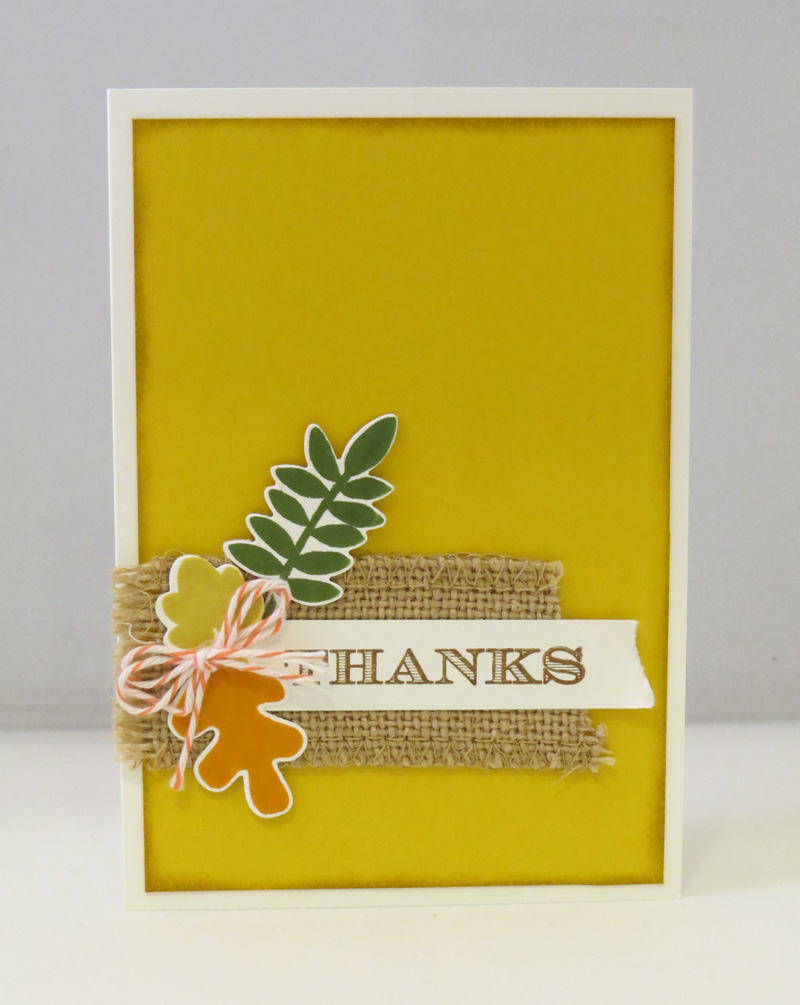
    Wanna a peek at one of the boxes we’ll be making in my Too Cute Curvy Keepsake box class?  I had said that we would be making 4 boxes including one that was stamped… but when I went to go actually make the stamped box I stalled out.  I had wanted to use my Endless Wishes stamp set, but had forgotten I had loaned it to a downline member.  So I needed an alternate option and this is what I came up with:

    Turns out Mixed Bunch is a great substitute!  Especially when you use gold and Early Espresso.  Didn’t it turn out nice?

    I used the KRAFT cardstock – it is sturdier and a bit heavier than the Crumb Cake cardstock.  We’ll use Early Espresso ink and Encore Gold ink and then sponge with some Soft Suede ink.  But I really loved the extra touches to add to the bling – like the stamped sentiment which I stamped directly onto the Gold Foil sheets and then die cut out with the Starburst framelits.  Then add some gold sequins and 1/4” cotton ribbon to the top and you are set.

    I think these could be cute favors for events or just nice little gifts.  Can’t you imagine a pretty pile of these?  Smile

    If you would like to try out the fun boxes that you can make with this die, check out this fun class & class by mail I’m running tomorrow!  (Yes! You can still RSVP if you hurry)

    Tuesday 9/30 at 7pm, Panera in Redmond – RSVP here
    $15, save $5 with purchase of the Curvy Keepsake box die
    (Bonus kit – bring a friend and you both get to make the Turkey box for free!)
    Kit by mail option available!

    KIT BY MAIL – Get all the pieces precut and mailed to you in a kit to make all 4 boxes we make in class plus instructions for all of the boxes and the Turkey box!
    Cost is only $15+$3 shipping  (only $10 if you have purchased the die from me!)
    BONUS – have a friend sign up for the class too and I’ll include the Turkey kit for each of you!


    INSTRUCTIONS ONLY – Get access to the instructions for all 5 boxes so you can use your dies and punches at home to make these cute projects.
    Instructions will include all the dimensions, supplies used, and tips for making them as easy as possible!
    Cost is only $4.95  (that is only $1/box!)


    spaced shop now sig bar

    Hostess Code:  C2HYWWQM Use this Hostess Code and receive a free gift!
    (Please do not use the Hostess Code if your order is $150 or more)

    Project Supplies Used

  • Holiday Catalog Project Inspiration from the Fun n’ Crafty Stampers

    I am so incredibly grateful for my Fun n’ Craft team of demonstrators.  They are an awesome group of crafters and just overall wonderful people.  In our group, we have Pam Wu who has started organizing card swaps for our team each time a new catalog comes out.  We usually have a good amount of people participate and let me say… the cards are off the charts awesome!  So today we thought we would do a little mini-blog hop to share them with you.

    Here is my simple card that I swapped:

    Tips for creating this card:

    • The new Fall Fest stamp set makes this card quick and easy to create because the leaves and pumpkins are all part of the same set.  Plus, with matching framelits, cutting them out is a snap!  So, definitely grab the bundle and save 15% while you are at it.
    • Use the same color ink as your card base for stamping the little leaves randomly all over the front of the card.  This gives you a nice tone-on-tone look without being too busy or overwhelming your card.
    • Cut out both pumpkins with the framelits and pop them up on dimensionals for dimension to your card while still keeping it super simple


      Use a small strip of the Burlap Ribbon to give it a real fall look.

    And for the sentiment, I used the Host Special stamp set – Good Greetings!

    Good_Greetings

    This set is fabulous, especially for holiday cards and you still have time to get it free!  Host a party (it can be in person or an online only party) or place a $300 order and you’ll get it free on top of your regular hostess benefits.  Email me at jennifer@nwstamper.com if you would like to set something up so you can get it! Smile

    See more amazing Holiday Catalog samples here –

    We had 4 more people participate in the swap (just for one reason or another, they weren’t able to participate in our little blog hop) , so I’ll be sharing their cards here on the blog tomorrow!  I hope you can come back and join me!

    spaced shop now sig bar

    Hostess Code:  C2HYWWQM Use this Hostess Code and receive a free gift!
    (Please do not use the Hostess Code if your order is $150 or more)

    Card Supplies Used:

  • A Bit of Merry with Seasonally Scattered

    It’s Monday and I’m still catching up from the weekend!  But I wanted to make sure to get a post up to share (I have sooo many projects to share I need to get crackin on getting them all posted and ready!)  Today is a quick Holiday card:

    This was another convention display board card and I was trying to come up with something different to do with the Seasonally Scattered stamp set.  So, this was one of my “experiment” cards

    Interesting things on this card:

    • I started by stamping the “Merry” sentiment from the Seasonally Scattered stamp set with Versamark ink and then heat embossing with white embossing powder on some patterned paper (from the Moonlight paper stack).  Then to make the word really pop, I sponged over just the letters with Cherry Cobbler ink.
    • Not sponging over all the embossed image allowed the words to stand out and keep some of the snow clean and white Smile
    • Use sponge daubers to create perfect inked circles on your paper but in random patterns
    • It’s hard to see, but I sponge daubered in Versamark, some circles and then embossed with Iridescent Ice for some sparkle circles too!
    • I tied some Silver baker’s twine and some White baker’s twine around the front and then take extra pieces of twine and tie them to your strands for your knots.  Fringe the ends and voila!

    It’s quick and easy and lots of little touches everywhere!

    A Few Updates

    Thank you to everyone who has already started shopping in my Online Craft Rummage Sale!  Yesterday I spent the entire day at the Washington State Fair with my family including staying late with the hubby for a Pentatonix concert (they are an amazing acapella group you should check out if you don’t know them yet!)

    2014-09-21 14.17.50

    Because who can resist a day with scones, huge pumpkins, strawberry shortcake, and petting goats?!  Nicholas even got to do the kid version of bull riding and try to ride and hang onto a sheep for 6 seconds as it ran across an arena.  It was such a hoot!

    2014-09-21 10.55.26

    So, this morning I’m working on catching up getting out Online Craft Rummage Sale shipping information and invoices. Smile

    • If you’ve already marked the items you want, I’ll be following up with you today!
    • If you haven’t shopped yet, there is still LOTS of great items to be had!

    Check out the Online Craft Rummage Sale here

    BONUS GIFT  – everyone who hops over to my facebook page and shops my online sale will get a gift of a Stampin’ Up gift certificate worth 25% of their total online craft sale purchase for use towards a Stampin’ Up catalog order with me in the future.

    Also, if you signed up for my Too Cute Curvy Keepsake Box kit by mail, I am working on the tutorial now and cutting all the kits.  I should have them ready by the end of the week!  If you haven’t signed up for one, you can check it out here.

    spaced shop now sig bar

    Hostess Code:  C2HYWWQM Use this Hostess Code and receive a free gift!
    (Please do not use the Hostess Code if your order is $150 or more)

    Card Supplies Used

  • Online Craft Garage Sale Starts Today!

    Online Craft Garage Sale Starts Today!

    Ok, so if you follow my Facebook page, you know all too well how I spent my weekend so far!  Getting ready for and then helping out at a craft garage sale run by on of my downline, Stacey Lane.  I even got motivated to dig through my craft room and find more stuff I was willing to part with… I came up with a decent pile don’t you think?!

    2014-09-19 16.20.21

    It was a great sale with lots of fun stuff to look at.  We had stuff in her driveway and inside the garage too

    2014-09-20 10.42.10

    Sadly, all of my stuff didn’t sell… isn’t that how it always goes?  So, I spent all night getting my extras and leftovers posted up for an Online Craft Sale over on my Facebook page!

    2014-09-20 22.25.34

    I really did have plans to get all the stuff up on facebook in late afternoon and then get it posted to the blog so it would be up by this morning.  Sadly, just getting it on Facebook took me until just after midnight, so I bagged the idea of getting everything over here on the blog for now.

    So, if you would like to shop, make sure to swing by on my Facebook page

    Northwest Stamper Online Craft Sale – Click to Shop

    BONUS GIFT  – everyone who hops over to my facebook page and shops my online sale will get a gift of a Stampin’ Up gift certificate worth 25% of their total online craft sale purchase for use towards a Stampin’ Up catalog order with me in the future.  Smile  Its like extra free craft supplies!

    Today, my family is off to the Washington State Fair to enjoy it’s last day this year, so I’ll check back on the sale when I get home in the evening.  In the meantime, enjoy the shopping!

    spaced shop now sig bar

    Hostess Code:  C2HYWWQM Use this Hostess Code and receive a free gift!
    (Please do not use the Hostess Code if your order is $150 or more)

  • From Scraps to Shiny Sweet

    Yesterday, I was trying to finally unbury my craft table…again!  I had everything piled up from the last two weeks, including all the odds & ends from my spare table that I used for prep work for my events that I took down over the weekend.  I was sooooo excited to be down to just all my scrap cardstock that was sorted and just needed to be put away in my file folders, so I thought I’d get it all wrapped up. 

    What is it about a clean craft table that makes you want to get crafting again?!

    As I was putting away scraps, I had this stamped strip of paper and the scrap strip of Gold Foil paper.  I thought,” why not make a banner out of the gold paper and glue them together?”  Then I grabbed the Vintage button I had colored for my Blendabilties class and stuck it on the end… grabbed some sequin trim scrap, some lace scrap, and cherry cobbler scrap… and things just started coming together!  Gotta love it when that happens. Smile

    Tips for making this card:

    • Take a regular ol’ white or vanilla button – like this Very Vintage Button – and color it with your Cherry Cobbler blendabilities!  Use the PEN TIP to color so you don’t risk messing up your brush tip.
    • Add a single sequin to the center with a glue dot for a complimentary bit of shine.

    • Did you know, this sentiment is from the Happy Hour stamp set and is 25% off with the weekly deals this week!  Love it!
    • Want to add a bit of shine to a corner of a card?  Staple a string of sequins for some not-too-overdone shine!  I used my Stampin’ Up mini stapler to staple the strand into a twist first and then stapled that onto my card.  (yes, I’m sure that made no sense, but if you just staple it to your card front, that works great too!)

    So, don’t forget to use those scraps!  You never know when they will come together just right. Smile

    spaced shop now sig bar

    Hostess Code:  C2HYWWQM Use this Hostess Code and receive a free gift!
    (Please do not use the Hostess Code if your order is $150 or more)

    Card Supplies Used:

  • A Little Bit of Love with Seasonally Scattered

    Wanna see the very first card I made of the convention display boards this year?  And the very first one I made with the new Seasonally Scattered?  Well, here you go!

    This card is pretty different from my usual style… in fact, I actually made it and then set it aside for a while to see if I liked it or not.  In the end, I decided I did like it and had fun with the mixture of patterns and textures!

    Tips for making this card:

    • The sentiments from the Seasonally Scattered stamp set are pretty big and the letters are part of the un-stamped image (meaning, when you ink up your stamp, where you see the letter “L” it does not get any ink on it).  But that gives you some fun other options, like heat embossing your image!
    • Once you emboss your image, sponge over the top of the embossed image for a varied saturation of color.

    • Tear off the edge of your embossed and sponged cardstock layer to give you a rough white edge since you’ll be ripping off the sponged surface and exposing inside of the white cardstock!
    • Color a pearl with your Cherry Cobbler blendabilities and then place it in the center of a Vintage button for a matching pop of color.


    Oh, and I tucked my chevron ribbon under my white cardstock layer, to make sure the torn edge showed up and to mute some of the boldness of the chevron.

    The nice thing about a card like this is that the big bold patterns and images give you a lot to look at when you look at the card but its actually super easy to put together.  Smile

    Join me for some stamping fun!

    My class calendar has been updated for the rest of the year!  As you heard, I have my Too Cute Curvy Keepsake box class coming up in a couple weeks; but I also have card nights, technique nights, and more.  Make sure you check out my calendar online or join my meetup to RSVP or stay in the know.

    And YES! You can get my classes by mail as well!  Just let me know if you are interested in that option.

    spaced shop now sig bar
    Hostess Code:  C2HYWWQM Use this Hostess Code and receive a free gift! (Please do not use the Hostess Code if your order is $150 or more)

    Need a Holiday Catalog?  Check it out online or email me at jennifer@nwstamper.com to get your copy!


    Card Supplies Needed:


    Heat Tool

    $29.95

  • New and Fabulous Weekly Deals are Here!

    New and Fabulous Weekly Deals are Here!

    It is Tuesday, so it is time for some new weekly deals!  Check out what is up for this week:

    IMG_233824959293113I love so many of the items on sale this week…and so tempted by that stamp set. Isn’t that sentiment so sweet?  “Every hour spent with you is a happy hour”!

    Wait, what?!?  I just noticed that my fav, Yippie Skippee is on sale too!  And the heart punch, and the flip card die… and those wood elements.  Ohhh, this is a dangerous week for me. 🙂

    spaced shop now sig bar
    Hostess Code:  C2HYWWQM Use this Hostess Code and receive a free gift! (Please do not use the Hostess Code if your order is $150 or more)

    Need a Holiday Catalog?  Check it out online or email me at jennifer@nwstamper.com to get your copy!

  • Too Cute Thanksgiving Turkey with the Curvy Keepsake Box

    So, as I was getting ready for Stamp Club last week, I decided to make this super adorable turkey I had seen online from my friend Darla Roberts.  I was going to let everyone do the pumpkin I had made earlier as one of their projects, but wanted to show them a few different fun ideas with the Curvy Keepsake die.  

    No seriously… if you don’t have it yet…. you totally should get it!  Because look at this guy –

    Isn’t he the cutest?!?

    Tips for creating this box:

    • Use the Feather Framelit from the new holiday catalog to create a great fan of feathers for the tail.  I used the small feathers for the “front” of the tail and the larger feathers for the “back” of the tail.
    • When adhering the feathers for the back, I found it easiest to fan them out and glue them to a circle punch in the same color as the body (in this case, Chocolate Chip cardstock).  I adhered a circle to the front and back of the fan to help hold everything in place.

    • To make the face, use a small heart punch (like this one from the new Itty Bitty Accent Punch Pack) and cut the heart in half to make the wattle.
    • For the eyes, I used the large circles from the Owl Punch along with candy dots for the black parts.
    • I used the great fall color combination – Cajun Craze, Daffodil Delight, Blackberry Bliss, and Chocolate Chip

    I’ve been loving these boxes so much that I decided to have them as the focus of my class at the end of the month!

    Too Cute Curvy Keepsake Boxes Class

    If you would like to try out the fun boxes that you can make with this die, I have a few options for you!

    IN PERSON – Join me on Sept 30th at 7pm at the Panera in Redmond where you will get to make 4 different boxes
    (a stamped box, a penguin box, a light up box, and one more)
    Cost is only $15  (only $10 if you have purchased the Curvy Keepsake Die from me!)
    BONUS – bring a friend and both you and your friend will get the kit to make this Turkey box too!
    RSVP here

    KIT BY MAIL – Get all the pieces precut and mailed to you in a kit to make all 4 boxes we make in class plus instructions for all of the boxes and the Turkey box!
    Cost is only $15+$3 shipping  (only $10 if you have purchased the die from me!)
    BONUS – have a friend sign up for the class too and I’ll include the Turkey kit for each of you!


    INSTRUCTIONS ONLY – Get access to the instructions for all 5 boxes so you can use your dies and punches at home to make these cute projects.
    Instructions will include all the dimensions, supplies used, and tips for making them as easy as possible!
    Cost is only $4.95  (that is only $1/box!)


    Note – I don’t have the instructions quite ready yet because I’m finalizing the final project designs for the class.  But you will have the instructions no later than the 27th when I will be mailing out the kits for the classes by mail.

    I mean, because…. seriously, how much fun does this look to make? Smile 

    spaced shop now sig bar
    Hostess Code:  C2HYWWQM Use this Hostess Code and receive a free gift! (Please do not use the Hostess Code if your order is $150 or more)

    Need a Holiday Catalog?  Check it out online or email me at jennifer@nwstamper.com to get your copy!


    Supplies you will need for this project:

    Curvy Keepsake Box Thinlits Dies


    $32.95

    Feathers Framelits Dies


    $12.95

    Big Shot Die-Cut Machine


    $99.95

    Owl Punch


    $16.95

    Triangle Punch


    $15.95

    Neutrals Candy Dots


    $5.95

    Itty Bitty Accents Punch Pack


    $16.95

    Sticky Strip


    $6.95

  • A Monochromatic Thanks with Seasonally Scattered

    I was thinking last night about blog posts and realized that I had been so good about posting my display board projects from the 2014 convention, but then got sidetracked with other projects (and to be honest, I wanted to mix up the stamp sets I was featuring here) and completely forgot to finish sharing the display board projects!  I had saved some of my favorites for last and so I want to make sure to get them posted…. like today’s card!

    This was one of the first I did with the Seasonally Scattered stamp set that I LOVED.  It’s not flashy, but I like it’s understatedness.  What do you think?

    Tips for this card:

    • Did you know, the Lovely as a Tree has a leaf stamp that goes PERFECTLY with the Seasonally Scattered thanks stamp??  Stamp your thanks image and then start stamping some falling leaves in Versamark and heat emboss with gold ink for a pretty fall touch.

    • Wrap some linen thread around a few times to add some texture and a simple rustic touch to your card.
    • In keeping with the brown monotone look for the card, I sponged the edge of my Very Vanilla cardstock with Crumb Cake to help all of the cardstock pieces transition nicely with each other.

    Its delightfully simple and yet elegant to do… and you could mix and match your colors to get exactly the look you want.  For this card, I used:  Early Espresso, Crumb Cake, and Very Vanilla; but shake it up when you try it at home!

    spaced shop now sig bar
    Hostess Code:  C2HYWWQM Use this Hostess Code and receive a free gift! (Please do not use the Hostess Code if your order is $150 or more)

    Need a Holiday Catalog?  Check it out online or email me at jennifer@nwstamper.com to get your copy!


    Card Supplies Used:

    Heat Tool


    $29.95

    Linen Thread


    $4.50

  • What’s New on Tuesday

    Welcome to your Tuesday!  We are getting back into the swing of things here with school starting and the weather cooling off.  As I shared on Sunday, I had a great weekend full of stamping friends and I’m looking forward to creating more and sharing more!  Today though, I wanted to make sure everyone was caught up on the specials and other happenings:

    One Day Left to Save on Paper Pumpkin!

    paper pumpkin half off promo

    Don’t forget, tomorrow is the last day to sign up for Paper Pumpkin if you want to get in on the 50% off promotion AND to get in on the September project kit!  Normally each month is a surprise but September’s kit they gave us as a sneak peek at Convention.  If you want to see a peek, check out this sample posted online here.

    ALSO besides getting in on the cute kits for only $10 shipped for the next 2 months (after that they are $19.95 shipped), subscribers can pick up refills or past kits for a great deal as well!  Some of the best kits are still available as refill kits.  So, give it a try and stock up on some quick and cute cards and projects while you are at it.  See Past Kits & Refills available to subscribers

    Sign up for Paper Pumpkin here

    New Photopolymer Stamp Set

    Today, they also released a cute new Photopolymer stamp set called You’re Wonderful

    And you can make cute cards with it like these:

    1 Youre Wonderful - all samples

    So, pretty right?!  See it online here.

    Fab Weekly Deals

    weekly deal 9-9-14

    Shop the Weekly Deals here

    And check out the fun stuff on the Weekly Deals this week!  I so want to get those Arrows in that punch… and I love the Dazzling Diamonds and that Hexagon Punch for cards like this:

    So much pretty inspiration! I guess that means it is time for me to clean up from this weekend and get stamping! Hope you have a wonderful stamping day as well!

    spaced shop now sig bar
    Hostess Code:  C2HYWWQM Use this Hostess Code and receive a free gift! (Please do not use the Hostess Code if your order is $150 or more)

    Need a Holiday Catalog?  Check it out online or email me at jennifer@nwstamper.com to get your copy!

  • See What I Did this Weekend!

    Whew!  This weekend was a big one for me… two big events and so many awesome people and great ideas!  So I thought I’d share with you a little of the fun I was having! 

    Bingo Night!

    First up was Stamping Bingo Friday night.  I still have to take a picture of the make & takes, but everyone got goodie bags with paper samplers from the holiday catalog plus some ribbon, the NEW holiday tag a bag kit, and note cards & envelopes.  Then we played 5 rounds of Bingo, did a card and that cute Pumpkin Box I shared last week, and then 6 more rounds of Bingo including a grand prize round where someone was able to win the new Good Greetings hostess set that you can only earn by hosting a $300 workshop with your friends.  Lucky winner!

    2014-09-05 21.27.54

    I’m thinking we may have to run this event again sometime! Smile

    Then when I got home it was time to unload the Bingo stuff and start loading up for the Stampin’ Up Unite & Excite event on Saturday morning!  This is a new type of event that Stampin’ Up is sponsoring for demonstrators that brings local demonstrators together for a few hours of networking, idea sharing, inspiration, and fun.  I was hosting the Washington event and so I had all the goodies, the refreshments, and everything needed for the agenda to pack up and be ready to take with me to Redmond in the morning.

    As seems to be typical for me these days, I decided at the last minute to gussy up my helper and presenter gifts – because you can’t give these special people just a stamp set as is… it has to have some fun and handmade touch to it, right???

    2014-09-06 00.41.54

    I started out with quick tags (which I could handwrite a thank you on the back) and then used the same idea for little cards for the presenters and tied them to the gifts:

    2014-09-06 01.33.31

    Unite & Excite 2014

    As host and MC for the morning, I got a chance to talk to and meet 75 wonderful demonstrators from the area.  And if you know me, you know I got a little bit goofy –

    10583793_10152698970253130_2524617422499871357_n10460320_10152698970303130_6006286923322992699_n

    We had some wonderful presenters… great roundtable discussions… yummy snacks

    10484912_10152698969578130_3983547057770175433_nWater bottles with tag that were used for the doorprize drawings!

    10696316_10152698969733130_8913568922319231559_nAnd for the stamping inspiration, I brought my display boards but then invited everyone who came to bring projects they had created to share or their display boards… and boy were there great ideas!

    Ever wonder what all the Stampin’ Up Big Shot dies look like?

    10525729_10152698970418130_6192699745568632170_n

    And you know how I love my Curvy Keepsake Box thinlit… check out this adorable witch!

    10606378_10152698970538130_6225972449609279554_nOr these Hamburger Box guys:

     10672380_10152698971743130_9176583802697972462_n

    And as a final gift, everyone got their own Everyday Occasions Card Kit!  Check out all the cards you can make in this one kit!  You get everything you need including stamps, ink, die cut paper, envelopes, and accessories for only $29.95! 

    10616395_10152698970628130_1948160698827278455_n

    It was such a fun event and I’m so grateful that Stampin’ Up gave me the opportunity to host it for everyone!  I had such a good time and I can’t wait to do more events like this in the future.

    Want to join me for my next Demonstrator event?

    I love running these types of events and I’ve been working the last year to start putting together Stamp and Share events for area demonstrators.  These events are half day events where we get together to share business and stamping tips, get lots of new ideas, win prizes, have fun and stamp together!  I ran my last one a couple weeks ago, but I plan to run these events around 3 times a year with my next one likely going to be in January.  If you are interested in being on my mailing list when the details are sent out, let me know by emailing me at jennifer@nwstamper.com!

    I do smaller meetings and events for my personal downline and if you aren’t a demonstrator already, I’d love to have you join us!  Learn more about the perks of being a demonstrator in my group here.

    spaced shop now sig bar

    Hostess Code:  C2HYWWQM Use this Hostess Code and receive a free gift! (Please do not use the Hostess Code if your order is $150 or more)

  • Spaces Added for Stamping Bingo!

    Just wanted to share a quick note that I was able to add some spaces to my Stamping Bingo night on Friday! 

    Your registration includes 2 stamping projects, a goodie bag filled with stamping goodies valued at over $25, plus 10 rounds of bingo with prizes (with lots from the Holiday Catalog) including a Grand Prize round with a prize collection!  It is going to be a blast and would love to have you join us.  Did I mention one of the parts of the goodie bag is a sampler of each of the new papers in the Stampin’ Up holiday catalog.  Yay!

    Get more details and RSVP here or email me to save your spot.

    spaced shop now sig bar

    Hostess Code:  C2HYWWQM Use this Hostess Code and receive a free gift! (Please do not use the Hostess Code if your order is $150 or more)