Northwest Stamper

Tag: gorgeous grunge

  • Share the Love with a Clean and Simple Watercolor Wings Card

    Summer is flying by and if your schedule is like mine… I don’t have quite as much time to create and craft as I did when the kiddos were in school.  I have lots of projects in my brain… now to get them out on paper!  Ever have that problem? 

    Well today, I wanted to share a quick card that you can pull together in a flash when you need to send a little love but don’t have a ton of time or a ton of supplies on hand for that matter!  All you need is a little bit of ink, some white paper, and some scraps of glitter paper and ribbon!

    Project Tips for Creating This Card:

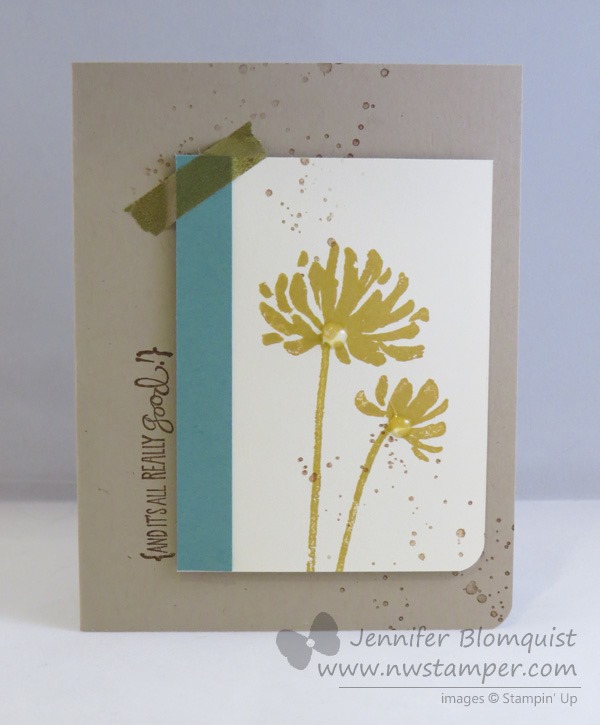
    • Take your basic Whisper White cardstock for your card base (cut to 8 1/2” x 5 1/2”, and scored at 4 1/4”). 
    • Grab your Sahara Sand ink pad and stamp a few splatters in the middle of the page using Gorgeous Grunge.  You don’t need a lot, just a couple splatterings will do!
    • Add a strip of scrap Dazzling Diamond glimmer paper and a scrap of ribbon like this fabulous Mini Striped Tip Top Taupe ribbon.  See, this is a perfect use for your scraps!
    • Create a butterfly!  Grab the Watercolor Wings stamp and get creating on a scrap of Whisper White cardstock:

    • Pick a great color combination!  I used Sahara Sand, Tip Top Taupe, and Elegant Eggplant.  Aren’t they so pretty?  But try out your favorite colors and you will be surprised how fabulous your butterfly turns out!
    • Kick up the shine by coloring with the Wink of Stella clear glitter pen over all the Elegant Eggplant ink.  Seriously, it looks fabulous in person!  Don’t forget about this great pen… it makes every project just a little more awesome.

    This stamp set is a hidden gem.  So if you have it at home – break it out!  You won’t be sorry. Smile  And if you don’t have it yet… it may want to go on your wishlist.  Just saying Winking smile

    NWstamper signature_thumb[9]

    order online button for sig 3_thumb[4]

  • Gorgeous Grunge Polaroid Birthday Card

    Gorgeous Grunge Polaroid Birthday Card

    One of the things I especially love about crafting is that two people can take the same supplies and turn out completely different cards with totally different styles.  As you may have noticed from my blog, my style tends to be more clean and simple cards that can be created pretty quickly.  That said, Rosemary Bryson is one of the gals in my downline and she can take the same products I have and seem to effortlessly turn them into stunning works of art!  For example, this card:

    I love how she combined the stamp sets and punches to create such a unique look!

    The hearts were stamped using the Perfect Pennants stamp set and then traced with a white gel pen and then covered in crystal effects.  she also added sequins and glimmer paper dots to add some extra sparkle and shine.  Such a fun idea!

    And it is really hard to tell, but she actually inked the entire paper (the polaroid frame) with versamark and embossed it with white embossing paper to give it that thick, shiny feel!  See, that is something I never would have thought to do.  And add some more embossing on the background paper with Gorgeous Grunge and you have a fun paint splatter effect to keep any part of the card from being boring. Smile 

    Stampin’ Up Supplies Used

    If you happen to be in the Pierce County (Tacoma/Bonney Lake/Puyallup), Washington area, you should definitely check out her classes she is starting up with a new meetup group called the Pierce County Paper Crafters.  I know I want to go myself and get to make some of her amazing creations!

    spaced shop now sig bar

    June Online Stamp Club Hostess CodeACANDKB4
    Use this code to get free exclusive tutorials & project kit!  Learn more

  • Another Catalog CASE with Too Kind and Hello Honey

    Another Catalog CASE with Too Kind and Hello Honey

    Last week, I participated in a Blog Hop with other gals from my Fun n’ Crafty team of demonstrators (which you should totally join, by the way, with the $50 limited time starter kit deal. 😉 )  We all picked a project in the 2014-2015 Stampin’ Up catalog and made our own version.  This was a card I made for the hop but ended up not posting that day:

    And this was the card I saw in the catalog that I was inspired by:

    image

    Obviously, I had a few differences, starting from the stamp set ; but that is because I didn’t own the stamp set in the picture.  So instead I looked through my shelf of stamps and decided to grab my Too Kind set instead.  It is the same idea, a solid image flower, just with different shapes. Smile  I also wanted to play with my new inks including the Hello Honey and Lost Lagoon.

    I also thought my flowers needed a little something so I added a drop of Crystal Effects in the center of each flower.  A little shiny center for each one!

    I was asked recently when I showed this card in a class I was asked how I got the splatters on the card.  In this case, I used the stamp set Gorgeous Grunge – really, it is the perfect set for little background touches!

    Stampin’ Up Supplies I Used

    I love the new catalog and its layout for getting lots of new ideas and inspiration.  So, check it out (you can see it online here) and give it a try!

    spaced shop now sig bar

    June Online Stamp Club Hostess CodeACANDKB4
    Use this code to get free exclusive tutorials & project kit!  Learn more

  • Scalloped Peek-a-Boo Flower Catalog CASE

    Scalloped Peek-a-Boo Flower Catalog CASE

    Today the girls over at Stylin’ Stampin’ Inkspiration have put together a fun collection of cards to share.  We all picked a card from the Annual Catalog to CASE (Copy-And-Share-Everything) and then share for the blog post.  So I thought I would share a card we did recently for my monthly stamp club!

    This card was actually made because one of the ladies saw it in the catalog and really wanted to see how to make it.  And, of course, I was happy to oblige!

    This is my card:

    This is the card in the catalog on page 176:

    image

    Wow… maybe I need to photo graph my cards on top of bright colored paper because comparing their photo to mine, it makes quite the difference! Smile 

    In any event, the fun thing about this card was trimming out a rectangle from the front of the card so that your flower can pop through.  I cut it out 1/2” from each of the top, right, and bottom edge of the card and make it 1-1/4” wide.

    Then I could use the 1-1/4” scallop punch and the 7/8 scallop circle punch to create a cute flower to show through.  Add some decoration with Gorgeous Grunge stamps and some Gold Baker’s Twine and you have a fun alternative!

    If you have any specific questions about this card, leave me a comment and I’ll be sure to get back to you! 

    My club ladies had a lot of fun creating this card and I hope you take the time to try it out too.  With the Stampin’ Trimmer, it is really quick and easy to create these cut outs on your card fronts.

    spaced shop now sig bar

    April Online Stamp Club Hostess CodeG4VQJ7VB
    Use this code to get free exclusive tutorials & project kit!Learn more

  • Playing with the New Labels Thinlits Flip Card

    When I ran a recent class about cards that flip and pop, I knew I had to share a card using the new Labels Thinlit die.  I mean, the fact that one run through the Big Shot and you have the card almost done, got to love the ease of that. 

    Since the thinlit die comes with a bunch of extra shape dies, I wanted to see what I could come up with that mostly uses those extra shapes.  Have you seen all the options?

    image

    So, this is what we made:

    I decided to try to experiment – and this is a little hard to see in the picture – but with the main label shape, we actually cut out a label in Coastal Cabana and then cut out a second label shape in So Saffron, but this time, we placed the “hi” die inside the label die so that it would cut out the “hi” leaving a hole in the shape of the word (does that make sense? Smile)  Then we glued the labels together so the Coastal Cabana peeked through!

    To decorate the rest of the card, we added a bit of Washi tape to the front of the card and then stamped an image from the Gorgeous Grunge stamp set.  We stamped the inside, just like the card from last month’s newsletter

    (if you missed it, you can sign up here and I’ll get you a copy of the past newseltter)

    So this is an idea to make a card using just a few supplies…. now I’m off to try out a few more ideas that incorporate more items from your craft room to step up the card even more. 

    Untill then, happy stamping!

    spaced shop now sig bar