This week has really been a real life lesson for me on gratitude. I have been blessed by some amazing people who came out of the woodwork and helped me survive this week as I was starting to get super stressed out midway through! I am one of those people who have a hard time asking for help and I was shown how amazing friends and community can be. ![]() So today’s card share is my virtual way of sharing my gratitude for them!
So today’s card share is my virtual way of sharing my gratitude for them!
See, Thursday morning, I was helping decorate a table for a Ladies Christmas Dinner with my MOPS group and I was starting to freakout just a little. Hubby was out of town, so I was single parenting and still needed to get ready for card class the next night, plus clean and finish planning my daughter’s birthday party on Sunday. And lets just say my house was a disaster and I didn’t really know what I was doing for the party. Oh, and I knew I would be out late that night because I would be at the Christmas dinner. So I was just seeing a lot to do and not enough plan to know how I was going to do it!
But by the end of the night, I had one friend, Trisha, who was helping with the Christmas dinner offer to come over the next day to help me finish cutting for card class… then that afternoon, my friend Chrissy had me over to help me get my mind straight about the party and put together a plan – but even more, she sat there with her Cricuit and cut out a BUNCH of decorations for the party while we were talking! So I went home not only with a plan but with many of the decorations done! Then in the evening I was overwhelmed when another friend, Lisa, sent me a picture of a fondant Hello Kitty she had made me for on top of the birthday cake (Caitlin had asked for a “Hello Kitty” cake and while I can make anything with paper… designing with frosting is not quite my forte ![]() ) And my evening timed out that I could clean my kitchen and by the time I went to bed, I was starting to feel like I could do this after all! So to all of you – THANK YOU!
) And my evening timed out that I could clean my kitchen and by the time I went to bed, I was starting to feel like I could do this after all! So to all of you – THANK YOU!

Tips for making this card:
- Frame it up with simple layers – I always love how clean everything looks when you use simple layering to mat your card elements. I find that a 1/8” mat is the perfect size most of the time, and really easy to cut on your trimmer. Just cut your matting cardstock 1/4” larger in both directions than your smaller piece. So for example, in this card:
– Card base as a mat: 4 1/4” x 5 1/2”
– Crumb cake piece: 4” x 5 1/4”
– Soft Suede square mat: 3 1/2” x 3 1/2” - – Very Vanilla piece for stamping: 3 1/4” x 3 1/4”
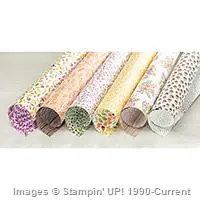
- Use those busy patterned papers for accents – I used one of the patterns from the Into the Woods designer paper for a pop of color and an accent. The pattern is one I like but busier than I would normally use for a big piece, so use it for a smaller layer and tuck it under one of the elements for just the right accent piece.
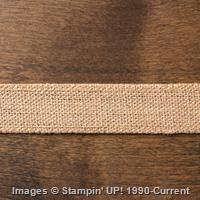
- Get creative with your Burlap Ribbon – I love my burlap ribbon… like use it all the time! But I wanted to soften it up a bit when I was making this card, so we changed it up a bit. First, trim off the stitching from one side of the ribbon. Then pull out 3 threads from the top of the burlap ribbon before gluing it down to your card front. (I recommend tape runner applied to the cardstock on the card for taping down the ribbon). Then use the threads for other accents on your card! I used two like twine across my Very Vanilla piece and then threaded the third through a Gold Button and tied a bow.

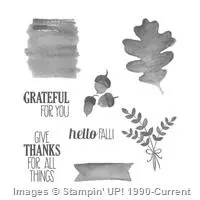
- Make a Shadow for your images – No lining up required! One fun way to play with your stamp images is to use two different colors to create a “shadow” image. The nice thing is, since you want them to be slightly offset, you don’t have to worry about lining things up. So, you can get a little messy and it looks great everytime! In this case, I stamped the background rectangle from the For All Things stamp set in Crumb Cake in, and then stamped the leaves in Soft Suede ink over the top as my main image. Then stamp the shadow in Cajun Craze ink by stamping close to my original spot but not exactly the same position.

I’m happy to say, thanks to the help earlier this week and then my mother-in-law coming over to help clean as I was baking for the party yesterday, I think we are all ready for our Princess Party! Princess Caitlin is all ready to go!

So hugs to all of you and thank you to everyone who takes the time to share their talents and time to help make every day just a little bit more survivable and a little more magical!
![NWstamper signature_thumb[9]](https://i0.wp.com/www.nwstamper.com/wp-content/uploads/ad87b4046c1e_C9F6/NWstamper-signature_thumb9_thumb.png?resize=322%2C118 "NWstamper signature_thumb[9]")
![]()
Use Hostess Code BEFX37ZS at check out to get a special thank you from me!
See all the tutorials & classes by mail here
Check out the Holiday Catalog Retiring List & Sold Out Updates
Save 25% on the Latest Weekly Deals
Don’t miss up to 60% off in the online Clearance Rack!
Project Supplies Used on this Card:
Click any image for more details or to shop! Use hostess code BEFX37ZS when shopping to get a special thank you from me!


![NWstamper signature_thumb[9]](https://i0.wp.com/www.nwstamper.com/wp-content/uploads/ad87b4046c1e_C9F6/NWstamper-signature_thumb9.png "NWstamper signature_thumb[9]")


