Northwest Stamper

Tag: celebrate card

  • Pretty Project Accents with Stacked Die Cuts

    Pretty Project Accents with Stacked Die Cuts

    I’m back today with a card to share with you that I’m going to admit, I’m a bit undecided about – I love the stacked die cuts trick I used but for the rest of the design… well I don’t know what I think about it.  But that is more of the reason why I decided I had to share it. 🙂

    I’m going to get a little bit personal here – You see, over the last year, I have managed to go through a bit of a crafting identity crisis.  I was trying to figure out what direction I wanted to take my crafting and as I saw what others were doing, I let it get into my head that I wasn’t doing enough/doing the right things.  I would feel bad and feel like I needed to do so much more.  Which overwhelmed me and turned into me slowly putting off posting projects, classes, or updates as I was waiting to get them “perfect”.  Does this resonate with anyone out there?

    It took a number of months but I finally realized that I was never going to be perfect all the time and that is OK!  I started out the year with my one little word being “imperfect” and said I wanted to strive to be perfectly imperfect.

    I am perfectly imperfect quote

    In fact, I did a short talk for Stampin’ Up demonstrators last month on growing your business by allowing yourself to be imperfect.  The funny thing?  I was cheering them on to just go for it, just put it out there even if it isn’t perfect… and what was I doing?  Sitting on my projects and ideas!  So, today, I’m taking my own advice and sharing with you a project… with less than perfect photos, and maybe a less than perfect design.  But fun non-the less!

    Celebrate You Stacked Die Cuts Embellishment

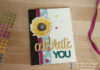
    The centerpiece for this card is the idea of creating a custom embellishment by stacking die cuts instead of using dimensionals.  Check it out above!  Its an easy and fun way to use your die cuts.

    Tips for making this card:
    • Stacked Die Cuts make great coordinated embellishments – so what do I mean by this?  Well, I usually will die cut a shape or a sentiment and then pop it up on my card or project using Stampin’ dimensional foam dots. But you can get a cool effect if you replace the dimensionals with extra cardstock!  Start with the shape you want to be on top – in this case, the So Saffron celebrate sentiment.  Then start die cutting more of the same shape to be the supporting layers.
      You can make all the layers the same color to make it look like a fat puffy sentiment – or do like I did here and us a few different colors that coordinate with the rest of your card.  I used 2 Early Espresso layers and 2 Berry Burst layers plus the 1 So Saffron layer.  I used the Fine Tip Glue pen to hold my layers together; this gave me a little bit of wiggleroom to line up my words in each layer. When you are done, you get this need colored shadow effect that ties in perfectly to your card.
    • Use ribbon as a pretty way to cover where two papers meet – I love mixing and matching cardstock and designer paper, like this pattern from the amazingly cute Picture Perfect Party stack. But add a bit of polish to your card by covering up the seam where the cardstock and pattern paper overlap with some ribbon.  This metallic edge Berry Burst satiny ribbon is so pretty and a perfect accent for the card. I usually just add adhesive to the ends of the ribbon and use that to glue the ends to the back of the cardstock/pattern paper before gluing them down to the front of the card.
      Celebrate you Painted Harvest birthday card close up
    • Glitter Enamel Dots add a party to your paper! I’ve been hoarding these Glitter Enamel shapes.  They are A-MAZ-ING!  You get an ombre range of colors in the package and they are shiny and glittery and just make your card look so festive.  I had put this card together and was struggling with the “whitespace” on the right side of the card.  I knew I needed something but I couldn’t decide what.  I tried some of the clear enamel shapes but it just didn’t look quite right.  Thankfully my mom was nearby and she told me “it needs some color” and the lightbulb went off and I dug into my drawer and pulled these out.  They have adhesive on the back, so they are ready to go.  So, if you have an embellishment you are hoarding – I encourage you to dig it out and USE IT!  🙂
    Just a reminder – 

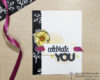
    The Celebrate You die cuts are available for a limited time as a Sale-a-Bration exclusive.  You can get them free with a $100+ order through the end of March or while supplies last.  They will be back in the Stampin’ Up Annual Catalog in June, though I don’t know how much they will cost for the set.   But if you love them, consider grabbing them now because why not get something free when you can? 🙂  Plus, once they are gone in March they won’t be back for a few months, so this is your last chance to get them early.   See another cute card idea with the Celebrate You dies HERE.


    Wanna make this at home? Here is what you need:

    Celebrate You stacked die cuts card birthday

    I hope you enjoyed this project and will try stacked die cuts to make your own custom embellishments for your projects soon!

    Jennifer Blomquist - Northwest Stamper Stampin Up Blog


  • Congratulations or Birthday Card – You Decide!

    Congratulations or Birthday Card – You Decide!

    I recently held my first Creative Cards class of the year with my local stampers. And, since it was right after the Stampin’ Up Occasions catalog launched, I HAD to play with all the new stuff I had gotten from that catalog! I am so glad I had this class on the books because I hadn’t taken much time to get my new stamps inky before then.

    Let me give you a little back story – see, my family is FULL of December babies.  My birthday is in mid-December, both of my kiddos are in December (one at the beginning of the month, one at the end of the month) plus there is my Sister in Law’s birthday and Christmas, not to mention my Mother-in-Law and niece who both have birthdays around Thanksgiving.  So, you see… the end of the year is a busy time for me around here! 🙂   Add to that the fact that it looked like a tornado had thoroughly gone through most of the rooms in our house; well, lets just say that I spent most of the month cleaning up in preparation for parties or holiday get togethers, prepping for those events, and then cleaning up afterwards!

    So, now things are getting back into a routine and I’m excited to start stamping more and sharing more here on my blog and over on my Facebook page. 🙂  Like this fun card using the Amazing You stamp set and Celebrate You thinlits from the Sale-a-Bration catalog!  I love that these can be Congrats or Birthday… which do you think this card would be good for?

    Mix & Match for a fun Celebration card

    This card started out as the idea of having the half sunburst behind the sentiment on a plain white cardbase.  But I got excited and stamped my images and then realized the idea that was in my head just was not working out in real life!  So, I started grabbing bits and pieces from around my craft table to add a little bit of color, a little bit of pop, and some extra sequins for balance; and I ended up loving how it turned out!

    So don’t be afraid to grab unrelated embellishments and papers and experiment with popping them onto your project!


    Need some pieces to play with?  Check out my 2018 Occasions Catalog product samplers to get a little bit of all the new papers, ribbons, and embellishments – so you can try them out and see which ones you like!

    Amazing You Sale-a-bration card idea side view

    Tips for making this card:
    • Neutral pattern papers are great! Take advantage of the Petal Passion designer paper being all black and white designs. Use them add some weight to your card without having to worry about conflicting colors.  I added this 3/4″ x 5 1/2″ strip to the left side of my card to anchor all my different elements.
    • Coordinate the stamps and dies – Coordinate the sentiments from the Amazing You stamp set with the die cut sentiments from Celebrate You thinlits.  They are both free with a purchase during the Sale-a-Bration promotion (Jan-Mar 2018).  The stamp set is free with a $50 purchase, the dies are free with a $100 purchase.  *Or get them BOTH* with a $150 order, PLUS you’ll become the host of your own party and get an extra $15+ in free goodies to add on to your order.  And who doesn’t love free?
      Create your own Amazing You Bundle
    • Pick your Pop of Color – If you stick to one or two light or neutral colors (in this card, I used Basic Black, Basic Grey, and Daffodil Delight), then add in one bright color to add a pop to brighten things up!  I LOVE LOVE LOVE this Berry Burst metallic edge ribbon, and so used that behind my sentiment for that extra pop!
    • Customize your stamps!  I wanted to add the flower from the Amazing You stamp set but it turned out it was just too big for how the card was turning out.  So just cut off the leaves!  I colored in the flower using my Daffodil Delight Stampin’ Blends, trimmed out, and ready to pop on the card.

    Amazing You Sale-a-bration card idea coloring with blends close up

    • Sequins made easy! Finally I needed just one more touch – and it was the Tutti Frutti adhesive back sequins!  You get 5 pretty colors (Berry Burst, Daffodil Delight, Lemon Lime Twist, Pool Party, Pumpkin Pie).  And they already have glue on the back so they are a snap to add on to your projects and they don’t fall off later! 🙂

    Wanna make this at home? Here is what you need:

    Thanks for stopping by! Shop online here


  • Bright Birthday Card with Celebrate Today and Sale-a-Bration Accessories

    Did you catch my Occasions Catalog walkthough video?  If you did, you saw me showing this card when I talked about both Sale-a-bration products as well as the Celebrate You stamp set and framelit bundle.  It was my first time playing with this set and I just had too much fun!

    Tips for making this card:

    • If you like the Celebrate Today stamp set, then you definitely should go for the bundle!  You get framelits to cut out almost all of the shapes including those cute balloons (and pennants, which I didn’t in this card, but could have).  Plus you save money in the process.
    • When picking colors for your card, pick your papers or your accessories to get inspiration from. In this case, I reached for my Best Year Ever (FREE) Sale-a-Bration accessory pack and used the ribbons and buttons.  So, the rest of the card was centered around those colors – Crushed Curry, Calypso Coral, and Coastal Cabana
    • Don’t be afraid to go “off the page”!  I let my elements (like the sentiment and the balloon) have their edges peek over the edges of my white layer.  This gives the card more interest and keeps it from being too stiff.

    Get those buttons and ribbons free!

    You can only get them for free (that’s the best price, right?) and you can do it one of two ways:

    1. Place a $50 order in my online store and you can pick their bundle as your free Sale-a-Bration item
      OR
    2. Purchase my I WANT IT ALL Product Sampler from me.  As a bonus for getting the full shebang (all for only $26 for all the papers and accessories in the catalog) you’ll get a sampler of these ribbons, buttons AND the coordinating designer paper!  Sweet right?

    Have fun and enjoy the new goodies!

    NWstamper signature_thumb[9]

    order online button for sig 3_thumb[4]

    Project Supplies Used:
    (if you are reading this in email, click here to see the list of supplies)

  • The Gift Bow Die is Back!

    Do you remember all the super cute creations that were made with the Gift Bow Die over the holidays?  I was shocked that the die wasn’t carried over when the Holiday catalog ended, but then I checked my computer today and IT IS BACK!

    Gift Bow die

    Gift Bow Bigz Die – #129977

    See, you can make cute FLAT bows for your cards like this :

    How perfect would that be for Father’s Day?  Details for how to make this bow are here.

    Or make bows for gifts like this:

    (These are gift boxes my Mom and I made for craft fairs this fall!  If you are curious to see the insides or want one, you can see the details here.)

    Plus, the bows are super easy to make too!  Check out this video for how to make the different bow shapes:

    Get your Gift Bow Die online here

    Have fun, and I’d love to see/hear what you create!

    spaced shop now sig bar

    Stampin’ Supplies Used

    Stamps – Seasonal Sayings
    Ink – Chocolate Chip
    Paper – Gumball Green, Cherry Cobbler, Whisper White, Season of Style designer paper (retired)
    Accessories – Burlap Ribbon, Regals candy dots, Big Shot, Gift Bow die, Crystal Effects

  • Frosted Glass Butterfly Technique and Card

    As I get ready for Monday’s Terrific Techniques: Fun with Washi class, I was looking over a card I made recently using the Best of Butterflies stamp set.  (You know, because it was one of my few samples right now that uses washi)

    I was playing with Vellum and thought it would be really pretty to create a softly colored butterfly image.  Its super easy to do too!

    All you have to do is:

    1. Stamp your image on Vellum using Stazon Ink
    2. Flip over your Vellum paper (so inked side is down) and start coloring using markers. 
      I recommend coloring with your darker color first because the first color you ink will be the top layer you see when you flip over the stamped image.
    3. Cut out your image
    4. Adhere to your card base using a glue dot behind part of your image that is solid black.

    And TA-DA!  You have a totally cool looking butterfly!


    Stampin’ Up Supplies Used:
    Stamps – Best of Butterflies, Seasonal Sayings
    Ink – Stazon, Crumb Cake, Calypso Coral, Daffodil Delight marker, Pumpkin Pie marker, Cajun Craze marker
    Paper – Calypso Coral cardstock, Very Vanilla cardstock, Vellum cardstock
    Accessories – This and That washi tape, Glue dots


    spaced shop now sig bar