Northwest Stamper

Tag: Big Shot

  • Bright Retro Fresh card with Starburst Sayings

    Bright Retro Fresh card with Starburst Sayings

    It’s funny. I tell myself that I’m going to focus on getting caught up on some other tasks I’m behind on (like making sure the last few people who participated in my Online Stamp Club at the end of the month have their project passwords & make and take packets in the mail!)  So, I’m going to wait to edit photos and post on my blog for a few days.  But then after I haven’t posted for 2 days, suddenly I feel like its been AGES and I have the itch to get something to share. Smile 

    So, here I am, pulling out a card to share that I received from my fabulous friend Annie Lee, because YOU need something bright and cheery to send off your Friday! 

    Now, I normally shy away from orange as a main color… I don’t wear it, I rarely buy it…. but times like these remind me that it isn’t as bad as I think!  Smile  In fact, I think it actually makes the card.  It helps the patterns in the Retro Fresh designer paper and the sentiment stand out without needing them to be super bright themselves.

    And she reminded me about those Vintage buttons that have been sitting on my desk for the last 9 months and never been touched… remember those?  I swear, I never would have though to grab a “frilly”, vintage button to go with a modern retro card – but it works!

    And that, my friends, is why doing card swaps and sharing ideas is so great.  It helps you see the supplies you have in a whole new light and give you great ideas to try. 

    Want to swap and share ideas online with me and other crafters?

    I’ve been thinking of putting together a group for sharing ideas and possibly swapping (most likely a group on Facebook).  You wouldn’t have to be a Stampin’ Up demonstrator to participate as I’d love as many people to share ideas as possible.  If you are interested in joining a group like this, leave me a comment, post on my facebook page,000 or shoot me a mail.  If I have enough interest, I’ll get it going and make sure you are invited!

    spaced shop now sig bar

    April Online Stamp Club Hostess CodeG4VQJ7VB
    Use this code to get free exclusive tutorials & project kit! Learn more


    Supplies Used:

    134818s
    132993s
    129327s
    133520s
  • Super Fun Spring Wreath with the Burlap and Blooms Kit

    Super Fun Spring Wreath with the Burlap and Blooms Kit

    So, I can make cards.  And I can make scrapbook pages.  I can even make boxes and bags out of paper.
    But when it comes to making cute home décor items, I have to admit I struggle a little bit.  Not because I can’t make them, but because the interior-decorating eye doesn’t come naturally to me and so I never think them up!

    My sister-in-law, on the other hand, doesn’t scrapbook or stamp, but her home has the CUTEST walls around!  I always go over to her place and get inspired to try to make my house look a little more crafty and put together.

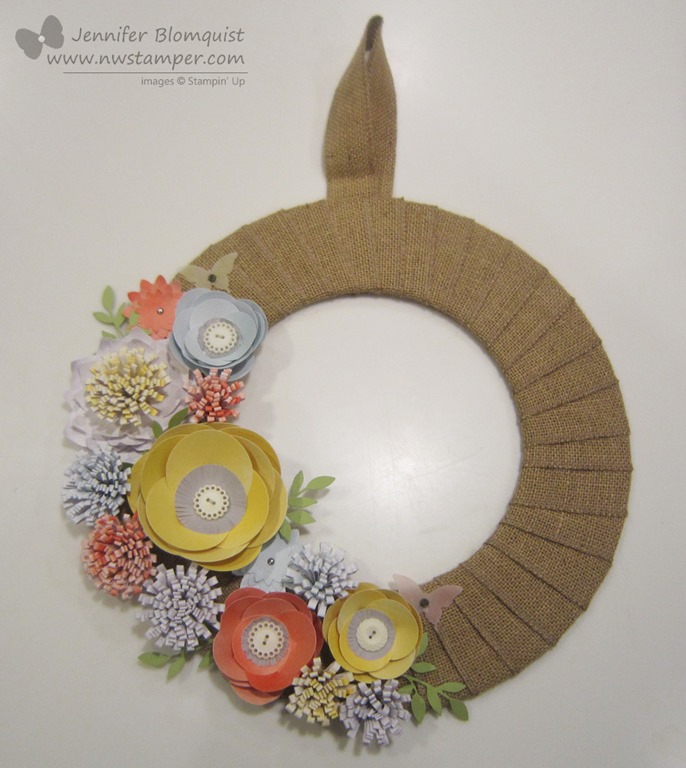
    But check it out ….. I totally made this and I LOVE IT!!

    It looks so crafty and fancy and cute… but the best part, I didn’t have to think of much of anything at all and all the tedious work was done for me!  Yay!

    So, I pulled this all together from the Burlap and Blooms Wreath Kit from Stampin’ Up.
    image

    All I needed was a little bit of time – which can be tricky with two small kiddos who always want to craft with you if they see you at your craft table and you are trying to wield a hot glue gun! – and some adhesive.   Oh, and some scissors for a smidgen of fringing – but only on the grey circles in the middle of the big flowers.

    The biggest problem I had was that the instructions were a bit brief and so I had to figure out what I was doing by my best interpretation.  But in case you are a more visual learner, I put together a video that walks you through how to make each of the flower types in the kit!

    Video Tutorial for making the Flowers in the Burlap and Blooms Kit

    (If you are reading this post in email, and can’t see the video – click here to check it out on my YouTube channel)

    Finally, I wanted to add a few little details that were my own –

    I had so much fun making this wreath that I’m thinking of giving her this one and then getting another one to make for me to keep!  She just moved, so it would make a perfect housewarming gift, don’t you think?

    And don’t forget,
    if you grab 1 kit for you + 1 kit for a gift + the Elegant butterfly punch = 1 FREE sale-a-bration stamp set/paper/punch/accessory of your choice!  Score!

    So, give it a try and if you have any questions, feel free to email me at jennifer@nwstamper.com or leave me a comment and I’d be glad to help clarify things for you!

    spaced shop now sig bar

    Stampin’ Up! Supplies Used

    Ink – Calypso Coral, Daffodil Delight
    Paper – Pear Pizzazz cs, Vellum cs
    Accessories – Burlap and Blooms Wreath kit, Multipurpose liquid glue, Hot glue gun, Big Shot, Little Leaves sizzlit, Elegant Butterfly punch, Vintage Trinket embellishments

  • Make a Wish–Neutrals and Gold Birthday Card

    So, if you saw my blog post from yesterday, I shared a card that used the Oval Framelits to cut out a frame to highlight some vellum in the center of the card.  The frame effect was really cool, but I was left with two, pretty big ovals when I was done.  Wanna see what I did with them?

    Now, I am a hardcore crafter and pack rat… yes, fine – I’ll admit I’m a bit of a hoarder. Smile  So, that means any scrap that is bigger than itty bitty makes me think, “I could use that… that is big enough to use on another card, or to punch a shape out of…”etc.  And typically I stuff them in a box or bag near my craft table

    …. never to be used again!

    So, I’ve made it a new rule for me.  If I want to keep a punched/die cut/stamped scrap, I need to use it right then (or pretty soon to right then) otherwise it goes in the recycling bin. 

    (Seriously, if you were at my craft garage sale this summer, you saw the gallon ziploc bag FULL of punched and die cut pieces that I never used and decided to let go of!)

    And create I did!  I used the two ovals as backgrounds for the card and then started layering elements on top.  I grabbed the new Naturals Chevron ribbon and then to spice it up, I tied some linen thread around the top and frayed what was above the thread.

    Also, if you look close…. you can see that the party hat in the lower right hand corner is fussy cut and glued onto the card front.  Wanna know why?

    Because I was too chicken to stamp directly on the cardfront!

    Ha ha, it’s true!  I thought the card needed something and I thought the hat would look good in the corner but I didn’t trust that it would really work out.  And since everything else was already glued down, I just stamped on a piece of the same Crumb Cake paper and cut it out.  Turns out I liked it so I just glued it down as is!

    So, to make this card – here are the supplies I used:

    Stamps – Perfect Pennants, Sketched Birthday
    Ink – Chocolate Chip, Crisp Canteloupe
    Paper – Gold Foil, Crisp Canteloupe cs, Crumb Cake cs, Whisper White cs, Neutrals Core’dinations cs (Early Espresso)
    Accessories – Big Shot, Oval Framelits, Sanding Block, Neutrals Chevron Ribbon, 7/8” Cotton ribbon, Linen Thread

    I love how it turned out and I hope it gives you ideas as well!


    spaced shop now sig bar

  • Cyber Monday Special–Save on the Big Shot!

    It is here!  The last day of the Big Holiday Sale and what do you say we let it go out with a Bang?! On top of all the great bundles and saves in image_thumb[1]

    Special Northwest Stamper Deal!  TODAY ONLY! Save 25% off the Big Shot or receive a $25 credit towards additional accessories!

    How to get your Big Shot savings:

    You have 2 options for taking advantage of the Big Shot savings:

    1. Call or Email me your order I will give you your choice of 25% off the Big Shot or you can select up to $25 in additional accessories when you purchase your Big Shot
    2. Order your Big Shot in the online store When I see your order come in, I will contact you to give you your choice of a refund of the 25% discount amount, or you can choose to receive a $25 gift card to use on accessories for your new machine!

    Please note – this offer is only available through me, Jennifer Blomquist.  This is a special offer I’m making available to my customers as an extra thank you!

    More Cyber Monday Specials!

    image

    These products are 30 percent off for 24 hours on Monday, December 2:

    DescriptionRetail PriceSale Price
    Envelope Liners Framelits Dies (item 132172)$26.95$18.87
    Expressions Thinlits Dies (item 132171)$24.95$17.47
    Holly Jolly Greetings Simply Sent (item 132159)$14.95$10.47
    Snowflake Season Simply Sent  (item 132176)$14.95$10.47
    Large Rhinestone Basic Jewels (item 129324)$4.95$3.47
    Extra-Large Gift Box (item 132147)$3.95$2.77

    Get your shopping fingers ready as this all is only available for 24hr tomorrow only! I will be placing a group order tonight, so let me know if you want in on it to snag these deals and save even more!  email me at jennifer@nwstamper.com or you can shop online!  

    spaced shop now sig bar

  • Getting Ready for Cyber Monday & New SU Specials

    Hopefully you’ve been having a great holiday weekend… or just a great weekend for those of you not in the US!  I’ve had a great laid back weekend with the family and have actually gotten a lot of scrapbooking done!  I think I’m actually close to having all of Halloween this year in an album… don’t ask me about the rest of the year or last year though… ha ha.

    So, today I’ll try to get some photography done but in the meantime, I wanted to share some of the new stamps and upcoming specials that I have the scoop for you today.

    Cyber Monday Deals! 

    Turns out that Stampin’ Up! decided to add some Cyber Monday deals – yay!  And I know that everyone had been waiting for the BigShot to go on sale…and while SU didn’t put it on sale, I wanted to say thank you to all my customers and so I’m giving to you for a discount for one day only!

    image

    Special Northwest Stamper Deal!  Monday, Dec 2 – Save 25% off the Big Shot!

    These products are 30 percent off for 24 hours on Monday, December 2:

    DescriptionRetail PriceSale Price
    Envelope Liners Framelits Dies (item 132172)$26.95$18.87
    Expressions Thinlits Dies (item 132171)$24.95$17.47
    Holly Jolly Greetings Simply Sent (item 132159)$14.95$10.47
    Snowflake Season Simply Sent  (item 132176)$14.95$10.47
    Large Rhinestone Basic Jewels (item 129324)$4.95$3.47
    Extra-Large Gift Box (item 132147)$3.95

    $2.77

    Get your shopping fingers ready as this all is only available for 24hr tomorrow only! 

    I will be placing a group order tomorrow night, so let me know if you want in on it to snag these deals and save even more!  email me at jennifer@nwstamper.com or you can shop online!

    December “Best of” Stamp Set – Best of Sale-a-Bration

    The final “Best of” Stamp set was released this morning… it is a collection of past Sale-a-Bration stamps.  How many do you remember?

    image

    Best of Sale-a-Bration (December)

    Don’t forget, once you collect any 6 of the 12 “Best of” Stamp Sets and you’ll be able to fill out a collectors card and mail it in to get any stamp set in the catalog valued up to $14.95 for Free!

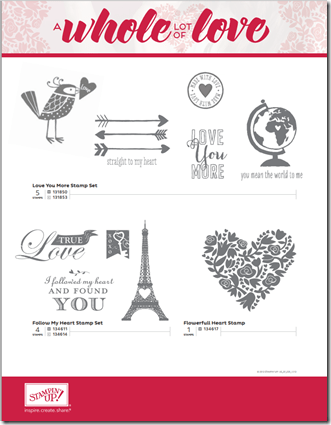
    A Whole Lot of Love with Cute Valentine’s Items

    I know some folks have been waiting for an Eiffel Tower stamp and guess what?  A new one just came out!  Stampin’ Up! is releasing some Valentine’s items in December so that you have time to get everything you need early.

    Check out what is new.  Items are available December 1st – Jan 27th!  See everything online here.

    image

    Check out the Flyer of Cute Valentine’s Kits


    image

    Check out the flyer of Exclusive Stamp Sets


    Ok, so I think you have the latest scoop!  Don’t forget, stop by tomorrow for the final Cyber Monday Specials

    spaced shop now sig bar

  • Elegant Glitter Floral Frames Card & Weekly Deals!

    When I saw the weekly deals this morning, I thought it was so cool that Floral Frames framelits were on sale and it made me think of my favorite card I’ve made with these framelits.  Wanna see?

    Glitter floral frames elegant card

    Sorry it isn’t the nicest picture, but it is what I had from when I made it a while back.  It is easy to make thanks to the different size flowers in the floral frames framelit set and when you use the coordinating Daydream Medallions stamp set it comes together in a snap.

    Project Supplies

    Here is everything available on the weekly deal starting today and going through Dec 2nd:

    Floral Frames Framelits Dies
    Item # 127012

    Regular Price: $26.95
    Discounted Price: $20.21 US

    Peekaboo Frames Bigz Large Die
    Item # 124587

    Regular Price: $32.95
    Discounted Price: $24.71

    Soft Sky Classic Stampin’ Pad
    Item # 131181

    Regular Price: $5.95
    Discounted Price: $4.46

    Regals Stampin’ Write Markers
    Item # 131262

    Regular Price: $28.95
    Discounted Price: $21.71

    1″ Square Punch Item # 124094
    Regular Price: $15.95
    Discounted Price: $11.96

    Cherry Cobbler 3/4″ Chevron Ribbon
    Item # 130012

    Regular Price: $8.95
    Discounted Price: $6.71


    Don’t Forget!

    Use Hostess Code – VPESSGUJ when shopping and you will be entered to WIN a minimum of $25 in your choice of free benefits!

    Beautifully  Baroque Textured Impressions Embossing Folder Item # 130917
    Regular Price: $7.95
    Discounted Price: $5.96

    Compilation of Recipes Designer Template
    Item # 127755

    Regular Price: $14.95
    Discounted Price: $8.97


    spaced shop now sig bar

  • A Sweet Ice Cream Cone Punch Art Birthday Card

    We are about to enter “birthday season” here at my house with the first few starting up at the end of the month and then me and my two kids all have December birthdays… so it is about to get crazy here!  But one thing I always have to have for birthday is cake and ice cream… so what better way to say Happy Birthday than with some adorable ice cream on a card?

    So sweet!  And it is really easy to make too!

    To make the ice cream cone, you just need a couple of punches and an embossing folder.

      +
    +
    • Add some glitter to the top of your first scoop of ice cream and you have an adorable ice cream cone!

    I layered the cone onto a tag made with the Chalk Talk framelits and sponged the edge with Crisp Cantaloupe ink.

    Stampin’ Up! Supplies Used
    Stamps:  Fabulous Phrases
    Ink:  Basic Grey, Crisp Cantaloupe
    Paper: Very Vanilla cardstock, Smoky Slate cardstock, 2013-2015 In Colors (Baked Brown Sugar, Crisp Cantaloupe, Pistachio Pudding, Coastal Cabana, Strawberry Slush)
    Accessories:  Big Shot, Chalk Talk framelits, Square Lattice embossing folder, Cupcake punch, Pennant Builder punch, Natural Trim ribbon, Linen Thread, Sponge Daubers


    weekly specials 11-5 to 11-11

    And it is Tuesday as well, which means NEW weekly deals!  As you can already see, I love the Cupcake punch… but I don’t have the Autumn Accents die and that is for sure going in on my group order this week! 🙂

    See details on all the deals in the online store here


    spaced shop now sig bar

  • Fabulous Flower Shop Summer Card (Convention CASE)

    I had to continue my sharing of the great convention with another card that I loved so much that I had to share it in a class last week.  I really wanted to start playing with my goodies from the Holiday catalog but I couldn’t quite let go of summer yet, and so I gravitated to this cute idea.

    Card designed by Sherrie Schintz

    I loved how this card uses all 5 of the 2013-2015 In Colors together and after you emboss them with the Perfect Polka Dots embossing folder, they are pretty cheery wouldn’t you say?

    We added some of the flowers from the Flower Shop bundle (which includes the stamp set and the posy punch) and of course a bit of glitz with a rhinestone in the center of each.

    Now, I loved the card, but I wanted to add a little bit of something, so we all lined an envelope by creating our own matching designer paper.  Now, when playing with the liners recently I noticed that if you use designer paper that has a dark pattern, you can sometimes see it through the front of your envelope.  So this was an example of using Whisper White cardstock and stamping one side with your preferred image (in this case, we stamped the same flower images in a random pattern).

    Then, grab your NEW, AWESOME Envelope Liners!  Sigh, I love these things… Smile

    image

    They come in 3 sizes:

    1.  A2 – to fit 4.25” x 5.5” cards

    2. Notecards – to fit the 3.5” x 5” cards from the Stampin’ Up! notecards & envelope set

    3.  Square envelopes – to fit 3” x 3” cards

    So, we cut our Whisper White paper to 6”x6” (so you can get 4 out of a 12×12 piece and stamped our flowers.  Then cut it out using the largest envelope die.  Because you have white on the back, you don’t see anything through the front of your envelope, but on the inside you have lots of cute flowers!

    Plus, the liner stops just short of the adhesive on the envelope, so you still have the gummy to seal your envelope when you are ready.  Sweet, huh?  So, grab these dies and get creative and I know you’ll love the results!

    spaced shop now sig bar

  • How to Make Your Own Flocking & Add Fuzz to Your Projects

    When I was playing with the Swallowtail stamp, I realized that it was a big stamp… seriously, like background sized big stamp.  And I was trying to figure out how I wanted to use it.  So, I cut and I played, but I really wanted to keep the full butterfly image for my card.  So I let go of my 4 1/4” x 5 1/2” boundaries and let my butterfly fly!

    But then as I was working on the rest of my card, I decided that the Honeycomb embossing folder looked a bit too tall… too sharp for my card.  So I grabbed my handy sanding block and started rubbing down the layers.  When I was done, I was much happier with my cardstock and I had a ton of extra fuzz collecting on my desk.

    That fuzz makes awesome flocking!  If you don’t know what flocking it, it is like glitter only instead of being a jar full of reflective bits, it is a jar full of fluffy fuzz.  It is perfect to add as a layer over parts of your stamped image or card that you want to have a plush texture and when you make your own, it perfectly matches the rest of your project.

    Here is a close up of how my honeycomb looked when I was done sanding and you can kind of see the butterfly body too:


    I even made a video so you can see how I made it!


    To Order Stampin’ Up! Products Anytime, click here!

    Supples Used
    Stamps
    – Swallowtail, Fabulous Phrases
    Paper – Whisper White, Crumb Cake, Lucky Limeade, Wisteria Wonder
    Ink – Early Espresso
    Accessories – Big Shot, Honeycomb Embossing Folder, Rhinestones, Sanding Block, Stampin’ Dimensionals

    image

  • Scrapbooking Sunday: Using Stamps as Accents on a Baby Page!

    I know it is St. Patrick’s Day and so I should be posting something green, but I finished this scrapbook page for my daughter and just had to share it with everyone for this week’s Scrapbooking Sunday!  So, you can virtually pinch me but I hope you enjoy the ideas for this weeks layout.

    I’ve been trying to get through some of the recent backlog of photos I printed opportunistically and then never got scrapped.  Smile  This is one of the photos from right before we left the hospital after she was born.  I may not look my best, but it is one of the few pictures of I have of her and me and so I’ll love it no matter how I look.

    This whole layout actually started with me wanting to use the elephant from the Patterned Occasions stamp set exclusively available during Sale-a-Bration but to use it for a baby scrapbook page.  So I grabbed my Pink Pirouette marker and started coloring the elephant and making an elephant parade.

    One thing I noticed is that the markers are so juicy and the pattern of the elephant is so intricate that extra ink gets caught in the spaces so it wasn’t as crisp of an image.  But I didn’t care and couldn’t be bothered to try again using a post-it note to mask the stamp itself.

    But then I tried again using a mix of colors for one more fun elephant accent.  This time I left the flower in the image and cut it all out.  I accented it with a 1 1/4” scallop circle punched out of Pink Pirouette cardstock.

    Finally, I needed a little more something at the top of my page and my Hearts a Flutter stamp set and framelits was exactly what I needed.  I just adhered my baker’s twine across the top of the page and tucked my banners under the twine where I wanted them.

    I even like the Summer Starfruit designer paper from the Sale-a-Bration flyer (Sycamore Street designer paper) as my background even though initially I was not a fan at all of this pattern. Smile

    Don’t Miss the Start of Sale-a-Bration Send Off Week! Giveaways and more!

    Don’t forget that this is the last week to get your free stamps and accessories as part of Sale-a-Bration.  To remind you (and me!) of the fun ideas and projects you can make with the different stamps and accessories, I’ll be holding a send off celebration here on my blog all week capped off with a Sale-a-Bration Send Off Party on Friday.

    All week you can get entries for prizes and drawings!

    So, come back tomorrow when it all kicks off and you can start celebrating and winning with me!


    To Order Stampin’ Up! Products Anytime, click here!

    Are you earning your Northwest Stamper Rewards?

    Every order gets you closer to your FREE stamp set! Click here to learn more!

    Patterned Occasions Baby Scrapbook Page Recipe:
    Stamps:
    Patterned Occasions*, Hearts a Flutter
    Ink: Soft Suede, Summer Starfruit, Rich Razzleberry, Markers: Pink Pirouette, Rich Razzleberry, Soft Suede, Gumball Green
    Paper: Pink Pirouette, Rich Razzleberry, Soft Suede, Very Vanilla, Primrose Petals core’dinations cardstock, Sycamore Street designer paper *
    Accessories: Sycamore Street ribbon & button pack*, Big Shot, Junior Timeless Type sizzlits, Hearts a Flutter framelits, Square Lattice embossing folder, Glue Dots, Stampin’ Dimensionals, Crochet Lace trim, Early Espresso baker’s twine, stapler, Sanding Block, 1 1/4” scallop circle punch

    * item that is available for free with a $50 order through 3/22/2013

  • Adorable Easter Class Projects, Punch Art, & a Blog Hop!

    It’s the first Thursday of the month and that means the Stylin’ Stampin’ Squad blog hop.  I lucked out because this month the theme is Easter/Spring and I just so happen to have my Everything Easter class coming up this weekend on Sunday!

    So I thought I would share some of the projects we’ll be doing in the class and give you some inspiration for what you could do for your own Easter baskets!


    Not-so-tiny Treat Pouch!

    I had been looking at some past projects and saw some old treat pouches that were made with a Big Shot die that retired a few years back.  It reminded me of the fun and easy idea of a no-sided bag that holds a pouch of treats in the middle.  Did that make any sense at all?  I bet not, so here – how about a picture to show you what I mean?


    Does that make more sense now?

    Ok, so this is really easy to make and you can change it up for any event or holiday.

    In this case, I took a 4”x12” piece of Certainly Celery cardstock and scored at 5” and 7”.  Then I used my new Ovals Framelits to cut out a piece of Pool Party core’dinations cardstock to make my top flap!  I then embossed the top flap and sanded down the dots for a subtle, textured effect.

    The stamped flowers are from the Madison Avenue stamp set that is only available as a free stamp set with a $50 order.  The flowers are separate from the leaves and it makes for some great stamping options.

    Tip:

    • Use Sticky Strip (red line tape) to attach the scallop oval flap to the back of your pouch.  This helps hold up with multiple openings of the pouch.
    • Use a slim velcro dot to keep your flap closed on the front of your pouch – this allows for easy reuse later.
    • Secure a clear envelope or card sleeve to the front-inside panel of your base cardstock.  (So in my picture, behind where my stamped flowers are).  This helps with the stability of the pouch and keeps the candy from getting away. Smile 

    Punch Art Easter Duck / Chick

    I’ll admit I don’t have many Easter stamps.  But that is usually ok because there are so many adorable punch art options that are perfect for Easter!

    Like take this duck punch art for example …  isn’t he CUTE!

    I just love this little guy and knew I had to share him with my friends for the class.  I tried to use as few punches as necessary but ended up with 6 punches used:

    • Ornament Punch
    • 1 3/4” Circle Punch
    • 1 3/4” Scallop Circle Punch
    • 1 1/4” Scallop Circle Punch
    • Large Oval Punch
    • Circle from Itty Bitty Punch Pack

    The funny thing about this sample card is that this duck was my “figure it out” version and then I made a “nice sample” version where I sponged the edges of the different body parts, made sure everything was on straight, etc.  But when I was putting together the card, I grabbed a duck….glued…. and then realized I had used my messy version instead of the “nice” one.  Smile  I guess it didn’t turn out too bad, huh?

    I have two more projects for the Everything Easter class on Sunday – a card and an awesome punch art bunny treat box!  Sadly, I didn’t get them photographed in time for today, but I’ll try to share them soon.

    Until then, if you want more inspiration for your Easter and Spring projects, check out the other talented stampers who are sharing their great ideas on our blog hop!  Click the “Next Blog” image or your favorite link below:

    1. Shellie G. of Craft Smashup
    2. Annie L. of Love Me Cards
    3. Nancy B. of Lady Stamps-A-Lot
    4. Rose C. of Stamp with Rose
    5. Tonya B. of Stampin’ with Tonya
    6. Dawn S. of Dawn’s Creative Chalet
    7. Darcy J. of DJ’s Stampin’ Place
    8. Pamela W. of Stinky Tofu
    9. Kim R. of Stamping with Kim
    10. Heidi B of Stuck on Stampin’
    11. Jennifer B of NW Stamper  <—YOU ARE HERE!
    12. Bree of Craft-somnia
    13. Diana E of Stampin’ Fun with Diana

    I hope you enjoyed my projects I shared today!

    I’d love to hear what you think – please leave me a comment and let me know what you think.


    To Order Stampin’ Up! Products Anytime, click here!

    Are you earning your Northwest Stamper Rewards?

    Every order gets you closer to your FREE stamp set!  Click here to learn more!

  • Smashed Bottle Cap/Soda Pop Top Spring Card

    Ever since I went to Leadership in January, I have been dying to try out the technique of smashing the soda pop tops with your Big Shot to create these super cute embellishments.  For some reason I thought it was going to be super hard or complicated… or something that made me a little bit intimidated to give it a try.  But then one day I decided to just go for it and I was shocked at how easy it was!

    So, I just had to put together a card to share with my group at my monthly team conference call/meeting.  I showed them how easy it was and then had supplies for everyone to make this card:

    I just had to use some of my new favorites including Tea for Two designer paper and the Honeycomb embossing folder for the base of the card.

    But check out this pop top… isn’t is awesome when smashed?!?

    How to Smash Your Soda Pop Top in Your Big Shot

    Ok, so if you want to do this yourself, this is what you need to do:

    1.  Put your white multi-purpose platform on the Big Shot base with all of the tabs/shims flipped open

    2.  Sandwich your bottle cap/pop top between the two clear cutting plates and place on top of the multi-purpose platform

    3.  Run through your Big Shot

    That’s it!  It smashes fast and like buttah!  I have way too much fun doing this. Smile

    I just used the 1” Circle Punch after I stamped my image from the Collage Curious stamp set (stamped on River Rock cardstock) and adhered it to the inside of the pop top.  Then I filled the inside with Crystal Effects. 

    I will warn you it takes a long time to dry!  Like seriously, it took probably about 45 min for mine to dry because I used soooo much Crystal Effects.  But it looks so awesome that I just had to do it.

    So if you haven’t tried this smashed soda pop top technique yet, you totally should!  Give it a try and let me know what you think.


    To Order Stampin’ Up! Products Anytime, click here!

    Are you earning your Northwest Stamper Rewards?

    Every order gets you closer to your FREE stamp set! Click here to learn more!

    Smashed Recipe:
    Stamps:
    Teeny Tiny Wishes, Collage Curious
    Ink: Crumb Cake, Markers: Calypso Coral, Certainly Celery
    Paper: Very Vanilla cs, Certainly Celery cs, Tea For Two designer paper
    Accessories: Big Shot, Honeycomb embossing folder, Glue Dots, Crystal Effects, Paper Snips, Calypso Coral ruffled ribbon, Stampin’ Dimensionals