Northwest Stamper

Category: Techniques

  • Playing with Pastels

    ahhh… it feels good to back at the blog.  I just getting over a yucky cold and just in time because my technique night was last night.  We were playing with pastel chalks and between my cold and my half-cleaned craft room, I got a bit of a late start preparing for it.  However, I’m happy to report that I’ve made huge progress on my craft room (you can now fit chairs at the table and the table is cleaned off for the first time since moving here last fall :))!  Of course, in the process of prepping for the class last night, my craft table is a mess… so I get that straightened up and share it with you.


    But in the meantime, I thought I’d share what I whipped up as samples for some different techniques.  This was actually my first time in a long time that I had used my chalks and I discovered they are a lot more fun than I remembered.  And the girls did some awesome work with them – I just need to remember to take pictures of what they create!

    pastels_tt_wm2

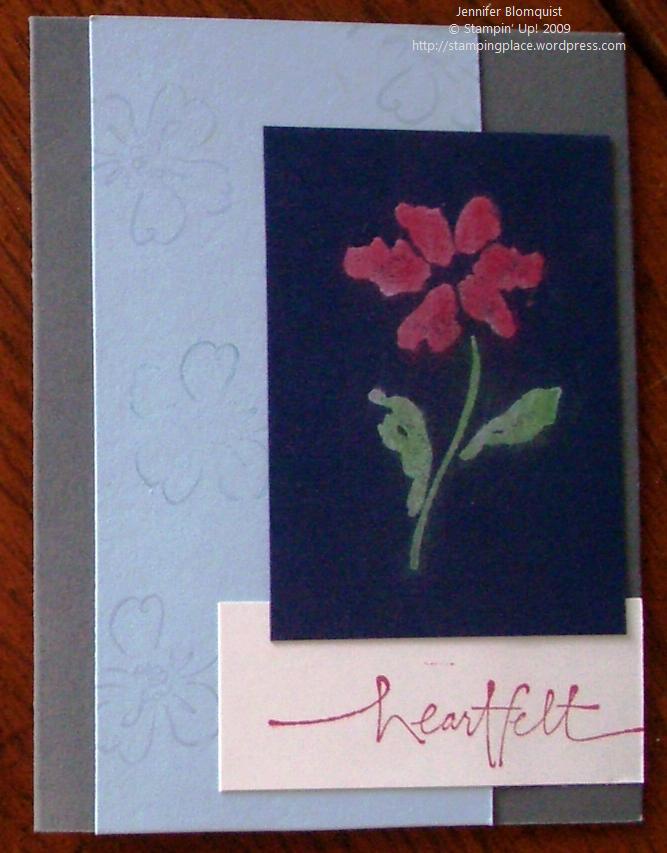
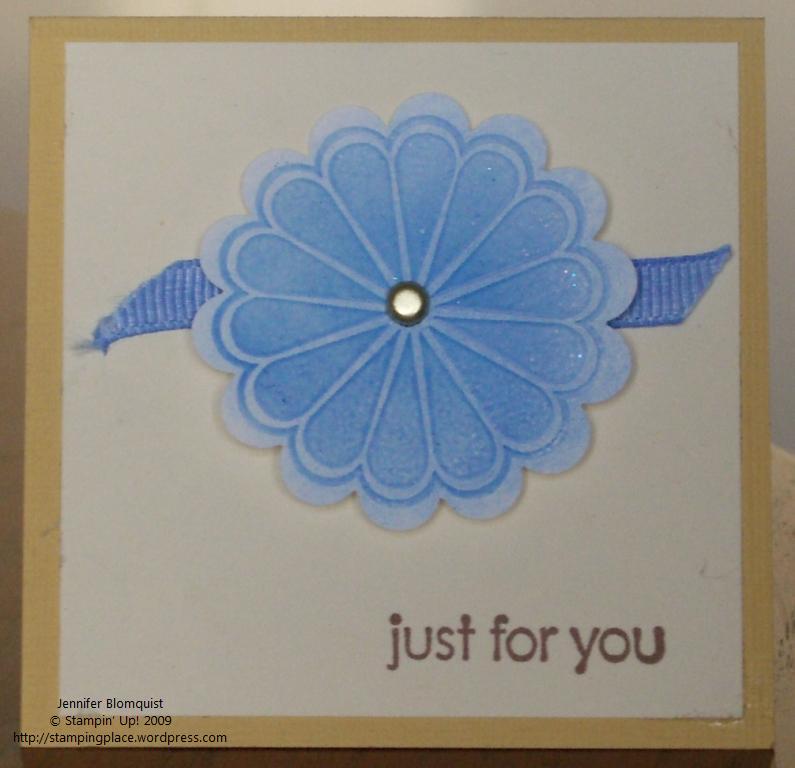
    The techniques we focused on were popping pastels (the cupcake and the butterflies), coloring an embossed image (the blue scalloped flower), coloring ribbon (the blue ribbon), chalkboard technique (the red flower), and using chalks directly on the stamp to color a stamped image (some of the background flowers on the heartfelt card).


    pastel_ribbon_wmThe flower started out as clear embossing powder over versamark on whisper white paper. After you have embossed your flower, you can take a sponge to your chalk to pick up some color and then rub the sponge over the embossed image to color it. I recommend using brighter colors though because my first attempt with a light blue barely showed up. This card was made using the brilliant blue chalk. And with chalks it is very easy to layer colors. One person, used orange as a base color and then used rose red to color the edges.


    And yes, this is a white ribbon! Use the same sponge to apply color to your ribbon by rubbing along the white ribbon.  You can use sealent afterwards to keep it from rubbing off on your hands but it doesn’t rub off much if you don’t.


    chalkboard_heartfelt_wm This card used the chalkboard technique where you stamp with white craft ink on a dark paper and then pick up the chalk color using a q-tip or applicator.  Once you have the color, you want to tap your stamped image to apply the chalk.  Don’t rub or you will have a lovely smear of white and chalk in places you may not want. 🙂  Once you have applied your colors.  I tapped off excess power and then use a paper towel to lightly wipe off the excess color.  It turns out with a very lovely effect.


    Well, I’ll be back later with hopefully some new goodies to show you (my occasions mini preorder is supposed to arrive today!)  Have a happy wednesday!

  • Using Crystal Effects

    babybestwishes_wm1So tonight was our Crystal Effects night, and I think everyone learned something new – myself included!  I ended up staying up late last night as I kept finding new ways to use crystal effects that I wanted to try.  If you haven’t heard of crystal effects, it is this great thick clear liquid laquer for using on craft projects.  The most straightforward use is to add a bit of gloss or shine to your projects by applying some Crystal Effects on top of a stamped image.  However, there are a ton of fun and creative other uses. 

    I made a few samples of some different techniques last night.  So we talked about those different ideas and then set to work making a few items to take home.  Tonight we made Faux brads, Laquered die cuts, and a card using colored Crystal Effects on a transparency.  However, here are some of the different ideas for how you could use crystal effects:

    1. Add a touch of gloss to a stamped image
    2. Use crystal effects as a base for glitter.  Drop some crystal effects onto a stamped image and then cover in glitter.  Tap off excess glitter and allow to dry.
    3. Create Faux Brads by punching out a circle of paper and placing it over a glue dot.  Add some crystal effects to the top and you are ready to go!
    4. Create dew drops by dropping some crystal effects onto wax paper or the backing for the stickers from your stamp sets.  Add a bit of reinker color to make different colored drops.
    5. Color with crystal effects by mixing some crystal effects and reinker, and then using a brush or toothpick, color in a stamped image for a colored, glossy effect.
    6. Make a 3D embellishment by drawing a shape with crystal effects on wax paper (or the sticker backing) and then pouring glitter on top.   Allow to dry and then pop-off.
    7. Create laquered die cuts.  Cut out a shape in chipboard (in my case, I cut out the left over piece from a chipboard die cut after I popped out the die cut).  Glue the chipboard to a piece of designer paper.  Fill in the die cut space with crystal effects and allow to dry.
    8. Make glittering transparencies.  Mix some crystal effects with some reinker and dazzling diamonds.  Use a paintbrush to apply the colored crystal effects to the backside of a stamped transparency.  Allow to dry and attach to your card or project.

    techniquece

  • Decorating a Birthday Gift with Stamps

    I’m always looking for ways to use my stamps in different ways.  giftbox_beforeSure I love making cards, but sometimes you need something different and its fun to use your stamping supplies to add that personal touch.  In this case, my sister-in-law’s birthday is 2 days before Christmas.  So, when I bought her a gift at the local soap store, they offered to decorate the box as a gift.  I couldn’t turn down free gift wrapping but after they gave me the wrapped gift, I realized it was really Christmas wrapped.  My birthday is a week before Christmas, so I’m pretty sensitive to differentiating birthday and Christmas gifts, so I wanted to make sure her gift was definately “birthday” and not “christmas”.  So, stamps to the rescue! 


    giftbox_after

     The turtle is from a hostess set from the last catalog, but the tag is from the new Party Hearty set and the Happy Birthday under the turtle is from A Little Birthday Cheer.  This was also my first time in a long time using water color pencils.  They are like magic!  🙂  If you haven’t used them before, you color in an image with the pencils and it looks like normal pencil.  But then, go over the colors with a water pen and suddenly the color blends and instead of pencil marks, you just have a smooth watercolor image.

  • Finally able to post pictures

    So, while away on my trip, I tried posting the pictures from last week.  Unfortunately, my internet connection was apparently not good enough to make that happen, so I wanted to get out a quick post this morning. 

    Like I said last week, we had a great time getting ready for the holidays by making gift packaging.  I posted most of the items we made, but I didn’t get a chance to post the final two items. 

    scallopedgc This bag was one I first saw my mom do and I thought it would be perfect for holding gift cards.  It is super simple to do; so I thought it would be a good addition to the class.  All you do to make it is cut a piece of 3×6.5″ cardstock, scoring at 5″.  Use the scallop punch to edge of the flap of the main cardstock. Using sticky tape, adhere a 3×5″ cello bag to the 3×5 section of cardstock.  Punch holes through the main cardstock and cello bag (one on each side) about halfway between the 5″ score line and the end of the flap – don’t punch through the flap itself.  Run ribbon from the back of the holder, through the holes, and then use to tie the flap down.

    holidayboxThen, while waiting for the ladies to show, I decided I wanted to play with my new designer label punch and some hardware from the Hodgepodge Hardware kit.  So, I created a box with a band that would hold a designer label hardware piece.  Since it was based on the pizza box style boxes, it was super fast.  I just wish I had stamped the main cardstock instead of just the band.

    Recipe (GC holder):
    Stamps:
    none
    Ink: none
    Paper: textured chocolate chip CS, Ghostly Greetings DSP
    Accessories: scalloped edge punch, crop-a-dile, Ridinghood Red taffeta ribbon

    Recipe (box):
    Stamps:
    Christmas Classics, Best Yet (hostess)
    Ink: Always Artichoke
    Paper: Ridinghood Red CS, Always Artichoke CS, Kraft CS
    Accessories: Hodgepodge Hardware vanilla

  • Fun with heat embossing

    Last night was both a technique tuesday and a historic presidential election.  So, we ended up combining the two events into an election watch party in the living room and technique tuesday in the dining room. 🙂 We had a small group but had fun trying out a few different ways to add texture and interest to your projects with embossing.  I just had to share the cute cards we made.

    emboss_monkey1 The first card we made was a bit of traditional embossing.  We stamped the Thinking of You image in versamark on the Chocolate Chip card stock and then embossed with gold embossing powder.  We then stamped the sock monkey image straight onto whisper white and then I stamped the flower image using markers.  Finally, we used the versamarker pen to color in the flower petals and embossed those with gold again.  (I also couldn’t help myself and had to sponge the edges with more mustard and chocolate chip ink.  Not sure I love the results but they aren’t bad either!)


    emboss_thankyou The second card we made used embossing as a color resistor.  We first stamped the flower images using versamark and then embossed with clear embossing powder.  Then we were able to sponge on top with baja blue and pacific point inks to bring out the embossed flowers.  Finally, we straight stamped the thank you image, punched it out, and used a dimensional to attach it to the card.  Very quick and very fun.

  • November’s Technique Tuesday is Heat Embossing!

    Every first tuesday of the month I offer a technique class to give you a chance to try new things and learn more about some of the techniques you have seen in pictures or on samples. This month we will be trying out heat embossing.

    With embossing, there are two methods – dry embossing and heat embossing.

    • With dry embossing, you use some type of metal or plastic template with holes cut out. You place your paper over the template and then use a ball-tipped stylus to press your paper into the holes, creating a raised image in the shape of the template.
    • With heat embossing, you stamp an image and then sprinkle the wet image with embossing powder. The embossing powder sticks to the wet ink and when you apply heat with a heat gun, melts into a raised image in the shape of the stamped image.

    There are a few different ways you can use heat embossing, whether to create an elegant shape like what is commonly done for wedding invitations or to act as a color resist when adding more stamps or ink to your paper. Join us Tuesday Nov. 4 at 7pm to try it out for yourself. Cost -$5. Email me at stampingwithjennifer@gmail.com for more details.

  • Getting Punchy

    Last night I started playing with my word window punch some more and one of the ideas I had was to create a flower using punches.  This quickly turned into a card challenge to myself to see if I could make an interesting card that was almost entirely based on punches instead of stamps. It was a fun experiment and helped me brainstorm a ton of new ways to use punches (though most of those uses didn’t look so good when all smooshed together on one card).  In the end, I used two stamps though if I had thought to use rub-ons for the sentiment and designer paper for the background, I think I could have gotten away with none. 🙂

     To make this card, I used 5 different punches.  The card is actually very quick to put together because most of it is just punching and glueing paper.  

    Recipe
    Stamps:
    Pretty Petals background stamp, Sock Monkey
    Inks: Pink Pirouette, Pixie Pink, Garden Green
    Paper: Pink Pirouette cardstock, Garden Green cardstock, Whisper White cardstock
    Accessories: word window punch, small oval punch, five petal punch, trio flower punch, ticket punch, gold brad

    Read the steps to make this card!

  • Using the word window punch

    Yesterday I was asked by someone about ideas for different ways the word window punch could be used.  Now, one thing I love about paper punches is that they tend to be pretty versitile and the word window is no exception.  As I started brainstorming all the ways I’ve seen this punch used and new and different ideas I could try, I was amazed at how long the list was getting.  Now, I’m pretty inspired to play with some of the techniques myself.  If only it wasn’t midnight when I was ready to get punchy.  🙂

    So, this week I’m going to be working on projects that include different ways to use the word window punch.  Since I didn’t have time to make something new last night, I figured I’d put up some older stuff I had already completed (these are pretty simple uses but the first ones I found on short notice).  Tonight I’ll get cranking on some new, more complicated projects. 

    6×6 scrapbook page
    small card – design by Denise Rolak


    Read some more ideas for ways to use the word window punch

  • Upcoming Classes and Events

    Now that I’m a bit more settled after my move to Portland, I’m starting up some classes and events.  These events are a great way to unleash your creativity and learn a new technique or two.  I hope you can join me!

    Holiday Stamp-a-Stack – October 25th
    Ease some of the stress of the holidays by getting your holiday cards done early.  Provide a personal touch by making the cards yourself with our holiday stamp-a-stack.  We will be making 20 cards – 4 each of 5 different designs.  By the end of the afternoon, you will have a great set of cards and all you will need is the stamp.  All supplies will be provided.  RSVP required. 

    Technique TuesdaysNovember 4th
    The first tuesday of each month, I will be offering a technique class.  We will focus on learning a new technique and creating a couple small projects using this technique.  These evenings will offer you a chance to take a bit more time to experiment with different tools and techniques without feeling the pressure to get lots done.  I will announce the technique for the next class at the end of the month prior.  So, later this month I’ll announce the featured technique for November. 

    Thank You Note Stamp-a-Stack – November 22th
    During the whirlwind time of the holidays, lots of presents are exchanged which means thank you notes are in order.  Be prepared before it all begins with a stack of handmade thank you cards.  We will be making 16 cards – 4 each of 4 different designs.  All supplies will be provided. RSVP required.

    As always, I’m happy to schedule a workshop for you and your friends.  I am also considering scheduling a holiday decor class or a holiday gift class.  With the holiday decor class, we would be making ornaments and other decorations for around your home.  With the holiday gift class, we would be making crafty items to give as gifts such as exploding photo boxes, gift bags and boxes, decorated frames, etc.  If you are interested in participating in either of these holiday classes, let me know and if there is enough interest I will schedule a class.

    Check out my calendar online for all the details!

  • Mounting your stamps

    I recently discovered that while I had been scrapbooking and stamping a lot, I had a lot of stamp sets that I had never mounted. For those of you who have never bought stamps from Stampin’ Up! before, let me share with you what to expect. You will recieve a plastic storage box with lots of wood blocks, a page of stamp image stickers, and a sheet of foam mounted rubber. The idea being that you can put the image sticker where you want on one side of the wood block, and the rubber where you want on the other side of the block. The nice thing about this is that you get full control of your stamps, the downside is you probably have some apprehension about how to actually get the suckers on the block just right. I know I did!

    I read the paperwork provided by SU and did some research on the internet and boy was I confused. But after some advice from some fellow demonstrators and a lot of practice, I now have many mounted stamps and a lot more confidence. Though I don’t know how much longer I will need it as Stampin’ Up! has started die cutting all of their new designs so you no longer have to do the cutting…. just pop out the image from the rubber sheet, stick it on the wood, and you are off stamping!

    But just in case there are those of you staring at your unmounted stamps and feeling a little overwhelmed like I was, I wanted to post the tips I learned.  Leave me a note if you have other tips to share or questions about these steps! 

    How to mount your stamps