Northwest Stamper

Category: Events

  • So Much Good Stuff to Share from OnStage 2019

    So Much Good Stuff to Share from OnStage 2019

    Whew! It has been a whirlwind weekend thanks to the Stampin’ Up OnStage 2019 local event on Saturday. I traveled with 5 of my Fun n’ Crafty Stampers to Vancouver BC, Canada on Friday and spent the weekend having a blast with my friends from all over as we reconnected and then got giddy checking out the new products and special promotions coming soon from Stampin’ Up!

    Excited to show the cover of the 2019-2020 Stampin' Up! catalog

    I was posting throughout the day from the event over on my Northwest Stamper facebook page, and shared some project and product sneak peeks. But by the time the event was over and I had driven back over the US/Canada border – and got my event new product preorder in – sorry, a girls got to have her stamp priorities! 😉 I was too tired to get this blog post up yesterday. But, I’m trying to redeem myself and get a new post up for you today to share with you a little of the excitement of the event and lots of sneak peek product pictures!

    And yes, one perk of driving up was that I got to finish up swaps on the drive. You know me… I never have my swaps actually done before the last second. ha ha!

    Making swaps in the car. Adding Stampin' dimensionals to the back of springtime impressions butterfly die cuts.

    Why I Love OnStage Events

    One of the things I most love about going to Stampin’ Up events is the people that I meet and see there. From the staffers to the other demos around me, I always connect with such wonderful people. And I love when I get to see them again and again at future events. Being in Canada, I got to see some of my Canadian friends that I don’t typically get to visit with. Totally worth the drive to me!

    Friends from OnStage 2019
    Some of my friends including Kasia (concept artist from the Stampin’ Up home office), Natalie (Demonstrator Development Manager from Stampin’ Up), my friend Desiree Spenst, my mom – Kathy Thisted, my kick butt team member Nicole Flournoy, our awesome Fun n’ Crafty Stampers and friends table at the event, the lovely Karina Chin, and the so sweet Sheri Pearson!

    Wanna see some goodies?

    So, aside from hanging out with all the awesome people, there are 2.. ok, maybe 3 big reasons people like to attend OnStage.

    1. Getting free new product! (because, um, who doesn’t?!)
    2. Getting to see sneak peeks at the newest catalog
    3. Getting to actually order some of the items we saw at the event!

    And OnStage 2019 didn’t disappoint! So, shall I share some of that with you today? 🙂

    Free New Stampin’ Up Product!

    When I laid it all out, I was impressed with the amount of goodies I came home with from a one day event (plus a leadership dinner friday night). Check it out:

    All the goodies and swap from OnStage 2019 Vancouver

    And in case you are wondering, why the shammy (that purple rectangle in the stamp case) is all inky. That is because they had a brand new one on the table for us to use with our make & takes; and at the end of the day they let us divide up our goodies amongst the table and so I got to go home with a practically new, and oh so soft Stampin’ Shammy!

    Sneak Peek of new Products!

    I’m not confused… I know you are here to see what is new and cool and coming soon! 🙂 Here are some of the product suites and new products we got to see in person at the event. I didn’t get to play with all of it, but I got to see it all and play with some.

    PSST- Want to see lots of product sample pictures?
    Check out my post over on my facebook page HERE

    Magnolia Lane product suite from Stampin' Up!
    Bird Ballad Suite from Stampin' Up!
    Come Sail Away Suite from Stampin' Up!
    Come Sail Away memories and more kit from Stampin' Up!
    Dinoroar suite from Stampin' Up!
    Follow your art suite from Stampin' Up!
    Mosaic Mood suite from Stampin' Up!
    Noble Peacock suite
    Perennial Essence Suite by Stampin' Up!
    Pressed Petals Suite from Stampin' Up!
    See a Silhouette Suite by Stampin' Up
    Woven Threads suite by Stampin' Up!
    Garden Lane Suite by Stampin' Up!
    Lookin' Up! card kit from Stampin' Up!
    For the love of felt project kit by Stampin' Up!
    InColors for the 2019-2020 Stampin' Up catalog
    New Stampin' Up paper products for 2019
    Stampin' Up new ribbon and embossing folders for 2019
    New coloring tools from Stampin' Up in 2019

    Isn’t it exciting stuff?

    These will be available in the new Annual Catalog in June, though if you are a demonstrator or join my Fun n’ Crafty Stampers group before then, you’ll get to order in May AND get a discount to boot! #DemonstratorPerks!

    I’ve placed my first early preorder, so I hope to start creating and be able to sprinkle some sneak peek project ideas here on the blog for you over the next month and a half!

    In the meantime – don’t miss out on the Retiring Products!

    Right now is a time of transition for Stampin’ Up – more so than normal! We are moving away from our partnership with Sizzix and so will be moving to a new die cutting machine sometime after the new catalog comes out. That means a lot of the current Big Shot accessories are retiring and may go quickly.

    We also are discontinuing our Stampin’ Trimmer and there will be a transition time when we are no longer selling replacement cutting blades but don’t have our new paper cutting tool available yet.

    If you aren’t a subscriber on my mailing list – I shared the full scoop in my last email and you can check it out ***HERE***

    ***The Retirement List comes out Monday 4/15 at 1pm MT ***
    Products will be while supplies last and may be discounted!

    Shop the retiring products in my Online Store before they are GONE!

    OnStage 2019 check in desk fun! I loved being a helper this time.

    OnStage 2019 was a blast! Lots of exciting things to look forward to over the next couple months. Please stop by the blog again for more fun sharing over the coming weeks! 🙂

    Thanks for reading! Shop Stampin' Up by clicking here

  • Limited Time – Build Your Stash Card Class By Mail

    Limited Time – Build Your Stash Card Class By Mail

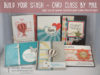
    I’ve been promising this class by mail for a while and I finally have everything up and ready so you can make these cards at home!  So I’m offering this as a class by mail for a LIMITED TIME only as many of the supplies are retiring and are while supplies last.

    ***Class kit registration is available through May 19th***

    I ran this as a class at my recent Northwest Crafty Retreat Weekend and everyone loved the cards.  So I knew I had to make it available to my crafty friends who couldn’t make it to the retreat!  Its centered around the Cupcakes & Carousels designer paper stack.  A great paper pack that is so much more versatile than it seems at first glance.

    Check out what you get in this great card class by mail

    You’ll get supplies to make 12 cards!  2 each of the 6 designs including:

    • Precut cardstock to make the 12 cards
    • A FULL PACK of the Cupcakes & Carousels designer series paper, with the needed piece precut for you for these cards.  You’ll have the remaining pieces from the 48 sheet 6×6 pack included in your kit so you can make more cards and projects beyond these 12 cards.
    • A FULL SPOOL of the Very Vanilla 1/4″ Satin ribbon, with the pieces you need for the cards precut.  The rest of the 10 yd spool will be in your kit to use on future projects.
    • Punched and die cut pieces for the cards
    • Necessary accessories and embellishments
    • Step-by-Step color PDF tutorials for each of the cards emailed to you
      (PDF tutorial only option is also available)

    Build your stash -card class by mail to make at home

    You just need to supply your own stamps, ink, and adhesive and you’ll be ready to have your stash ready for anything.

    All this is only $34 plus shipping to you!


    Class kit options


    Class kit registration is available through May 19th
    Kits will ship the following times: 
    Early Bird orders placed by May 3rd will ship the week of May 8th
    orders placed May 4th-May 19th will ship the week of May 22nd

    If you have any questions or need extra supplies, email me at Jennifer@nwstamper.com

    NWstamper signature_thumb[9]

    order online button for sig 3_thumb[4]

  • Sneak Peek of the Thoughtful Branches Class by Mail!

    I’ve been playing a lot with my Thoughtful Branches bundle that I order last month… see, it always takes something sitting on my shelf for at least 2 or 3 weeks before I seem to percolate enough to start busting it out and getting it inky.  Know the feeling? 

    Well, I’m lucky that I got my groove on because this fabulous set is only available for about 4 weeks!  Yep, that is right!  The stamp set and dies just came out yesterday as a limited time offer and are only available while supplies last or August 31st, whichever comes first.  So, I’m getting my playing done while I can still show you how fun it is AND then you can still pick up your own copy…. ‘cause you know you are going to want to play with it too! Smile 

    To help get you some inspiration and to make it easier to get started playing once you get your own set, I created this fun class by mail just for you!  I wanted to show how versatile the stamp set is and give you the supplies to get going.  So for this month, I’m GIVING YOU the class kit for FREE when you purchase the bundle from me! 

    Say what?!?

    Yep, that is right!  Get the supplies to make 8 of these cards for FREE!  Or purchase the class kit or instructions if you already have your bundle.  Here is the scoop:

    Thoughtful Branches Class by Mail

    The class kit includes all the precut paper and embellishments to make 8 cards (2 each of 4 designs), plus envelopes and full color PDF tutorial set emailed to you.  You can get yours one of three ways:

    • GET IT FREE! – order the bundle from me and I’ll include the class kit for FREE!  You just pay the shipping to get it to you. Smile  Bundle price with class kit shipping – $69
    • Just need the kit supplies?  No problem!  Get just the class kit for only $25 and get the supplies and instructions for all 8 cards
    • Or pick up the PDF instructions for $6.95 

    Class Options


    Note – class kits will be mailed the week of 8/15.  PDF instructions will be emailed out mid-week of the first week of August.

    Get even more ideas!  Check back later (around 6pm PT on Wednesday), as I’ll be participating in a fun Blog Hop all about framelits and I have a bonus card using this Thoughtful Branches bundle to share with you!


    NWstamper signature_thumb[9]

    order online button for sig 3_thumb[4]

    Product List

  • Summer Time Fun Time–Keeping Busy with Fun Stamping Events

    During the school year, I spend a lot of time with my stamping business online.  But with the kids home and summer in full swing, I’ve been spending more time away from my computer and out and about.  But that doesn’t mean all stamping has stopped!  I just have fallen behind on some of my sharing… but whooo boy!  There are some exciting things to share coming up!  From fun events, product sneak peeks, and more!  I thought I’d hop back online and share what I’ve been up to and what exciting things are coming soon!

    Just for August! Thoughtful Branches Bundle, Class in Person & Class by Mail (Get it FREE)!

    thoughtful branches

    This is a super versatile and adorable stamp set and die that is ONLY available in the month of August.  And it is while supplies last.  Seriously though… it is AMAZING!  Check it out:

    image

    image

    Love it?  Get a FREE class with it when you purchase the bundle from me! 

    Yup!  That is right!  I’m back with a new class you can either do IN PERSON or BY MAIL!  We’ll be making 4 fun cards using this set (images coming soon!) – the online class will make 8 total (2 of each design). 

    Class options:

    • In Person – Join us on Monday August 1st, at 7pm at the Panera Bread in Redmond, WA.  We’ll be making 4 cute cards together and all supplies are provided.  Class fee is only $15
      GET IT FREE!  – purchase the bundle that night or place another order and get your class fee waived!
      RSVP HERE or by emailing me at jennifer@nwstamper.com
    • By Mail – Not local or can’t make it?  No problem! I’m offering the class by mail as well with extra!
      Class kit by mail:  Have fun making it at home!  Get the supplies to make 2 each of all 4 cards.  You’ll get all the paper precut, embellishments, envelopes, and a full color pdf tutorial so you can have the walk through instructions.  Class kit fee is $25
      GET IT FREE! – preorder the bundle from me and I’ll include the class kit for FREE!  You just pay the shipping to get it to you. Smile  Bundle price with class kit shipping – $69
    • Instructions only:  Already have the bundle?  Get the pdf instructions for $6.95
      PDFs will be emailed out mid-next week

    Class Options


    Northwest Stamp & Share Regional Demonstrator Event

    Are you a demonstrator or thinking of becoming one?  If you didn’t know, I LOVE being a Stampin’ Up demonstrator and in fact am celebrating just hitting my 8 year anniversary on the 26th!  One of my favorite things to do is get together with other demonstrators and share and learn from each other.  I’m so excited for this new event for Stampin’ Up demonstrators in the Pacific Northwest!  Join us as we share the excitement of the NEW Holiday Catalog.  Get project ideas, participate in swapping, learn from other demonstrators, and have lots of fun!  This is our very own unofficial regional event and you are sure to go away inspired.

    This has been the big event I’ve been focused on this summer and I can’t wait to see it all come together next month!

    Get the scoop and register to join us!


    Northwest Crafty Escape Weekend is Coming September 16-18!

    My other big event that is in the works is my fall Crafty retreat!  It is always a blast and this one will be no exception!  We’ll be playing with new goodies from the Holiday Catalog, creating till the middle of the night, getting inspired and laughing all along the way.

    2016-04-22 19.40.11

    NW Crafty Escape Weekend

    ANNOUNCING – the Northwest Crafty Escape Weekend Fall Fest!

    Sept 16th-18th, 2016
    Hyatt House in Bellevue
    3244 139th Ave SE, Bellevue, WA 98005

    RSVP deadline – Sept 5th, 2016

    Get details and reserve your spot here


    Finally, don’t forget, Bonus Days are happening now!  You have until Sunday, July 31st to place your $50 orders and get your $5 Bonus Coupons to use in August! 

    So, as you can see, it’s a busy summer and lots of great stuff happening!

    Don’t forget to take advantage of my FREE CARD CLASS to go with your purchase of the Thoughtful Branches bundle!  Alright, back to planning… stamp with you soon!

    NWstamper signature_thumb[9]

    order online button for sig 3_thumb[4]

  • Fun with the Sunburst Die & NEW Class by MAIL!

    While I was at my Northwest Crafty Escape Weekend a few weeks ago, I ran a fun class that was all about the Sunburst thinlit die and 5 different techniques you could use with that die!  It was super fun and everyone loved seeing some new ideas for how to create with this die!  So, I’ve been working on putting together this class as a Class by Mail and I’m happy to report that I’m putting the finishing touches and so I ready to start opening up registration for this by mail event!

    Sunburst Sayings Class by Mail!

    5 different technique ideas using the Sunburst die that you can make from the comfort of your home!
    Get the scoop here – www.nwstamper.com/sunburstclass
    but I will have the tutorial option as well as kits in the mail options for you!
    RSVP this week and I’ll ship out your class kit next week before I leave on my Stampin’ Up cruise!  Otherwise, final kits will be mailed out the first week of June when I’m back from my trip.

    In the meantime, check out another fun idea IN ADDITION to the 5 class cards using the Sunburst die

    I loved the idea of cutting out a Sunburst as your main focal point on your card, but then cutting out another sunburst using a complimentary color (in this case- I used Hello Honey for the darker yellow, and So Saffron for the lighter yellow).  Once you have your second color, you just cut down the rays to make a fun highlight to your sunburst!

    You can use a punch – like the retiring 2 1/2” circle punch – or just trim it down by hand for a more funky look.

    Then just add in some fun accents to brighten up your sentiment.  I love layering Gold Glimmer paper behind my sentiment… just make sure to use a strong adhesive to hold your paper down like glue dots or fast fuse are great options!  Then I just added a few rhinestones for a little more bling without adding too much color.  Turns out pretty, right? Smile

    Play with your colors and how much you trim down for fun accents and designs!

    And then consider signing up for my class by mail and get even more ideas of what you can create with this die and get step by step instructions and even some videos to make sure you have it down totally right!

    Sunburst Sayings class by mail ad light

    And don’t forget! The Sunburst Sayings bundle (get the stamp set and die together at a discount) gets unbundled – so no more discounted price – starting in June!  So, grab the bundle while you can at a discount. Smile

    NWstamper signature_thumb[9]

    order online button for sig 3_thumb[4]


    Product List

  • Inspiring Weekly Deals & save on the Flurry of Wishes Class by Mail!

    When I woke up this morning and checked out the weekly deals, I was expecting one or two cool things and a couple that I could take or leave… but man was I pleasantly surprised to see a lot of awesome up this week! 

    Check it out and if you aren’t inspired by something… well, you will have to tell me what DOES inspire you.Smile 

    11201941_10205590681675469_3676096873224387746_n

    So, lets break it down… shall we?

    Festive Flower Builder Punch… cute for Holiday Pointsettias or just make cute flowers for any time of the year!

    image

    Want to see how to make this Pointsettia?  Check out this video to show you how!

    I also love this White version created by Peggy Noe!  You can check out her beautiful card on her blog post here.

    Metallic Foil Doilies… Can I just say I’ve already gone through at least 2 packs of these Smile  LOVE them!

    image
    Though, embarrassingly, I just realized that apparently I haven’t photographed my recent pictures with the doilies so I’ll have to get on that! 🙂  I did use them though for a recent Project Life album I was working on!

    metallic doilies in Project Life scrapbook albumPerfect Pines Framelits… Good with or without the stamp set!  (if you want to see the coordinating stamp set, you can see it here in a bundle)
    Like this with card that was from my Holly Jolly Greetings Class by Mail!

    Or check out this cute card made by Jennifer Frank at our recent Northwest Crafty Escape Weekend as an entry into one of our challenges!

    Perfect Pines christmas card challenge card

    Snow Flurry Punch… this is one of my FAVORITES!  I love it alone but again, especially with the coordinating stamp set.  You can see the bundle here

    I also did a class by mail using this punch, and so I’ll pass the savings on to you!  Purchase the punch as part of the Flurry of Wishes Class by mail and I’ll give you $4.50 off the class fee!  Just sign up here and I’ll refund you the $4.50 after either seeing your purchase of the Snow Flurry punch or when you sign up for the best value class bundle!

    NWstamper signature_thumb[9]

    order online button for sig 3_thumb[4]

    But use Hostess Code PU2EYZJY to get a special thank you from me!

  • Have a Holly Jolly Christmas–Fun Card with Foiled Vellum, Glimmer Paper, and More!

    So, yesterday I was (correctly) chastised for getting behind on posting on the blog. Smile So, I had to hop-to and get another one of my recent favorites up to share with you.

    Today I have another card from my Holly Jolly Greetings Class by Mail, it has lots of little details but I love how they come together!

    A few tips for making this card:

    • The candy cane striping is from the Holiday Fancy Foil designer vellum.  You get 3 patterns in the pack – green foiled christmas trees, silver foiled snowflakes, and red foiled stripes.  I wanted the red color for this card, but also wanted it to be striking!  So, all you have to do is layer a piece of Whisper White cardstock behind your vellum and you get a bold POP of contrast between the foiled pattern and plain vellum!
    • Layer your foiled vellum onto an accent piece of the full sheet of Red Foil sheets for even more shine!
    • Help your sentiment stand out by popping it up on a plain white 2 1/2” Circle punch.  Want to take it a step up?  Grab the Updated Essentials Piercing Pack and use the circle template to pierce holes all the way around the circle.  Then grab your Tip Top Taupe marker and connect the dots to create a fun Faux Stitched look.
    • And since I’m so onto red right now.  Why not add in more sparkle with the GORGEOUS Red Glimmer paper?  Perfect for the “Jolly” from the Christmas Greetings thinlits that are bundled with the Holly Jolly Greetings stamp set.
    • Add some pearls in different sizes on your card to bring it all home.  See those 3 pearls by the Jolly?  Those are part of those strands of connected-together pearls that are always left over on your pearl or rhinestone sheets… Smile  Cut a few off and they are perfect here!

    See, totally fun and don’t you love the texture that White Jute ribbon gives to the card too?

    Want to make this at home?  The class kit is still available!  I’ll be mailing more out this weekend, so make sure your name is on the list.  You’ll get pdf instructions for this and 4 other cards along with supplies to make 2 each of all 5 cards.  Here are all the cards:

    Sign up for your Holly Jolly Greetings Card kit here

    Oh, and I almost forgot!  Today is Tuesday which means there are NEW Weekly Deals!

    12188928_10205528193593306_4220536223974106088_n

    Check out these deals in the online store here

    So, thank you Heather for the kick in the pants to get a fun new card up on the blog.  Now to get the rest written and posted to share!  Guess I know what I’m doing this week. Smile  I really do appreciate you taking the time to check out my posts and I love the feedback you share in comments, on my facebook page, and in email!  Keep it coming!
    NWstamper signature_thumb[9]

    order online button for sig 3_thumb[4]

    use Hostess Code FHRCKER7 to get a special thank you from me!

  • Gold & Burlap Rustic Christmas Card from the NEW Holly Jolly Greetings CLASS BY MAIL!

    I have been having so much fun creating for my Holiday Card Series this fall and when I put the finishing touches on the Holly Jolly Greetings class, I couldn’t wait to share it with everyone.  This was one of my personal favorites from the class, but you’ll have to tell me which is your favorite! Smile

    I had a heck of a time photographing it because one of my favorite touches was the subtle sparkle on the trees from where we lightly painted on Dazzling Details glitter glue!  You can kind of see it in this picture… it is only on the raised parts of the trees.  We ran a thin line of Dazzling Details down the center of each tree and then smeared it around with our finger to make a lightly sparkling tree and something that would dry quickly too!

    We used a few stamps from the Holly Jolly Greetings stamp set (which was the focus of the class) but added lots of neutral touches like the different browns in the cardstock (Crumb Cake & Early Espresso with Very Vanilla) along with the strip of Burlap Ribbon which I’m just loving this year.

    But we also needed some glitz and cheer for the holidays too!  You can’t have Christmas without a little sparkle, right? Smile  So I added some of the Gold Sequin trim along with that Dazzling Details schmear. A full strand of sequins below the embossed paper and then individual sequins for ornaments.  And I had to continue the tree theme between the Woodland embossing folder and the Perfect Pines framelits!

    A little bit of sponging with Garden Green ink, some stamping and layering and you have yourself a fun card!

    I ran this first as an in-person class, and everyone made 2 of this card and the other 4 cards, and if you sign up for this class by mail, you’ll get supplies to make 2 each as well – for a total of 10 cards!  Like I said, this probably was my favorite, which of these cards is yours?

    Sign up for the class by mail and you’ll get:

    • Precut supplies & accessories for 10 cards – 2 of each of the 5 designs
    • Pre-punched & embossed elements for the cards
    • Holly Jolly Greetings Stamp Set (clear mount)
    • PDF instructions walking you step-by-step through how to complete each of the cards
    • Priority shipping of your kit to you
    • (optional) Add on the Christmas Greetings thinlits (what we used to create the “peace”, “jolly”, and “merry” for only $16.  That is LESS than the catalog price!  <— BEST VALUE ADD-ON  — 

    Live outside the US or don’t need the kit – PDF instructions ONLY option is also available


    Kit choices


    >>> See all the classes in the Holiday Card Series here <<<


    Don’t forget about the Big Stamp Sale too! —TODAY IS THE LAST DAY!  —

    So visit the online store or grab your catalog and wishlist and let me know by 10:30pm PST/11:30pm MST what you want and we’ll get you that 15% off savings!

    15 off stamps promo_NWStamper[5]

    NWstamper signature_thumb[9]


    order online button for sig 3_thumb[4]

    But use Hostess Code FHRCKER7 to get a special thank you from me!

    Product Supplies Used:

  • Flurry of Wishes Vintage Elegance Christmas Card & NEW Class by Mail!

    This last weekend I held the first of my Holiday Card Series – this is something new I’m doing this year where I’m running 4 Holiday Card classes between now and the end of November and each one will give you a stack of cards that will get you well on your way to getting your holiday cards done this year.  PLUS – everyone who participates in 3 of the card series classes will receive a $15 shopping spree from me at the end of the series.  Participate in all 4 and you get a $20 shopping spree!  How stinkin sweet is that?  And yes!  This even goes for those of you participating in my class by mail program. Smile   You can get more details about this at the bottom of this post!

    But back to the card I wanted to share today – this oh so pretty vintage & elegant Christmas card using the Flurry of Wishes!

    LOVE!  If I do say so myself. ha ha ha!  Like I mentioned, it was part of the first Holiday Card class that was all about the Flurry of Wishes stamp set – here is everything we made:

    But we are talking about this card today… and I wanted to share with you a few of my favorite touches with it.

    Tips for making this card:

    • Stamp your main image in a slightly darker ink color than the cardstock – in this case, we stamped with Tip Top Taupe ink on to Sahara Sand cardstock.
    • Fill in a few of the outlined shapes using the white Chalk Pen.  It gives a soft look and highlights some of the detailing of the image.
    • Take it up a notch by adding a few small pearls as well!  They are subtle but really add to the elegance factor.
    • For the sentiment, layer your cardstock over some of the A-MA-ZING In Color lace trim – again we were using the Tip Top Taupe trim.  It is wide enough to be a great layering ribbon.
    • I am in love with the wooden Snowflake embellishments so one had to come out for this card and again, a few more little pearls!

    It all comes together for a great card that doesn’t actually take that many supplies and can be quick to mass produce as well.  Always a perk, right?

    Flurry of Wishes – Class By Mail is Here!

    Everyone loved this class this weekend and raved about the cards and the value; and I wanted to share it with those of you who aren’t able to attend my classes in person!  So, I am offering this (and the rest of the Holiday Card Series) as a class by mail.

    In this class you’ll get:

    • Precut supplies & accessories for 10 cards – 2 of each of the 5 designs
    • Pre-punched elements for the cards
    • PDF instructions walking you step-by-step through how to complete each of the cards
    • Priority shipping of your kit to you
    • (optional) the Flurry of Wishes photopolymer stamp set and Snowflake punch!  <— BEST VALUE ADD-ON  —  SAVE over $10 off the class kit when you include the stamp set & punch in your kit

    Live outside the US or don’t need the kit – PDF instructions ONLY option is also available

    NOTE – I am finishing up the pdf instructions now, so they will start being emailed out to everyone Friday, Oct 2nd.  Class kits will be mailed starting next week.


    Kit choices – includes priority shipping


    If you have any questions, don’t hesitate to let me know at jennifer@nwstamper.com .  So, give this idea a try and have fun playing as we head into the fall and holiday season!

    NWstamper signature_thumb[9]

    order online button for sig 3_thumb[4]

    Project Supplies Used:

  • Walkthrough Wednesday – Clean, Simple, and a little bit Funky 2015 Convention Card Swap

    Every year I go to the Stampin’ Up Convention in Salt Lake City and it is the highlight of my summer.  I mean, come on – getting to spend 3 days being surrounded by amazing creative ideas and even more creative men and women?!  What isn’t to love about that?  I always come away recharged and excited and filled with so many ideas.  And this year is no exception. Smile 

    Now, before I go, I always create some amount of swap cards.  Often I will make multiple designs because goodness knows I don’t have the patience for actually making 100 of the same card!  This year, I participated in 3 organized swaps and then made extra of those designs to swap out and about with random people.  This was my absolute favorite and also my last minute card too!  I literally designed and cut for it about 12 hours before my flight left for Salt Lake City! 

    It is quick to make and yet still has a lot of personality, which I love.  So I wanted to share it with you AND I have a Walkthrough Wednesday video tutorial below so you can see how to make it step by step.

    Tips for making this card:

    • Start with an idea that grabs you and build from there! 
      In my case, I really liked the idea of using the Sunburst from the Kinda Eclectic stamp set and having a Gold Foil Star in the center and then I started adding more paper and ribbon from there.
    • Don’t feel like your ribbon colors have to be a traditional match.  Mix and match and you’ll be surprised how fun things can turn out.  I used the Watermelon Wonder dotted lace trim and then added a layer of designer paper and a finishing touch of the Bermuda Bay sequin trim.
    • Find common elements to pull everything together.  Like in this case, I have gold sprinkled throughout and I have “shiny” too!  The paper and the star are both gold and the sequins tie in to the star by being shiny!
    • When trying to attach lace trim and paper, the tape runner (like the Stampin’ Up SNAIL work great) but for sequins, I prefer to either use glue dots to hold the ends down, or use a mini stapler to attach the ends.
    • If you can’t tell, Stampin’ Up has done something new with their Neutrals Designer Paper stack this year and has added in Gold and Silver metallic papers.  I like that they are metallic without looking like foil so I can add it in without it overpowering my projects.  It is really cool paper!

    Want to see how it all comes together?  Check out this video I put together to walk you through step by step with dimensions and all the great tips you expect along the way. Smile


    (note – if you are reading this post in email, you can get to the video here)

    Need any of the supplies so you can make this yourself?  (You can’t go wrong with any of the items I used in this card this week… they are all favorites that I totally recommend!)  You can find them all in my Online Store or click any of the pictures below to learn more about any of the supply items.

    Thanks so much for stopping by! I  hope you’ve been enjoying the Walkthrough Wednesdays… I’m looking at ways to change and improve my blog posts and ways I share my projects and so hopefully I’ll have more fun stuff for you soon. Smile 

    NWstamper signature_thumb[9]

    order online button for sig 3_thumb[4]


    Project Supplies Used:

  • Sharing a Few of my Favorite Swaps

    After coming back from the Stampin’ Up convention, I had a TON of swap cards… ok, more like 120, but still, that feels like a ton!  I spent time over the last few days photographing the cards and finally have pictures of all of them.  I posted them all of my team facebook group (so if you are one of my Fun n’ Crafty Stampers, make sure you’ve checked out the album on our page!) But I want to share some of my favorites with you here on the blog too!

    I’ve hand picked a few that I’m going to go into detail on later this week, but for now I thought I’d get the party started with 6 cards that I loved and I hope at least one catches your eye too!

    I love how simple yet bold this card is.  Plus it also shows a great way to use that vegetable paper from the Farmer’s Market designer paper in a way that is cute!  I love this paper pack, but will admit to not having a clue on how to use some of the patterns.  So when I saw this card I had to swap for it!

    This is another simple yet super cute cards!  The heart is the Dazzling Diamond designer paper that she spritzed with Watermelon Wonder ink to create the matching heart.   If you haven’t tried this at home, here is how it works:

    To make custom color glitter paper:

    1. Start with Dazzling Diamond glimmer paper and cut down to near the size you need for your project
    2. Take a Spritzer and fill with rubbing alcohol
    3. Add 20-60 drops of your preferred color ink refill (like this Watermelon Wonder ink refill)
      the amount of drops varies how dark your color will turn out
    4. Place your paper in a cardboard box, standing upright
    5. Press on the top of the spritz bottle while holding the bottle UPRIGHT
    6. Keep spraying until you get the color you want and then set aside to dry

    It is also hard to tell, but the paper with the words on it is actually silvery so that it has a subtle shine to it.  That is from the Stampin’ Up Neutrals Background designer series paper stack.  Isn’t it cute!!

    I also had to swap for this gift card holder as soon as I saw it!  I love punch art and just thought he was totally adorable!  I haven’t measured the circles yet to recreate him but I can share once I do.

    It wasn’t until I went to photograph the card that I realized it was a gift card holder.  How clever is that? 

    This was one of the cards that made me realize that I needed the Remarkable You stamp set.  In fact, it is now arriving at my house tomorrow!  Yay!  It is so simple yet oh so pretty!  I’m thinking this may need to turn into one of my customer thank you cards soon. Smile

    I loved the added touch of the flowers being popped up for more dimension without distracting from the rest of the card.  Awesome, right?

    I thought this was such a clever use of the Celebrate Today bundle!  I love the balloon die cut, but thought making the cloud background and then adding the sun from the Kinda Eclectic stamp set and adding two circles for Mickey Mouse ears were great added touches.

    I saw my friend Michelle Suit working on swaps in the weeks leading up to convention and then she and her family went to Disney World.  It looked like such a fun time and she had the brilliant idea to take some of her Disney Themed swaps and get them signed by the characters in the park.  I even lucked in to one signed by Snow White!

    Finally, I have one more for you today.  This was a great card created by Angela McCormack – one of our Fun n’ Crafty Stampers!

    She always comes up with great card ideas and I loved how easy this is to make.  All the words are part of the single background stamp – A World of Thanks.  The trendy sketched words look great all together and then with some added punched hearts, stars, and some rhinestones, it just really comes together, don’t you think?

    I hope you enjoyed these ideas and will stop back by as I share even more this week!  Plus, I’ll be getting my first back of New Holiday Catalog Preorder Items and will be sharing them with you too!

    If you want to get your own swap cards, consider giving my Fun n’ Crafty Stampers group a try!  We have a Holiday Catalog group swap coming up, monthly swaps, AND you will be eligible to join us and hundreds of other demos by attending the On Stage Local events around the country in November where there is sure to be lots more swapping going on!  Get your starter kit and give it a test run here, we’d love to have you join us!


    NWstamper signature_thumb[9]

    order online button for sig 3_thumb[4]

  • Wrapping up the Stampin’ Up Convention! Highlights, Display Boards, and More!

    It happens every year… the first night of a Stampin’ Up Convention or other event, I stay up late the first night socializing and then blogging/facebooking.  Then the second night, we are up late again… but more tired from the late night/early morning from the day before.  So I get a little less done.  Then by the last day… I’m just toast!  Smile  This year was worse than normal for me as my team had a blast staying up and having in-room “happy hour” as we chatted and some people had some wine.  But after coming home at midnight on Saturday and then spending time with the family before the hubby turned around for his turn to go on a business trip) I rested and am finally catching up on the last bit of sharing! 

    I wanted to give you the full experience, so WARNING! Lots of pictures ahead! Smile

    Stampin’ Up Convention 2015 – Day 2

    As always there are a ton of demonstrators gathered for Convention, but I love getting a chance to meet and mingle with everyone!  By day 2, my crew had a plan in place for snagging seats for our group.  I just had to sneak away for a minute to snap a quick pick of some of the crowd eagerly awaiting the chance to get in for day 2!

    IMG_0481

    I also love the chance to see and say hello to some of the amazing Stampin’ Up Home office staff who make these events and all the support for demonstrators so great throughout the year.  Like the lovely Miss Andrea Withers and the fabulous Bonnie Farley!

    2015-07-24 09.27.07

    2015-07-24 11.09.43

    Plus they always play fun music while we are waiting for the session to start so you have to stand up and dance a little!  See, even Tanya, Nicole, and Carla were getting into it. Smile

    2015-07-24 11.11.34

    There were awesome stamping demonstrations featuring new products like new Black Glimmer Paper, new stamps, and a new Pillow Box die!!

    2015-07-24 10.03.33

    And new spiderweb doilies, framelits, papers, and even new fall wood accents!

    2015-07-24 10.07.49

    2015-07-24 12.21.43

    Of course there was Prize Patrol!  Monica and I won the new Project Life stamp set coming in the Holiday Catalog.

    2015-07-24 18.28.11

    Then on to a workshop demonstration and Make & Takes!2015-07-24 14.32.05

    I totally meant to finish my projects… but I was chatting and getting way to excited about some of the new product I got to play with!

    FINE TIP GLUE!!!!!  With a pin in the cap so that the tip doesn’t get sealed up!

    2015-07-24 14.48.41

    And new Archival Ink in Basic Black and Basic Grey.

    2015-07-24 14.33.02

    The new ink pad stamps like a dream!  They use the old linen pads and are a new formula but they are AWESOME!  I fell totally in love when I was using it on the make & take… so imagine my excitement when they ended up giving the out to everyone at convention!  Yay!!

    2015-07-24 19.35.36

    As usual, there was lots of swapping

    2015-07-24 10.43.56

    And as you wandered around the Gathering Place, you could see lots of the new products as samples or to just play with… such as these edgelits (there are 3 in the pack! Trees, sleigh, and cottages)

    2015-07-24 15.01.39

    New embossing folder of birch trees

    2015-07-24 15.03.59

    And window/fireplace scene stamp set and framelit bundles!  There are two bundles… one all about the fireplace

    IMG_0515

    and one all about the window frame and scenery

    IMG_0517

    Then it was time for more classes and stamping presentations

    2015-07-24 14.47.33

    Let me just say this bird set is going to be HUGE this year!

    2015-07-24 19.17.37

    psst – new punch alert!!

    IMG_0500

    IMG_0555

    psst – another new punch alert!

    IMG_0557

    I even got to walk across the stage for earning the Grand Vacation – the Mediterranean Cruise – which was fun!

    IMG_0508

    And in addition to spoiling us at the event with great places to relax and chat and share with other demonstrators, prizes, and inspiration… for everyone who earned an annual award or had reached a milestone anniversary with the company, we had a little relaxation space that not only had some treats and drinks, but they also gave us this reuseable trash bin filled with lots of goodies!  I didn’t have that stamp set yet either – so super bonus score!

    annual award goodie bag

    Then we had the evening to ourselves so the crew headed to Olive Garden before heading back to the hotel for a dip in the Hot Tub and day 2 of “happy hour”.  I also got a chance to catch up with some other great friends, especially my great friend Sarah Naber

    2015-07-24 23.44.29

    I went to bed “early” as it was only 1am… not too bad for me on an event night! Smile

    Stampin Up Convention Day 3

    With the sun rising on Day 3, it was my last day in Salt Lake City.  The main convention event only went until lunch time, so there was a lot to get through in a little bit of time!

    2015-07-25 07.23.07

    … I always love having this view from my room!  Its my happy place!…

    I spent some time in the morning checking out the display boards… they were entirely filled with cards brought by other demonstrators this year and they were fantastic!  Like how stinkin’ adorable is this bird?

    IMG_0723

    *** See all the display board cards in pictures on my Facebook Page here ***

    IMG_0725

    Rich Judkins, the President of Stampin’ Up, came out and shared a great story on perspective and talked about how the company was doing both from a numbers perspective and from a morale perspective.  It was honest, and real… and great example of him sharing that the executive team really does hear how demonstrators are feeling, what we are concerned about, and CARES about us!  There is a lot of change this year and we all know it is tough, but they are trying to make things better for demonstrators and keep improving as they hear our feedback.  It was seriously great and reassuring to hear!

    We had more stamping demonstrations… so more cute ideas!

    2015-07-25 13.36.31

    and new product!  Must have this snowflake stamp set/punch bundle and those wood snowflakes!!

    2015-07-25 14.07.13

    and more cute stuff!

    2015-07-25 14.17.42

    Double wide pillow box using the new pillow box thinlit!

    IMG_0743

    And of course, more prize patrol!

    2015-07-25 13.39.32-1

    Plus something for everyone!  Hand painted holiday paper for all of us… thanks, Stampin’ Up!

    2015-07-25 14.28.50

    And with that, convention was over!  I had the opportunity to attend some additional leaders training in the afternoon.  I got to chat with Sara (seriously the most down to earth CEO there is!)

    2015-07-25 15.06.52

    And for those of you who have seen Brian Pilling bring Diet Coke to the presenters on stage at events before… he does it in real life too!  Isn’t he sweet for taking care of everyone!

    IMG_0787

    The training was a great way to review what I learned and think about how to make improvements to my business but also how to use it to help my team as well!  So much to get implementing for all my crew as the year goes on!

    2015-07-25 16.20.00

    Fun Fact!  My Mom and I have attended every Convention together since I joined and 2 leaderships.  So this was our 7th Convention together… .how cool is that?!?

    2015-07-25 14.47.19-2

    We celebrated the end of a great weekend with some Strawberry Shortcake before heading to the airport to say good-bye once again to Salt Lake City and back to our amazing, supportive families!

    2015-07-25 18.18.34

    So, I hope you enjoyed my recap.  Wish you were there (unless you were there – in which case, glad to celebrate with you!)  I’m already looking forward to the new On Stage events coming up starting in November.  I’d love to have you go with me.  All you have to do is let me know you want to go, snag the great deal that is the starter kit so you can become a member of my Fun n’ Crafty Stampers and then register!  We have an awesome group and you will have a blast!

    Give it a try!  Join the Fun and pick out your Starter Kit here

    2015-07-23 09.28.28

    Until next time… keep it fun and happy stamping!

    IMG_0783


    NWstamper signature_thumb[9]

    order online button for sig 3_thumb[4]