Northwest Stamper

Tag: woodgrain embossing folder

  • ICS Fall Fun Blog Hop

    It is fully October, if you couldn’t tell from all the Pumpkin Spice EVERYTHING that is in the stores and restaurants!  And that means that we are ready to head out of summer and jump into fall.  To help get you in the spirit and thinking of changing leaves, pumpkins, and all things warm and cozy… the gals at the Inspire, Create, Share blog hop group have put together another fun hop to share with you lots of Fall themed projects!

    I wanted to break out some of the great designer paper I had ordered from the Holiday catalog and break out those fall color combinations.  And while I was thinking about what to create, I suddenly remembered this oldie but goodie stamp set – Wonderous Wreath!  Check it out:

    Usually you see the wreath with Christmas or winter colors, but there is no reason why it can’t be fall instead!  I just grabbed my Petals & Paisleys designer paper and flipped it over to the back to look at the label where the professionals at Stampin’ Up have already come up with a great color combination.  I just use it as my crib sheet! Smile  Try this combo on for size:

    TAMS Color Builder (1)

    So, I just used those colors to create my wreath!  The coordinating wreath and bow dies made it a cinch to cut out and then I just needed to start layering it onto my card. 

    Since I had used the colors from the Petals and Paisley designer paper, it was a no brainer to pick my favorite patterns to layer on the left of the card.  Then I wanted to add just a touch of texture so I cut a piece of Crumb Cake cardstock and embossed it with the Woodgrain embossing folder for the perfect backdrop for the wreath itself (don’t forget to sponge the edge of the embossed paper with Soft Suede ink to really distress it!)

    Then I just needed a sentiment and I’m so super in love with this one from the Suite Seasons stamp set in the Holiday Catalog.  You’ve seen me use this sentiment on Very Vanilla cardstock and color in the decorative piece.  But since I didn’t want that accent to take away from the wreath, I left it simple and subtle with Soft Suede ink.

    This card showcases a fun way to use some of your favorite patterns from the designer series paper.  Right now many of the papers are buy 3 get 1 free!  Woo hoo!  I totally spaced and forgot this was a specialty paper, so it isn’t in this sale, but change this up for the Presents and Pinecones designer paper that IS on sale, and make the wreath holiday and you are good to go!

    I hope you have enjoyed this Fall inspiration idea!  Keep on hopping and check out what Candy has in store for you, for even more fun fall ideas.

    Thanks for hopping!

    NWstamper signature_thumb[9]

    order online button for sig 3_thumb[4]

    October Online Stamp Club Hostess Code – YG62GG6C
    Get free exclusive tutorials each month and even get the supplies in a Make & Take kit with your order over $40 when you use the monthly hostess code!

    Project Measurements:

    • Crumb Cake cardstock – 5 1/2″ x 8 1/2″, 2 3/4″ x 2 3/4″
    • Very Vanilla cardstock –3 1/4″ x 3 1/4″, 2″ x 2″
    • Petals & Paisleys designer paper  – 1″ x 5 1/2″, 1 1/4″ x 5 1/2″

    Product List

  • Free Stamps & a Fun Idea for the Sunburst Die

    I suddenly realized this morning that June is rapidly flying by and that means the fabulous promotion for getting 2 free stamp sets added to your Starter Kit when you purchase it in June is also quickly coming to a close!  So I wanted to make sure to post a reminder for everyone!

    recruiting_header_newdemo_may2416_eng

    How it works:

    • Decide you are ready to join the Fun Side by becoming a demonstrator – my Fun n’ Crafty Stampers group would love to welcome you!
    • Pick out $125 in product from your wishlist (easy, right?  with the new Annual Catalog) and head over to start filling out the starter kit info.
    • Pick out 2 MORE stamp sets you want to get FOR FREE (any value) and add them to your starter kit
    • Only pay $99 plus tax… Stampin’ Up even covers the shipping!
    • Get fun stuff in the mail and I’ll reach out to say welcome and get you added to our Fun n’ Crafty team FB group and more! Smile 

    With so many great reason to give it a try… why not try it out?

    2 Free Stamps Promotion ends June 30th!
    Get yours and your Starter Kit Deal here

    Fun Idea for the Sunburst Thinlit Die

    So, are you ready for some inspiration?  Maybe even some things to add to your starter kit Winking smile.  This was a card I created for my Stamp Club as a way to mix and match some supplies in my craft room that I didn’t normally think to put together.  Check it out:

    Fun things to try on this card:

    • Create a cool background with the Sunburst Die and Vellum!  I love the look of the sunburst die, but I wanted to do something a little bit different with is, so I used it to create a background pattern for my card.  The neat thing is that when you use Vellum for your sunburst, you can layer it over your cardbase and depending on the color of your base cardstock, you’ll get a cool muted color where the vellum overlays. 
    • Only adhere the vellum where it is covered – just a tip for gluing down your Vellum, only put the glue where the sunburst will be covered up.  So, in this case, I just glued down underneath the square and not all the way to the ends of the sunburst rays.
    • Create a frame for the sentiment of your card – I love doing this with my cards.  I stamp my sentiment onto a piece of cardstock and then on a SECOND piece of cardstock (slightly larger than the sentiment piece) punch out a window using a framelit (like the Circles Framelits for a card like this) or a punch.  Then pop up that cardstock with a cutout over your sentiment using Stampin’ Dimensionals for a cool layered look.
    • Add extra texture by using an embossing folder for your frame piece – I took it up a notch by using the Woodgrain embossing folder on my circle frame piece.  Now, word of caution – you want to put in as few shims as necessary when embossing with this particular folder because when you go to cut out your circle, you end up with skinnier areas of cardstock around the circle which will be prone to tearing if your aren’t careful.  Good news though, if it tears a little, you can always put a dimensional behind the tear and it will hold it together and hide the rip.

    I also created my colorful background for the sentiment by using the swoosh from the Work of Art stamp set and stamped in three different colors

    • Pool Party
    • Delightful Dijon
    • Wisteria Wonder

    But mix and match the colors to coordinate with the colors of your card!

    Try another color combination for the same card idea!

    I thought I’d also post another version of this card that I created for the April OnStage Display boards – I changed up the colors to make the emphasis Mint Macaron, one of the colors I needed to highlight for the boards.

    So you can see that changing up the colors on this design still looks great!  In this case, I used

    • Pool Party
    • Sahara Sand
    • Mint Macaron
    • Watermelon Wonder (for the heart)

    So give it a try and let me know what color combinations you discover and love!

    NWstamper signature_thumb[9]

    order online button for sig 3_thumb[4]

    Use Hostess Code WKVC92UY at check out to get a special thank you from me!

    Product List

  • A Vintage Feel for a White Christmas Snow Scene Card

    Alright, are you ready for the last card in my Christmas card series?  I LOVE this card!  Seriously one of my favorites this year.  It was a mix and match of a few different cards using the White Christmas stamp set (which I’m SO SAD is not carrying over at this point).  But I really liked the vintage-y feel.

    Tips for making this card:

    • Start out with a Sahara Sand card base and base for your stamped image.  Then stamp the snow scene from White Christmas in black ink before you start covering it with snow.
    • Create the snow by sponging the ground with Whisper White craft ink (and YES! You can still get it from Stampin’ Up!) and stamp your falling snow with the same ink.
    • Add highlights and coloring in your snowman using the Chalk Pen.  It creates a bolder white, and while its not the best for coloring in large areas, the smaller space of the snowman is just the right size.
    • Punch out a star shape after you’ve stamped your trees so you can get it just where you’d like and then glue a piece of Gold glimmer paper behind it for just the right amount of sparkle.  And by gluing the paper behind the hole, it makes it a bit more subtle than when you punch out a gold star and glue it on top.
    • Add some sponging and emboss your card base to finish out the look!

    Need a last minute gift?

    There are 2 great last minute gift ideas that you can buy now and print out today!

    1. Give a Gift Certificate!
      Email me at jennifer@nwstamper.com and I can email you a gift certificate to print out today!  You can get it in any increment you choose and they can use it whenever they’d like for whatever they’d like!
    2. Give the gift of Monthly craft projects with Paper Pumpkin!
      Shop online for Prepaid Paper Pumpkin subscriptions and you will also receive a gift card you can print out to give the recipient with the code for them to redeem their monthly subscription.  You can get 1, 3, 6, or 12 month subscriptions and they get everything they need for fun projects each month!

    NWstamper signature_thumb[9]

    order online button for sig 3_thumb[4]

    Project Supplies Used:
    (if you are reading this in email, click here to see the list of supplies)

  • Gratitude Month–Thank You Card using Kinda Eclectic and In Colors
    Gratitude Month–Thank You Card using Kinda Eclectic and In Colors

    Happy November!  As I mentioned yesterday, I’m kicking off my Month of Gratitude with a free gift for you and a project tutorial.  Today I’m sharing a card I created as a different way to use your Kinda Eclectic stamp set and have a neat thank you card that you can use for guys, girls, and any time of the year.

    November Gratitude PDF Tutorial – Kinda Eclectic Thank You Card

    Project Tips:

    • Stick with a color family or In Color set (in this case the Stampin’ Up 2014-2016 In Colors) to make your background and for complimentary cardstock colors.  This gives you a variety of colors but you know the tones will work together no matter how wild you get with you stamping.
    • Use the starburst stamp from Kinda Eclectic to make a great background layer to your cards or projects.
    • Use the starburst framelits to cut out on of the stamped starbursts and do it off center.  This makes it more visually interesting, especially when you add an accent like the wooded elements.
    • When stamping on wooden pieces, use STAZON ink to prevent yucky bleeding and fuzzing of the ink.

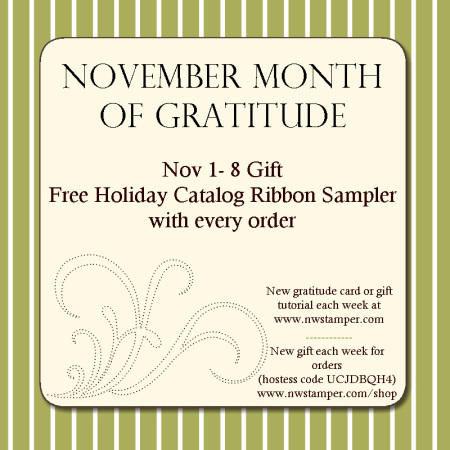
    So, click the link above if you would like the full tutorial for this project.  And if you would like to order anything, don’t forget I have a special gift for you each week with orders.  This week, you get a cool ribbon sampler from the Holiday Catalog as my thank you to you!

    image

    Just shop in my online store or email me your order at jennifer@nwstamper.com and use hostess code UCJDBQH4 and when I start mailing out Thank You gifts you’ll receive this special bundle free in your mailbox! Smile

    Gratitude Month Gift

    And check back on Wednesday when my Fun n’ Crafty stampers are putting together a small blog hope focused on gratitude projects!  It should be great!

    NWstamper signature_thumb[9]

    order online button for sig 3_thumb[4]

    Card Supplies Used:
    (if you are reading this in email, click here to see the list of supplies)

  • Sweet and Simple Christmas Card with Wondrous Wreath

    Nothing like some Christmas cards to start getting me in the mood for the holiday season!  The late fall/winter time is my favorite time of the year!  Yes, there is Christmas and even my birthday, but I just love all the joy that is everywhere, the twinkling lights, the shimmer and sparkle that you see everywhere.  Today the Stylin’ Stampin’ Inkspiration girls are sharing some Christmas card joy and this is my card I wanted to share:

    Isn’t it so cheery?!  I love how easy this stamp set is to make these fun wreaths.  You get three stamps that each add a little bit more to the wreath:

    1. The leaves of the wreath
    2. A few accent leaves of the wreath
    3. The berries for the wreath

    Plus there are handle guides ON THE STAMP that help you line up everything just right!

    I was going to try to explain lining it all up, but I realized you would be so much better served by a video, so I’ll put one together for you very soon!

    Tips for making this card:

    • I like to start with a white 3.5”x3.5” piece of white scrap paper and stamp your image with all the leaves so that the guide (an extra “tail” of the photopolymer stamp) is pointed towards one corner.
    • Stamp your second image with the accent leaves over the top with it’s guide pointing towards the same corner (using the corners helps you remember how to line up your stamps)
    • The berries, just stamp however looks nice to you!

    • Keep it simple by using the matching framelits (Wonderful Wreath – and you might as well get the bundle, because you know you will want it and then you get 15% off both!) to cut out the wreath with both the inside and outside cutting at the same time.
    • And just cut out some cardstock with the included bow framelit to make a pretty bow!  Add a pearl for extra bling.
    • The sentiment even fits inside the fabulous Decorative Label punch.
    imageimage

    Make this at my Holiday Card Stamp-a-Stack!

    If you are coming to my Holiday Card Stamp-a-Stack, you’ll get to make 3 of this card; so you’ll get lots of practice lining up your wreaths. Smile   There is still time to RSVP if you’d like to come!

    Holiday Card Stamp-a-Stack #1
    Jennifer’s House in Bellevue, WA
    10/18/2014 at 1pm
    Make 12 cards – 3 each of 4 designs with envelopes for only $25
    They will be lots of ideas that you can replicate if you want to make more! 
    (Holiday Card Stamp-a-Stack #2 with more card ideas will be Nov 15th)
    RSVP here


    And don’t forget to check out the Stylin Stampin’ Inkspiration blog for even more fun holiday card ideas!

    spaced shop now sig bar

    Card Supplies Used:
    click on any of the photos below for more details and easy shopping!

  • Masculine Monday with Burlap, Woodgrain, and Word Bubbles!

    Masculine Monday with Burlap, Woodgrain, and Word Bubbles!

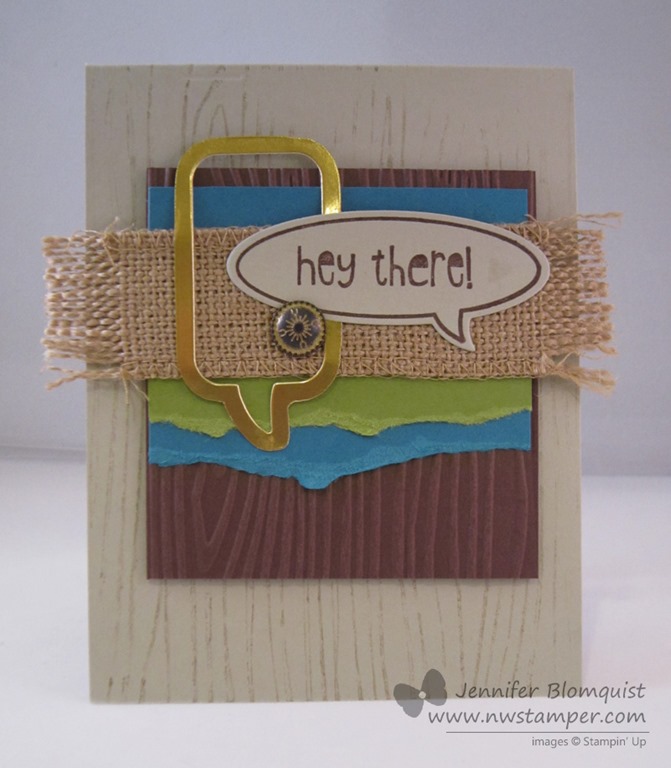
    I know many of us struggle with masculine cards.  I often find it so easy to reach for my flowers and rhinestones and pinks and whatnot; but when I need to make a card for a guy, those go-to items suddenly don’t seem to be quite the right fit.  Well, as luck would have it, today over on the Stylin’ Stampin’ Inkspiration blog, they are sharing some cards for Masculine Monday (and WOW are there some stunners!)  So, I wanted to participate with the design team and I wanted a guy card for my upcoming card class at the Scrapyard Chicks Spring Workshop, so I grabbed some burlap ribbon, some scraps of paper, and got to work!

    Can I just say… I LOVE how this turned out.  It has a lot of fun touches to it without being super over the top or fussy.

    The class I’m teaching in April focuses on 6 different techniques and for this card, I was showing off a neat different way to use your embossing folders…. as a stamp!  That is right, that grainy background on the card base – it is actually stamping using the Woodgrain embossing folder.

    So how does that work?

    1. You take your ink pad and slide it along the raised side of your embossing folder.
    2. Close the embossing folder over your card front so the ink is where you want it (basically, make it look like you are about to run it through the Big Shot)
    3. Do NOT actually run it through the Big Shot, instead use your bone folder to burnish the embossing folder and impress the ink onto your card base
    4. Open up the folder and admire your stamping work. Smile


    The other think I really liked about this card was the mixing and matching of the word bubbles.  I stamped the “Hey There” with the Just Sayin’ stamp set and then cut it out with the Word Bubbles framelits (and yes, get the bundle!  They are both cute Winking smile).

    But then I needed something more, so I grabbed some of the Gold Foil paper and cut out a different word bubble shape from the framelits.  Now, when you look at the paper that now has a word bubble sized hole in it, you will see that the framelit die embossed a faint line from the outer edge of the die (as opposed to the inner edge of the die where the cutting occurred).  So in this case, you can use that faint line as a cutting guideline and cut along that share to give you this cool metallic word bubble outline!

    Oh, and I actually did emboss the Chocolate Chip paper with my embossing folder… I like the contrast of the stamped woodgrain and the embossed woodgrain.

    So, what do you think?  I really liked how it turned out and can’t wait to share it at the workshop in a month!


    spaced shop now sig bar

    March Online Stamp Club Hostess CodeXEWP4DFD
    Use this code to get free exclusive tutorials & project kit! Learn more

    Stampin’ Up! Supplies Used
    Stamps – Just Sayin’
    Ink – Soft Suede, Chocolate Chip
    Paper – Sahara Sand, Old Olive, Island Indigo, Chocolate Chip, Whisper White, Gold Foil
    Accessories – Big Shot, Word Bubble framelits, Vintage Brads, Woodgrain embossing folder, Burlap ribbon

    Favorite products:

    134820s
    127821s
    132140s
    117273s
    132622s
  • Thank You Card Sample with Orchard Harvest

    I’m still getting through last month’s card class projects to post, but I wanted to share this Thank You card today while it is still – sort of – fall time.  Plus, I wanted to share something other than Christmas for a change of pace. Smile

    I reached for my Orchard Harvest designer series paper as the inspiration for this card.  Using the stitched pattern from the paper pack mixed with the Stitched Satin Ribbon in Raspberry Ripple.  Then, just to add in a few other touches of texture and dimension, we ran some Early Espresso core’dinations cardstock through the Big Shot with the Woodgrain embossing folder for the accent on the bottom of our card.

    Finally, take a handy dandy sponge dauber and I attacked just about everything with the Crumb Cake ink and sponged the edges of my dsp, my punched out sentiment, and the edges of my card base!

    Stop back by tomorrow for a TON of inspiration ideas. I’ll be participating in the Stylin’ Squad’s blog hop and will be one of a number of folks who are sharing some great holiday ideas!

    See you tomorrow!

    To Order Stampin’ Up! Products Anytime, click here!

    Its INK-REDIBLE December!
    Get a FREE set of 10 ink pads with a qualifying order or party; or get them free when you join the Stampin’ Up! family! Learn more

    Are you earning your Northwest Stamper Rewards?
    Every order gets you closer to your FREE stamp set! Click here to learn more!

    Fall Thank You Card Recipe
    Stamps:
    Curly Cute
    Ink: Early Espresso, Crumb Cake
    Paper: Crumb Cake, Early Espresso Core’dinations, Orchard Harvest designer series paper
    Accessories: Raspberry Ripple Stitched Satin Ribbon, Sponge Dauber, Snail, Stampin’ Dimensionals, wide oval punch

  • Mixed Medley Hanging Christmas Wreath Card

    Thanks to everyone who sent their good luck wishes or stopped by my Stampin’ Up! booth at the Seattle Creating Keepsakes Convention!  It was fun to set up as a vendor this year though it turned out to be quite the eventful weekend with my entire family getting taken out suddenly by the stomach flu.  But everyone made it through and life is getting back to normal – and I look forward to having some new crafting friends in the future from the show. 🙂

    Well, today I thought I’d share a card we made in one of this year’s Christmas stamp-a-stacks.  Each month we have been doing a different set of cards and this was one of the first.

    Merry Christmas hanging wreath card


    The designer series paper makes it look a little like you are looking out the window to a snowy forest to me, do you see it?

    Merry Christmas hanging wreath card close upThen we made a “wreath” to hang on the bottom part of the card.  We started by taking some Cherry Cobbler baker’s twine and gluing the two ends together and under the Cherry Cobbler cardstock so that you have a loop on your card front.  Then use a Stampin’ Dimensional to glue down the twine where the wreath will be – because you are using a foam dimensional, you can make the loop spreadout so that it looks kind of like a triangle…. does that make any sense? 🙂

    Basically make your loop of bakers twine look like a teardrop and stick the dimensional across the fat base of your teardrop to hold it in place.  Then cover up your dimensional with your stamped images from the Mixed Medley hostess set.


    Come Stamp With Me!

    Just a reminder that I have a few classes coming up that I’d love to have you join me for!  Visit my events calendar or email me at jennifer@nwstamper.com to RSVP and save your spot!

    • Friday – 11/16 – Build Your Stash Card Class!
      • Join me at Panera in Redmond as we make a set of fun all occasion cards using the latest cute stamps, papers, accessories, and techniques!  It’s a great night out for your and your friends.  $15 or free with a minimum order
    • Monday – 11/19 – Build Your Stash Card Class! (afternoon session)
      • Same class as the friday card class only in a convenient afternoon timeframe.  Hosted at my house in Bellevue, WA.
    • Sunday – 11/25 – Christmas Card Stamp-a-Stack LAST ONE!!!
      • It’s the last Christmas Card class of the season and we’ll be finishing up our holiday cards!  We’ll be making 3 each of 4 great designs, plus you’ll be going home with your envelopes so you are ready to sign and mail before the holiday rush!  $25 early bird price when prepaid by 11/17, $30 afterwards.

    Hope to craft with you soon!


    To Order Stampin’ Up! Products Anytime, click here!

    Its INK-REDIBLE November!
    Get a FREE set of 10 ink pads with a qualifying order or party; or get them free when you join the Stampin’ Up! family! Learn more

    Are you earning your Northwest Stamper Rewards? Every order gets you closer to your FREE stamp set! Click here to learn more!

    imageMixed Medley Hanging Christmas Wreath Card Recipe

    Stamps: Mixed Medley
    Ink: Gumball Green, Cherry Cobbler marker, Chocolate Chip Marker
    Paper: Gumball Green, Cherry Cobbler, Chocolate Chip, Whisper White, Snow Festival designer series paper
    Accessories: Gumball Green stitched satin ribbon, Big Shot, Woodgrain Embossing Folder, 1” Square punch, Glue Dots, Cherry Cobbler baker’s twine, Stampin’ Dimensionals

  • Button Buddies Flower Fun

    I know we are in fall time and so a lot of the projects are rich colors and holiday themes, so I hope you don’t mind me going off in a completely different direction with this bright and cheery card!

    This was one of my “scraps” cards.  As in, I have a terrible time throwing in my recycling bin any stamped scraps, embossed papers, or other rejects from working on one card that I just know could be used on another card later.  But then those half used papers pile up and I start to go a little bit crazy.   So, I’ve been trying to periodically make a card mostly or completely out of scraps I have left over.

    So, first I had these flowers from when I was trying to pick a pink color for a different card.  Turns out they go great with a homemade glitter brad I created for a Crystal Effects class.  (That is a Cameo Coral In Color brad that has been covered in Crystal Effects and dipped in Dazzling Diamonds glitter!)


    I had left over Wisteria Wonder cardstock that had been embossed with the stripes going the wrong way for a card I was prepping for a class one time and so it worked perfectly here.  And then I decided to break out my FAVORITE paper right now – Early Espresso Coordinations cardstock.  If this paper doesn’t stick around after the Holiday Catalog I will be (1) surprised and (2) so very very sad!

    I ran a scrap through the Woodgrain embossing folder and my Big Shot and then punched out a Modern Label punch to use as a mat behind my sentiment punched out with the Word Window punch.

    I really was happy with how the card turned out AND the fact that I used up a number of scraps!  It still doesn’t put too much of a dent into my scrap pile, but it’s a start!


    Shop for Stamps and More Online, click here!

    Are you earning your Northwest Stamper Rewards? Every order gets you closer to your FREE stamp set! Click here to learn more!

    Button Buddies Flower Thank you Recipe
    Stamps:
    Button Buddies, Teeny Tiny Wishes
    Ink: Raspberry Ripple, Primrose Petals, Pretty in Pink, Old Olive
    Paper: Old Olive, Daffodil Delight, Wisteria Wonder, Whisper White, Early Espresso core’dinations cardstock
    Accessories: Big Shot, Stripes embossing folder, Woodgrain embossing folder, Sanding block, In color printed brad, Crystal Effects, Dazzling Diamonds glitter, Stampin’ Dimensionals


  • Pretty Perfectly Preserved Pears

    Talk about a tongue twister, huh!?  🙂

    Well, after a great weekend away with my mom (we flew to Utah late last week for a weekend scrapbooking retreat in Utah), I’m back and blogging.  I have to say, there is nothing like a weekend dedicated to creating and actually having the time to get some projects done!  I was on the plane flying home and was ready and eager to finish the project I was in the middle of and keep the creative ball rolling.  Of course then reality (and dentist appointments and household tasks) cropped up today… but still!

    Anyway, enough about me… how about a cute card to look at?


    Perfectly Preserved In Color Card

    This card was created by the awesome designers at Stampin’ Up!  (see, I love the resources and inspiration provided by Stampin’ Up! because I know I wouldn’t have thought of this color combination for pears – but isn’t it pretty?!

    Plus this card shows some fun ways to use some of the new goodies from the Holiday catalog.

    Quickcan you guess how many new items are showcased in this card?
    Just a fun little challenge.

    Alright, you ready?

    1.  Perfectly Preserved stamp set

    2.  Cannery framelits

    3.  Orchard Harvest designer paper

    4.  Woodgrain embossing folder

    5.  Brushed Bronze designer buttons


    And the colors, that I was saying I didn’t think of for pears are Calypso Coral, Lucky Limeade, and Island Indigo (sigh… Island Indigo… I have a serious crush on this color right now! 🙂 )

    So, hope you enjoyed the card and I’ll be back soon with more ideas for you!


    Have you seen the new Single Stamps being offered?
    Stampin’ Up! is testing out selling individual stamps from certain stamp sets to see how people like the option of buying parts vs the whole thing of a stamp set.  So, if you love the idea, grab them now since this program is only available through the end of the year!

    Check out the flyers for Word Play  |  Perfectly Penned  |  Seasonal Sayings


    Shop for Stamps and More Online, click here!

    Are you earning your Northwest Stamper Rewards? Every order gets you closer to your FREE stamp set! Click here to learn more!

  • Masculine Card using Affection Collection?

    So I put a question mark at the end of my blog title because I’m trying to decide if this card counts as “masculine” or not.  It definitely isn’t flowery, or pink, or have lots of lace and bows.  So I think it counts.  But take a look and you can decide for yourself.


    Have I mentioned yet that I’m having a total love affair with Island Indigo right now?  Some of my favorite cards highlight Island Indigo and I’m already feeling like 8 months isn’t enough time to love this color before it’s term as an In Color ends.  So, hopefully you don’t mind it because you’ll be seeing a lot more I’m sure! Smile

    This was a quick card that I made to show a few of the new items in the Holiday catalog including:

    * the woodgrain embossing folder

    * the 7/8” Cotton ribbon

    * the Affection Collection stamp set

    I was in a rush and so I didn’t want to wait for the ink to dry if I stamped on the ribbon; so instead I stamped next to the ribbon.  I also grabbed the awesome Decorative Label punch and stamped and sponged the sentiment.  Then I took two more punchouts of the same shape and cut them to give me the matting I wanted for the sentiment.  (If you don’t already know how that works, let me know and I can put together a video to share it!)

    My favorite thing about this card is how the Early Espresso sponging around the Friends sentiment layered over the Cajun Craze matting somehow makes it look like the edges are rounded and dimensional!

    PS – Did you hear the other announcements from Stampin’ Up! yesterday?

    3 stamp sets that you can buy individuals stamps out of… lowered printing prices with My Digital Studio…and a survey to help Stampin’ Up! pick a project kit to offer in the near future!  Check out this blog post to see all the details!

    To Order Stampin’ Up! Products Anytime, click here!

    Check out the 2012 Holiday Catalog

    Are you earning your Northwest Stamper Rewards? Every order gets you closer to your FREE stamp set! Click here to learn more!

    Masculine Friends Card Recipe
    Stamps:
    Affection Collection
    Ink: Island Indigo, Early Espresso
    Paper: Very Vanilla, Island Indigo, Cajun Craze, Early Espresso core’dinations cardstock
    Accessories: Big Shot, Woodgrain embossing folder, 7/8” cotton ribbon, decorative label punch, sponge daubers, Stampin’ Dimensionals

  • Fun Pumpkin Halloween Card with Jack of All Trades

    Alright, I’m starting to get into the fall and Halloween spirit… if you follow my Facebook fan page, you’ll have seen that I have been debating whether to jump into the Halloween project bandwagon but everyone’s enthusiasm for these cute projects has convinced me.  So, don’t be surprised to see more Halloween treats posted here over the next few weeks! 🙂

    But in the meantime, I wanted to share this swap I got at convention that I just LOVE!  From the colors to the embossed and sanded Core’dinations cardstock to the fun jack-o-lantern, it just made me smile.

    card created by Pam Zimmerman

    This card uses the Jack of All Trades stamp set to create the pumpkins and even includes the witches hat!  (I had to double check because it was so perfect).  But I really like the added touch of the Woodgrain embossed Early Espresso core’dinations cardstock and then a sanded version of the core’dinations cardstock for the modern label punch out with the sentiment.


    So now that I’m in the mood for Halloween, I want to hear – what is your style for Halloween projects? Cutesy characters, Gothic designs, or something else?

    Guess its time for me to start creating!


    Shop for Stamps and More Online, click here!

    Don’t Miss It! Free Stitched Satin Ribbon with every $40 purchase!

    Are you earning your Northwest Stamper Rewards? Every order gets you closer to your FREE stamp set! Click here to learn more!

    Jack of All Trades Halloween Card Recipe
    Stamps:
    Jack of All Trades, Teeny Tiny Wishes
    Ink: Gumball Green, Midnight Muse, Pumpkin Pie
    Paper: Gumball Green, Whisper White, Early Espresso Core’dinations cardstock
    Accessories: Midnight Muse stitched satin ribbon, Paper snips, Word Window punch, Modern Label punch, Big Shot, Woodgrain Embossing folder, Labels Framelits, Sanding Block, Stampin’ Dimensionals