Northwest Stamper

Tag: Punch Art

  • Cute Card Idea for Using Up Paper Scraps

    I don’t know about you but last week was crazy busy for me!  I had 2 classes, a craft fair, Halloween events, and the usual everyday life stuff (if you are curious to see some of what I’ve been working on, I’ve been posting pictures up on my Facebook page here).  It was one of those weeks that by Sunday morning I was trying to figure out what to start catching up on first (let me say that the house did not win the coin toss for what I worked on first Winking smile)

    But I finally got lots of photos taken of projects and started editing them and just HAD to share with you one of the cards we made on Friday.  It was inspired by a card I found on Pinterest by Jennifer Rzasa from 2011 and I think it turned out super cute and is the perfect way to use up paper scraps!

    And the fun bright colors from the I Am Me designer paper just make me smile when I look at them.

    All you have to do to make a card like this is to:

    1. Pick up to 7 patterns from designer paper you like
    2. Punch out 1” squares using the square punch in each design
    3. Cut out 1-1/8” squares from coordinating cardstock
    4. Round two opposite corners on each square using the corner rounder punch
    5. Adhere to your card base using Stampin’ Dimensionals
    6. Stamp a sentiment and you are done!

    See, totally easy peasy!  And seriously, how fabulous is that “Smile” sentiment with the camera pattern designer paper? hee hee

    Stampin’ Up! Supplies Used
    Stamps:  Happy Day
    Ink:  Calypso Coral
    Paper: I Am Me designer paper, Whisper White cardstock, Smoky Slate cardstock
    Accessories:  1” Square punch, Corner Rounder punch, Stampin’ Dimensionals

    Ok, I’ll be back tomorrow with more fun for you once I get a few more photos edited!  Talk to you then!

    spaced shop now sig bar

  • Colorful Flower using the Mosaic Punch & Pressed Clay

    imageOk, I’ll admit it.  I wasn’t sold on the Pressed Clay when Stampin’ Up! announced it’s release during the demonstrator preorder in advance of the new Annual Catalog launch.  I kept hearing people get all excited about it but I didn’t order it because I couldn’t see myself actually using it.

    Wanna know what just showed up in my recent order? 

    Yup, that is right!  The clay!

    My mom, Kathy Thisted, ordered the clay and molds during the preorder and so I figured I’d make one or two to samples to show.  But I found once I got started playing it, I had a hard time stopping. ha ha!  Its kind of like being 5 again and playing with play doh.  Once you get started there are endless possibilities of what you can create!

    So while I haven’t gotten all my experiments photographed, I had to share with you one cool sample that she shared with me recently.  Check it out:

    Its this cool mashup of a bunch of new products in ways I never would have thought to do (isn’t that why sharing is awesome?!)  She took the Mosaic punch to punch out the petals and then stamped each one with the Mosaic Madness stamp set.  Then she dyed some Simply Pressed Clay with Daffodil Delight reinker and pressed it into the flower mold to create the pretty center.  Creative, no?

    Card Supplies used:
    Stamps – Mosaic Madness, Field Flowers, Sweet Essentials
    Ink – Whisper White, Wild Wasabi, Baked Brown Sugar, Daffodil Delight reinker
    Paper – Soft Sky, Coastal Cabana, Strawberry Slush, Baked Brown Sugar, Pistachio Pudding, Crisp Cantaloupe
    Accessories – Simply Pressed Clay, Buttons & Blossoms Clay Molds, Stampin’ Dimensionals, Bone Folder


    So if you haven’t tried out the clay yet, you totally should!  Its easier to work with than I expected and has tons of potential.  I’ll try to get photos taken but I’ve seen:

    • Coloring with a marker
    • Multiple color coloring
    • Using the molds
    • Creating an impression with stamps
    • Creating an impression with a decorative brad
    • Turning molded images into brads
    • Creating a shiny accent with Crystal Effects
    • Heat embossing the finished embellishment

    And I’m sure there are more ideas I haven’t even seen or come up with yet!

    So, leave a comment with your ideas if you have been playing or pick up some clay today and start experimenting!

  • Adorable Easter Class Projects, Punch Art, & a Blog Hop!

    It’s the first Thursday of the month and that means the Stylin’ Stampin’ Squad blog hop.  I lucked out because this month the theme is Easter/Spring and I just so happen to have my Everything Easter class coming up this weekend on Sunday!

    So I thought I would share some of the projects we’ll be doing in the class and give you some inspiration for what you could do for your own Easter baskets!


    Not-so-tiny Treat Pouch!

    I had been looking at some past projects and saw some old treat pouches that were made with a Big Shot die that retired a few years back.  It reminded me of the fun and easy idea of a no-sided bag that holds a pouch of treats in the middle.  Did that make any sense at all?  I bet not, so here – how about a picture to show you what I mean?


    Does that make more sense now?

    Ok, so this is really easy to make and you can change it up for any event or holiday.

    In this case, I took a 4”x12” piece of Certainly Celery cardstock and scored at 5” and 7”.  Then I used my new Ovals Framelits to cut out a piece of Pool Party core’dinations cardstock to make my top flap!  I then embossed the top flap and sanded down the dots for a subtle, textured effect.

    The stamped flowers are from the Madison Avenue stamp set that is only available as a free stamp set with a $50 order.  The flowers are separate from the leaves and it makes for some great stamping options.

    Tip:

    • Use Sticky Strip (red line tape) to attach the scallop oval flap to the back of your pouch.  This helps hold up with multiple openings of the pouch.
    • Use a slim velcro dot to keep your flap closed on the front of your pouch – this allows for easy reuse later.
    • Secure a clear envelope or card sleeve to the front-inside panel of your base cardstock.  (So in my picture, behind where my stamped flowers are).  This helps with the stability of the pouch and keeps the candy from getting away. Smile 

    Punch Art Easter Duck / Chick

    I’ll admit I don’t have many Easter stamps.  But that is usually ok because there are so many adorable punch art options that are perfect for Easter!

    Like take this duck punch art for example …  isn’t he CUTE!

    I just love this little guy and knew I had to share him with my friends for the class.  I tried to use as few punches as necessary but ended up with 6 punches used:

    • Ornament Punch
    • 1 3/4” Circle Punch
    • 1 3/4” Scallop Circle Punch
    • 1 1/4” Scallop Circle Punch
    • Large Oval Punch
    • Circle from Itty Bitty Punch Pack

    The funny thing about this sample card is that this duck was my “figure it out” version and then I made a “nice sample” version where I sponged the edges of the different body parts, made sure everything was on straight, etc.  But when I was putting together the card, I grabbed a duck….glued…. and then realized I had used my messy version instead of the “nice” one.  Smile  I guess it didn’t turn out too bad, huh?

    I have two more projects for the Everything Easter class on Sunday – a card and an awesome punch art bunny treat box!  Sadly, I didn’t get them photographed in time for today, but I’ll try to share them soon.

    Until then, if you want more inspiration for your Easter and Spring projects, check out the other talented stampers who are sharing their great ideas on our blog hop!  Click the “Next Blog” image or your favorite link below:

    1. Shellie G. of Craft Smashup
    2. Annie L. of Love Me Cards
    3. Nancy B. of Lady Stamps-A-Lot
    4. Rose C. of Stamp with Rose
    5. Tonya B. of Stampin’ with Tonya
    6. Dawn S. of Dawn’s Creative Chalet
    7. Darcy J. of DJ’s Stampin’ Place
    8. Pamela W. of Stinky Tofu
    9. Kim R. of Stamping with Kim
    10. Heidi B of Stuck on Stampin’
    11. Jennifer B of NW Stamper  <—YOU ARE HERE!
    12. Bree of Craft-somnia
    13. Diana E of Stampin’ Fun with Diana

    I hope you enjoyed my projects I shared today!

    I’d love to hear what you think – please leave me a comment and let me know what you think.


    To Order Stampin’ Up! Products Anytime, click here!

    Are you earning your Northwest Stamper Rewards?

    Every order gets you closer to your FREE stamp set!  Click here to learn more!

  • Wise Men Punch Art Christmas Card

    I love Punch Art cards and I’m always amazed at what people come up with when creating punch art…. so I was blown away when I was at convention this last summer and someone had come up with a 3 Wise Men card using punches!  How unique is this?!

    card created by Ingrid Rosario

    I thought it was so cool how this shows that with just a few switches of punches and paper color you can create unique people shapes.  So here is what you need:

    • 1 1/4” Circle Punch
    • Boho Blossom punch
    • Curly Label punch
    • Scallop Square punch
    • 5 Petal flower punch (retired)

    Only a few punches but totally different looking people, huh? Smile  This is also an excellent way to use up your scraps too.

    To Order Stampin’ Up! Products Anytime, click here!

    Are you earning your Northwest Stamper Rewards?
    Every order gets you closer to your FREE stamp set!Click here to learn more!

  • Snowman Snowglobe Holiday Card

    My son keeps telling me that it isn’t wintertime because there is no snow.  Apparently to his 2 – going on 3- year old view of the world:

    fall = leaves fall off the trees and winter = snow.

    That a pretty close approximation!  Unfortunately we don’t get too much snow up here in Seattle.  So I thought I would make my own “dreaming of snow” card today! Smile

    I stamped this cutie of a snowman from the No Peeking stamp set and then decided to punch him out and make him his own snowglobe!  I sponged the edge of the circle with Midnight Muse ink for a subtle edge and then made a base out of the Curly Label punch.  Finally, add some snow by using Dazzling Details glitter glue.


    He looks so happy in his little globe, don’t you think?

    Last Day for the Ink-Redible Ink promotion
    Don’t forget, you can get a FREE set of 10 ink pads with a qualifying order or party; or get them free when you join the Stampin’ Up! family! Learn more

    To Order Stampin’ Up! Products Anytime, click here!

    Are you earning your Northwest Stamper Rewards?
    Every order gets you closer to your FREE stamp set!Click here to learn more!


    Snowman Snowglobe Card Recipe
    Stamps:
    No Peeking
    Ink: Basic Black marker, Gumball Green marker, Real Red marker, Midnight Muse
    Paper: Gumball Green, Basic Black, Whisper White
    Accessories: Big Shot, Perfect Polka Dot embossing folder, 2 1/2” Circle punch, Curly Label Punch, Dazzling Details, Stitched Satin Ribbon – Gumball Green, Stampin’ Dimentionals, Sponge Daubers

  • Scrapbooking Sunday: A Punch Art Bunny For Spring!

    Happy Easter to you!  I hope you have a wonderful day full of fun and happy moments.

    For my blog post today, I wanted to share a scrapbook page I created to hold some of our Easter moments this year (I knew what color outfits the kids would be wearing so I could pick the right colors – hee hee; but I don’t have the pictures printed yet).

    If you saw my stamping basics video earlier this week, you saw that I used the Button Buddies stamp set to demonstrate the difference paper can have on your image.  Well, what you didn’t see is that I did that about 4 different times because I was trying to figure out how to get my video camera to point to the right place and work for my demonstration – or making sure it was on… that was frustrating when I did the full video only to realize I had pushed the record button off instead of on when I started!

    Anyway, I had some extra flowers and an idea, so I created this:


    The very first thing I knew I wanted to do was create this row of flowers.  I punched them out with my scallop circle punch and went about laying them down.  I alternated having one flower glued straight down to my paper and the next flower popped up with Stampin’ Dimensionals.  And while this stamp set is made to work perfectly with a designer button in the center of the flower, I decided I wanted to do something a little more subtle and so I used Crystal Effects to add some shine and pop to my flowers.


    And then there is the bunny…. I LOVE making this punch art bunny.  I’ve made one in the past but for this page I knew I wanted a smaller version and so I had to start from scratch.  So, I looked at my punches and started experimenting… but isn’t he cute?


    I’ll admit I got the button tail idea from a few demos online (I saw it first from Pam Steckman on facebook) though their bunnies were much bigger.  Anyway, if you want to create this little bunny, I thought I’d show you how I put it together.  It is the Heart to Heart punch for the ears and feet, the 1” circle punch for the body, and the 3/4” circle punch for the head.  I sponged all the pieces with Blushing Bride ink just to give them a subtle definition from each other.

    As it turns out, seeing the bunny shape from my example to show you how I made the bunny looks like another cute way to create a punch art bunny.  So, hopefully this gives you a couple new ideas to play with on your projects!


    To Order Stampin’ Up! Products Anytime, click here!
    Are you earning your Northwest Stamper Rewards? Every order gets you closer to your FREE stamp set! Click here to learn more!

    Sponged Easter Egg Card Recipe:

    Stamps: Button Buddies
    Ink: Blushing Bride Classic, Rich Razzleberry
    Paper: Certainly Celery CS, Melon Mambo textured CS, Whisper White CS, Nursery Nest designer paper, Pear Pizzazz CS
    Accessories: Twitterpated buttons, glue dots, Pear Pizzazz 1/2” stitched poly ribbon, 1 3/8” square punch, Heart to Heart punch, 1” circle punch, 3/4” circle punch

  • Celebrating St. Patrick’s Day with a Special for You!

    Happy St. Patrick’s Day!

    Hopefully today finds you in your finest green attire; even if that just means green inky fingers! 🙂  It’s a day that I mostly get to celebrate these days by digging some green out of my closet and remembering to listen to some great Irish music…or at least Irish singers.  Has anyone heard of the Irish Rovers?  They are a group that my parents used to listen to when I was growing up and I’m definitely feeling the need to see if I can find their album and play it around the house today.

    I’m also feeling like sharing some green with you today as well!  I put together a card for you as well as I’m having a special all day today.

     Every order of $25 or more today will receive a Stampin’ Write marker in the green of your choice

    Fun, huh? 🙂  And after deciding to offer this special, I realized just how many green options there are right now in the Stampin’ Up! color palate:  Old Olive, Certainly Celery, Wild Wasabi, Always Artichoke, Garden Green, Pear Pizzazz, and Lucky Limeade.  So many great options for your projects that need a little green in them.  For my card today, I decided to go with Pear Pizzazz and Always Artichoke:

    I don’t normally have much of a need to make St. Patrick’s Day cards or scrapbook pages, so I don’t tend to have themed crafting supplies on hand.  Luckily, it is easy to pull something together with punches and paper I had lying around!

    I started out with the Paisley Petals designer series paper as the background and the Pear Pizzazz ribbon.  From there, I decided I would finish out the card in a monochromatic fashion, so I stuck to the greens in the paper and ribbon.

    I love making clovers out of punched hearts… so easy and isn’t it just cute?  And I decided to pull out my Stampin’ Write markers and my handy dandy Color Spritzer and get even the white paper in theme with the card.  I spritzed the paper with my Always Artichoke marker for a spackled effect in the center of my card.

    And to finish it all off, I grabbed one of my go-to stamp sets, Teeny Tiny Wishes, because it has a stamp for all holidays including St. Patrick’s Day!  Ta da!

    So, I hope you have a wonderful day and enjoy all the green on display today!


    Ready for your free green marker to spritz or color with?
    Email me at jennifer@nwstamper.com with your color choice and your order, and I will get you all hooked up!


    To Order Stampin’ Up! Products Anytime, click here!


    St. Patrick’s Day Card Recipe:

    Stamps:  Teeny Tiny Wishes
    Ink:  Always Artichoke Stampin’ Write marker
    Paper: Paisley Petals designer paper, Pear Pizzazz cardstock, Always Artichoke cardstock, Whisper White CS
    Accessories:  Pear Pizzazz 1/2” Poly Stitched ribbon, 2 3/8” Scallop Circle punch, 1 3/4” Circle punch, small Heart punch, Always Artichoke brad, Color Spritzer, Stampin’ Dimensionals

  • It’s All About The Cupcake!

    Happy Saturday, everyone!  If you are a fan of my Facebook page, you’ve already seen today’s card; but I had so much fun making it that I wanted to make sure I shared it with my blog readers too.  (And it just makes me happy to look at so I’m having fun writing up this post!)

    I made this cupcake card when I was trying to come up with something that would be quick to make.  I had just gotten my Sweet Shoppe specialty designer paper and when I flipped to the cupcake pattern, I got inspired!

    One of the things I love about Stampin’ Up! is that since everything is color coordinated, I don’t have to think too hard.  In this case, I could just look at the paper pattern and just pull those exact same colors from my cardstock stash and start stamping and punching away to make a punched out version of the same cupcake.

    For both the cupcake base and the sentiment, I used the matching Create a Cupcake stamp set to go with the Cupcake Builder punch (have I mentioned how nice it is to have matching stamps and punches?).  Talk about quick!

    image         image

    Ok, now I think I want to make some cupcakes.  Yum!


    Don’t miss out on Sale-a-Bration – see what you can get FREE with your order!

    To Order Stampin’ Up! Products Anytime, click here!


    Punch Art Cupcake Birthday Card Recipe:
    Stamps: 
    Create a Cupcake
    Ink:  Soft Suede Classic
    Paper: Sweet Shoppe specialty designer paper, Calypso Coral CS, Pool Party CS, Soft Suede CS, Whisper White CS
    Accessories:  Cupcake builder punch, Stampin’ Dimensionals

  • Fun with Pennant Parade and the New Pennant Punch!

    I don’t know about you, but I LOVE stamp sets that go with punches.  See I love my punches (you can never have enough punches), but when you can stamp cute images in different colors and textures and then can punch them out instead of cutting them out by hand – Brilliant!  That is why I was so excited to see Stampin’ Up! come out with this Pennant Parade stamp set and the matching Petite Pennant builder punch.

    If you haven’t seen them, this is what the stamp set looks like and the shapes the punch cuts out:

    image  image

    So, when you look at the stamp set, you think… that is cool, it matches the punch so there must be cute stuff you can do with it.  But what?  Let me say, convention was FULL of inspiration with this stamp set courtesy of some awesome stamper’s swap cards.   Check out all these fun things people came up with!


    card by Krissie O’Donnell

    card by Jessi Mann
    card by Jackie Tucker
    card by Jackie White

    Totally adorable, right?  I know I’m super inspired and can’t wait to get my stamps inky!  Have you used this stamp set or punch yet?  Leave a comment and let me know what you think!

    Shop now and start earning your free stamps with NW Stamper rewards!

  • A White Only Card– LNS Challenge 131

    Whew! Nothing like a deadline to get me to hurry up and post a card I made this week for a challenge the the Late Night Stampers yahoo group.  Each week they post some kind of project challenge, and this week sounded really interesting:

    Challenge 131:  Only use white in your project except you can use a different ink color for your sentiment.

    So, this is what I came up with:

    I know it is hard to see the different elements so I tried taking some close up shots to show the butterflies and flower heart.

    If you want to try this at home, I punched out a large heart from Whisper White cardstock.  Then I punched out a ton of flowers using the Itty Bitty Shapes punch pack.  Then I curled up the flower edges and glued them to the heart with the Tombow liquid glue (the nice thing about both the heart and the flowers being out of white is that if there are gaps, you don’t notice too much!)  Then I added the smallest rhinestone to each flower center.  It takes a bit of time, but looks very pretty in person. 

    The rest of the card is just an embossing folder and the Beautiful Wings embosslit and some white ribbon. 

    Reserve your Designer Paper sampler now! 
    Only $25 for 96 sheets including specialty papers!

    White Challenge Card recipe:
    Stamps: 
    Teeny Tiny Wishes
    Ink:  Elegant Eggplant
    Paper:  Whisper White cardstock
    Accessories:  Large Heart punch, Itty Bitty Shapes punch pack, Beautiful Wings embosslit, Framed Tulips embossing folder, Big Shot, Whisper White Organza ribbon, Stampin’ Dimensionals

  • Fun and Creative Convention Swap Cards

    I am always so amazed and inspired by the swap cards I get at convention.  From the cards that make you go “WOW!” to the cards that are so simple to make that I realize you don’t have to go over the top to make a striking card.  I started taking pictures of some of the cards I received so I can share them with you.  So, expect to see more pop up on my blog.

    For today, I wanted to share a couple cards that I thought were just fun and creative.

    First up!  How lips stamps can be cool:

    card by Naomi Keeling

    I saw the a la carte stamp S.W.A.K. when the catalog first came out but I had no idea how I would use it.  Well now I do!  What is hard to see in the picture but looks awesome in person is that the dotted background looks to be a piece of designer series paper behind a square of vellum – all attached together with silver mini brads.  Then she heat embossed with the Melon Mambo embossing powder the lips on top of the vellum.  Isn’t it cute?!

    Next, an awesome idea for your Blossom Petals punch:

    card by Debbie Flattum

    Isn’t this creativity with punches is inspiring!  They sponged some vellum paper with Marina Mist ink and then punched out 5 of the larger petals from the Blossom Petals punch.  Then they punched out 5 of the leaves from the same punch on unsponged vellum.  Add a Round Tab punch for the top (with a 3/4” circle punched out to make the neck) and you have an adorable dress card!

    I think I need to start using more vellum ‘cause I just love how it is used in these cards!  Well, these cards inspired me and I hope they inspired you.

    Shop now and start earning your free stamps with NW Stamper rewards!

  • Fishy Best Wishes to You!

    Thursday night I held my first event with my new Bellevue/Redmond Card Makers meetup group.  We had a small group but it was fun to meet some local gals and great to have the forced motivation to get my craft room unpacked!  I’ll admit it, I didn’t get the craft supply boxes opened until that morning. :)  Thankfully, I knew I had extra supplies from the card we did for my last get together in CA, so I didn’t have to do design work, just find and gather the supplies.

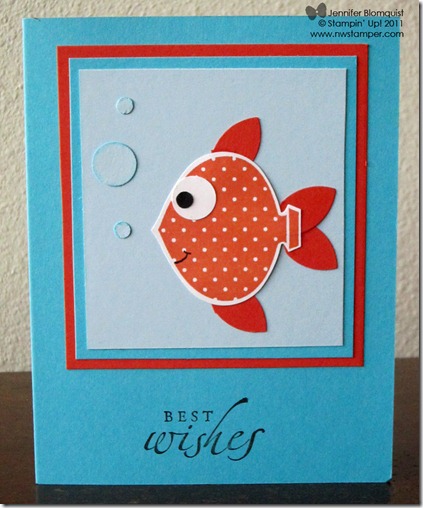
    This was the fun fishy punch art card we made:

    I found this card on Lyssa Zwolanek’s blog and loved it so much I had to share it with others. Isn’t he just the CUTEST?!  The fun part is that this card uses some punches in very non-traditional ways.

    1.  For the body, I used an ornament stamp from the Delightful Decorations stamp set and punched it out with the Ornament Punch.

    2.  Then I punched out a flower using the 5 petal flower and trimmed off the petals to use for fins.

    3.  Then I used the 1/2” circle punch and the 3/16” punch on my Crop-a-dile for the bubbles and eye.

    Fun, huh?  Give it a try and you can have your own cutey fish too.  Need one of the punches or supplies?  You can get it now in the online store

    Click here to shop online 24/7 and start earning your NW Stamper rewards!

    Best Wishes Recipe:
    Stamps: 
    Delightful Decorations, Sincere Salutations
    Ink:  Tangerine Tango, Basic Black, Bashful Blue (sponging around the bubbles)
    Paper:  Tempting Turquoise CS, Tangerine Tango CS, Bashful Blue CS, Whisper White CS, Basic Black CS
    Accessories:  Ornament punch, 5 Petal flower punch, 1/2” circle punch, Crop-a-dile, Sponge Daubers, Basic Black Stampin’ Write marker