Northwest Stamper

Tag: Punch Art

  • It’s a Love Thing! Inspire Create Share Blog Hop

    Holy mackerel!  Valentine’s Day has snuck up on me and I can’t believe we are less than a couple weeks away!  Good thing is… there is still time to make your Valentine’s Day treats and cards.  And yes, there is still time to order those last minute supplies and get them in time to play before the holiday!  Smile  So, to get you all fired up and inspired for all the love-filled creations, I’m joining up with the Inspire, Create, & Share crew on a Blog Hop all about Love!

    12417846_10153838682348048_338791290049439201_n

    I’m one of 14 stops on the hop, so if you are joining me from Darla’s blog, welcome!  I have a fun project to share today… a Valentine’s Treat Pouch I made as a bonus project for my Stamp Club.  It is fun to make and quicker than you might think!

    Love Blossoms Envelope Punch Board Valentine Treat Bag

    Jennifer’s Project Tips:

    • It all starts with an adorable owl – The very first thing I designed for this project was the Owl.  If you haven’t used the Owl Builder punch before, you are missing out on so many cute projects!  From owls, to penguins, to reindeer, it is a super versatile punch!
      But even when you are making a simple owl, don’t hesitate to dress her up!  I used the small flower flourish from the Bloomin’ Love stamp set and stamped it onto a scrap of Pink Pirouette cardstock before punching out the tummy for my owl.  It is like she is wearing a pretty dress!  Then punch out two of the hearts from the same punch and glue them together over her ear for instant bow.  BAM!  Cute or Super Cute??Valentine's Day Owl Builder Punch
    • Create a custom treat holder with the Envelope Punch Board – I was trying to decide what to put my owl on, when it hit me!  I could use the envelope punch board along with the cute Love Blossoms paper stack to quickly make the treat holders.
      –  Start with a 6×6 piece of patterned paper (good thing this paper pack comes as a 6×6 pack!)
      –  Use the envelope punch board to create an envelope. Start at the 2 5/8″ score line and score and punch as normal.on all sides (video tutorial for the punch board).
      –  fold in 3 of the sides but do NOT fold and press the 4th side.
      –  decorate to your heart’s content!
    • Have fun with layers!  I next created the sentiment – the banner stamp and the sentiment are both from the same Bloomin’ Love stamp set, but did you know? The banner has a matching framelit over in the Large Numbers framelit set!  Or trim by hand.  Either way works.  I stamped my banner first and THEN added my sentiment.  But then don’t stop there, add more layers!  Try wrapping the treat bag with the Watermelon Wonder satin ribbon and then layering your sentiment and the owl.
      – Want extra credit?  Keep it going!  Add a gold metallic doily to the front of the bag and adhere a 2 1/2” Crumb Cake cardstock circle for a shiny backdrop.Valentine's Day treat bag layers
    • But what adhesive to use for what?  I used a few different adhesives for this project so I thought you might like a quick guide for it:
      –  Holding together your treat bag = Fast Fuse, you want something stronger than your average tape to make sure your treat doesn’t come apart!
      –  Layering your Owl = 2-way glue pen, with all these small pieces you are trying to stick together, the glue pen is easy to handle and not messy with your little pieces
      –  Attaching your Owl = I used one Stampin’ Dimensional to keep her in place
      –  Everything else = viewers choice!  Though my preference is for SNAIL or Fast Fuse, basically some kind of tape runner

    So I hope you enjoyed my project and found some new ideas for inspiration!  Click the next button below to see what Claudia has created for the blog hop!  The next in your 14 stop hop full of love!

    12507113_10153838680978048_4014289948782387983_n


    NWstamper signature_thumb[9]

    order online button for sig 3_thumb[4]

    Use Hostess Code PGHMVNJM at check out to get a special thank you from me!

    Pick a FREE item with every $50 you spend!  See the Sale-a-Bration catalog.

    See all the tutorials & classes by mail here

    Save 25% on the Latest Weekly Deals


    Price: $18.00

    Price: $110.00

    Price: $40.00

    Price: $10.00

    Price: $4.50

    Supply List

    Built for Free Using: My Stampin Blog

  • Fun Reindeer Punch Art Gift Card Holder with the Owl Builder Punch

    I never get sick… my kids are usually extremely healthy.  Which I’ve been so grateful for over the last few years.  Unfortunately, this year… a cold ran through our household… right before Christmas!  I was the last to get it and it hit the week of Christmas and between that an multiple family festivities, I’ve been away from my computer most of the time.  I’m getting back on my feet now and there were a few projects I really wanted to share, so even though they were supposed to be posted last week, I’m going to share them now – like this adorable Rudolf the Reindeer gift card holder!

    I saw this cute reindeer by Dena Renkow and I had to make it myself and share it with my stamp club gals.  It is a super fun punch art piece, but there are lots of little bits to it, so I made them a chart for what pieces they needed.

    reindeer punch art how to

    If you can’t read the punch names very well, this is what we used:

    • Extra Large Oval Punch – body
    • Owl Builder Punch – head, hooves, nose, eyes
    • Tree Builder Punch – antlers, ears
    • Fun Flower Punch – white tummy patch
    • 3/4” Circle Punch  – muzzle

    Then we started by assembling our reindeer!  We trimmed the pieces as I showed in the picture above and glued together using a dimensional to pop up his head and then again to pop up his nose.  And of course, we used red glimmer paper for the nose to make him extra festive!

    We made the card base by cutting a 4 1/4” x 11” strip of Sahara Sand cardstock and cutting off 1/2” from one end.  Then score at 4 1/4 and 8 1/2” so that you have a 4 1/4” square card with an extra flap you can adhere to the inside to hold the gift card.  Stamp the small flap with one of the snowflakes from the Flurry of Wishes stamp set and Sahara sand ink and then use the Extra-Large oval punch to punch an easy-grab space for the gift card.  Adhere the flap to the inside of the cards using Tear Tape so you don’t have to worry about it coming apart once the gift card is inside!

    We decorated the front by stamping more snowflakes on the top of the card front and then wrapping some of the Cherry Cobbler wide-striped ribbon.  And a little sentiment from the Oh, What Fun stamp set in the Holiday Catalog.

    It is a super cute project and though the reindeer takes some punching and assembly time… he is so cute and oh so worth it for any project.  Maybe some cute Thank You cards for all those fun gifts you got this year? Smile  Give it a try and let me know what you think!


    PS – Don’t forget that there is one week left before the Holiday Catalog & the Year-End Sale are over and goneCheck out the saving here
    NWstamper signature_thumb[9]

    order online button for sig 3_thumb[4]

    Use Hostess Code BEFX37ZS at check out to get a special thank you from me!

    NEW ITEMS ADDED – BIG Year-End Clearance Sale!  See what is on sale here.

    See all the tutorials & classes by mail here

    Check out the Holiday Catalog Retiring List & Sold Out Updates

    Save 25% on the Latest Weekly Deals

  • Make Your Own Punch Art Bats for Halloween

    So if you receive my Newsletter, this will look familiar because it was one of the tutorials that I shared recently. 

    And if you aren’t on my newsletter list… see what you are missing? Smile  Better hurry up and sign up here!

    But I thought with Halloween around the corner, I’d share this on the blog so that everyone can add a little batty, spooky fun to their projects.  Like this super simple Halloween card:

    Halloween bats with butterfly punch

    All it is is a few punches, some black glimmer paper, and some ink.  But the fun part is making your own bats…. check it out:

    How to make a bat from butterfly punch

    See?  Isn’t that super easy and fun?

    Give it a try and then let me know what you think!  I’d love to hear or SEE what you created.  Feel free to leave a link to your project in the comments and I’d love to come check it out.

    Just a few reminders:

    • I’m getting ready to finish ordering the supplies for the upcoming Northwest Crafty Escape Weekend, so if you are thinking of coming, make sure you are registered!  Get details here
    • New weekly deals were posted!  Check them out here along with a few project ideas.
    • Join the cause and support Breast Cancer Research!  Make sure you are signed up to receive the October Paper Pumpkin project kit by mail & Stampin’ Up will donate $1 to the Breast Cancer Research Fund.  If you are a new subscriber, they’ll donate $2!  Learn more and sign up here

    NWstamper signature_thumb[9]

    order online button for sig 3_thumb[4]

    use Hostess Code FHRCKER7 to get a special thank you from me!

  • Easter Punchart Throwback Card and a FREE SHIPPING announcement!

    I had remembered that I had a card that I LOVED that was a punch art bunny, and so I decided today to go digging it out to remind myself what it was.

    original blog post here

    Isn’t that bunny super cute??

    Well, since he uses some retired punches (like the small oval and the itty bitty punch pack) I thought I’d share how you could make this guy with punches that are still available.  He comes out a little bit larger, but still oh so cute.

    For a size comparison, here is how your new bunny is going to turn out:

    Easter bunny punch art

    I know, I’ll have to turn him into a completed card later, but I wanted to show you quick how to pull this bunny together!

    how to make a punch art bunny

    What you will need is the following:

    Punch out 3 of the ovals, two for the ears and one for the “feet”.
    Punch out one each of the circles for the head and body
    Punch out the smallest flower from the Boho Blossom punch for the tail

    You may notice in the bunny card at the top of the page, I sponged the edges of all the pieces to help them stand out a little better.  I like sponging with Sahara Sand for a subtle color that don’t look too dirty on the bunny.

    Layer together starting at the top of the bunny and finishing by tucking the last oval punch underneath the bottom of the bunny.  Easy and done!

    how to make a punch art bunny instructions

    It’s Coming!!  Free Shipping & my Spring Adhesive Sale!

    image

    Starting on Monday, Stampin’ Up will be giving ALL orders (except expedited orders) free shipping no matter the minimum amount!  So, make sure you get those wishlists ready!

    Plus on top of that, I’ll be running my Spring Adhesive Sale! Stock up on your favorite adhesives at big discounts!

    Make sure you are on my mailing list to get all the details first!  Sign up here

    NWstamper signature_thumb[9]

    order online button for sig 3_thumb[4]


  • Curvy Keepsake Easter Bunny Tutorial for the Fun n’ Crafty Blog Hop!

    Yay!  It’s time for another Blog Hop with the Fun n’ Crafty stampers, my lovely and talented downline that I’m blessed to have connected with and become friends with over the last few years!  (I told you SU is pretty awesome, right?)  Well, today we are doing our monthly blog hop a little bit early because we wanted to share with you some Easter ideas while you still had time to make them!  And while I had plans to make another card to show you, I got knocked out with a stomach bug over the last few days, so it was all I could do to get this little video tutorial filmed.  So I hope you like it!

    So here is my little bunny box for you.  I think I’m going to fill mine with jelly beans and put them in my kids Easter baskets this year – because that is what is so awesome about this, it is a treat box AND a cute decoration in one!

    I’ve also been making this in my card classes this month as a bonus project (I have one left coming up this Saturday if you are in the Seattle area Winking smile) and everyone have been having lots of fun with them and so I can vouch that ANYONE can make them.

    Tips for making this project:

    • When putting together your box and adhering your ears, make sure you are using VERY STRONG adhesive such as the Fast Fuse or Sticky Strip.  I wouldn’t trust snail or liquid glue to hold up over time.  In fact, my first couple boxes I made last year I used snail and they started popping apart a few weeks later.
    • I built my box first and then adhered all the punched elements – mostly with liquid glue.  I saved my inking with pen for last so I could see how it all had come together.
    • Here is a list of the punches used (see the supply list at the bottom of the page for pictures of each of these punches if you are more visual like me!)
      –  Extra Large Oval
      –  Large Oval
      –  Modern Label
      –  Owl Builder
      –  1/2” circle
      –  Mini treat back die
    • If you need any of these supplies, now is a great time to get them thanks to Sale-a-Bration!  For every $50 you spend, you’ll get to pick out something free… in fact, you can even pick out a refill for your Fast Fuse as a free item if you want!Check it out:  Original Sale-a-Braiton Items  |  March additions  |  Annual Catalog Choices

    I also put together a Video Tutorial for How to Make the Bunny– now the first few minutes are tips and tricks for the curvy keepsake box and then I start step by step walking through going from punches to bunny!

    (note – if you are reading this from email, you won’t see the video so click the link above)

    I’ll be back later with more fun Easter ideas but in the meantime, don’t wait!  Check out the great projects shared by these lovely ladies and don’t forget to give them some love along the way!
    **Blog hop starts at 7am PST on 3/25**

    Fun & Crafty Blog Hop

    Tobe B. of The Craft Sea

    Sarah G. of 1200 Some Miles

    Jennifer B. of Northwest Stamper <—YOU ARE HERE

    Pam W. of Stinky Tofu


    NWstamper signature_thumb[9]

    order online button for sig 3_thumb[4]

    Project Supplies Used:
    Easy shopping anytime!  Click the images below to see the item in the online store.

  • Christmas Fun with a Punch Art Snowman Gift Card Holder

    Well, another Christmas is past and it was a good one this year for our family.  We had a great day relaxing at home on Christmas and then a noisy day on the 26th with family and cousins. Smile  But isn’t that the best kind of day, at least for kids?

    I had two more Christmas projects I wanted to share and today is a gift card holder I made for a friend.  It started out with a fun punch art snowman gift tag that I converted to a belly band for the holder.

    Punches used for the snowman:

    • 1-3/4” Circle Punch
    • Wide Oval Punch
    • Banner Punch
    • Starburst Framelit (for the background)

    It is really easy to put him together too!  The hat is 2 wide ovals punched out in black (you just trim down one to make the top hat part), his head is the 1-3/4’ circle punch in white, then the body is a wide oval punch in white.  Glue those pieces to a strip of patterned paper for the scarf so he looks about how you like (I used the Trim the Tree designer paper stack – also on discount right now).  Punch out a second piece of designer paper using the banner punch and glue at an angle to create the other tail of the scarf.  His nose is just a freehand cut scrap of Pumpkin Pie cardstock and then I drew on his eyes, mouth, and buttons with a black marker. 

    Add accents like the All is Calm snowflake embellishment (another discount item) to cover up where you adhered the banner punch and a little pearl in the middle for flair.  I also used the Chalk Pen to make dashes around my Starburst framelit die cut for the background and to make the white trim on his hat.

    Pretty cute, huh?

    He was made onto a belly band as the gift card hold was a trifold card.  On the front and inner flap, I decorated with the Trim the Tree designer paper.

    Then you flip it open to reveal a space for your message and the gift card.  I actually added a second pocket to the top flap so they could have 2 gift cards inside.  And the pocket had a little space cut out for easier grabbing using the small oval punch.

    It was easy and fun to make and I hope my friend liked it!

    I also know that those instructions for the snowman may have been a bit tough to follow, so I’ll try to put together a video to help show what I was talking about. Smile 

    And like I mentioned, both the Trim the Tree paper and the All is Calm snowflake embellishments are part of the Year End Blowout Sale!  They are only available for about another week, so grab then now so you can get started on your Holiday scrapbook pages or projects for next year!

    All is calm snowflake embellishments trim the tree designer paper stack

    NWstamper signature_thumb[9]

    order online button for sig 3_thumb[4]

    Project Supplies Used:
    (if you are reading this in email, click here to see the list of supplies)

  • Peek-a-boo Washi Tape Card with a Quick Tip video tutorial

    **LAST DAY!  Don’t miss out on the Stock Up & Save Sale!**


    I’m so excited to share these cards with you today.  Not only because I love them, but also because I actually have a Quick Tip video tutorial to go with them!  Turns out I really enjoy putting videos together… who knew?  Anyway, let me share with you a fun card that you can reproduce with these punches or your favorites at home.

    There are two main “fun” elements to this card – the washi tape strips and the layering of punches for the butterfly centerpiece. 

    First, here is how you would create the butterfly centerpiece:

    1. Punch out a butterfly (this is the Elegant Butterfly punch) from a piece of scrap Whisper White cardstock
    2. Set aside the punched out butterfly and grab the scrap paper with the butterfly hole in it.  Punch out a 2-1/2” circle using the 2-1/2” Circle punch so that the butterfly hole is in the middle of the circle.
    3. Sponge the edge of the circle with Coastal Cabana ink
    4. Punch out a 1-3/4” circle from a piece of Soft Suede scrap paper
    5. Set aside the punched out circle and grab the scrap paper with the circle hole in it.  Punch out a 2-3/8” scallop circle using the 2-3/8” scallop circle punch so that the 1-3/4” circle is centered in the middle of the scallop circle.
    6. Adhere the scallop circle to the front of the 2-1/2” sponged circle
    7. Adhere to the front of your card using Stampin’ Dimensionals

    The other tip I have for you today is laying down your washi tape!  For my cards I used the sets from Stampin’ Up (Retro Fresh above, Beach House below).  You just lie three strips across your card front so that you can position your butterfly over the tape for a pop of color. 

    Video Tutorial – Check out this video for a quick tip for how to make sure you Washi Tape goes on straight.  (note – if you are reading this in email, click here so you can view the video)

    Now, as you saw in the video you can use different colors of paper and washi tape to give slightly different looks to your card.  Here is what the exact same design looked like only with Strawberry Slush cardstock and the Beach House washi tape:

    Let me know what you think about the video!  Please leave a comment and let me know if you’d like me to do more and even better, if you prefer quick tip videos, walkthrough for projects, or product reviews!  I so appreciate the feedback!

    spaced shop now sig bar

    Hostess Code:  C2HYWWQM Use this Hostess Code and receive a free gift!
    (Please do not use the Hostess Code if your order is $150 or more)

    Card Supplies Used

  • Last Chance for Free Shipping & a Few More Stampin’ Up Convention 2014 Highlights

    Last Chance for Free Shipping & a Few More Stampin’ Up Convention 2014 Highlights

    Hey everyone!  I actually got a chance to sleep in after traveling late last night home from the Stampin’ Up! convention.  It was an awesome trip and fun weekend away with family and friends.  And when you add in stamping…. all the better!

    While I’m finishing uploading pictures from the last day (many are up on my Facebook page already), I wanted to remind everyone that TODAY is the LAST DAY for my Free Shipping special.


    NORTHWEST STAMPER CONVENTION SPECIAL

    Free Shipping on All Orders using hostess code 7RDHVEKR

    I wanted to do a little something-something while I was away playing at Convention, so I thought I would give you all free shipping this weekend! Place an order online using the hostess code 7RDHVEKR and when I get back from my trip I will send you a handmade thank you card and a refund of your shipping!

    Good through 7/20/2014


    Also, anyone who is ordering with me this month, will also be on my customer list for mailings of the new Holiday Catalog that come out at the end of August!  And believe me, you are going to LOVE it!

    Ok, I’m off to go out for a yummy breakfast with the family, so here are a few more highlight pictures from the last day – with more to come over the next week. Smile 

    Why I love convention:

    1.  Awesome Swaps

    2014-07-19 08.57.09

    2.  Awesome Announcements and Sneak Peeks

    2014-07-19 13.54.56

    2014-07-19 13.55.06

    3.  Awesome Class Ideas (I’m running this one soon – who wants to do it with me?!)

    2014-07-19 14.36.49-1

    2014-07-19 14.37.07

    2014-07-19 14.37.23

    4.  Awesome Prizes

    2014-07-19 16.08.54

    5.  Most of all – Awesome Friends!

    2014-07-18 07.33.59-1

    2014-07-18 07.35.14

    2014-07-18 12.51.32

    2014-07-18 13.45.08

    2014-07-19 08.52.25

    Up next is Leadership 2015, which anyone who is interested in learning about how you can grow your ability as a crafter and share it with others is invited to attend. If you would like to learn more about attending with me as part of my Fun n’ Crafty group, I would OVE to talk to you more about that.  Just email me at jennifer@nwstamper.com and I’ll give you all the scoop!  It is another awesome experience complete with stamping presentations, displays, prizes, laughter, and lots and lots of learning and fun!

    2014-07-19 16.11.51

    Then, we can grow together and hopefully by the end of June 2015 have earned the Grand Vacation – a Mediterranean Cruise! 

    Have a wonderful day and don’t forget to check out my Facebook page and Instagram for lots more photos from Convention weekend and more.

    spaced shop now sig bar

  • Quick Spring Easter Treat Bag Tutorial with Punch Art Daffodil!

    Quick Spring Easter Treat Bag Tutorial with Punch Art Daffodil!

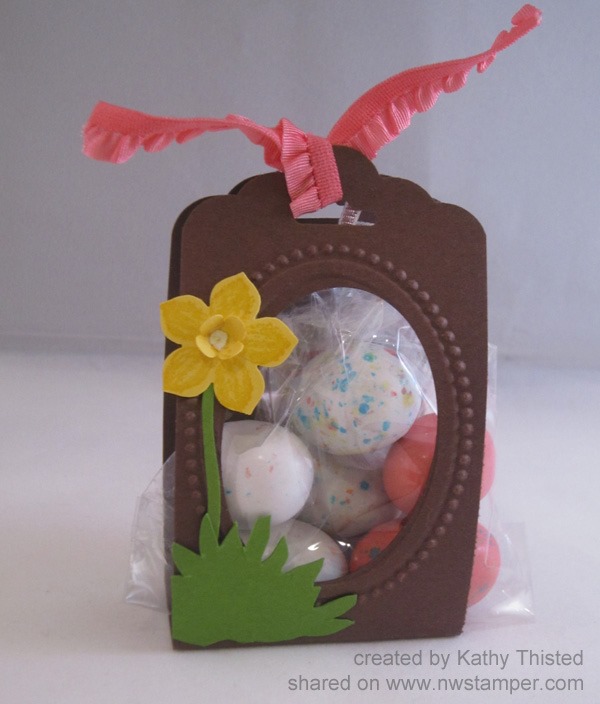
    Happy Easter weekend! I don’t know about you, but we still need to do a lot of our prep for Easter.  Today we’ll be spending time coloring Easter eggs – and I’ll be making sure I have everything I need for Easter baskets and Easter dinner! 

    (PS – don’t forget to enter the Retirement List Prediction Contest!  It is free to play along and you could win up to $30 in free Stampin’ Up products!)

    So, back to Easter treats!  I thought I would share a quick spring or Easter treat idea that you can pull together at the last minute!  This was created by my Mom, Kathy Thisted, for our Fun n’ Crafty team Stamp & Share a few weeks ago and I just love it.

    Scallop Tag Topper & Punch Art Treat Bag

    There are lots of fun elements to this treat bag, but the nice thing is that with a few punches, it is super quick to make!

    Start with a 2”x8” piece of cardstock (this is Chocolate Chip) and score at 3-1/2” x 4-1/2” to help it stand up on it’s own.  Then, grab the Designer Frames Embossing Folders and use the oval to one to emboss your frame. 

    Use the Extra Wide Oval Punch to punch out the center of your oval.  LOVE that it is an almost perfect match!

    Punch both ends of the strip of cardstock with the Scallop Tag Topper Punch to give you that pretty finished look!

    Then grab your Petite Petals punch  and the four petal flower punch from the Bitty Punch Pack to make your Daffodil.  I punched one of each shape out of Daffodil Delight cardstock.

    In the sample, the flower is stamped first using the Petite Petals stamp set – and I think it definitely adds something to it.  But for the sake of this tutorial, I didn’t end up stamping.  I hope you don’t mind. Smile 

    Fold up the small punched flower and adhere it to the center of your larger flower with liquid glue or a glue dot!  I love how my mom colored in the center of the little flower with the White Gel pen for a little extra definition!

    Add a scrap of cardstock for the stem and grass at the bottom.  Want to hear a fun trick?  Stamp out one of the flower heads from the Too Kind stamp set and then cut it out and use the backside for your grass!  Neat huh?

    image

    Add some candy, tie it with a ribbon and you are done!  Easy Peasy!


      Reminder! Get your guesses emailed in!

      If you haven’t gotten in your guesses for my Retirement List prediction contest, don’t forget to get those in!  You have until tomorrow afternoon but since I know many folks will be busy with Easter activities, you may want to send them in today. Smile 

    Pick 10 stamp sets from the annual catalog that you think will be retiring and email me your list to jennifer@nwstamper.com.  If you have the most guesses correct when the list is posted Monday morning, you will win a shopping spree from me!  See all the details here.

    spaced shop now sig bar

    April Online Stamp Club Hostess CodeG4VQJ7VB
    Use this code to get free exclusive tutorials & project kit! Learn more

  • Happy St. Patricks Day with a Pansy Punch Shamrock

    Happy St. Patricks Day with a Pansy Punch Shamrock

    shamrock tagHappy St. Patrick’s Day!  It snuck up on me, but thanks to my hubby, I remembered to wear green this morning. 🙂

    Well, last week for my stamp club, I shared this cute little tag as a bonus project to show another great way to use that Pansy Punch.  Turn it into a fun shamrock for St. Patrick’s Day!

    Now, how do you make it?

    1. First, punch out a flower in your favorite shade of green (in this case, I used Gumball Green).
    2. Then, pick a petal to start trimming and cut off the sides of your selected petal.  (I’ve shaded in the part to cut off in the picture below)
      how to make a shamrock from flower punch
    3. Cut away the petals….punch art shamrock

    And you have a cute shamrock!

    Add it to cards or die cuts to make a fun tag for a card, gift, scrapbook page, whatever you need.

    I punched out a 2-1/2″ circle in Very Vanila and added the stamped sentiment from the Teeny Tiny Wishes stamp set and then mounted the whole thing on a Gumball Green starburst (using the Starburst framelits).  Add a green button, just for fun, and Ta Da!

    shamrock punch art

    So, I hope you have a great – and lucky – day!

    spaced shop now sig bar

    March Online Stamp Club Hostess CodeXEWP4DFD
    Use this code to get free exclusive tutorials & project kit!
    Learn more

    Supplies Used


  • Getting Ready for a Card Bonanza!

    I stayed up last night to start sorting out my card kits for my upcoming Card Bonanza this weekend.  On Saturday, I’m hosting the event at my house and it is an All-You-Can-Stamp crafting event!

    I was shocked to discover that I have over 130 card kits ready to go based on over 50 card designs!  See, this event is what I do to use up all my extra card kits left over from my technique nights, card classes, swaps, and events.  I deeply discount the kits and invite everyone over to make as many cards as they want.

    Here is the scoop:

    • Come and stamp for only $1.50/card
    • Come and stamp as many cards as you want for $10  (you just have to let me know when you get started)
    • Pick up a premade card with envelope from my big stash for only $2

    Can’t attend in person?

    • Get a set of 5 card kits for $11 mailed to you to make at home
      (note – due to Stampin’ Up policy, kits will not include stamped images, but they will include all paper and accessories precut and portioned)

    Either way, that is WAY LESS than Hallmark for some really fun and cute cards!

    Here is a small sample of some of the cards available to make:

    Fun, right?!

    So, check your calendar and if you are free this Saturday (2/22) between 1pm- 5pm, let me know and plan on coming over for this fun event!  RSVP here

    Can’t attend in person but would love some kits?  Email me at jennifer@nwstamper.com or order here and I’ll get you hooked up with some cute card kits!

    Card Kit Grab Bag – 5 card kits shipped w/in the US for ONLY $11!


    Now I’m off to finish pulling all the supplies needed for all the different cards – that is going to take me a while! But it will be fun and I can’t wait to see everyone creating on Saturday.

    spaced shop now sig bar

    Virtual Stamp Club Hostess CodeBNDDMDVU
    Use this code to get free exclusive tutorials & project kit! Learn more

  • A Sweet Ice Cream Cone Punch Art Birthday Card

    We are about to enter “birthday season” here at my house with the first few starting up at the end of the month and then me and my two kids all have December birthdays… so it is about to get crazy here!  But one thing I always have to have for birthday is cake and ice cream… so what better way to say Happy Birthday than with some adorable ice cream on a card?

    So sweet!  And it is really easy to make too!

    To make the ice cream cone, you just need a couple of punches and an embossing folder.

      +
    +
    • Add some glitter to the top of your first scoop of ice cream and you have an adorable ice cream cone!

    I layered the cone onto a tag made with the Chalk Talk framelits and sponged the edge with Crisp Cantaloupe ink.

    Stampin’ Up! Supplies Used
    Stamps:  Fabulous Phrases
    Ink:  Basic Grey, Crisp Cantaloupe
    Paper: Very Vanilla cardstock, Smoky Slate cardstock, 2013-2015 In Colors (Baked Brown Sugar, Crisp Cantaloupe, Pistachio Pudding, Coastal Cabana, Strawberry Slush)
    Accessories:  Big Shot, Chalk Talk framelits, Square Lattice embossing folder, Cupcake punch, Pennant Builder punch, Natural Trim ribbon, Linen Thread, Sponge Daubers


    weekly specials 11-5 to 11-11

    And it is Tuesday as well, which means NEW weekly deals!  As you can already see, I love the Cupcake punch… but I don’t have the Autumn Accents die and that is for sure going in on my group order this week! 🙂

    See details on all the deals in the online store here


    spaced shop now sig bar