Northwest Stamper

Tag: paper pumpkin

  • ICS Blog Hop–Season of Gratitude

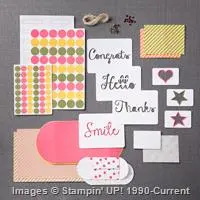
    Welcome to November and fun new blog hop with the Inspire, Create, Share gals!  We’ve decide to do something a little bit different this month and we are pulling out our Paper Pumpkin boxes for this month (technically they are from October, but hey, November’s kits don’t ship until after November 10th, so you have time to sign up for yours!)

    As I often do, I create the design the way the instructions tell us to for the first project, and then I start exploring what other options I can do to change things up!  I usually stick with trying to figure out ideas that you can make using ONLY WHAT IS IN THE BOX.  So I don’t grab extra ink, paper, or punches when I’m starting out.  I want to give folks ideas of what they can do even if they don’t have a bunch of other supplies in their craft room.  So, check out what my favorite alternative turned out to be:

    October 2016 Paper Pumpkin Alternative Card Design

    Now, I’ll share what the cards in the kit are “supposed” to look like.  This is my first card created using the instructions as they were written for the kit.  You end up making a fall shaker card when you are done.  And it is kind of hard to tell, but that Vanilla paper is actually dry embossed, so those grooves are part of the paper.  Which made me want to bust out my sponges and try coloring it, which led to the second card version:

    It wasn’t my favorite, but I thought I would share it anyway.  Also, it leads me to a tip or reminder… depending on who you are.

    Paper Pumpkin Project Tip

    • When you are adhering the Window Sheet to the back of the leaf cut-outs don’t worry about putting adhesive on all sides of the window sheet!  I did that with my first one and totally ruined the window sheet because there wasn’t enough room without the adhesive being exposed through the die-cut holes.  And let me just say, an Adhesive Eraser is magic, except not so much on acetate sheets. Smile  They still smear all over the place!  So just put adhesive on the Vanilla Die Cut Sheet around the holes and press the window sheet onto that.  You just need to make sure the holes are covered, it doesn’t have to be perfect.
    • The instructions say to use the foam strips (to contain the sequins) on all 4 sides of the embossed Vanilla piece; and while that works, you often won’t see your sequins!  So, in the card above, I made my foam strips make a small rectangle just around where the die cut holes are.  That way, the sequins are almost always viewable.  Then I just added some extra foam along the far left edge to keep the paper balanced and steady.
    • Don’t forget to put your sequins on the bottom paper (in this case the card base) and NOT onto the window sheet.  By making little piles on the bottom sheet, you can place the top layer (with the holes) exactly where you want and still see what you are doing.

    But now, back to my final alternative that I really like!

    I switched away from the Shaker card idea and instead started cutting out my favorite elements.  I cut out the die cut leave holes and then trimmed down some of the background colored paper to fit behind them.  I loved the crackle stamp for the cool effect that you get for the leaves, so I had to keep that in there – and now you can see it even better because you don’t have to look through sequins!

    I used Stampin’ Dimensionals to raise the die cut holes over the stamped paper, and then glued those down directly to the card base.  Then it was time to figure out the sentiment.  I used the same die cut shapes and just layered them a little bit differently:

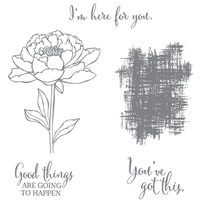
    But I didn’t want it to be too plain, so I layered back in one of the die cut pieces that popped out to make my shaker card and added a stamped acorn from the stamp set that comes with this month’s Paper Pumpkin kit.  And you may remember me telling you that when I do these alternative cards, I don’t grab extra papers and inks from my stash, so want to know where I got the paper for that acorn?  Check it out – it’s the left over paper in between the Cajun Craze tags!

    2016-11-02 15.24.35

    Then just add a few extra sequins and you are done!

    I hope you have enjoyed this Paper Pumpkin kit alternative idea!  Keep on hopping and check out what Andrea has in store for you, for even more great ideas.

    And don’t forget, if you like these ideas – you can always get MORE of the kits by purchasing refills in the Online Store!

    • If you are a current Paper Pumpkin subscriber, you get exclusive access to refill kits for past months as a great price.  see them here
    • And if you weren’t a subscriber before, you can always join now and get immediate access to be able to purchase refill kits, plus you’ll be all good to go to get this cute Holiday Exclusive box in your mailbox for November!

    14917149_1784322711825603_4425822216026875299_o

    Thanks for hopping!

    NWstamper signature_thumb[9]

    order online button for sig 3_thumb[4]

    14947527_10153874106165776_4026858921570814699_n

    November Premium Tutorial Pack Hostess Code – YG62GG6C

    NEW! I’ve joined with a group of amazing talented demonstrators – many of whom have been designers for the Stampin’ Up display boards at the Conventions with me, plus Artisan Design team members, and other talented folks, to create a set of great project tutorials just for you featuring the stamp sets that are on sale this month!  You can get your free copy of this SET of great project ideas by either:

    Place a $50 Stampin’ Up order with me (either directly or in my online store using the hostess code above) in the month of November

    Join my Fun n’ Crafty Stampers!  My team gets a copy of this Tutorial Pack for FREE!

  • LAST CHANCE for 50% off Paper Pumpkin Subscriptions

    Just a quick reminder that if you were thinking of giving Paper Pumpkin monthly kits by mail and wanted to get in on the 50% off for 2 months deal, TODAY is your last chance to SAVE!

    Here is what we got in August:

    So cute, right?! 

    I can tell you that the kit coming this month is Fall/Halloween themed for fun 3D treats/gifts.  But even if that isn’t your thing, you can always sign up now to get in on the great deal and just SKIP this month, you’ll still get 50% off your next 2 months!  This is an awesome deal given that it typically runs $19.95, which is also a great deal because each month we get:

    • Exclusive subscriber only stamp sets
    • Precut cardstock & accessories
    • All the ribbons & embellishments
    • INK!  (guaranteed different colors each month for at least 12 months!)
    • A clear block with your first kit that you can use with ALL the stamps in future kits
    • Extra supplies – just in case you need them
    • Exclusive access to purchase refill kits (everything but the stamps and ink for only $8!) or complete extra kits while supplies last! (see them online here)

    Join the Paper Pumpkin Fun – Sign up here

    NWstamper signature_thumb[9]

    order online button for sig 3_thumb[4]

  • Get More Alternate Ideas for the July Paper Pumpkin kit + Last Day to get Half Off the August Kit!

    ******************************
    REMINDER – TODAY is the LAST DAY to take advantage of the 50% off your first 2 months of Paper Pumpkin AND get the August project kit.  I’ve actually seen this one and think it is a super cute kit!  But you have to be signed up by tonight to get it.
    Try it out using the promo code HALFOFF

    Then join us over on Facebook at the Paper Pumpkin Fun group to share what you make!
    ******************************

    Sometimes I want to craft but I don’t want to have to think…I want to just be able to create and know it will come together and look cute.  Last night was one of those nights. I’ve spent all weekend with out of town family, and don’t get me wrong, it’s been lots of fun… but it also means in addition to all the adults we have 5 children running around and attempting to play together from the ages of 18 months to 7 years.  So it gets a little crazy to say the least.  I got home and just wanted to relax and I realized I hadn’t finished my July Paper Pumpkin yet, so I decided to play!

    This was the original design that was shown on the package… so you could make 8 cards that all looked like this:

    But then I decided to start mixing things up a bit and changing up the layout just a little

    Then I though, how would it look if I turned that patterned paper on it’s side and ran it across the card front.  Kinda cute, huh?

    Now, one thing I ran into when I turned my paper on it’s side is that I didn’t have an orange paper or sticker that was long enough to go all the way across the card front.  So, I did a little hack!  Take one of the orange strips and cut it in half!  Line up each half to the outside edges of the card base.  There will be a little bit of a gap in the middle, so just cover it up with the notepad looking paper!  Easy way to hide the gap!

    I also started experimenting with that happens when you take off the perforated tabs on the notepad paper.  I liked it off, but then thought it made an interesting texture when you glue it back down OVER the white cardstock.  just a little bit of subtle texture and something fun to look at.

    Then I started to get a little crazier and start moving things to the edges and turning them on their sides…

    Or even just turn the whole card on it’s side!

    Those diagonal stripe strips in the corners are actually one of the grey and white diagonal stripe stickers that I cut in half longways.  Then I laid them across the corners diagonally to make it look a little like washi tape and trimmed the edge!

    Then I had to do one more… this time a fancy fold card!

    The basic layout on the front is pretty simple and the same as one of the first cards but this time, I folded back the front flap of the card base to make a Z Fold card!  See what I mean?

    I would have gotten a little more crazy with it but I was just too dang tired.  And I thought this looked cute as is.

    Finally, I put together the envelopes and don’t ask me why, but this was the hardest part for me!  It took me 3 tries to get the envelopes put together the “right” way!  Though I still think I like the side opening version. Smile

    Fun right?

    Well if you would love to get your own kit in the mail, don’t forget that you can get your first two months for only $9.95 and NO OBLIGATION!

    Give it a try and use the code HALFOFF to get 2 months for only $9.95/month!
    Sign up for your trial here

    You can skip any month or cancel anytime.  But you’ll be having fun and you get a total deal each month any way.  Plus, once you are a subscriber, you can pick up past kits or refills for a great price.  For example, you can get a refill for this kit for only $8!

    July Thanks a Latte Paper Pumpkin Kit Refill – Available Online

    image

    NWstamper signature_thumb[9]

    order online button for sig 3_thumb[4]

  • New Weekly Deals–Ribbons and More Galore!

    It is a Tuesday Quickie here!  Just wanted to make sure you had heard about the latest deals… especially since they are so cute!

    New Weekly Deals

    11800495_10205059731236314_4954220019427063650_n

    I’ll be putting in an order today and possibly another later in the week.  So you can either email me with what you want or start shopping online here – See the Weekly Deals in the Store

    New Paper Pumpkin Promotion

    While I was at convention, Stampin’ Up also announced a new Paper Pumpkin promotion.  So if you haven’t subscribed before, or stopped a while back, this may be a great time to give it a go. 

    image

    This is an awesome deal given that it typically runs $19.95, which is also a great deal because each month we get:

    • Exclusive subscriber only stamp sets
    • Precut cardstock & accessories
    • All the ribbons & embellishments
    • INK!  (guaranteed different colors each month for at least 12 months!)
    • A clear block with your first kit that you can use with ALL the stamps in future kits
    • Extra supplies – just in case you need them
    • Exclusive access to purchase refill kits (everything but the stamps and ink for only $8!) or complete extra kits while supplies last! (see them online here)

    Start your new subscription here

    PS – if you have been a subscriber before, make sure to sign up using a DIFFERENT email address to make sure you get the 50% off.

    I’ve seen the next 2 months of kits, so if you have questions, let me know and I’ll give you the scoop!


    NWstamper signature_thumb[9]

    order online button for sig 3_thumb[4]

  • Another Great Monochromatic Card with You’ve Got This

    Sometimes I love getting out all the layers and accessories for my cards… and sometimes I like keeping it simple and not needing too much for my project.  Today’s card is one of the latter!  When I’m feeling overwhelmed in life, it is nice to be able to feel accomplished and that I can get something done that looks great but I don’t have to think too hard or have a million supplies out on my desk.  Can you relate? Smile 

    Tips for making this card:

    • Pick your favorite color and pair it with Whisper White and you are off to a good start!  in this case, I used the new Mint Macaron as my main color because it is so soft and fresh.
    • When using the crosshatch background stamp that comes with the You’ve Got This stamp set, I like to “stamp off” my inked stamp onto scrap paper first before stamping it onto my card.  This makes the image lighter so that my main image (the flower) shows up better)
    • Try stamping that background image just on the top of the card where your flower head will be instead of behind the entire flower so that you have a clean space for your sentiment.
    • Stamp the flower in Black and then color in the center with the Delightful Dijon marker for just a hint of complimentary color.
    • Pop your stamped and matted layers up with Stampin’ Dimensionals for a little depth to your card.

    REMINDER – TODAY is the Last Day to be Signed up to get the July Paper Pumpkin kit!

    They check their subscription counts today and then start mailing around the 15th, so if you aren’t signed up or you haven’t activated your prepaid subscription, make sure you have done so by the end of today!

    Here is what they sent us last month (you had enough supplies to make 8 total cards):

    As the kit comes out, I’ll be sharing my project ideas on my new Paper Pumpkin Fun facebook group and may try to do another video like I did last month. Smile 

    Get signed up for your subscription here

    Paper Pumpkin box promo

    NWstamper signature_thumb[9]

    order online button for sig 3_thumb[4]

    Project Supplies Used:

  • Walkthrough Wednesday–Fun Alternate Ideas for your June 2015 Paper Pumpkin Kit

    Total SPOILER ALERT!!!

    I’m so proud of myself for actually finishing a Paper Pumpkin kit in the same month that I got it. Smile  I have to admit, I’ve gotten really bad about getting a kit in the mail and being so excited to make the project… and then letting the box get buried on my desk only to be dug out weeks later.

    But no more!  I just launched a new Facebook group to share Paper Pumpkin project kit tips, alternate ideas, and the occasional great deal!  So now I have to start making my kits on time so I can share in the group when everyone gets their kits. Smile  Feel free to join us here – Paper Pumpkin Fun with Northwest StamperAnyway, this was a fun kit and I thought really cute.  I especially loved the thin wood accents on the banner card!


    PSST – Did you know that you have the option to either (1) subscribe monthly to Paper Pumpkin, but you also can (2) prepay your subscription for you OR as a GIFT??  Prepaid subscriptions for 6 month or 12 months actually get you discounts, can be combined with other catalog purchases, and can even earn you hostess benefits!!  (check out prepaid subscriptions online here)

    Ok, back to today… it is also Walkthrough Wednesday and so I thought I would share my alternative card ideas I came up with from the kit and help walk you through them too.  So here are the alternative cards:

    And you can check out the video about Paper Pumpkin and how to make these cards here:

    (note – if you are reading this blog post in email, click here to view the video)

    But here are a few close ups of the cards – each using only the supplies from the kit.  So you don’t have to have anything else in your craft room, or with you, to make these variations!

    Flower Card – Alternate

    Instead of laying out those stickers on the front of the white cardstock, I layered them BEHIND to make a fun background pattern.  Add some extra stamping and tie on some of the thick twine and you get a fun country card.

    Banner Card – Alternative

    I also wanted to mix things up a bit with the banner card too.  So I started by squeezing all the triangles together which left me just enough space at the top for a sentiment!  And where did that green background paper come from you might ask?  Well, the kit included envelopes and envelope liners – so I just repurposed PART of an envelope liner!  You still can line the top of your envelope and still have enough to make this cute background.  And no extra white cardstock required either!  I just trimmed the bottom of one of the banner card bases.  Check out the video for all the exact measurements and cutting instructions. Smile

    And so for comparison… the card on the left is the one from the instructions in the kit and the card on the right is my alternate version:

    And if you have received your kit but haven’t put it together yet, you can follow along with my Paper Pumpkin June edition walkthrough video where I share tips for making the default cards in the kit… check it out:

    (note – if you are reading this blog post in email, click here to view the video)

    Ready to get started with Paper Pumpkin or give one as a gift?

    You have 2 options to get these great kits sent direct to you AND have access to purchase past kits and refills (see all the kits available here)

    1. Start a Monthly Subscription
      No obligation, you can cancel at anytime, or just skip a month when you know you will be busy.  (learn more)
    2. Purchase a Prepaid Subscription – Perfect for SAVING you or the perfect gift for someone else!
      Prepay for a 1,3,6, or 12 month subscription and get EXTRA benefits! (check them out)

    One Week Special!  Get a free gift from me with ANY prepaid subscription!
    If you will purchase a subscription by June 30th you’ll receive some nice rewards for doing so!

    • Purchase a 1 month subscription $19.95 plus tax receive a free sheet of dimensionals.
    • Purchase a 3 month subscription $59.85 plus tax receive a snail refill and dimensionals.
    • Purchase a 6 month subscription $113.70 plus tax receive a snail refill, dimensionals and liquid tombo glue (SAVE $1 a month on your pumpkin plus get all the freebies)
    • Purchase a 12 month subscription $215.40 plus tax receive a snail refill, dimensionals, liquid tombo glue and $21.00 in free product YOU CHOOSE the free product including hostess only items on page 178-181.  (BEST DEAL you save $2 a month on your pumpkin plus get all these freebies)

    Pick up your prepaid subscription here and please use hostess code ZKGTCW6U

    NWstamper signature_thumb[9]

    order online button for sig 3_thumb[4]

  • Thanks to all the Moms out there! Happy Mother’s Day!

    Happy Mother’s Day to you and your Mom!  I’m hoping to have a relaxing day with my family and hope you are close enough to yours to do the same.  And if not, then at least a day to sit back, relax, and enjoy happy memories of your loved ones. Smile 

    I wanted to share this fun card from a past Paper Pumpkin kit as my thanks to my Mom, Kathy Thisted, who truly is seriously amazing. Smile  Especially because she has had to put up with me and my wild, determined, independent ways as I was growing up!!  And that she fostered a love of creating and continues to share it with me as we share our experience with Stampin’ Up together!

    2014-07-18 13.45.08

    So here is to all the moms out there!  And all the crafty families.

    Here is a little bit more about the project too:

    • I told you the Paper Pumpkin kits were improving, didn’t I? Smile  This is the “Seriously Amazing” kit and it has all kinds of fun sentiment options from Thanks, Hello, Smile, and Congrats.  AND you can still get it as a Paper Pumpkin subscriber too (or if you just want to sign up to try it and pick up some awesome extra kits along the way!)
      Check them out:  Seriously Amazing Full Kit  |   Seriously Amazing Refill Kit
    • Make this same style of card by die cutting out your letters from a white piece of cardstock and add some stamped flair (like the Hello Honey dots here) around your cut out word.

    • Layer your die cut word over some patterened paper, and keep up up with Stampin’ Dimensionals for a cute look.
    • Add a few sequins for a different style of sparkle and shine… attach with a glue dot – easy peasy!
    • Layer your sentiment with a banner to tell her how you really feel.


    And if you aren’t a Paper Pumpkin subscriber yet, it is an fun way to get projects in the mail each month and you can pause or cancel anytime, plus have immediate access to purchase some of the awesome past kits.  So consider giving it a try! 

    Try Paper Pumpkin Today

    Have a wonderful day and thanks for sharing some of it with me. Smile

    NWstamper signature_thumb[9]

    order online button for sig 3_thumb[4]

    Project Supplies Used:

  • Hurry! 24 Hour Flash Paper Pumpkin Sale! ENDS TONIGHT!

    Last night I got home from dinner and I discovered that Stampin’ Up had posted a 24 hour sale on Paper Pumpkin subscriptions!  You know, a surprise box in the mail with everything you need (except glue) for around 8 or more cute projects!  You can get your first month – May- for only $5!
    You just have to sign up with a new subscription by TONIGHT (5/9) at 6:50pm PST.

    >>> Get Signed Up Here <<<

    This is an awesome deal given that it typically runs $19.95, which is also a great deal because each month we get:

    • Exclusive subscriber only stamp sets
    • Precut cardstock & accessories
    • All the ribbons & embellishments
    • INK!  (guaranteed different colors each month for at least 12 months!)
    • A clear block with your first kit that you can use with ALL the stamps in future kits
    • Extra supplies – just in case you need them
    • Exclusive access to purchase refill kits (everything but the stamps and ink for only $8!) or complete extra kits while supplies last! (see them online here)

    For example, this is what we got for April:

    (photo by Carrie Rhodes)

    Here are a few of my favorite projects people have created recently with some recent Paper Pumpkin kits (all found on the Paper Pumpkin Pinterest Page!):

    Like making treat bags from cards… or using left over felt from the February kit on the side of the Tag a Bag Boxes!

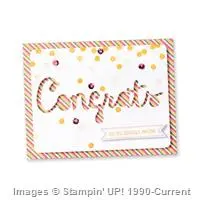
    And I love seeing what people do with the left overs from the kit like this fun card using left overs from the December kit:

    And if you get a 3D kit like the Valentine’s Treats, there are lots of ideas for other things to make too!

    Here are what the kit projects have been looking like:

     March 2015 Paper Pumpkin Kit
    March 2015 – 9 cards with pierced words for optional threading
     April 2015 Paper Pumpkin Kit
    April 2015 – 8 cards with Kraft Pockets
    January 2015 Paper Pumpkin Kit
    January 2015 – 24 treat bags with embellished clips
     February 2015 Paper Pumpkin Kit
    February 2015 – 8 accordian cards and little boxes w/ 48 felt letters
     November 2014 Paper Pumpkin Kit
    November 2014 – 8 die cut cards, 12 die cut gift tags
     December 2014 Paper Pumpkin Kit
    December 2014 – 9 Fun Shaker Cards with Envelopes

    See?  Way cute and lots of great options!

    It’s no obligation too.  You can skip a month, as many times as you need, you can order an extra kit one month when your Mom is visiting or you need an extra gift, or cancel at anytime.  So for $5 and you know you’ll get a fun stamp set and ink, what do you have to lose?

    Don’t forget, this ends TONIGHT (5/9) at 6:50 pm MST and use promo code “24hours”!

    Get your Paper Pumpkin experience started today!  Sign Up here


    NWstamper signature_thumb[9]
    order online button for sig 3_thumb[4]
  • Stampin’ Up Leadership 2015–Day 3 Recap

    Stampin’ Up Leadership 2015–Day 3 Recap

    If you can believe it, we’ve already made it to day 3 of Leadership and it is time to start wrapping things up!

    IMAG7389

    As always, thank to everyone who has been over on the Facebook page visiting with me and following along.  I’ve been putting ALL of my photos up (well, except for the random business class slides) over in albums there, so you can check them out if you want to see even more!

    Albums:  Leadership Day 1  |  Leadership Day 2  |  Leadership Day 3

    So, shall we recap? Smile

    Over the course of the last 3 days, I ran into some friends all the time…. like everytime I turned around I saw them!  And then there were a few that I pretty much never bumped into.  Thankfully, before the morning session I got some time to say hello, chat and – of course- take a selfie!!

    Jennifer Blomquist and Lyssa Zwolanek Leadership 2015

    Like getting to finally briefly catch up with the fabulous Lyssa Zwolanek Smile

    And getting in one last hug with the sassy Tamra Davis!

    Jennifer Blomquist and Tamra Davis Leadership 2015

    Then I had to hustle to my seat because it was time for the main stage presentations to begin for the final day.  First up was the moving keynote speaker – Jason Wright.

    IMG_7399

    He is an author… and in contrast to past speakers who talked to us about staying motivated or reaching out to new demongraphics of customers… he talk about making a difference.  It was an AMAZING reminder of the core of what we do!  He talked about how much meaning and importance comes with a hand written letter or a card.

    An email is nice, but he was right, when you write a note and make a card, there are touches of you on that note and it is something they can keep with them if they ever need to think of you and have something to bridge the time or distance.

    Long story short, there is something so powerful and special from the handmade!  Time for me to start sending more cards and messages with others

    For fun they did a gameshow.  Do you like the “no cheating” blinders they got to wear? Smile

    IMAG7364

    The winner received a $100 shopping spree!  Lucky lady!

    Then it was back to classes for a few more great ideas and inspiration-

    IMAG7321

    That is Alisa Bown who was a new trainer for Stampin’ Up and she was fabulous!  She used to write for the magazine we all get as demonstrators – Stampin’ Success – and so if you see her on the list for a future Stampin’ Up event check her out. Smile

    During lunch, I took one last run through the Product Playground and checked out all the displays (don’t worry, I have a whole blog post coming up to the display boards!).  But here are a few of my favorites:


    IMG_7447

    IMG_7442IMG_7416

    And I got a sneak peek of the next 2 months of Paper Pumpkin kits!

    2015-01-30 11.09.34

    I won’t tell you what they are unless you email me or leave a comment asking me too… I know some of you like the surprise!  But let me say, I think February is fun and I LOVE LOVE the March Kit!  My mom had just cancelled her subscription and decided February was just her style and so she ended up signing back up – Just sayin’!

    (PS – you know you can get a 3 month pre-paid subscription on sale right now AND earn a free Sale-a-Bration item at the same time, right?  I know, right?! 

    Even current subscribers can take advantage of this and either give away the 3 month subscription as a gift or use it to cover the next 3 months of your subscription!!  Get yours here)

    And if you have been a subscriber for a while, check out some ideas using your stamps and supplies from past kits:

    IMAG7323

    IMAG7325

    Oh my this is getting long!  So hurrying up… Carrie did the final stamping presentation

    IMAG7366

    IMAG7371IMG_7468IMG_7465

    IMAG7373

    And then with a final word from Shelli… one last giveaway (free Birthday Bash designer paper)… and a cheer, the last Leadership of it’s kind came to a close.

    We had a little bit of time to kill before heading to the airport so we drove to City Walk at Universal Studios and grabbed dinner at Bubba Gump Shrimp… Don’t you agree, Karen got the coolest glass!

    Karens drink

    Though I was there for the Strawberry Shortcake!  Yummy!!

    strawberry shortcake

    Oh, and I thought this was HILARIOUS!  If you want to go to the bathroom, all you gotta do is follow the “I*GOTTA*P license plates. Smile

    IMG_7481

    Too the point, no?

    Then it was off to the airport… and a crazy stressful adventure.  One little thing after another meant that we didn’t make it to the airport until 6:12 for our 6:42pm flight (thankfully we weren’t checking bags!).  Thanks to Karen suggesting we get a wheelchair service for my mom because of how her body was responding to the stress, we were able to get through security fairly quickly… but a few mishaps later and we were standing at our gate watching while our last friend hustle to us as they closed the boarding door. Sad smile

    We got put on the next flight that was supposed to get us to Dallas at 9:40pm in terminal C when our flight departed at 9:55pm out of terminal A…. it wasn’t looking good!  But the gate agents tried to get boarding done early and the plane hustled to Dallas and we landed at 9:18!  Then, because mom was in a wheelchair, when we passed one of those driven carts they gave us a ride and we got to our gate right as they were doing the final boarding call for us!!  Smile


    What a whirlwind and amazing weekend!  I loved seeing so many friends and learning great ideas and just getting my head and heart on straight!

    Thanks so much to these Fun n’ Crafty Stampers who joined me for this!  All of us and more are already planning our trip to Convention in July!

    IMG_7457


    Won’t you join us?

    I’d love to have you come join me for the incredible experience that is a Stampin’ Up convention!  The great starter kit deal right now as part of Sale-a-bration makes it a perfect time to join our community and see what it’s all about… and then come party with us in Salt Lake City in late July!

    I’d love to chat more with you about all the fun opportunities to grow your crafting, your friends, and your life…and go on the adventure with you. Smile Email me at jennifer@nwstamper.com if you have more questions… (or just hop on over to get the starter kit and join our group now – it’s a no risk, no obligation best decision you’ll make!)

    All my inky love!

    ~Jennifer

    order online button for sig 3_thumb[4]

  • Wanna See What We are Making for Craft Night?

    If you are already subscribed to Paper Pumpkin and got July’s project kit, you’ll have seen these projects.  In July, everyone got the supplies to make 6 of each of these projects.  Totally cute, right?

    Craft Night Out
    Thursday 8/7 at 7pm (Panera in Redmond) or 2pm (my home in Bellevue)
    only $5
    Make the above projects plus a bonus project!
    RSVP here or email me at jennifer@nwstamper.com

    Well, I wanted everyone to get a chance to have an easy night out where you get to check out Paper Pumpkin and make some fun projects.  You’ll get to make the above projects – a card, a gift box, and a tag; plus if you have time,I’ll have a bonus project for you to make with your extra supplies.

    I’d love to have you join me – either in the afternoon or evening!  It’s always a great time together.

    spaced shop now sig bar

    August Online Stamp Club Hostess Code – TT2NETD4
    Use this code to get free exclusive tutorials & project kit! Learn more

  • Stampin’ Up Convention 2014–Check In Day

    Stampin’ Up Convention 2014–Check In Day

    I told my mom that I wasn’t going to stay up until 3 again… but somehow it is 2:30am and so I’m going to have to keep this quick.  But I couldn’t go to bed without sharing some of the fun that is happening here in Salt Lake City!  Oh, but first:


    NORTHWEST STAMPER CONVENTION SPECIAL

    Free Shipping on All Orders using hostess code 7RDHVEKR

    I wanted to do a little something-something while I was away playing at Convention, so I thought I would give you all free shipping this weekend!  Place an order online using the hostess code 7RDHVEKR and when I get back from my trip I will send you a handmade thank you card and a refund of your shipping!

    Good through 7/20/2014


    Ok, now on to the fun stuff, right?  Here is your 2014 Stampin’ Up Convention recap for check in day:

    karen swap creating on a plane

    We left hot and sunny Seattle early in the morning (we being my mom, Kathy, and myself) to fly to Salt Lake City for the Stampin’ Up convention.  The night before I learned that Karen (one of my downline and Fun n’ Crafty stamper) had not been able to make cards for a swap due to life circumstances.  And since I knew she would have tried if it was all possible for her to do it, I decided to surprise her by creating 25 card swaps for her while on the plane…

    ok, I didn’t finish them all on the plane, but I did get the stamping done!  the rest we finished at the hotel. Smile 

    Fun n Crafty Stampin Up convention display board setup

    Then after some lunch, myself, Kathy, and Karen headed in to the Gathering Place and the display boards to start setting up the board that my group had been asked to fill.  We have some fantastic stampers in our Fun n’ Crafty group and I was so excited to be able to share some of their creations with everyone at convention! 

    (For those of you that love display board pictures, check back tomorrow when I’m allowed to officially post pictures Winking smile)

    We went off to a group dinner and stamping with some friends and then soon it was 6pm and time for Convention bag pick up and the Paper Pumpkin Night Out party!  As you can see, a lot of people were excited to get their convention bag.

    I got in and out of line 3 times over the course of the evening but turns out the “B” line or “A/B” line (since we were picking up based on our last name) was a popular one this year. Smile

    Rich Jutkins convention bag stuffing

    Something fun to see… Rich Jutkins (the President of Stampin’ Up) and Sara Douglas and her family all were helping get bags and supplies put together for use!  It’s not everyday you see executives for a company getting down and dirty helping serve the rank & file.  And this is one of the many reasons why we love them!

    Then it was off to the party with lots of cookies and cake treats, a make & take featuring the September 2014 Paper Pumpkin kit, prizes, and a couple displays (though the lighting was terrible for photos).

    I’m so grateful to be able to attend many of the Stampin’ Up events and thought it was so cool to get a chance to hang out for a few minutes with Stampin’ Up home office staff and stamper extrordinaire – Shannon West – and the oh so sweet Andrea Withers who has been the coordinator for all my Convention Display Board activities this year!  <3 them!

    And eventually I got my bag and all the goodies it contained (stamps and supplies for this weekends crafting projects, including NEW sneak peek stuff!!)

    The Convention bag this year is actually a nice bag that is perfectly sized for tablets (or a few stamp cases as I discovered).  It isn’t huge, but that is probably a good thing for me! Have you seen how full I stuff my bags??! Smile

    These aren’t all the photos I took, these photos and more are up on my Facebook Page and I’ll be sharing more over the next few days while I’m out and about the conference and then posting many of them at night.  So, make sure you have liked my page to get all the updates!

    Ok, and now I REALLY need to get some sleep.  My alarm goes off in 3 hrs!

    spaced shop now sig bar


    FREE SHIPPING Convention Special! Get free shipping on all orders through 7/20/2014 when you use the hostess code 7RDHVEKR.  Shop online here

  • Birthday Cake decorations by Paper Pumpkin

    Birthday Cake decorations by Paper Pumpkin

    I’ve been meaning to share this photo for a while.  And really, I just want to share because I’m so happy.. (tickled pink? hee hee)  to have finally used on of my Paper Pumpkin kits that I never knew what to do with when I got it.  And it is all thanks to my mom and the fact that she had a birthday!

    So, I wasn’t able to celebrate with my mom on her actual birthday this year, so when she came to visit a few days later, I wanted to put together some kind of mini celebration.  Unfortunately, I completely spaced on that plan until the morning she was headed to visit and so I only had a couple hours to pull something together.  I have a problem with being a complete last minute nelly on everything!  Thankfully I had cake mix and pink frosting in my cupboard so that when into the oven ASAP, but I thought it was too plain when it was done – even with candles in it.

    Then suddenly I remembered last July’s Paper Pumpkin kit and I knew what to do! 

    If you didn’t get July’s paper pumpkin kit, this is what it looked like:

    Basically it made these banners on long toothpicks… and aside from a scrapbook page, I wasn’t sure what I was going to do with them.  But it was super fast to make because I just had to stamp the background patterns onto each pennant and then adhere the letters I wanted.  And, ta-da!  I was done.

    So, now I’m glad I had it in my stash for a perfect, no-thinking, last minute decoration.  And I love the patterned stamps that were in this kit.  That is what I used for some of the layers (those little pieces under the “Wahoo”) in my Craft Wars: Paper Pumpkin edition at Leadership:

    See, love versatile stamps!  If you are curious about the Craft Wars challenge at Leadership, check out the details of how it worked and what we had to play with!

    Did you know?

    Stampin’ Up has some of the past Paper Pumpkin kits available to purchase as a full kit or as refills?  See all available past kits here.

    And there are also changes coming to the Paper Pumpkin program as well!

    1. New subscribers no longer will get the “Welcome Kit” but instead will get a thin clear block and the same kit that is going out to everyone the month you sign up!  So you don’t miss a thing when you start!
    2. Now you can purchase gift subscriptions to give to family and friends for Paper Pumpkin. 
    3. Want a prepaid subscription for yourself to save some money?  Prepay for up to 12 months at a time and get a discount on your monthly rate!  PLUS, prepaid subscriptions count towards hostess benefits on personal or workshop orders!

    image

    Now to impatiently wait to see what this month’s box has in store for me. Smile  Happy Friday and have a wonderful weekend!

    spaced shop now sig bar

    May Online Stamp Club Hostess CodeZUBHUEK6