Northwest Stamper

Tag: linen thread

  • Color Blocking Card Using High Tide

    Color Blocking Card Using High Tide

    When is the last time you got a handmade card in the mail?
    Do you remember how it made you feel?  

    The other day, I went to the mailbox and was flipping through my mail when I saw a smaller envelope – a card envelope.  And handwritten on the front was my name with a return address label from my friend Julie Davison.  I literally stood there on the sidewalk thinking… why is Julie sending me a card?  I wonder what her card looks like! It wasn’t my birthday and it wasn’t for a swap.  So I eagerly opened the envelope and found this card with a sweet note from Julie along with something she had promised to send me and I had totally forgotten about.

    I absolutely adore this card and it was a good reminder why sending the cards we make is such a meaningful thing to do.  Especially when you can send a card at times of the year for no other reason than to say “Hi! I’m thinking of you!”.

    I’m getting ready to gear up a card mailing blitz for myself (and I’ll be sharing it with you here and on my Facebook page too!)  So, I invite you to remember the smile it brought to your face to get a card when you didn’t expect it and consider sending that smile to someone you know could use it!

    Tips for making this color blocked High Tide card:

    So, you heard the story behind this card, but how about we take a minute to talk about some of the cuteness of the card itself?!

    • Give this color combination a try!  I remember struggling with the (retiring) Delightful Dijon In Color when it first came out.  But it has turned out to be a great accent color – especially for fall cards and masculine cards.  In this case, it is the great combo of Sahara Sand, Early Espresso, Cherry Cobbler, and Delightful Dijon.
      Great fall or masculine color combination with Stampin' Up colors
    • Color Blocking is a great and simple way to mix colors – with color blocking, you want large, bold areas of a single color.  I love how Julie did that in this card.  The dark base allows you to really show off the other colors with wide bands that go all the way from side to side.  To make the most of this technique, you will want to stamp your main image first, and then base the sizing of your color bands based off of the sizing of your main image.  You want your color bands to be just a bit smaller than your main image (such as 1 1/2″ smaller across than your main image).  Then just layer.
    • Get matching layered colors with two-step stamping – one of the great things about this set is that it is MADE to have the colors be layered.  So you can use the same color inks as you used for the cardstock to create a great seaside scene.  The images are designed so that it is easy to layer and even if you are not a perfect stamper, they almost always look great even if you are off just a little bit!

    High Tide color blocked card nt

    Want to make this card at home? Here are the project supplies:  

    Get more project ideas and newsletter-exclusive tutorials sent directly to you email inbox!

    To help you get inspired to create cards to send to folks any time of the year, I often include free PDF tutorials for cute projects to my newsletter email list.  You can download and save the tutorials to try when you are ready, and these projects are exclusive to my newsletter subscribers!  I’m working on sending out the next one shortly, so be sure you are signed up!

    click to sign up for my mailing list
    NWstamper signature_thumb[9]

    order online button for sig 3_thumb[4]


  • Vintage Christmas Card with Clear Block Stamping

    Vintage Christmas Card with Clear Block Stamping

    lovely-as-a-tree-clear-block-stamping-christmas-card
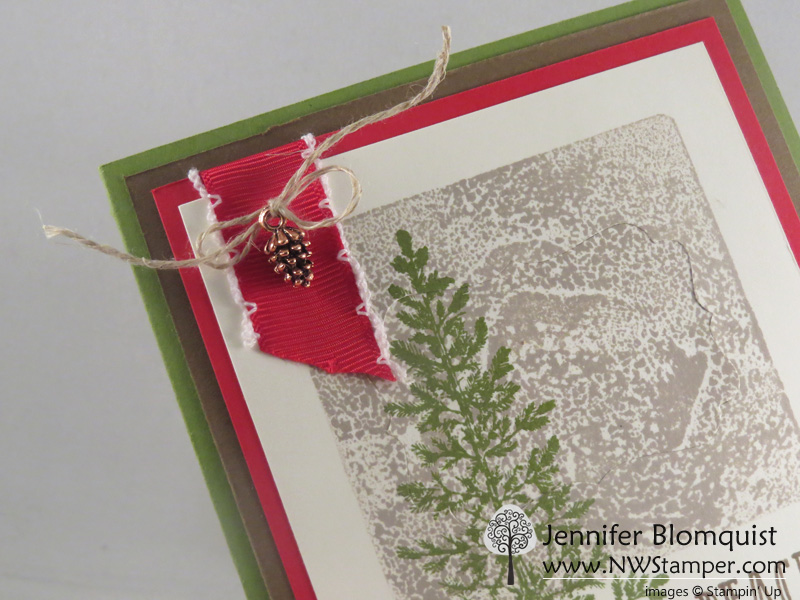
I have totally had a crafting-crush on these Mini Pinecones embellishments since I first got a chance to play with them.  They are so little, but oh so details and super cute!  My biggest challenge was actually getting them out of the container and onto my projects.

    Between the “don’t want to use them up” and trying to figure out where to put a 3D embellishment (though it is little so, it is still possible to mail), I just kept admiring them on my desk.  Come on, admit it… you have something like that in your craft goodies too. 🙂

    Well, as I was working on my Christmas card stamp-a-stack class, I found a way to break them out and I love it!
    lovely-as-a-tree-christmas-card-mini-pinecone-accent

    Thread a piece of linen thread through the top of the pinecone and tie a bow… then just attach to your project with a glue dot.  It couldn’t be cuter!

    It also pairs perfectly with my FAVORITE ribbon from the Holiday catalog – the Real Red Stitched Edge Ribbon.  I discovered a trick last night that let me see if certain items are going to be discontinued after the Holiday Catalog ends and *sniff* *sniff* both the pinecones and this ribbon are on this list.  So, I’m just going to snuggle this card, and then make a bunch more to enjoy the heck out of them. 😉

    Clear Block Stamping Backgrounds

    So, I realize I’ve been going on about the small embellishment piece in the corner of my card, but need to talk about the fun background image – that Sahara Sand square behind my tree!  It is so easy to do and adds a cool look to your cards.lovely-as-a-tree-clear-block-stamping-christmas-card-close-up

    • Pick the perfect shape for your background – its as easy as pulling out your clear blocks and setting them on your project (or over the stamps you plan to layer with) so you can decide which size is the right one for you.  Since the blocks are clear, you can easily tell which size will look the best for what you want.
    • Foam ink pads work best – now you can do this technique with the older linen ink pads, but I find that I like the look better with the foam ink pads.  (If you aren’t sure what I’m talking about, Stampin’ Up changed the actual pad that holds the ink a few years ago – the new style are a smooth-topped squishy foam pad.  The old style look more textured and aren’t shiny as they are a linen material.)
    • Gently tap the clear block onto the ink pad to pick up the color – you will find that you see a pattern in the ink on the clear block.  If an area didn’t get covered or you don’t like the pattern, just keep tapping!  Each time you tap you will get a slightly different look, so just go until you like what you see.
    • Use a foam or pierce mat under your paper – since the clear block is all acrylic, it doesn’t have any give if there is any uneveness in your table.  So, you will get a more solid image if you place a piercing mat under your cardstock so that when you stamp with the block, the foam can cushion as necessary to make sure all parts of the block make contact.

    I loved the background stamped in Sahara Sand and then layered with the tall tree from Lovely as a Tree, but I’m sure you can imagine a bunch of other combinations too!

    I’d love to hear what you think we should try next with this technique!

    And just a reminder, you have TODAY and TOMORROW to take advantage of the 25% off stamp sale.  Then December 1st the official retirement list is coming out for the Holiday catalog and the Year-End Closeout sale items will be announced.  So, lots to look forward to. 🙂 25% off Stampin' Up Stamp Sale

    UPDATED November Hostess code – FUYTBWNK

    NWstamper signature_thumb[9]

    order online button for sig 3_thumb[4]

    Project Measurements

    • Old Olive cardbase – 4 ¼” x 11”, score at 5 ½”
    • Soft Suede cardstock – 4″ x 5 1/4”
    • Real Red cardstock  – 3 3/4″ x 5
    • Very Vanilla cardstock – 3 1/2″ x 4 3/4″
    • Real Red ribbon – 3.5″
    • Linen Thread – 8″

    Product List

  • Feeling Thankful on a Friday with Acorny Thank You

    Whew!  We made it to Friday!  Some weeks blow by and others I am just grateful it is almost the weekend.  I’m not sure which it is for you, but even though I’m a mom of small children and so weekends don’t mean quite the same thing they did a few years ago…I look forward to not HAVING to be anywhere in the morning and so we have a little more flex in our day which is nice.  This week is also a time of transition for Stampin’ Up demonstrator as Stampin’ Up announced at the beginning of the year that they were making significant changes to the business structure for demonstrators (like what our titles are, criteria for how much we are paid, what incentives are offered) and that all kicked off this week as they changed to a new fiscal year starting in October.  Lots of good changes, but lots of brain power required to shift from the old system to the new system. Smile

    So, today I am thankful.

    – Thankful that I am able to stay home with my kids – even when it is stressful.

    – Thankful that I am able to create cute projects and share them with my friends and customers – even when I realize that I wasn’t paying close enough to the calendar and the class I thought was a week away was only a couple days away and I wasn’t ready!  (Thank goodness for pinterest to get the mojo going on short notice!)

    – Thankful that I have amazing men and women who share this experience with me as members of my amazing Fun n’ Crafty Stampers demonstrator group and as the sweetest customers I know!

    So, the card I have to share with you today is another of my beloved Acorny Thank You cards… all about being Thankful.

    A couple punches, some patterned paper, and a deep breath to relax and enjoy the creative process and you get this lovely card.

    Tips for making this card:

    • Create your center piece of the card using your favorite designer papers and colors.  In this case, I used the Into the Woods designer paper for both the yellow square AND that leafy acorny circle.
    • Yep, that is right, that leafy spray behind the acorn is as easy as grabbing your 2-1/2” Circle Punch and punching out one of the clusters from this great paper from the Into the Woods paper pack.into the woods dsp
    • The yellow pattern is a 3”x3” piece (makes for extra efficient use of your 12”x12” pieces of paper!) layered onto a 3-1/8” x 3-1/8” piece of Rich Razzleberry cardstock.
    • Run some linen thread around and tie a bow before layering down your 2-1/2” circle.
    • Stamp your acorn base in Early Espresso and the acorn top in Rich Razzleberry and they are super easy to punch out with the Acorn punch!  (Get the punch with the stamp set in a bundle and save 15% off both!)
    • Did you know?  You can cut out the sentiments from this stamp set using the Bitty Banners Framelits?  It’s true!  That is what I used to cut out this Thankful sentiment and it layers over the top perfectly.
    • Finally, for the last touch, I had to get into my Corrugated Cardstock!  This awesome paper is totally lost in the Stampin’ Up Annual catalog but once you start playing with it, you will love it.  It is an easy way to add texture without the need of any tools!  Plus it is bumpy on one side and flat on the other so it glues down like a dream.

    Just add a few dimensionals to pop everything up and you have a great card that looks so much cooler than those grocery store cards!

    Flurry of Wishes Card Class Instructions are going out today!

    If you purchased my Flurry of Wishes Holiday Card class by mail or just the pdf instruction sheets, I wanted to let you know that the instructions are being emailed out this afternoon!  One more round of kit supplies are being ordered this afternoon, so the kits themselves will start shipping out mid next week.

    Haven’t ordered your copy yet?  You can!  Just click here –> Flurry of Wishes Class by Mail to sign up!


    NWstamper signature_thumb[9]

    order online button for sig 3_thumb[4]

    Project Supplies Used:
    use Hostess Code FHRCKER7 to get a special thank you from me!

  • A Monochromatic Thanks with Seasonally Scattered

    I was thinking last night about blog posts and realized that I had been so good about posting my display board projects from the 2014 convention, but then got sidetracked with other projects (and to be honest, I wanted to mix up the stamp sets I was featuring here) and completely forgot to finish sharing the display board projects!  I had saved some of my favorites for last and so I want to make sure to get them posted…. like today’s card!

    This was one of the first I did with the Seasonally Scattered stamp set that I LOVED.  It’s not flashy, but I like it’s understatedness.  What do you think?

    Tips for this card:

    • Did you know, the Lovely as a Tree has a leaf stamp that goes PERFECTLY with the Seasonally Scattered thanks stamp??  Stamp your thanks image and then start stamping some falling leaves in Versamark and heat emboss with gold ink for a pretty fall touch.

    • Wrap some linen thread around a few times to add some texture and a simple rustic touch to your card.
    • In keeping with the brown monotone look for the card, I sponged the edge of my Very Vanilla cardstock with Crumb Cake to help all of the cardstock pieces transition nicely with each other.

    Its delightfully simple and yet elegant to do… and you could mix and match your colors to get exactly the look you want.  For this card, I used:  Early Espresso, Crumb Cake, and Very Vanilla; but shake it up when you try it at home!

    spaced shop now sig bar
    Hostess Code:  C2HYWWQM Use this Hostess Code and receive a free gift! (Please do not use the Hostess Code if your order is $150 or more)

    Need a Holiday Catalog?  Check it out online or email me at jennifer@nwstamper.com to get your copy!


    Card Supplies Used:

    Heat Tool


    $29.95

    Linen Thread


    $4.50

  • Watercolor Wonder Notecards Ideas–Day 2 with Wood Chips and Vellum

    Watercolor Wonder Notecards Ideas–Day 2 with Wood Chips and Vellum

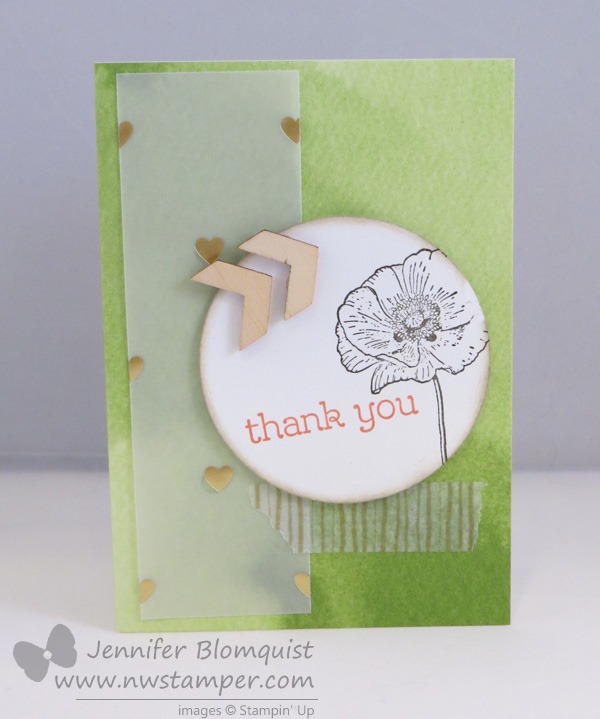
    So, I was planning on finishing posting these cards this weekend… but then the family decided to do an impromptu holiday trip to Portland, OR, so we took off and I completely forgot to schedule these before I went.  But now I’m back and have a lot to share with you in the next few couple weeks!

    Today, I was going to share with you the rest of the designs I put together for the Watercolor Wonder notecards.  With these cards, I started pulling in some different elements from around my craft room.  So, here is one of my favorites:

    I started out with the Gold foil vellum and then added the stamped circle with the poppy and sentiment from Happy Watercolor.  But it was just too plain…. so then I added some of the gold Watercolor Wonder washi tape.  And that was better, but it still needed something.

    And that is when I decided to grab my Wood Elements embellishment pack….. They were just the right addition of texture and dimension for me.  LOVE them!

    But these cards don’t have to have lots of layers to be cute.  Like I also really like this card too…. the chevrons come preprinted on the card, so all I had to do was stamp my flower and thank you.  I watercolored the flower with my aqua pen and just to add something to the card, I wrapped some linen thread around and add a subtles designer button, and DONE!

    Can you tell yet that I’m a fan of things that are cute but very quick and easy?  Smile  Seriously, with my two hyper heads running around, I have to squeeze in what crafting I can so while I love lots of layers and intricate projects, I can’t do them that often.  Thankfully I don’t think my friends and customers mind the quick and cute ideas!  (or if they do, they have a great poker face, ha ha!)

    Ok, so here are the last two cards.  They are the same card base (the polka dot background and the flowers come preprinted on the cards).  This was actually the most challenging for me to design with because the flowers are so pretty I didn’t want to completely cover them up, but I also needed to figure out how to have something balanced in the non-flower part of the card.  So, I started with just a simple thank you.

    But since just thank you isn’t enough… gotta have some pizzazz, I added some gold sequins and a daffodil bitty butterfly so I had my beloved dimension to everything.

    They are both pretty much the same except for the sequins…. So what do you think?  Random sequins or straight sequins are better?

    And just to end on a fun note, I thought I would share one of the photos from my trip to Portland.  Near downtown is a mall called Lloyd Center where there is a big ice rink enclosed in the mall.  A couple years ago we were in Portland and we took Nicholas on the rink, so this time Caitlin got her first chance to go ice skating… see, this is a novel thing in the Northwest. Smile  She did awesome and have fun on her one trip around the rink (both kids were ready to be done after one trip around).  I, of course, was the only one from our family to fall over on the ice and I did it in style! Flat on my back, landing head first.  But it was still a great trip!  I hope you had a wonderful holiday weekend as well!

    image

    Quick Dates Reminders:

    So I realized that the dates for when some of these items are no longer available are a little confusing so I wanted to give everyone a quick reminder of how it works this year:

    • The Occasions Catalog items (like the Happy Watercolor stamp and the Watercolor Wonder Notecards used above) are available until June 1st
    • The NEW Annual Catalog items are available starting June 2nd
      (need a catalog?  Fill out my request form here)
    • The Retiring items (everything on the discountinued Stamp list or discontinued Accessory list) is available WHILE SUPPLIES LAST through June 4th

    Make sense?  If you have any questions just shoot me a note to jennifer@nwstamper.comSmile 

    spaced shop now sig bar

    May Online Stamp Club Hostess CodeZUBHUEK6
    Use this code to get free exclusive tutorials & project kit!Learn more

    Stampin’ Up! Supplies Used (for all cards in this post)
    Stamps – Happy Watercolor
    Ink – Stazon, Gumball Green, Calypso Coral, Daffodil Delight, Tangerine Tango
    Paper –Watercolor Wonder Notecards, Whisper White, Gold Vellum, Daffodil Delight
    Accessories – Watercolor Wonder washi tape, 2-1/2” circle punch, Wood Elements accessories, Gold Sequins, Aqua Pen, Bitty Butterfly punch, linen thread

  • A Masculine Card with Six Sided Sampler

    A Masculine Card with Six Sided Sampler

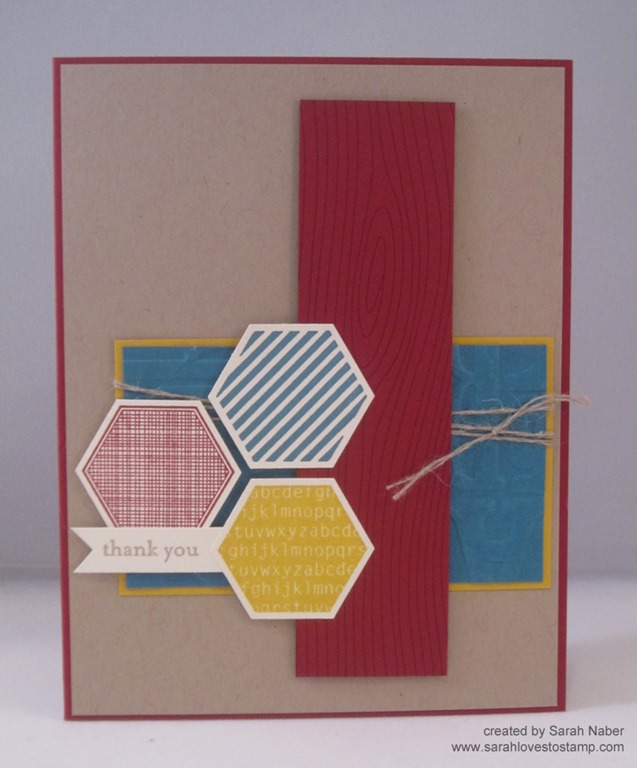
    Quick, name a stamp set that you just had to have but have since used once – or not at all!  For me, that has been the Six Sided Sampler stamp set.  I saw lots of cool things done with this set and I loved the hexagon punch that coordinated, so I picked it up last fall.  and I think I’ve used it about twice!  Thankfully, my friend Sarah Naber came to my rescue with this awesome inspiration that is great for guys or gals!

    You know me, I love clean and simple cards – especially if they have lots of great details that are subtle but really add to the card.  And boy does she deliver!

    It is a little hard to see in the first picture, but I like how she stamped the Cherry Cobbler cardstock with the Woodgrain stamp  and then she embossed the Island Indigo cardstock with the Alphabet Press embossing folder

    Add a touch of Linin Thread for one last bit of texture.  Such a great color combination (Crushed Curry, Cherry Cobbler, Island Indigo, Crumb Cake) and use of those hexagons.  I think I have some inspiration to play with again!

    spaced shop now sig bar

    April Online Stamp Club Hostess CodeG4VQJ7VB
    Use this code to get free exclusive tutorials & project kit! Learn more

    Stampin’ Up! Supplies Used
    Stamps – Six Sided Sampler, Teeny Tiny Wishes, Woodgrain
    Ink – Cherry Cobbler, Island Indigo, Crushed Curry, Crumb Cake
    Paper –Cherry Cobbler, Island Indigo, Crushed Curry, Crumb Cake, Whisper White
    Accessories – Big Shot, Alphabet Press embossing folder, Hexagon Punch, Linen Thread


    Favorite Supplies:

    132725s
    128763s
    127802s
    113439s
    130916s
    104199s
  • Make a Wish–Neutrals and Gold Birthday Card

    So, if you saw my blog post from yesterday, I shared a card that used the Oval Framelits to cut out a frame to highlight some vellum in the center of the card.  The frame effect was really cool, but I was left with two, pretty big ovals when I was done.  Wanna see what I did with them?

    Now, I am a hardcore crafter and pack rat… yes, fine – I’ll admit I’m a bit of a hoarder. Smile  So, that means any scrap that is bigger than itty bitty makes me think, “I could use that… that is big enough to use on another card, or to punch a shape out of…”etc.  And typically I stuff them in a box or bag near my craft table

    …. never to be used again!

    So, I’ve made it a new rule for me.  If I want to keep a punched/die cut/stamped scrap, I need to use it right then (or pretty soon to right then) otherwise it goes in the recycling bin. 

    (Seriously, if you were at my craft garage sale this summer, you saw the gallon ziploc bag FULL of punched and die cut pieces that I never used and decided to let go of!)

    And create I did!  I used the two ovals as backgrounds for the card and then started layering elements on top.  I grabbed the new Naturals Chevron ribbon and then to spice it up, I tied some linen thread around the top and frayed what was above the thread.

    Also, if you look close…. you can see that the party hat in the lower right hand corner is fussy cut and glued onto the card front.  Wanna know why?

    Because I was too chicken to stamp directly on the cardfront!

    Ha ha, it’s true!  I thought the card needed something and I thought the hat would look good in the corner but I didn’t trust that it would really work out.  And since everything else was already glued down, I just stamped on a piece of the same Crumb Cake paper and cut it out.  Turns out I liked it so I just glued it down as is!

    So, to make this card – here are the supplies I used:

    Stamps – Perfect Pennants, Sketched Birthday
    Ink – Chocolate Chip, Crisp Canteloupe
    Paper – Gold Foil, Crisp Canteloupe cs, Crumb Cake cs, Whisper White cs, Neutrals Core’dinations cs (Early Espresso)
    Accessories – Big Shot, Oval Framelits, Sanding Block, Neutrals Chevron Ribbon, 7/8” Cotton ribbon, Linen Thread

    I love how it turned out and I hope it gives you ideas as well!


    spaced shop now sig bar

  • Fun Friend Card with Paper Pumpkin Welcome Kit Stamps

    I’ve been subscribed to My Paper Pumpkin since it started and so each month, I tend to get excited about the newest projects and stamps that come in the mail each month, and I sometimes forget about the past stamps.  But with the August promotion where you can get your first 2 months for only $10 a month (including shipping!), I have had some new friends join Paper Pumpkin this month and get the welcome kit.  So, I wanted to send a little note saying hello and thank you and decided to pull out those stamps that come with the welcome kit.

    This is what I came up with:

    It all started with a card base that I had made a while back by embossing the entire card front with the Honeycomb embossing folder.  Then just started adding some fun elements that were lying around my craft room.  I loved how the new burlap ribbon made a fun border for my scrap of Whisper White cardstock that I stamped with the speckled splatter stamp.

    So I hope they like it!  I really had fun with it and think I may need to make a few more!

    Don’t forget – the 50% savings for the first 2 months ends August 31st!  You can cancel or skip a month anytime with no penalty, so if you’ve been thinking about trying it out, don’t miss out on this great deal!  Plus I’ll send you one of these cards as well to thank you for joining. Smile  Get your no-obligation Paper Pumpkin subscription started here and use promo code PUMPKINDEAL!

    Card Supplies Used

    Stamps- Paper Pumpkin Welcome Kit
    Ink – Crumb Cake, Island Indigo, Daffodil Delight
    Paper – Daffodil Delight, Whisper White
    Accessories – Linen Thread, Burlap Ribbon (SU Holiday catalog), Glue Dots, Big Shot, Honeycomb embossing folder, Decorative Label punch

    spaced shop now sig bar

  • Lovely As A Tree Autumn Thank You Card

    I guess fall was on my mind when I was creating recently.  Today is another share that I created for a swap but started with me looking around my craft table and figuring out what paper and scraps I had lying around.  🙂

    See, sometimes I like to challenge myself to create a card or project using just my scraps on hand and so the Crumb Cake card base, Garden Green cardstock, Lovely as a Tree stamp set, and Day of Gratitude stamp set were all staring at me – begging to be used!


    I colored the tree using markers, starting with Chocolate Chip for the trunk and More Mustard for the leaves.  Then I “thumped” Cajun Craze and Garden Green markers on top of the More Mustard leaves in a few places to add specs of color.  And to be clear, when I say “thumped”, I mean literally took my marker, laid it on its side, and smacked my stamp rubber!  🙂


    The ribbon is the new 7/8” Cotton Ribbon from the Holiday Mini.  I just folded it in half (I actually ran my snail along one edge to help stick it together when I folded it) and wrapped it around my stamped layer.  Then I used some Linen Thread to tie it together on one side.

    Simple, but oh so Autumn!


    And if you are already thinking past Fall, I invite you to join me for my Christmas Card stamp-a-stacks starting up this weekend and running each month for the next 3 months!

    We’ll create 12 cards with envelopes at each session 3 each of 4 different designs. Each month we’ll do something new so join us and get you holiday cards all done before December even starts!  Join me for one of the following sessions:

    • Sept 30th – 2pm –Panera Bread in Redmond
    • October 28th – 2pm – Panera Bread in Redmond
    • November 25th – 2pm – Panera Bread in Redmond

    I’ll have everything precut and ready for you to get creating right away!  Everything you need for 12 cards plus envelopes is only $25.  Visit my events calendar to RSVP if you can join us!


    Shop for Stamps and More Online, click here!

    Don’t Miss It! Free Stitched Satin Ribbon with every $40 purchase!

    Are you earning your Northwest Stamper Rewards? Every order gets you closer to your FREE stamp set! Click here to learn more!


    Lovely As A Tree Autumn Thank You Card Recipe
    Stamps:
    Day of Gratitude, Lovely as a Tree
    Ink: Markers – Early Espresso, Cajun Craze, Garden Green, More Mustard
    Paper: Crumb Cake, Very Vanilla, Garden Green
    Accessories: 7/8” Cotton Ribbon, Linen Thread, Snail, Stampin’ Dimensionals