When is the last time you got a handmade card in the mail?
Do you remember how it made you feel?
The other day, I went to the mailbox and was flipping through my mail when I saw a smaller envelope – a card envelope. And handwritten on the front was my name with a return address label from my friend Julie Davison. I literally stood there on the sidewalk thinking… why is Julie sending me a card? I wonder what her card looks like! It wasn’t my birthday and it wasn’t for a swap. So I eagerly opened the envelope and found this card with a sweet note from Julie along with something she had promised to send me and I had totally forgotten about.
I absolutely adore this card and it was a good reminder why sending the cards we make is such a meaningful thing to do. Especially when you can send a card at times of the year for no other reason than to say “Hi! I’m thinking of you!”.
I’m getting ready to gear up a card mailing blitz for myself (and I’ll be sharing it with you here and on my Facebook page too!) So, I invite you to remember the smile it brought to your face to get a card when you didn’t expect it and consider sending that smile to someone you know could use it!
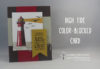
Tips for making this color blocked High Tide card:
So, you heard the story behind this card, but how about we take a minute to talk about some of the cuteness of the card itself?!
- Give this color combination a try! I remember struggling with the (retiring) Delightful Dijon In Color when it first came out. But it has turned out to be a great accent color – especially for fall cards and masculine cards. In this case, it is the great combo of Sahara Sand, Early Espresso, Cherry Cobbler, and Delightful Dijon.

- Color Blocking is a great and simple way to mix colors – with color blocking, you want large, bold areas of a single color. I love how Julie did that in this card. The dark base allows you to really show off the other colors with wide bands that go all the way from side to side. To make the most of this technique, you will want to stamp your main image first, and then base the sizing of your color bands based off of the sizing of your main image. You want your color bands to be just a bit smaller than your main image (such as 1 1/2″ smaller across than your main image). Then just layer.
- Get matching layered colors with two-step stamping – one of the great things about this set is that it is MADE to have the colors be layered. So you can use the same color inks as you used for the cardstock to create a great seaside scene. The images are designed so that it is easy to layer and even if you are not a perfect stamper, they almost always look great even if you are off just a little bit!


Want to make this card at home? Here are the project supplies:


Get more project ideas and newsletter-exclusive tutorials sent directly to you email inbox!
To help you get inspired to create cards to send to folks any time of the year, I often include free PDF tutorials for cute projects to my newsletter email list. You can download and save the tutorials to try when you are ready, and these projects are exclusive to my newsletter subscribers! I’m working on sending out the next one shortly, so be sure you are signed up!

![NWstamper signature_thumb[9]](https://i1.wp.com/www.nwstamper.com/wp-content/uploads/ad87b4046c1e_C9F6/NWstamper-signature_thumb9_thumb.png?resize=322%2C118 "NWstamper signature_thumb[9]")
![]()