Northwest Stamper

Tag: itty bitty accent punch pack

  • Black & White with Gold Daddy’s Love Scrapbook Layout & a Card using Winter Wonderland designer paper

    I know, I normally post cards here on the blog, but I also love to scrapbook as well.  Not only is it a fun way to get some of my favorite photos off the camera or computer and somewhere where I’m more likely to see them, but it is also a great way to use some of your favorite papers and elements you have lying around your craft room.  For today, I have another idea for both a card and a scrapbook using the Winter Wonderland Specialty paper for non-holiday projects.  First up, my favorite – the scrapbook layout!

    See!  This paper pack is such an awesome black & White & Gold theme, that you can use it for just about any project.  I had some black & white photos from when Caitlin was a baby that I thought would go perfectly with this paper pack – and make it easy for me to have fun with the other random stamps and elements I had around my craft room, that I could just have fun and play with pulling this all together.  The only thing was that this paper is a bit glossy, so it was hard to take a picture that wasn’t too shiny. Smile

    One of the first things I did was layer some of the Black & Gold stripe pattern over the black & white dots paper.  I let the Gold frame my photo and decided to keep the rest of the layout simple and stick to neutrals for my color palate.  Thankfully the Tip Top Taupe ribbon was just a perfect touch of neutral AND delicateness to balance all the bold feelings of the gold.

    Then I added some Metallic Sequins to the corners of my photo to pull in the metallic and shine from the paper subtly into the photo area and framing even more two of my favorite people in the picture.

    Once the photo was in, I started playing with other elements for my page.  I started with one of the Project Life Grid Cards to use as a base for my journaling area, but sponged the edges in Crumb Cake to “dirty” it up and go for more of the vintage look.  I did a similar trick for the strip of newsprint by grabbing a scrap of Typeset designer paper and crumpling it up.  Then I used my sponge dauber to add some crumb cake in to the crumpled paper so it wasn’t so stark and new either.  Then I looped some Gold Thread behind my strip of paper to fill in some of the grid card space.

    To finish up my title, I used my Alphabet Rotary Stamp to stamp the Daddy’s Love and then just cut around the words with my snips.  I just plopped them down over the thread with some dimensionals… and done!

    Then I moved on to adding some more elements, from some hearts punched using the Itty Bitty Accents Punch pack on a Circle from the retired Wooden Elements, to some layered banners with Satin Ribbon and the sentiment from the Amazing Birthday stamp set.

    It actually came together very quickly and was fun to play and mix and match all my elements from my craft table. Smile

    Now, if you aren’t so much into scrapbooking, let me just say this paper pack is great for cards as well.  Check it out:

    See, the white and gold make really pretty backgrounds for your everyday cards too!

    Fun notes for this card:

    • The corrugated cardstock makes great elements pieces.  Like in this case, I cut a 2” strip and then just used my Scalloped Tag Topper punch to make the cute end and voila!  A perfect background piece!
    • Use the precision plate when cutting out your words from the Greetings Thinlit, especially when you are using the gold foil paper… you won’t get the polka dots from the die showing through on your word!
    • Use the bird builder punch to create some easy leaves to come out from behind your flower. Easy, peasy, done!
    • When stamping the flower, get a cool mottled tie-dyed look by inking up your stamp with Daffodil Delight ink.  Get it nice and covered – but don’t stamp it yet!  Then grab your Melon Mambo ink and add some color by daubing the pink into onto the inked stamp using a sponge dauber.
    • Finish it off with a bit of baker’s twine for a cool pulled together card.

    So, I hope these gave you more ideas!  Don’t Forget!  The Holiday Catalog items retire TOMORROW (1/4)!  Some items have already sold out, so make sure to check the list for your favorites along with the Year-End Sale that ends tomorrow as well!

    Holiday Catalog Retiring List – see the list of what’s leaving

    Year-End Clearance Saleshop the sale online

    NWstamper signature_thumb[9]

    order online button for sig 3_thumb[4]

    Use Hostess Code PGHMVNJM at check out to get a special thank you from me!

    NEW ITEMS ADDED – BIG Year-End Clearance Sale!  See what is on sale here.

    See all the tutorials & classes by mail here

    Check out the Holiday Catalog Retiring List & Sold Out Updates

    Save 25% on the Latest Weekly Deals

    Price: $110.00

    Price: $4.00

    Price: $5.25

    Price: $7.00

    Supply List

    Built for Free Using: My Stampin Blog

  • Simple Spotlight Card with Sheltering Tree

    Sometimes I see a card online that I LOVE and totally inspire me.  Today was inspired by a card I saw by Michelle Long and I had to play around with the idea!  Because you know me and my deep love of clean and simple cards!

    It is a fun take on the spotlight technique with the details of the tree framed in the middle of the card.

    Tips for making this card:

    • The Sheltering Tree stamp set lets you take this one design and make it perfect for any season!  Use Blushing Bride tree leaves to make a pretty cherry blossom tree, or grab your Crushed Curry or Delightful Dijon to make it a pretty autumn image!
    • Stamp you tree leaves on the upper right corner of your card base…I found I needed to stamp it 2x to get wide enough coverage of the leaves.  You can check it is enough coverage by periodically placing your center mat cardstock down to see how many leaves are showing.Dimensions for this card:
      – Card base = 4 1/4” x 11”
      – Brown mat = 2 5/8” x 2 5/8”
      – White center cardstock = 2 1/2” x 2 1/2”
    • When you keep the rest of the card muted with light Subtles colors, give it is a POP with a bright colored flower, like the one from the Itty Bitty Accents Punch Pack.  Add a rhinestone in the center and it is just cute, cute, cute!

    What would you do with a $100 Shopping Spree? 

    The Sizzlin Summer Spectacular Promotion has kicked off and you have lots of chances throughout the summer to win great prizes!

    June Bonus Drawings & Tickets!

    As I do a final push to try to earn a Mediterranean Cruise from Stampin’ Up, I’m doing 2 bonus drawings in June!  Earn your tickets this week and you’ll not only be entered for the grand prize drawing but these bonus drawings and any others throughout the summer!

    • June 23rd – I’ll draw for one person to win 50% off any item in the catalog
    • June 30th – I’ll draw for one person to with a free stamp set!

    PLUS-

    For every $100 in Stampin’ Up product purchased June 15-June 30
    in person or online with the hostess code ZKGTCW6U) = get 5 bonus tickets

    Learn more about earning tickets here

    And if you are looking for some great deals while you are shopping, check out this weeks Weekly Deals-

    weekly deals 6-16-2015


    NWstamper signature_thumb[9]

    order online button for sig 3_thumb[4]

    Project Supplies Used:

  • Sweet Hello Baby Card

    Sweet Hello Baby Card

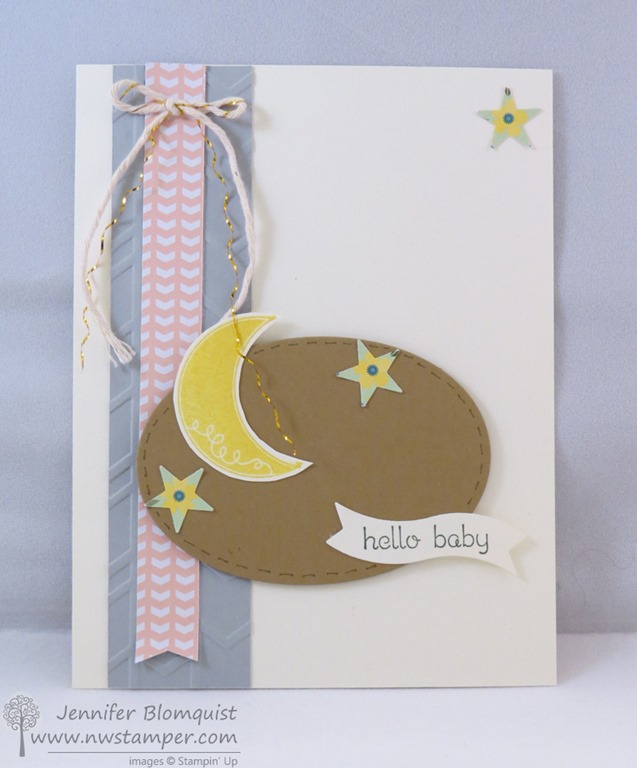
    Every now and then a card comes together that is a little bit of this and that and I just love the end result.  This is one of those cards.  I actually made it for last summer’s convention display boards and realized that I don’t think I ever posted it, so I wanted to share!

    Tips for making this card:

    • This is a perfect card for using up a bunch of your scraps because it is lots of little die cuts and scrap strips of paper.
    • Cut out an oval framlelit shape and then add a little bit of detailing by creating faux stitches using your Baked Brown Sugar marker.
    • Don’t be afraid of letting your stamped elements go off the edge of the oval.  It keeps it more interesting to look at and not too stuck together.
    • Mix and match your stamps like the moon from Pictogram Punches and then the sentiment from Teeny Tiny Wishes for just the card you want.
    • Add some flair to your bows by tieing a bow with the Gold Baker’s twine and then AFTER you tie the bow, unwrap the gold piece for a bit of tinsel.
    • Both the pink designer paper and the paper for the little stars come from the All Abloom designer paper stack.  You can give your paper new life by punching out shapes (like the flowers in the paper) with a different shape (the star from the Itty Bitty Accent Punch Pack)

    Sale-a-Bration Update!

    Did you catch the extra set of annual catalog items that are now available as Sale-a-Bration freebies?  The items in the Sale-a-bration catalog and flyers are while supplies last and with Blendabilities now being available, they wanted to make sure there were enough choices for everyone for the last week and a half of the promotion! 

    So if you want to do some embossing like how I used the Arrows embossing folder above, check out some other options you could earn for free!

    11046535_1060613977288096_7649050778645325773_n

    See the rest of the Sale-a-Bration Items here:

    Start shopping here to get your favorites before they are sold out!

    NWstamper signature_thumb[9]

    order online button for sig 3_thumb[4]

    Project Supplies Used:
    Easy shopping anytime!  Click the images below to see the item in the online store

    Price: $99.95

    Supply List

    Built for Free Using:  My Stampin Blog

  • Mix & Match those Flower Punches for this Great Dimensional Birthday Card

    Over the last couple catalogs, I’ve collected many of the flower stamp sets and matching punches from Stampin’ Up!  Because you know how much of a sucker I am for stamp sets that match punches – it makes it so easy!  So, I was playing around and started combining my different flowers and it turns out they look pretty great together.  Check it out –

    Tips for this project:

    • Stamp the flower image with the same color ink as your cardstock (in this case, Strawberry Slush) before stamping to create a custom look.
    • Mix in between your layers flower punches out of Whisper White cardstock and sponge with the same color ink you used on the other flowers to create a pop of color and make your flower layers distinct.
    • Use a Bone Folder to curl up the petals of your flower to help make it be more 3D and come to life!
    • The Window Frame framelits make the perfect opening to allow some of your patterned paper peek through behind your flower and frame your flower.
    • Cut your patterned paper to 1/4″ larger than your Whisper White cardstock to give an extra coordinating border.

    I often get asked if I recommend purchasing stamp sets in wood mount, clear mount, or photopolymer – and often I say it depends on the type of stamp set for me.  With these flowers and matching punches, I know that 90% of the time, I’m going to be stamping and punching out my flowers and so I optimized for Easy and Speed in stamping.

    –So I buy them in wood mount

    This is because I know that I won’t need precision placement most of the time and it makes it easy to grab and go when I want to stamp, and especially if I want to punch out a few different flower images from the same set.  I don’t have to clean my stamp and change the block between stamping, they are all ready to go and I can just do all my stamping at one time and then do all my cleaning.  Easy, peasy, done!

    NWstamper signature_thumb[9]

    order online button for sig 3_thumb[4]

    Project Supplies Used:
    Easy shopping anytime!  Click the images below to see the item in the online store.
    Use Hostess Code EGR29JBV to receive a free gift from me when you place your order!

    Price: $16.95

    Price: $15.95

    Price: $99.95

    Price: $6.95

    Supply List

    Built for Free Using:  My Stampin Blog

  • A Valentine’s Day Card Idea using the Label Flipcard Thinlit & All About Embossing Folders with the Weekly Deals!

    A Valentine’s Day Card Idea using the Label Flipcard Thinlit & All About Embossing Folders with the Weekly Deals!

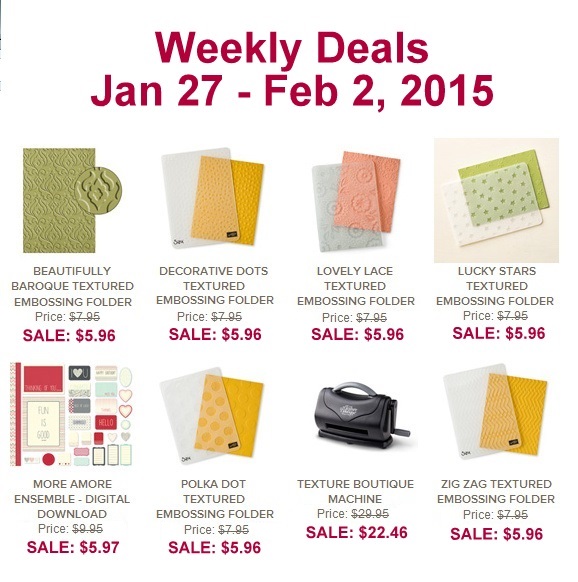
    Wow!  I checked out the Weekly Deals this morning and holy moly if you like embossing or have considered getting into Embossing folders, this is your week!

    weekly deals 1-27-15

    You can get

    • 6 Embossing Folders
    • the Texture Boutique machine to emboss your paper with them
    • a free stamp set, paper pack, or blendabilities of your choice from the Sale-a-Bration catalog

    All for only $58 this week!  Totally great deal!  Shop these deals online here.

    If you wanted an even better deal – consider getting the starter kit and you can get

    • 5 embossing folders
    • The Big Shot for embossing OR die cutting

    All for only $99 plus free shipping and then you’ll be a part of my Fun n’ Crafty demonstrator group and get a minimum of 20% off your future orders too!  Learn more here.

    Quick share today of a card I did in my Flip Card technique class where we used the different Flip Card thinlits.  For this sample, we used the Label Thinlit and the dies that came with it for this fun love card:

    Tips for making this card:

    • Start with a 5.5″x11″ piece of cardstock for your card base.
    • Place the thinlit die over the cardstock so that the left side of the die exactly matches the left side of the cardstock.  Then tuck the right edge of the cardstock OVER the right side of the die.  It will look like your paper is threaded through the die.  (under the left and the middle of the die, over the right end of the die).
    • After you run the paper through the Big Shot, you should have the flip part in the middle cut out and a score line on the right 1/3rd.  Fold in on that score line.
    • Use the Pictogram Punches stamp set to decorate the outside, and then the Perfect Pennants stamp set decorate the inside of the flip part.
    • Punch out a Crushed Curry scallop dotted ribbon and adhere along the INSIDE of the flipping edge so that half hangs over the edge (so you can see it when the card is closed).  Layer a white label die cut (that comes with the thinlit set) over the yellow ribbon cardstock to cover the middle.


    Well, tomorrow I leave for leadership… so watch for videos, pictures and more from me from the fun in Orlando!

    NWstamper signature_thumb[9]

    order online button for sig 3_thumb[4]


  • Scrapbooking Sunday: Use Up those Paper Scraps with this Layout

    I love my cards… love doing card making, but I used to scrapbook and the other day I was flipping through some of my scrapbooks (which don’t think they are complete themed affairs that complete a given year or all about a trip or what not… Smile  I’m not that good!) and realized I missed it.  So, I want to start back up my Scrapbooking Sundays here on the blog so I can have something that reminds me I need to get my photos in albums on a regular basis.  So here is my first for 2015!

    Strategy for keeping up with photos:

    So, I am guilty of having thousands of photos on my phone and on my computer and on my camera…. but not out where anyone can see them.  And where I will totally forget the context for some of the fun pictures I’ve taken.  I found a photo album from when I was in high school and while I remember many of the people and general stories of what was going on… I have no idea when the pictures took place or who everyone was.  And when I look at photos from when I was a kid or pictures from my parents or my husband’s parents, I have no idea what is going on.  *total sad face!*

    I didn’t like that and needed a strategy!  So, here is what I plan to do

    1. Once a month, send the photos from the month to Costco.  It could be 2 photos or it could be 50… whatever memories I want to keep and be able to share with my family later.
    2. Use the Project Life journaling pens (since they are archival safe) and jot a quick note on the back of the photo with the date and people in the picture (so if they ever get separated from my album, I know what the scoop is later)
    3. Drop them into the Project Life photo album page protectors and grab some of the Project Life cards to quickly write out what was happening in the pictures.
    4. DONE!

    5. Then, if there are extra special memories or photos, I’ll print extra copies and do a full 12×12 traditional scrapbook layout.  I love doing traditional layouts so I want to keep doing them, I just don’t want to hold up getting photos off my camera and into albums because it takes me a while to get a traditional layout done.

    Using Up Scraps with Scrapbooking

    I always forget that the scrapbooking is “SCRAP”booking.  Which means it is great for using up your extra paper scraps.  And that was the inspiration for today’s layout

    • Use up all those extra strips of paper that you trim off for your card and other projects as a fun accent in your layout.  I combined two photos across the page and then placed the Moonlight designer paper stack strips at different heights behind the pictures (don’t forget, this paper is 25% off through Monday!).  Sometimes cutting the strip in half so I had enough to go out the top and the bottom of the picture

    • Use extra cardstock scraps to make elements for the page like the letters for your page title!  I used the Tiny Letters thinlit dies to cut out most of the letters from my Blackberry Bliss cardstock.
    • Then to keep it interesting, I used my Metro Alphabet stamps to stamp the word “Hunt” and emphasize it.  You could get a similar effect by cutting out a different paper color or pattern to emphasize a word or words in your title.
    • Use extra elements you may have lying around to add some dimension, like these Wooden Elements from the Stampin’ Up variety pack.  I wanted to add some shine so I inked the top of the circle with my Gold Encore ink pad and then heat set it with my heat tool.

    So there you have it.  Some ideas for getting those scraps off your table and into some created project!

    Want to learn more about Project Life and photo album pocket memory keeping?

    I have a video talking about Project Life and then another where I walk through creating the layout I shared above.

    You can also email me or give me a call, I’d be glad to chat with you about it and give you some suggestions for getting started!  Plus, get free cards as part of the Sale-a-Bration promotion with any $50 purchase!  Score!

    image

    Shop and earn with Sale-a-Bration here

    I’m also happy to set up a Memory Keeping free demonstration with make & take for you and your friends… just let know!

    NWstamper signature_thumb[9]

    order online button for sig 3_thumb[4]

    Project Supplies Used:
    (if you are reading this in email, click here to see the list of supplies)

  • Framed Flowers Card for a Friend with Pictogram Punches

    When I saw that the paper stacks in the Stampin’ Up catalog were on the weekly deals this week for 25% off, I was pretty excited.  I love my paper and though I need to work on using it more (hence why I’m planning my technique class this month to be all about Using You Paper!)  I have had some fun with it already including this card:

    Tips for making this card:

    • Die cut the center of a piece of the All Abloom designer paper stack (I thought this looked like some fab wallpaper) and then layer over a piece of Whisper White cardstock to make the focal point in your card.
    • Take the same oval you used to cut the piece out of your patterned paper and the next size bigger and nest them on a piece of scrap Soft Suede cardstock.  Run them together through your big shot to get a “frame” for your cut out.

    • Use the colors from the paper you chose to decide which colors to stamp your vase and flowers from the Pictogram Punches stamp set and then punch out the flowers with the matching Itty Bitty Accent Punch Pack.
    • Make a dimensional sentiment by taking a strip white cardstock and folding in both ends to make a “Z” shape on each side.  Then glue the ends flat to your cardfront while holding up the middle with a dimensional.

    LAST CALL!  Stacked with Love Valentine’s Day Class

    Just a reminder, I’m getting ready to order all the supplies and start cutting and prepping for the Stacked with Love class next week.  If you would like a kit and/or the instructions, don’t forget to sign up ASAP.  It’s a lot of fun and everything is cut and ready for you to do all the fun part.

    Sign up here!

    NWstamper signature_thumb[9]

    order online button for sig 3_thumb[4]

    Project Supplies Used:
    (if you are reading this in email, click here to see the list of supplies)

  • A Christmas Card with a NEW Tree Punch for the NEW Holiday Catalog!

    Yay!  Today is the day!  The new Holiday Catalog is here!  Over at the Stylin’ Stampin’ Inkspiration blog, we are sharing some of our favorite new items from the Holiday Catalog.  Did I mention – Yay! It’s here!?  ha ha!

    image

    View the Holiday Catalog here

    Shop Online for all the new Goodies here
    (PS – I have some very special project kits using the Curvy Keepsake box that I’ll be sending out to anyone who orders from me using hostess code PA6NRD4S through 9/1!)

    But I don’t want to just tell you that the catalog is here… how about I share a project made from the catalog as well?

    This card uses a lot of new products from the holiday catalog and actually comes together really easily!  I was inspired by a card created by Rita Wright for this sample. 🙂

    Tips for making this card:

    • Use the new Stars mask from the Annual catalog and sponge over Smoky Slate cardstock with Whisper White craft ink.  I recommend using a Sponge Dauber because it helps your ink go on very solidly and smoothly.

    • When using a mask, make sure you “daub” – just tap down over the mask!  If you try to rub side to side, you risk bending up part of your mask and/or getting ink under the outline shape you want to be coloring.
    • Add some faux stitching with your white gel pen around the edge of the card to keep all those stars in Smile
    • Use the new stars embossing folder from the Holiday catalog to emboss some Real Red cardstock for your banner to tie into the masked stars
    • The Festival of Trees stamp set is AWESOME because (1) there is a PUNCH to match the tree!  And you know I’m a sucker for punches.  And (2) because this is a photopolymer set, you can stamp your main tree image in green & brown, and then it is super easy to stamp the red ornaments in the holes.  Seriously!!  I thought it was going to be a pain to line up but it was cake.  Ahhh, sometimes photopolymer is exactly the right way to go!

    So if you are thinking at all about holidays (halloween, fall, Hannukah, Christmas, etc) check out the Holiday Catalogand have fun!

    Shop online here & don’t forget!
    Use hostess code PA6NRD4S through Labor Day and I’ll be sending out adorable Santa and Pumpkin project kits using the new Curvy Keepsake boxes to everyone who orders.  I’ll have a peek at those tomorrow!

    LAST DAY for FREE PRODUCT too!

    Just a reminder that today is the last day for the Starter Kit special as well! I would love to have you be a member of my stamping community and join our fun swapping, sharing, chatting group as a demonstrator.  Whether you are looking to get a great deal on a chunk of your holiday catalog wishlist or want to earn extra money for holiday gift giving, now is a great time to do it!

    Photo: Just a reminder, only 2 more days of the starter kit bonus promotion!  I'd love to have you join my demonstrator family.  Have questions?  Post them here and I'll make sure to answer them all!

    Get $150 in products for only $99 and FREE shipping!  Get started picking your goodies now. Smile

    Have questions, I’m here to help!  Just email me at jennifer@nwstamper.com and I’ll get back to you asap.

    spaced shop now sig bar

    August Online Stamp Club Hostess Code – TT2NETD4
    Use this code to get free exclusive tutorials & project kit! Learn more

    Card supplies used:

  • Speedy Scrapbooking with Seasonally Scattered

    I realized this weekend that I haven’t done traditional scrapbooking in what feels like a long time.  And I really do miss it!  So, after I get all caught up with the samples for my next few events, I will be for sure doing more scrapping.  And I may just have to plan a cropping day too… anyone want to join me?

    Today’s share however is a page I created for the Stampin’ Up convention display boards using the new Seasonally Scattered stamp set from the Holiday Catalog (which I’m finishing mailing out this week, so if you need a copy, let me know!)

    Tips for this project:

    • Keep it quick by using the designer paper packs, like the Moonlight pack here, and just overlap full sheets of the paper to make your background.  No cutting means fast designs!
    • Use up your ribbon scraps by trimming the ends and then adhering them in a group behind one of your layers of paper.  I mixed 1/8” Taffeta in Melon Mambo and Satin Ribbon in Hello Honey & Blackberry Bliss.

    • After stamping your sentiment in Melon Mambo and then outline the letters of the stamped image in a contrasting marker – in this case Blackberry Bliss.
    • Use vellum for a subtle way to add journalling to your project without the journalling block dominating your scrapbook page.
    • Add a few sequins for some bits of color and shine along the top of your page.

    The fun part about scrapbooking is that you get to enjoy the memories while you are working because you are looking at your pictures… plus you get to have fun will all your tools and techniques as you build your page.  It is like a really big card to play and experiment with!

    Scrapbook even faster with Project Life!  If you have tons of pictures you want to get documented but don’t feel like you have time to scrapbook, don’t forget to check out Project Life.  All you need is a few essentials:

    image

    See all the options with Project Life here

    Drop your photos in the pocket pages – no cutting required! Add the cute cards from the card collections and just write in your notes about what was happening and you are done!  Easy Peasy!  Learn more about Project Life and see a video of how fast it is to create a set of pages in this blog post.

    spaced shop now sig bar

    August Online Stamp Club Hostess Code – TT2NETD4
    Use this code to get free exclusive tutorials & project kit! Learn more


  • Wonderful Word Bubbles for a I Love You Card

    Today I have to share a card that I created for a set of Pictogram Punches stamp set focused display board cards for our Stylin’ Stampin’ Inkspiration convention board.  I knew I had to get this set when I first saw it in the catalog, but when I had to create 4 different cards AND make sure they were cute enough to have on display next to some other very talented ladies… well, I knew I had to get creative.  And somehow this came out:

    YAY!  Isn’t it a fun card?  I often feel like I’m in a design rut when I’m staring at stamps and cardstock on my craft table and so I always get excited when I get my brain going in a totally different direction and something that isn’t a hot mess comes out! Winking smile

    Insight into the design process for this card:

    1. I started out with the idea that it would be fun to use the Word Bubble framelits (which by the way happen to be one of the dies that you can get FREE or discounted this month with the Big Shot special… just saying!)
      Anyway, I knew I wanted to use the framelits, but I had to use the Pictogram Punches stamp set, so I set out figuring out which image would work and I liked how the I {heart} U image looked and fit in the squarish word bubble.  So that settled that as my central image.
    2. Then I decided to use more word bubbles to emphasis my sentiment.
      So I pulled them all out and started experimenting with how to layer them together.  I ended up with something like this:

    3. Awesome…. now to figure out paper.
      I decided to use the Back to Black designer paper since I wouldn’t have to worry about it being too busy color-wise.  I could just focus on mixing and matching patterns.  I pulled out all the papers and picked 4 patterns that I thought would work in the small format of the die cuts and would go together ok.
    4. Somewhere in here I decided that I needed to add some texture to the card… either that or I had an extra piece of Sahara Sand that had already been embossed with the Stylish Stripes embossing folder and I decided to use that.
      I have a tendancy to do that… see something laying on my desk and jamming it into whatever project I’m working on at the moment.  You might say I’m desperate to use up scraps that I can’t bear to recycle or toss!
    5. I also thought that I needed a pop of color to break up the black and white, so here comes the Silver Baker’s Twine and then a splash of Real Red taffeta ribbon.
    6. Then I started putting down my die cut pieces.  Here is what it looks like before the sentiment got added.
      Yeah, I’m too lazy to actually trim off parts of the word bubbles so they just get flipped around so extra bits are hidden by the main sentiment. Smile

    7. Finally, I stamped the sentiment and cut it out using my Word Bubble framelits.  And for a final touch of color, I stamped again with Real Red ink and punched out the heart using the Itty Bitty Accent Punch Pack and layered that on top with yet another dimensional.


    Each card is like a puzzle, you just have to keep moving and turning the pieces until they suddenly all fit!  Eventually – and with a big enough hammer – they will fit for you. Smile

    And if you want to try this at home, don’t miss out on getting these framelits and the Somethin’ Somethin’ stamp set for FREE with the purchase of a BigShot or get the bundle for 15% off through the end of the month.


    Thanks for stopping by and congrats to everyone with Stylin’ Stampin’ Inkspiration for making to 1 year of regularly awesome projects, ideas, and inspiration!
    Now you can follow us on Pinterest or even like Stylin’ Stampin’ Inkspiration on Facebook!

    spaced shop now sig bar

    August Online Stamp Club Hostess Code – TT2NETD4
    Use this code to get free exclusive tutorials & project kit! Learn more

    Card Supplies Used:

  • Using Project Life Cards…for CARDS! Red & Gray Love Card

    Happy Monday! Today I thought I would share a super fast and simple card that I created using the Everyday Adventure Accessory pack from Project Life by Stampin’ Up!  As we were working on our projects for the convention display boards, we were sent a set of Project Life cards and accessories and invited to create some projects using the supplies in a “non-traditional” way.


    I saw the heart die-cut card from the accessory pack and thought it would be a fun core element to a card.  So I grabbed my Pictogram Punches stamp set and was excited to discover that the I <3 You stamp was an exact fit!

    Tips for making this card:

    • Cut a some glimmer paper 1/8” larger than your base paper (so in this case, the grey striped card was 3”x4”, so I cut my Real Red glimmer paper to 3-1/8” x 4-1/8”).  This gives you a very fine border around your main image and just a hit of sparkle to light it up.  It is a great way to add the sparkle without overwhelming the card with lots of bling!
    • Take a strip of scrap paper and turn it into a fun stripe for the background of your card.  In this case, I took a wide piece of Smoky Slate cardstock and glued it diagonally across the card front.  Then I flipped over my card and trimmed along the edges of the card base to cut off the extra paper that was hanging over the edge of the card.
    • Love those matching punches & stamp sets!!  The new Itty Bitty Accent Punch pack is a set of 3 punches for only $16.95 for all of them.  The heart and star are new sizes and all perfectly match with the Pictogram Punches stamp set.  The shapes are used in the sentiments for the set and so you can easily add a pop of color or glimmer to your project and no fussy cutting required!


    I have 1 spot left in my Project Life Night class tonight!
    If you’d like to come play more with Project Life with me, I’m running a class tonight and have 1 kit left so RSVP now and it is yours!  We’ll be making 2-3 cards, a 2 page scrapbook page, AND a giftable or two!  If you can’t make it in person but would like your kit to-go, I can do that too.  I’ll include a PDF of pictures of the projects and instructions along with a full set of Project Life cards for you to keep. Smile
    In person – 7/28 at Panera in Redmond from 7-9pm
    To – go – just email me at jennifer@nwstamper.com and I’ll get everything set up for you.

    Card Supplies Used:


    spaced shop now sig bar

    July Online Stamp Club Hostess Code – TT2NETD4
    Use this code to get free exclusive tutorials & project kit! Learn more

  • Friday Favorite–Amazing Birthday the Display Board Swap Card

    Friday Favorite–Amazing Birthday the Display Board Swap Card

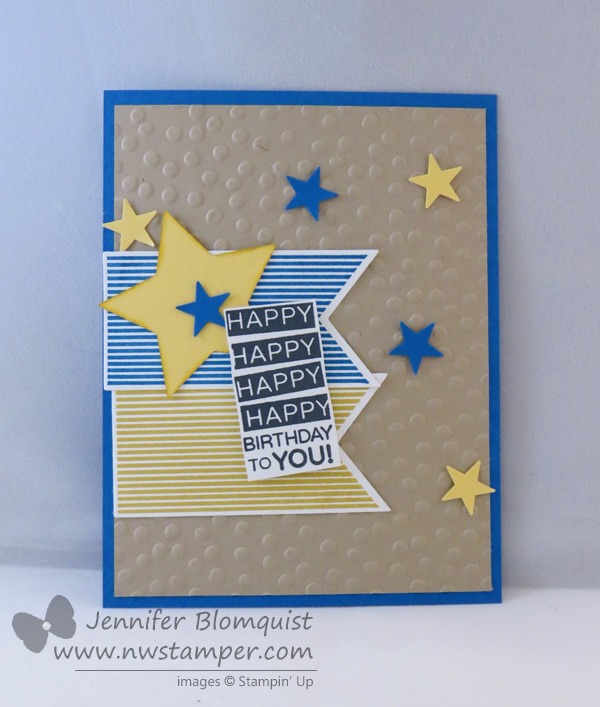
    Today over on the Stylin’ Stampin’ Inkspiration blog, the girls are sharing some of their favorites items.  I thought I would do a spin on that and share one of my favorite Convention Display Board cards and the stamp set that I loved working with – Amazing Birthday.  Like I’ve said before, I really like that this set is not just about Birthday but can be used for thanks, guys, or anything in between.  But in this case, I stuck to birthday and my favorite shape of the season – STARS!! No joke, I am so digging the stars thing right now and when I finished this card, it was the first one from the set of display board projects that I really got excited about.  So much so that I used it for our group swap where we picked on of our cards from the board to create and trade.

    (SPOILER ALERT! If you love stars, get excited because in the upcoming Holiday Catalog, there is a stars embossing folder & a stars confetti border punch!!! Um, yes please!!)

    Tips for creating this card:

    • Pick a neutral color and then two contrasting colors (I picked Crumb Cake, Pacific Point, and Hello Honey) and then repeat them all over your card.  Don’t be afraid to use a non-traditional color for your shape like blue for stars.
    • Offset your die cut images for a more interesting look.  You’ll notice that I had the Hello Honey banner aligned with the edge of the Crumb Cake whereas the Pacific Point is aligned to the edge of the card base.
    • Sponge the edge of bigger cardstock elements (like the the bigger star) to help them have more dimension even if you don’t pop them up on a dimensional.  Often just using the same color as the cardstock is enough.
    • When die cutting a shape with the matching framelit, like I did here with the banners, USE the Magnetic Platform!  Yes, you can use a post-it note… or the hope really hard methods Winking smile  but you will have a better time getting an even edge around your images when you use the magnetic platform because it is strong enough to keep the framelit where you set it!

    Card Supplies Used

    Oh, I forgot to mention, the sentiment is actually hand cut out… and yes, that Happy doesn’t have the dark line to the left of the “H”… that is intentional. Smile When I was doing this for a swap, I cut long strips for Whisper White cardstock (around 1.25” wide) and stamped my sentiment on the strip and then trimmed down with my snips to the narrower width. But this is a fun color combination, so grab some cardstock and give it a try with your projects.  I hope you enjoy it as much as I did!

    spaced shop now sig bar

    July Online Stamp Club Hostess Code – 7RDHVEKR Use this code to get free exclusive tutorials & project kit! Learn more