Northwest Stamper

Blog

  • Don’t Miss Out on the Daisy Punch!

    Don’t Miss Out on the Daisy Punch!

    Oh my goodness! I kinda dropped off the blogging planet as I was focused on family with the end of the school year, plus a massive house clean out resulting in a huge family garage sale in early June and then my big Craft Garage sale at the end of June (You can still shop my ONLINE CRAFT GARAGE SALE over on my facebook page! So many great deals, you should totally check it out!)

    The other big thing is I’ve been trying to get ready for the Stampin’ Up incentive trip to Thailand.  Eeek!  I can’t believe we fly out tomorrow to explore Phuket, relax, and even get some stamping in! 🙂 Stampin' Up Thailand Incentive Trip travel documents

    I should have internet access while I’m there, so I will try to post pictures from the trip when I can.  But for sure I’ll share all about it when I get back!

    In the meantime, there are a bunch of big promotions and announcements coming from Stampin’ Up this month and I wanted to share with you the top two you should know about.

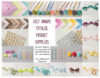
    TODAY is the LAST DAY to order the Daisy punch and bundle until August 1st!

    Stampn' Up Daisy Delight bundle with punch

    I just saw on the demonstrator website that the Daisy Punch has turned out to be the most popular punch they have come out with in the last 5 years.  So popular in fact that they are having a hard time keeping it in stock.  To avoid long backorders, Stampin’ Up will only be accepting orders for the punch and/or the Daisy Delight bundle through Friday morning at 8am MST.  At that point, they will be taking it out of the online store until their next shipment arrives (expected to be August 1st).  So, if you’ve been wanting this punch, don’t delay!!!

    Daisy Punch

    Daisy Delight Bundle

    SPECIAL BONUS!  Use hostess code RU72XXS6 when you order it today and I’ll mail you a mini card kit with the supplies to make 2 cards using this bundle when I get back from Thailand!

    Getting the Punch?  Get it as part of this amazing starter kit deal!

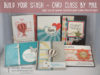
    Ok, remember how I told you there were more great deals this month, well, I HAVE to share with you what Stampin’ Up is doing with the starter kit this month!

    It’s Christmas in July!
    A FREE preview stamp set PLUS a huge stamping essentials bundle
    ON TOP of the regular starter kit!

    So, let me share how this works –

    1. You pick out $125 of your favorite items from your wishlist – you’ll get these as part of the regular starter kit.  You’ll get free shipping on your items and only pay $99+ tax!
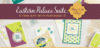
    2. Get the sneak peek stamp set from the 2017 Holiday Catalog – Carols of Christmas added to your starter kit for FREE!
      TH_Video_Carols_Xmas_ENG
    3. Get an essentials stamping pack added to your starter kit for FREE too!
      Stampin' Up! Essential Gift Pack
      PLUS 2 D Blocks! One for you and one for a friend — THAT IS A $52 Value
    4. Finish filling out your information and you are done!

    It’s a $247 value for only $99

    Get started ordering your starter kit

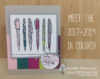
    By purchasing the starter kit, you’ll become a member of my Fun n’ Crafty Stampers group with access to our exclusive team facebook group and monthly team calls.  Plus you’ll have all the perks of being a demonstrator – a minimum of 20% off your orders, access to see the 2017 Holiday Catalog at the end of July and ORDER from it in August, join us at the big OnStage Live convention in SLC in November, connect with thousands of talented and inspiring demonstrators through a private facebook group and forums, and if you decide to share your love of stamping with others, you can earn extra cash and even trips with this!

    There is no obligation, so no risk in giving it a try and seeing what you think!

    So if you are thinking of getting the Daisy Bundle, consider getting it as part of the starter kit bundle and really stack on the savings!

    Daisy Delight suite

    ok, now I’m headed back to finish packing up and seeing how compact I can be in my suitcase. 🙂   If you have any questions, please leave a comment or shoot me an email and I’ll connect with you soon.

    NWstamper signature_thumb[9]

    order online button for sig 3_thumb[4]

  • Crafting Forever Using the New 2017-2019 In Colors!

    Crafting Forever Using the New 2017-2019 In Colors!

    Fun n Crafty Blog Hop Team BadgeIt’s time for another great Blog Hop with my Fun n’ Crafty Stampers group!  This month we are playing with the new 2017-2019 In Colors!

    I hope you take a chance to hop through our projects today because these new In Colors are ones that have some surprisingly great colors in the set!  For example, while my far and away favorite new in color is the Berry Burst… I first saw Lemon Lime Twist and thought,”Ack!  How can anyone do anything with this neon yellow/green color?”

    Oh, silly me!

    I soon saw people pairing it with black and white… seriously an amazing combination.  Along with using it in other accent color combinations and now I have to say I think it is my second favorite color in the bunch!  So, lets check out these colors:

    2017-2019 Stampin Up In Colors

    I was inspired by a card by Jenn Tinline and wanted to show off all the new In Colors in one go… and they were a perfect compliment to the pens stamp in the Crafting Forever stamp set!  I used my In Color Markers to color in the pens (you just have to stamp it twice, but I tried stamping it using no special tools and it lined up really easily!)  Then I used the pens again to color directly on the rubber for the sentiment.  A little Berry Burst for the “creative” and Fresh Fig for everything else.
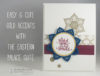
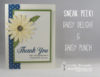
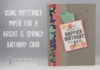
Fun tip for this card front.  I wanted my sentiment to look like a tag, but didn’t want to have to do a lot of work to get that look.  So I did it the cheater way!

    1. Stamp your sentiment onto scrap paper and then punch out with a circle punch.
    2. Run a piece of baker’s twine around your cardstock that you want the tag to “hang” from.  Make sure to only tape down the ENDS of the baker’s twine behind the cardstock.
    3. Adhere your circle to the card so that the top of the circle is just underneath your baker’s twine.
    4. Take a second piece of baker’s twine and tie a bow onto the first piece of baker’s twine.  Then position the bow so it looks like it is in the top of the “tag”
    5. Easy peasy done!

    Make this project at home! Here is what you’ll need:

    Check out more great ideas on the Fun n’ Crafty Blog Hop!

    So this was my idea using the New In Colors!  I showed you how fun they can be all together in one project, but keep checking out the projects on the hop and you’ll see more color combinations and fun ideas using different colors. 🙂 So, keep the inspiration going by checking out Christine’s projects next!

    Fun N Crafty Blog Hop - Visit Previous Blog
    Fun N Crafty Blog Hop - Visit Next Blog

    1. Christine Szekeres–Artful Musings
    2. Pamela Wu –Stinky Tofu
    3. Kathy Thisted–Stampablog
    4. Merit Brown–MB Squared Designs
    5. Susan Schultz –Stampin’ by the SF Bay
    6. Jennifer Blomquist –Northwest Stamper <– YOU ARE HERE

    In the Bellevue area?  Join me for my Annual Craft Garage Sale!

    I’ve been doing some deep purging of both my house in general and my crafting space.   And just in time for this weekend’s Annual Craft Garage Sale!  This is my big sale where I bring together multiple sellers and many of my retired Stampin’ Up stamps/paper/tools out at a discount for you.  This year we have about a dozen people putting their crafting goodies in the sale so it should be a great sale!

    Friday June 23rd & Saturday June 24th from 9am-3pm at my house in Bellevue, WA.  Get all the details HERE
    bellevue seattle craft garage sale

    NWstamper signature_thumb[9]

    order online button for sig 3_thumb[4]


  • Top 10 Favorites from the Stampin’ Up Annual Catalog – Released Today!

    Top 10 Favorites from the Stampin’ Up Annual Catalog – Released Today!

    Yay!  It is the 2017-2018 Annual Catalog Release day!  The new catalog is now live over in my Online Store and I hope you get a chance to go check it out. To help you wade through all the cute stuff in this new catalog:

    2017-2018 Stampin' Up Annual Catalog Cover

    Click HERE to view the 2017-2018 Stampin’ Up Annual Catalog PDF

    Get started shopping from your wish list today so you can be playing in no time!
    Click
    HERE to get started

    Top 10 NEW Items in the 2017-2018 Stampin’ Up Catalog

     Mini Stampin' Dimensionals#1 – Mini Stampin’ Dimensionals 

    I was so excited to see this hidden gem in the Stampin’ Up catalog!  I always am cutting my dimensionals in half to have them fit on the little shapes and letters.  Well, after one month recently where Paper Pumpkin had a kit that included mini Stampin’ Dimensionals, I thought, “Man, these would be great to have on hand all the time!”

    Stampin’ Up heard us and now you can get your own pack with 720 of them for only $4!

    See them in the online store

    Soft Sayings Card Kit #2 – Soft Sayings Card Kit
    I love, love, love card kits.  Especially when they make really cute cards, and this new card kit fits the bill perfectly!  The printed card bases give you a great foundation to stamp and embellish with all the great die cuts, stamps, and accessorites that come in a convenient little box.  This is great for traveling or for giving as a gift.  All you need is a SNAIL tape runner and you are set!See it in the online storePS – if you end up loving the kit, you can now get REFILLS for the kit at a discounted rate!
     #3 – Love Today Planner Kit

    If you love planners, or have been curious about planners, this is going to be a super fun kit for you!  I love how it takes the idea of a planner and steps it up!  Your planner kit includes a binder that is sized to perfectly fit any of the Memories & More (or previous Project Life) page protectors, so you can mix and match as necessary.  And you get pocket pages, undated calendar pages (so you can start anytime), stickers, and accessories.

    And even better?  The accessory sheets are hole punched so they store right in the back of your planner!

    See the planner in the online store

    Pick a Pattern Suite by Stampin' Up #4 – Pick a Pattern Suite

    I couldn’t pick just one favorite from this suite to share here in my list.  I love the stamp set and the patterned paper… and the colors are just so fun for anytime of year!  It is a good mix of cute images and cool backgrounds for your projects.

    See what I mean on the Pick a Pattern suite page

     #5 – Ombre Ribbon

    If you heard a scream a few weeks back, that was me… jumping up and down and squeeling like a little girl because that A-MA-ZING Ombre ribbon that was in the Cupcakes & Carousels Accessory Pack in the Occasions Catalog, was now available by itself in 3 cute colors!  You can get it in Calypso Coral, Island Indigo, and Lemon Lime Twist.  So soft and so pretty in person, whether you try them all in my Product Samplers or get a whole spool… you won’t be sad you did!

    See this ribbon in the online store

     #6 – Happy Birthday Gorgeous Bundle

    Really, I could love just the die alone… it is so fun.  But I love how it pairs with the Happy Birthday Gorgeous stamp set.  And when you can get them both and save money, well… sign me up!  Plus the stamp set coordinates with the Balloon Bouquet punch and the Classic Label Punch, so you can expand it even more!

    See the bundle in the online store with more ideas

    Glitter Enamel Dots #7 – Glitter Enamel Dots

    Everyone is going bananas over these, and myself included!  I was silly and didn’t order them on my very first pre-preorder after On Stage because I thought I was going to be good and wait until my regular preorder.

    Well… turns out they were so popular they quickly sold out and went on backorder!  I’ve ordered more, so they will be on their way to me soon.  But I know these are going to go like hot cakes!  You can order some today, but if you see a message about them being on back order, don’t worry!  They are getting their shipment in on June 5th, so they will be out the door to you and only behind the rest of your items by a couple days. 🙂

    See them in the online store here

    Floral Statements Stamp Set #8 – Floral Statements Stamp Set

    I had to put this stamp set on my list because I think it is going to be easily missed!  It is so gorgeous and looks really complicated to color… but it can be as simple or as detailed as you want! It is perfect for simple watercoloring with an Aqua Painter or get details with the Watercolor Pencils.  Either way, it is on my very first order and I can’t wait to play!

    See the stamp set in the online store

     #9 – Embossing Paste

    This is one thing I don’t have any experience with… and when I saw it in the catalog I pretty much just passed it over.  But then I saw it demo’d at OnStage and I was totally sold!  It is a really cool way to add some texture and dimension to your cards in actually a pretty simply way to do it.  Just lay down a mask and then paint on some of the Embossing Paste.  You can add color to the paste, color it later, use it as a background, lots of fun options!

    Check out the embossing paste and a few more samples in the online store

    Also, here are the masks and the tools that go with it to make your experience much easier and more successful!

     #10 – Birthday Memories Designer Paper

    Ok, one more favorite to make it a nice and even Top 10!  I thought I would share the Birthday Memories designer paper.  It looks like your favorite classic childrens book, but also has die cuts that perfectly cut out the shapes in the patterned paper, and so much more to go with it.  I saw a great idea for a fun class that I hope to have shared with you all soon!  But in the meantime, you have to check them out!

    See the Birthday Memories paper in the online store

    Don’t forget, you can try a number of these items in my PRODUCT SAMPLERS and I’ll be keeping sign ups open for just a short time more for these samplers, so get your selection in ASAP!

    Also, there is a great promotion going this month as well!

    June 2017 Hostess or large order rewards promotion

    If you have questions about the promotion or are interested in hosting, please let me know at jennifer@nwstamper.com.

    I’ll leave you to browse and enjoy!  Time for me to go finish up my order and get it in so I can start playing with more goodies soon! 🙂

    NWstamper signature_thumb[9]

    order online button for sig 3_thumb[4]

  • Clean and Simple Elegance Eastern Palace Card

    Clean and Simple Elegance Eastern Palace Card

    Fun n Crafty Blog Hop Team BadgeWoo hoo!  This week is hopping – blog hopping that is!  This time, its my Fun n’ Crafty Stampers team who are here to share with you some fresh ideas using the newest products – our preorder goodies!

    Now, I’ll admit, technically, I might be bending the rules a bit because the goodies I have to show you – you yourself can actually order them TODAY!  Say, what?!  I’m featuring the Eastern Palace suite that is new in the upcoming 2017-2018 Stampin’ Up Annual Catalog.  I’m not going to lie, this was a suite I wouldn’t have really thought twice about if I was just flipping through the catalog.  But Stampin’ Up was smart and they decided to offer it early as part of two Sneak Peek bundles (the starter bundle & the premier bundle).  So, of course, I ordered it. 🙂  And turns out, I love it!

    Eastern Palace Suite Premier Bundle

    My favorite piece in the suite is the Eastern Gold Vinyl Stickers.  That is what makes the shiny gold flower and little circles in the background of my card.  They are so EASY to do and because the stickers are clear and fairly close cut to the images, they blend in and look great!

    Easy Gold Accents with Eastern Gold Vinyl Stickers

    Tips for making this Eastern Palace Clean & Simple card:

    • Sometimes the perfect Gold ink is Yellow! As I was creating this card, I wanted to have the stamped ring around my sentiment fit with the gold accents of the card since I didn’t really want to introduce another color to the mix.  And right as I was lamenting the retirement of gold ink, I looked at my Color Caddy ink spinner and saw the Delightful Dijon ink pad!  I realized that the dark yellow was a great hue to compliment gold.  Too bad it is retiring on May 31st, or I’d be using it with this suite all year!
      Eastern Palace Color Palette with Delightful Dijon
    • Scissors is all you need to pop-out this diecut flower – I saw this flower on a card by Louise Sharp and it in fact inspired this card – but when I went to use my die to cut it out, I realized that the die actually just die cuts the petals so they curl up from the cardstock… it doesn’t cut the whole thing out of the paper!  However, it is an easy 30 second fix to just grab your snips and snip the one spot in between each petal that keeps it connected to the cardstock.  A few quick snips and you have a fun new die shape!
      Easy Gold Accents on Cards with Eastern Palace Suite side view
    • Think outside the suite for coordinating accents – I had the card coming together using the cardstock, stamps, stickers, and even designer paper from the Eastern Palace suite.  But it still needed that elusive something.  Thankfully I remembered the Fabulous Foil Acetate from the current Annual Catalog.  It is super easy to miss and in fact, I often forgot I even had some from my part of last year’s product sampler I ran.  But if you look at that mosaic gold piece above the purple paper, it is a printed window sheet that coordinates PERFECTLY with this suite!  I’m so glad it is carrying over, because now that I realized how fab it actually is; I plan to use the heck out of it. 🙂

    Easy Gold Accents on Cards with Eastern Palace Suite nt

    (thank goodness for samplers saving the day with this card! and yes, I have just released new product samplers for the upcoming catalog for when a year from now we discover that item that we never thought twice about, but now 11 months later is exactly perfect for a project!)

    So, what do you think of this card and this suite?

    I’d love to hear your thoughts… please leave me a comment below and let me know what YOU think of the Eastern Palace Suite!

    Make this project at home! Here is what you’ll need:

    Check out more great ideas on the Fun n’ Crafty Blog Hop!

    So, that was my idea using something new from the upcoming catalog.  While you can order the discounted bundle this month, you will be able to order individual pieces from this Eastern Palace suite starting June 1st!  And if you just can’t wait, we’d love to have you join our Fun n’ Crafty team!  Order your starter kit and you can get this bundle, plus $21.50 in product more for less than the price of the bundle alone!  You’ll be able to order it today and then consider joining us on our blog hop next month. 🙂

    In the meantime, keep the inspiration going by checking out Christine’s projects next!

    Fun N Crafty Blog Hop - Visit Previous Blog
    Fun N Crafty Blog Hop - Visit Next Blog

    1. Christine Szekeres – Artful Musings
    2. Merit Brown – MB Squared Designs
    3. Pamela Wu – Stinky Tofu
    4. Susan Schultz – Stampin’ by the SF Bay
    5. Stacey Lane – A Work of Carte
    6. Jennifer Blomquist – Northwest Stamper <– YOU ARE HERE

    NWstamper signature_thumb[9]

    order online button for sig 3_thumb[4]


  • The 2017 Stampin’ Up Annual Catalog Product Samplers are Here!

    The 2017 Stampin’ Up Annual Catalog Product Samplers are Here!

    I have had folks asking me about if they could sign up for my Product Samplers again for this new catalog – and I’m happy to announce that you can do that!  There are a TON of new ribbons, embellishments, and papers in the 2017 Stampin’ Up Annual Catalog and it would cost you over $750 to get them all if you bought them all separately.  Eek!  But instead of having to make the decision which ribbons and papers are your favorite based on snippits in the catalog, I offer the Product Samplers to give you a chance to try a little bit of them all.at a fraction of the price.

    >>> Click Here to Reserve Your Sampler! <<<

    Because of how many new items there are, I’ve broken it up into a few options for you, so you can select from the following:

    • Paper Sampler – a 6×6 piece of all the new designer papers, plus try out the new Glossy White cardstock and some of the large Adhesive sheets (great for those intricate die cuts or thin pieces)!
    • Ribbon Sampler (mini or regular) – try out some of all of the 56 new ribbons in the catalog!  Because there are so many, I’m offering this time a mini sampler (with 18″ of each ribbon) or my regular sampler (a full yard of each ribbon, so you can easily have enough of any ribbon for at least a couple cards or projects.)
    • Embellishment Sampler – at least one of each new embellishment by color and design.  So, you will be able to recreate that card you loved from Pinterest!
    • I WANT IT ALL! Sampler w/ FREE BONUS! – as always, I offer the option to get it all plus I add in a few extra goodies free for those of you who want to try it all!  This time I’ll be giving you a half pack of the Eastern Palace Vinyl stickers and the new Gold Striped treat bags.

    Stampin' Up 2017 Annual Catalog Product Samplers Promotional Image

    I only offer these for a limited time and plan to order the supplies for the first round of samplers on June 2nd.  I will be mailing out those first round of samplers by the end of the following week.  They are all so cute, even I guess wrong which were going to be my favorite until I saw them in person at the demonstrator OnStage Event!  So, order some fun and get happy mailed right to your door!

    >>> Go Here to Reserve Your Sampler! <<<

    NWstamper signature_thumb[9]

    order online button for sig 3_thumb[4]

  • Daisy Delight Sneak Peek Thank You Card

    Daisy Delight Sneak Peek Thank You Card

    I’m excited to finally be getting off my duff and participating in this fun Thailand Incentive Trip Achievers Blog Hop. Each month, a collection of the folks who have earned the trip and will be joining me in Thailand this July, choose a theme and share some amazing projects!  This month our theme is the “2017/2018 Annual Catalog Sneak Peek”. We want to show you some of the AMAZING products that are available for demonstrators to order right now! So check out all the cute projects and amazing inspiration!

    I have been having a blast using the new Daisy Delight Bundle.  It includes the new Daisy Delight stamp set and the Daisy punch.  And while I love my dies, I’m always a sucker for great punches.  They make projects quick and easy, and you don’t need a lot of space to get your work done.
    Layered Daisy Punch makes an easy card embellishment

    Tips for making this Daisy Delight Thank You card:

    • Double Up! I kept it sweet and simple.  I stamped my daisy in Crushed Curry twice and punched both flowers out.  The punch creates a sparse daisy, but once you start layering the punches, they really build up into beautiful flowers!
    • Perfect Complementary Punch! You can stamp the center of the flower and it punches out perfectly with the 1/2″ circle punch!
    • Add some shimmer! I’m hoping you can tell in the picture above, the middle of my flower was stamped in Early Espresso, but to get that coordinating golden glow and shimmer, I used my retiring Gold Wink of Stella brush.  It adds just the right hint of yellow to match the flower and adds lots of gold shimmer!

    Great thank you sentiment from the Daisy Delight stamp setI love the fonts and sentiments that go with this stamp set as well.  You can mix and match to fit exactly what you need your card to say.  And when I get the chance to mix and match my sentiment stamps, especially when there are different fonts, I love to mix and match my colors too!  I just picked two colors I used elsewhere in the card (Dapper Denim and Early Espresso) to tie everything together.

    Daisy Delight swap card by Jennifer Blomquist
    Such a fun stamp set and punch, to help make such pretty spring and summery cards!  And YES!  It will be released as a discounted bundle, so you can get them both and save too!

    Check out more great ideas on the Thailand Achievers Blog Hop

    Thanks for checking out my project and taking part in our blog hop! There are so many amazing ideas and inspiration you don’t want to miss. Remember that currently you are at my blog – Jennifer Blomquist – Northwest Stamper, so check the blog hop line up list to see who is next in the list.

    Make this project at home! Here is what you’ll need:

    NWstamper signature_thumb[9]

    order online button for sig 3_thumb[4]


  • Color Blocking Card Using High Tide

    Color Blocking Card Using High Tide

    When is the last time you got a handmade card in the mail?
    Do you remember how it made you feel?  

    The other day, I went to the mailbox and was flipping through my mail when I saw a smaller envelope – a card envelope.  And handwritten on the front was my name with a return address label from my friend Julie Davison.  I literally stood there on the sidewalk thinking… why is Julie sending me a card?  I wonder what her card looks like! It wasn’t my birthday and it wasn’t for a swap.  So I eagerly opened the envelope and found this card with a sweet note from Julie along with something she had promised to send me and I had totally forgotten about.

    I absolutely adore this card and it was a good reminder why sending the cards we make is such a meaningful thing to do.  Especially when you can send a card at times of the year for no other reason than to say “Hi! I’m thinking of you!”.

    I’m getting ready to gear up a card mailing blitz for myself (and I’ll be sharing it with you here and on my Facebook page too!)  So, I invite you to remember the smile it brought to your face to get a card when you didn’t expect it and consider sending that smile to someone you know could use it!

    Tips for making this color blocked High Tide card:

    So, you heard the story behind this card, but how about we take a minute to talk about some of the cuteness of the card itself?!

    • Give this color combination a try!  I remember struggling with the (retiring) Delightful Dijon In Color when it first came out.  But it has turned out to be a great accent color – especially for fall cards and masculine cards.  In this case, it is the great combo of Sahara Sand, Early Espresso, Cherry Cobbler, and Delightful Dijon.
      Great fall or masculine color combination with Stampin' Up colors
    • Color Blocking is a great and simple way to mix colors – with color blocking, you want large, bold areas of a single color.  I love how Julie did that in this card.  The dark base allows you to really show off the other colors with wide bands that go all the way from side to side.  To make the most of this technique, you will want to stamp your main image first, and then base the sizing of your color bands based off of the sizing of your main image.  You want your color bands to be just a bit smaller than your main image (such as 1 1/2″ smaller across than your main image).  Then just layer.
    • Get matching layered colors with two-step stamping – one of the great things about this set is that it is MADE to have the colors be layered.  So you can use the same color inks as you used for the cardstock to create a great seaside scene.  The images are designed so that it is easy to layer and even if you are not a perfect stamper, they almost always look great even if you are off just a little bit!

    High Tide color blocked card nt

    Want to make this card at home? Here are the project supplies:  

    Get more project ideas and newsletter-exclusive tutorials sent directly to you email inbox!

    To help you get inspired to create cards to send to folks any time of the year, I often include free PDF tutorials for cute projects to my newsletter email list.  You can download and save the tutorials to try when you are ready, and these projects are exclusive to my newsletter subscribers!  I’m working on sending out the next one shortly, so be sure you are signed up!

    click to sign up for my mailing list
    NWstamper signature_thumb[9]

    order online button for sig 3_thumb[4]


  • Cute Collage Stamping using Kinda Eclectic

    Cute Collage Stamping using Kinda Eclectic

    Today I wanted to share a card I created to send out as part of my customer thank yous.  I had gotten embarrassingly far behind on sending out thank you cards for orders over the last few months and so I wanted to make up some cards and make sure everyone knew how much I appreciated them and their support.  It took a while but it was great to sit and write a little note to each person.  Plus it was fun to take a big stack to the post office… say HAPPY MAIL!  🙂

    Happy mail - customer thank you cards in the mail

    So what is inside many of those cards?  This fun Kinda Eclectic collaged thank you card!  I have always loved the Kinda Eclectic stamp set because it is one of those sets that you can just randomly stamp a bunch of the images onto a piece of cardstock and it almost always looks great.  Gotta love stamp sets that make it hard for you to mess things up!

    Kinda Eclectic Collaged Thank You Card side view

    Now this card was also a last hurrah for me for many of the retiring items from the Stampin’ Up 2016-2017 retirement list (You can see everything that is still available and being discontinued here).  Including:

    • the Kinda Eclectic stamp set
    • Cucumber Crush Thick Baker’s Twine
    • Cucumber Crush cardstock
    • Cucumber Crush ink
    • Tip Top Taupe ink
    • Bitty Butterfly punch
    • Elegant Butterfly punch
      Kinda Eclectic Collaged Thank You Card with butterfly punches

    Yes… I’m still in a bit of shock that Stampin’ Up is retiring the butterfly punches!  They are so cute and look so great layered together!

    Tips for making this Kinda Eclectic collage card:

    This card is a lot easier to make than it may seem, so here are a few quick tips for making it.

    • Have fun with the leaves to fill in the corners!  I stamped the leaves in Cucumber Crush ink on the corners of the card base.  Then I used Memento Black to stamp ONCE full strength in the corner of the white cardstock and then I stamped AGAIN without REINKING just offset from the first black image so you get the faded layered look.
    • The two butterfly images come from the Kinda Eclectic stamp set.  Stamp the large butterfly full strength and punch out.  Stamp the smaller butterfly once on scrap paper and then again without reinking the stamp onto your cardstock scrap and punch it out with the Bitty Butterfly stamp.  Both of the butterfly images below were stamped using Tip Top Taupe ink.
    • Use glue dots to hold your butterflies together – I love using glue dots to adhere my butterflies.  I use one dot in the center of each butterfly.  This holds my punch out down firmly, but still lets me fold up the wings so it looks like it is trying to fly away.
    • Make a tiny matting border for a crisp way to break up your layers – I love using this type of small mat.  It is 1/8″ larger in each direction than the Whisper White cardstock.  Now, I mailed off all my copies of this card without measuring, but I think it is approximately 3 3/4″ x 5″ for the Whisper White cardstock and then 3 7/8″ x 5 1/8″ for the Basic Black cardstock.
      Kinda Eclectic Collaged Thank You Card nt

    Want to make this card at home? Here are the project supplies:  

    NWstamper signature_thumb[9]

    order online button for sig 3_thumb[4]


  • Spring Birthday Card Idea with Affectionately Yours Designer Paper

    Spring Birthday Card Idea with Affectionately Yours Designer Paper

    It’s May and I am back hopping with the Inspire, Create, & Share gals to bring you some inspiration for the girls this month!  The theme is “It’s A Girl Thing!” and so we are each sharing a project that we think is perfect for the girls in our lives.  The card I have for you is a fun Spring Birthday Card that with all the flowers and Flirty Flamingo ink and paper colors, makes me think of some of my good gal friends.

    Mix & Match Your Craft Supplies to Bring the Spring!

    I’m so grateful that Stampin’ Up makes such a big deal about color coordination and exact color matching in their products.  It means that going outside the box and mixing & matching supplies from your craft room is WAAAAY easier!  I’ll admit, I am a kit girl.  I love to stick to coordinated suites and project kits because it means I don’t have to think.  I can just dump everything out on my table and know that whatever I grab will work together.  But, today’s card goes a bit off the rails in that department!

    What did I use and how do they match?

    • I wanted to get some more crafting time in with my Affectionately Yours designer paper now that is retiring and coming to the end of it’s availability.  I love, love, love the copper foil accents in two of the patterned sheets (including the Night of Navy piece in this card).  So, I coordinated the Cucumber Crush striped ribbon with the Cucumber Crush leaves in that pattern.
    • And while the official color in the Affectionately Yours paper is Watermelon Wonder, the lighter pink sides are a perfect complement to the Flirty Flamingo cardstock I used to mat the sentiment.
    • Speaking of Flirty Flamingo, I coordinated the cardstock mat with the ink colors when I stamped some of the flowers from the Swirly Bird stamp set.  And since I knew that Peekaboo Peach was an In Color in the same family at the Flirty Flamingo, I knew I could use it for a contrasting flower color and the tones would go together.
      TIP – when in doubt, stick to colors in the same color family!

    Spring Birthday card with retiring Affectionately Yours paper - NWstamper.com

    I also finished it off with the super fun birthday sentiment from the retiring Balloon Adventures stamp set.  I am crushed this set is retiring… but I think it is going to just work it’s way over to my permanent personal stash.  It coordinates with the Balloon Bouquet punch and has such great birthday sentiments!

    Want to make this card at home? Here are the project supplies: 

    Product List

    Get more great ideas for the girls in your life!

    So, please keep on hopping and check out what other great ideas the Inspire, Create, & Share gals have for you on this “It’s A Girl Thing” blog hop!  Next up is Audra on our hoppy tour.

    Next blog on the Inspire, Create, Share blog hop
    So enjoy and please take a minute and leave a comment to let me know what you think! 🙂

    NWstamper signature_thumb[9]

    order online button for sig 3_thumb[4]

  • Sending Love Card with Jars of Love

    Sending Love Card with Jars of Love

    Ok, I just had to share one of my favorite cards from the Build Your Stash card class by mail!  Check out this fun Sending Love card featuring the Jars of Love stamp set!

    When I originally started designing the class, I had been planning on focusing on the Better Together stamp set – because it is a great sentiment set – as well as the Cupcakes & Carousels designer paper stack.  But when I pulled out this sunburst patterned paper from the pack, things just started going in a totally different direction.  And in the end, I felt the card had a bit of a vintage feel and somehow the sentiments from the Jars of Love set were exactly the right fit.

    Tips for making this card:
    • Layer your Punches – Two of my favorite punches are retiring this month – the Decorative Label punch and the Sweetheart punch.  Now, I knew layering a large oval (either from the retired wide oval punch, or the current Layering Ovals framelits) over the Decorative Label punch always looks classic; but I don’t always think about layering other shapes.  But matching up a punched shape (a heart, a flower, etc) with your sentiment or the overall feel of your card can end up making it be the perfect accent to your other layered pieces.
    • Everything doesn’t always have to be centered!  Now I’ll admit this took me a long time to become ok with. 🙂  I love my even borders and like everything to be balanced.  But sometimes, pushing everything to the side ends up emphasizing it more.  In this case, I had the sunburst piece and it was cut so that the center of the sun ray was off to the right.  So, when that happens, run with it!  I placed the doily mostly over the center of the sun ray and then centered the punched pieces on that.
    • Mix your textures for a more interesting card – popping up your shapes on dimensionals help, having patterned paper and cardstock helps, but it really steps up your card when you start mixing different textures as well.  In this case, I added the soft 1/4″ Very Vanilla satin ribbon across the top of the designer paper (it’s subtle, but really helps soften everything).  Then I added the three pearls in the upper right corner of the oval.  They helped tie together the punched pieces and add some extra softness in an area where you can’t see the ribbon.

    So, what do you think?  Its a fun card that is easy to make but is a WOW for the person you love that you are giving it to!  Want to make a couple of them along with the rest of the set?

    You have until May 15th to sign up for this limited time class or while my supplies last. So don’t delay!

    Build your stash -card class by mail to make at home

    >>>  Click HERE to sign up  <<<

    Want to make this card at home? Here are the project supplies:

    NWstamper signature_thumb[9]

    order online button for sig 3_thumb[4]

  • Sneak Peek!  The Eastern Palace Suite is Available Early!

    Sneak Peek! The Eastern Palace Suite is Available Early!

    How fun is this?  Normally, the new Stampin’ Up annual catalog comes out on June 1st and so you would have to wait for the new catalog to go live to order any of the new goodies (well, unless you purchased the demonstrator starter kit, but that is a whole other fun thing!).  But this year, Stampin’ Up decided to get the party started early by releasing one of the suites early!

    Introducing the Eastern Palace Suite!

    Stampin' Up Eastern Palace Suite Preorder Samples

    This is a new suite that is coming out with the Annual Catalog but you can get your hands on it via one of two bundles.  Plus, you’ll get one or more free items with your bundle as well!

    2017 Eastern Palace Bundles details

    Let me tell you, I know those pictures are hard to see, but the pieces in the bundles are SOOOO Pretty!

    I especially love the Eastern Gold Vinyl Stickers and you will be seeing me use them a LOT I expect. 🙂

    Free Card Tutorial to Get you Started when you Buy a Bundle!

    Now, if you think they look cute but you are worried about getting started with the bundle – don’t worry!  I have you covered!  Order one of the bundles and I’ll send you the instructions for making all three of these cards with your new goodies.

    And those are just the tip of the iceberg.  The one thing I’m learning with this framelit and stamp set, its that the possibilities truly are endless.

    See the items in the Eastern Palace Suite online HERE

    Get even more free with the BEST bundle option!

    I just thought I’d also share the best bundle option if you want to really take it up a notch and get more free goodies and have the opportunity to get even more.  Consider the Ultimate Bundle – the demonstrator starter kit!  You’ll only pay $99 plus tax – the shipping is always free – and you’ll be able to not only get the Premier Eastern Palace Suite, but you’ll also have $21.50 more in product you can select to be added to your kit.  That includes picking up Annual Catalog preorder items! See…

    Get 2017 Stampin' Up annual catalog preorder items in a starter kit

    We have an awesome Fun n’ Crafty Stampers group who would love to welcome you, and we are working right now to start inspiring each other with this bundle and I’d love to have you join us.

    NWstamper signature_thumb[9]

    order online button for sig 3_thumb[4]

  • Limited Time – Build Your Stash Card Class By Mail

    Limited Time – Build Your Stash Card Class By Mail

    I’ve been promising this class by mail for a while and I finally have everything up and ready so you can make these cards at home!  So I’m offering this as a class by mail for a LIMITED TIME only as many of the supplies are retiring and are while supplies last.

    ***Class kit registration is available through May 19th***

    I ran this as a class at my recent Northwest Crafty Retreat Weekend and everyone loved the cards.  So I knew I had to make it available to my crafty friends who couldn’t make it to the retreat!  Its centered around the Cupcakes & Carousels designer paper stack.  A great paper pack that is so much more versatile than it seems at first glance.

    Check out what you get in this great card class by mail

    You’ll get supplies to make 12 cards!  2 each of the 6 designs including:

    • Precut cardstock to make the 12 cards
    • A FULL PACK of the Cupcakes & Carousels designer series paper, with the needed piece precut for you for these cards.  You’ll have the remaining pieces from the 48 sheet 6×6 pack included in your kit so you can make more cards and projects beyond these 12 cards.
    • A FULL SPOOL of the Very Vanilla 1/4″ Satin ribbon, with the pieces you need for the cards precut.  The rest of the 10 yd spool will be in your kit to use on future projects.
    • Punched and die cut pieces for the cards
    • Necessary accessories and embellishments
    • Step-by-Step color PDF tutorials for each of the cards emailed to you
      (PDF tutorial only option is also available)

    Build your stash -card class by mail to make at home

    You just need to supply your own stamps, ink, and adhesive and you’ll be ready to have your stash ready for anything.

    All this is only $34 plus shipping to you!


    Class kit options


    Class kit registration is available through May 19th
    Kits will ship the following times: 
    Early Bird orders placed by May 3rd will ship the week of May 8th
    orders placed May 4th-May 19th will ship the week of May 22nd

    If you have any questions or need extra supplies, email me at Jennifer@nwstamper.com

    NWstamper signature_thumb[9]

    order online button for sig 3_thumb[4]