Northwest Stamper

Category: Holiday Projects

  • Wonderful Word Bubbles for a I Love You Card

    Today I have to share a card that I created for a set of Pictogram Punches stamp set focused display board cards for our Stylin’ Stampin’ Inkspiration convention board.  I knew I had to get this set when I first saw it in the catalog, but when I had to create 4 different cards AND make sure they were cute enough to have on display next to some other very talented ladies… well, I knew I had to get creative.  And somehow this came out:

    YAY!  Isn’t it a fun card?  I often feel like I’m in a design rut when I’m staring at stamps and cardstock on my craft table and so I always get excited when I get my brain going in a totally different direction and something that isn’t a hot mess comes out! Winking smile

    Insight into the design process for this card:

    1. I started out with the idea that it would be fun to use the Word Bubble framelits (which by the way happen to be one of the dies that you can get FREE or discounted this month with the Big Shot special… just saying!)
      Anyway, I knew I wanted to use the framelits, but I had to use the Pictogram Punches stamp set, so I set out figuring out which image would work and I liked how the I {heart} U image looked and fit in the squarish word bubble.  So that settled that as my central image.
    2. Then I decided to use more word bubbles to emphasis my sentiment.
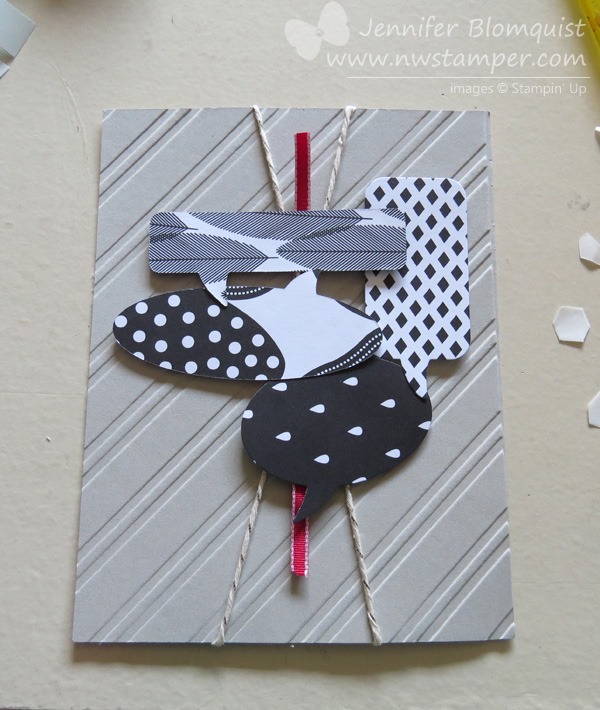
      So I pulled them all out and started experimenting with how to layer them together.  I ended up with something like this:

    3. Awesome…. now to figure out paper.
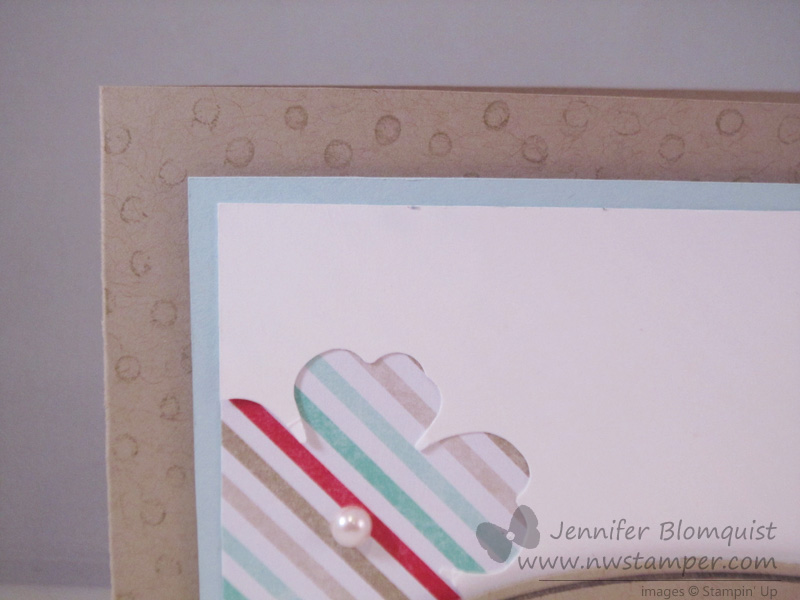
      I decided to use the Back to Black designer paper since I wouldn’t have to worry about it being too busy color-wise.  I could just focus on mixing and matching patterns.  I pulled out all the papers and picked 4 patterns that I thought would work in the small format of the die cuts and would go together ok.
    4. Somewhere in here I decided that I needed to add some texture to the card… either that or I had an extra piece of Sahara Sand that had already been embossed with the Stylish Stripes embossing folder and I decided to use that.
      I have a tendancy to do that… see something laying on my desk and jamming it into whatever project I’m working on at the moment.  You might say I’m desperate to use up scraps that I can’t bear to recycle or toss!
    5. I also thought that I needed a pop of color to break up the black and white, so here comes the Silver Baker’s Twine and then a splash of Real Red taffeta ribbon.
    6. Then I started putting down my die cut pieces.  Here is what it looks like before the sentiment got added.
      Yeah, I’m too lazy to actually trim off parts of the word bubbles so they just get flipped around so extra bits are hidden by the main sentiment. Smile

    7. Finally, I stamped the sentiment and cut it out using my Word Bubble framelits.  And for a final touch of color, I stamped again with Real Red ink and punched out the heart using the Itty Bitty Accent Punch Pack and layered that on top with yet another dimensional.


    Each card is like a puzzle, you just have to keep moving and turning the pieces until they suddenly all fit!  Eventually – and with a big enough hammer – they will fit for you. Smile

    And if you want to try this at home, don’t miss out on getting these framelits and the Somethin’ Somethin’ stamp set for FREE with the purchase of a BigShot or get the bundle for 15% off through the end of the month.


    Thanks for stopping by and congrats to everyone with Stylin’ Stampin’ Inkspiration for making to 1 year of regularly awesome projects, ideas, and inspiration!
    Now you can follow us on Pinterest or even like Stylin’ Stampin’ Inkspiration on Facebook!

    spaced shop now sig bar

    August Online Stamp Club Hostess Code – TT2NETD4
    Use this code to get free exclusive tutorials & project kit! Learn more

    Card Supplies Used:

  • Last Chance for Free Shipping & a Few More Stampin’ Up Convention 2014 Highlights

    Last Chance for Free Shipping & a Few More Stampin’ Up Convention 2014 Highlights

    Hey everyone!  I actually got a chance to sleep in after traveling late last night home from the Stampin’ Up! convention.  It was an awesome trip and fun weekend away with family and friends.  And when you add in stamping…. all the better!

    While I’m finishing uploading pictures from the last day (many are up on my Facebook page already), I wanted to remind everyone that TODAY is the LAST DAY for my Free Shipping special.


    NORTHWEST STAMPER CONVENTION SPECIAL

    Free Shipping on All Orders using hostess code 7RDHVEKR

    I wanted to do a little something-something while I was away playing at Convention, so I thought I would give you all free shipping this weekend! Place an order online using the hostess code 7RDHVEKR and when I get back from my trip I will send you a handmade thank you card and a refund of your shipping!

    Good through 7/20/2014


    Also, anyone who is ordering with me this month, will also be on my customer list for mailings of the new Holiday Catalog that come out at the end of August!  And believe me, you are going to LOVE it!

    Ok, I’m off to go out for a yummy breakfast with the family, so here are a few more highlight pictures from the last day – with more to come over the next week. Smile 

    Why I love convention:

    1.  Awesome Swaps

    2014-07-19 08.57.09

    2.  Awesome Announcements and Sneak Peeks

    2014-07-19 13.54.56

    2014-07-19 13.55.06

    3.  Awesome Class Ideas (I’m running this one soon – who wants to do it with me?!)

    2014-07-19 14.36.49-1

    2014-07-19 14.37.07

    2014-07-19 14.37.23

    4.  Awesome Prizes

    2014-07-19 16.08.54

    5.  Most of all – Awesome Friends!

    2014-07-18 07.33.59-1

    2014-07-18 07.35.14

    2014-07-18 12.51.32

    2014-07-18 13.45.08

    2014-07-19 08.52.25

    Up next is Leadership 2015, which anyone who is interested in learning about how you can grow your ability as a crafter and share it with others is invited to attend. If you would like to learn more about attending with me as part of my Fun n’ Crafty group, I would OVE to talk to you more about that.  Just email me at jennifer@nwstamper.com and I’ll give you all the scoop!  It is another awesome experience complete with stamping presentations, displays, prizes, laughter, and lots and lots of learning and fun!

    2014-07-19 16.11.51

    Then, we can grow together and hopefully by the end of June 2015 have earned the Grand Vacation – a Mediterranean Cruise! 

    Have a wonderful day and don’t forget to check out my Facebook page and Instagram for lots more photos from Convention weekend and more.

    spaced shop now sig bar

  • Christmas In July with a 2014 Holiday Catalog Sneak Peek!

    Christmas In July with a 2014 Holiday Catalog Sneak Peek!

    Now, I’ll admit, I’m one of those people that think I’m going to get my Christmas cards done early but then I keep putting it off until suddenly it is December 5th and I haven’t done a single one!  However, I know a lot of folks are really good about starting their Christmas cards in July – so that you’ll have plenty of time to actually get them done without madly crunching at the last minute.  So, if you are looking for some new inspiration, check out these brand new stamps that were just released to help get you started!

    beauty of the season

    Beauty of the Season – 2014 Holiday Catalog Sneak Peek set!

    We love our cardinals don’t we?  And this just looks so pretty watercolored!  I forget how a simple card base in watercolor paper lets you give the focus to your main element and then you don’t need lots of layers to have a beautiful card.  Add a sentiment and you are good to go!

    This will be coming out in the new Holiday Catalog at the end of August but you can actually get it right now if you love it and want to get going on your holiday cards.  Smile  

    Card Supplies Needed

    beauty of the season

    If birds aren’t your thing, then you can check out this more funky and modern stamp set that just came out in Photopolymer called Christmas Bliss!

    christmas bliss

    Christmas Bliss photopolymer stamp set

    This is one of those while supplies last stamps but I love how fun it is, especially with your non-traditional colors.  In this case, Pistachio Pudding, Baked Brown Sugar, and Calypso Coral!

    And isn’t that polka dot bag cute??  Gotta love things that make gift giving easy. Smile

    Supplies Needed

    christmas bliss stamp set_thumb

    So, pick your style and enjoy a little holiday cheer while you can still also enjoy the warm and sunny weather!

    oh.. and psst – make sure you are keeping your eye out on the Clearance Rack…. there may just be some new and fun stuff popping starting around Midnight MST tonight!!

    spaced shop now sig bar

    July Online Stamp Club Hostess Code7RDHVEKR
    Use this code to get free exclusive tutorials & project kit!  Learn more

  • Easter Punch Art & Why You Should Buy the Clearance Easter Egg Dye Kits

    Easter Punch Art & Why You Should Buy the Clearance Easter Egg Dye Kits

    Happy Easter!  I hope you have a wonderfully bright and peaceful day!  Today we’ll be hoping for sunny skies, family easter egg hunts, and spending time with our extended family in the area.

    But while we are doing that, I wanted to share an idea with you to consider as you see the Easter supplies go on sale in the stores starting tomorrow (or maybe even today).  Consider grabbing those Easter Egg dying kits while they are on clearance, and here is why…

    So, last night we pulled out our eggs and coloring kit to start dying some eggs.  I needed something to cover our counter…. turns out my used Stampin’ Up grid paper made a nice lining. Smile  (See there is a reason I don’t throw them away after classes!)

    2014-04-19 20.01.03

    We made our eggs like normal… add 3 Tablespoons of Vinegar to a cup and drop the dye tablets in.  After they are done fizzing, add your 1/2 cup water to each cup.  Then dunk your eggs and let them soak and dye the shells.  I also couldn’t find the box the dye tablets came in, so I had to create my own egg holder!  I took a cereal box and kitchen scissors and cut 12 holes in the top of the box.  Then I could set each egg on top of a (poorly) cut hole to dry!

    2014-04-19 20.17.32

    Now, this is the fun part!  Once you are done with your eggs, you still have lots of dye left over.  So I grabbed some of my ribbon from my craft room and started throwing them in the cups and letting them soak up the color!

    2014-04-19 20.25.26

    In these cups, I have 4 pieces of the 7/8” Cotton Ribbon and 2 pieces of the White Organza Ribbon.

    And this is how they turned out:

    2014-04-20 10.46.35

    Pretty huh?  Now to create some fun projects with my custom colored ribbons! Smile

    I hope you have a wonderful rest of your weekend.  And a few quick reminders:

    Last Call for the Retirement List Prediction Contest!

    Don’t forget to get your guesses in by tonight for what 10 stamp sets you think will be retiring!  You have a chance to win your favorites from the retiring list for free.  Email me your guesses to jennifer@nwstamper.com and find out tomorrow who the winner is!

    FREE SHIPPING starts tomorrow!

    If you didn’t see on my Facebook page, Stampin’ Up will be offering Free Shipping tomorrow through Friday for all orders – which is perfect timing as the retirement list comes out on Monday!  So, get your orders ready and don’t forget to use hostess code G4VQJ7VB to received this month’s free online stamp club tutorials and if your order is over $40, you will receive the make & take project in the mail too!
    (note – if your order is going to be over $150, don’t use the hostess code so you can receive the hostess benefits!)

    spaced shop now sig bar

    April Online Stamp Club Hostess CodeG4VQJ7VB
    Use this code to get free exclusive tutorials & project kit!Learn more

  • Word Bubbles Valentine or Spring Card–you choose!

    Word Bubbles Valentine or Spring Card–you choose!

    I was working on finishing out the last card for Stamp Club tonight and I wanted to do something Valentines-y.  So I was looking at my new stamps and just HAD to pull out my Just Sayin’ word bubbles stamp set and put something together.  This is what I came up with for the first sample:

    Just Saying Word Bubble Valentines

    Now, I know not everyone needs a Valentine’s Day card at this point, so I wanted to give them some options for what they made (plus I didn’t have enough of the patterned paper for everyone to make this exact card) so I created a second variation of the card that could be used any time:

    Just Sayin Word bubble flower card

    So, basically the exact same idea from the first card only with a few minor changes:

    But did you notice the coolest part?

    Check out the background for the card base!  NO it isn’t a rubber stamp!  Can you guess how I made it? 🙂

    stamping with embossing folders

    Yup!  An embossing folder!!

    I took my Decorative Dots embossing folder (free with a $50 order) and inked it up with my crumb cake ink and then “stamped” it onto my card base.  Burnish with your bone folder and you have a fun new background stamp!

    Makes you look at your embossing folders a little differently, huh?

    Join me in my Virtual Stamp Club!

    As i mentioned earlier, I created these cards for my stamp club gals.  I love my local stamp club, but know I have some friends and customers who aren’t able to join me in person each month because of distance or time. So, I wanted come up with a way to share the fun with them as well.

    And so… I am starting a Virtual Stamp Club!  Its easy to join and you can do it from anywhere in the US!

    How does it work?

    1. Place an order in my Online Store that is at least $25 by the 25th of the month.
    2. Make sure you use the Virtual Club hostess code when you check out (I’ll post the code each month at the bottom of my blog posts)
    3. Within 48hrs, I will send you the password for an exclusive club page with links for PDF tutorials for the 2-3 projects we are making in Stamp club that month with full supply lists for all of the projects.
    4. If your order is $40 or more, then I will mail you a free class kit packet for the club projects so you can make them at home!  Class kits will start going out by the 2nd Thursday of the month.
    5. PLUS – every time you spend $40 you also are getting a punch towards a free stamp set with my Northwest Stamper Rewards program!

    There is no commitment and you can participate one month and skip the next!

    And if you’ve been in the club at any time in the prior 4 months when a new catalog comes out, you will be sure to get one in the mail from me for free!

    If you have questions, shoot me an email at jennifer@nwstamper.com.

    Ready to go?  Shop online and use the hostess code BNDDMDVU

    spaced shop now sig bar


  • Little Bit of Love

    Little Bit of Love

    I have a few more cards to share that have a love theme and so as we work our way to Valentine’s Day in a few days I thought I would post them here for last minute ideas.  Today’s card uses the stamp set that I was so excited to get at leadership and have been woefully slow at using – Love You to the Moon!  I mean, look at these cute images:

    image

    Love You to the Moon – #133143 (clear)/ #133140 (wood)

    I origionally started this card for a Stylin’ Stampin’ Inkspiration design team project themed on using your markers – but I had a little love/hate relationship with the card and ended up doing something completely different.  But, I still like some of the details of this card so I thought I would share it anyway. Smile

    The very first thing that started this whole card off was the diagonal rows of “Love you” on the bottom half of the card.  I stamped most of them in Midnight Muse and YES, I used the stamp-a-ma-jig!  I am an imperfect stamper and am ok with things not being totally straight, but in this case I don’t think even I could have handled the randomness if I didn’t use the stamp-a-ma-jig!  The lone red Love you was colored with markers.  I used Raspberry Ripple for the “Love”, Midnight Muse for the “you” and even Chocolate Chip for the head and tail of the arrow.  Then, to help pull it together, I used my Summer Starfruit maker to create little dots between each of the sentiments.

    After I had the stamping done, I looked at the card and it wasn’t quite sitting right with me.  I loved the look, but I didn’t have a plan for layering anything else on.  So, I started by creating a border using the Watercolor Wonder gold washi tape (both the solid and the stripe patterns).

    Great, that looked good, but now what?

    Well, this is where things started getting haphazard!  I started grabbing scraps of paper and ribbon and stamps and started playing around.  In the end, I liked the pennant idea coming down from the corner so I put those one.

    But they looked too plain, so I tried some faux stitching with my markers.  That was ok, but it still needed something, so I added an additional sentiment to the Raspberry Ripple pennant for a final touch.


    I won’t go so far as to say this is a favorite card of mine, but like I said, I think there are some fun elements to it.  If you have any suggestions for tweaks or improvements, I’d love to hear!  Leave me a comment and when I redo this card, maybe that will help make it look better. Smile

    On a side note –

    If you don’t already get copies of my blog posts each day in email, you may consider Following my blog with Bloglovin.  I currently help people get subscribed using Feedburner but Google has stopped supporting it and so it may stop working when I don’t expect it.  So in the meantime, I’m checking out other options and one option I know a lot of people are liking is Bloglovin.  I’m going to try as well and hopefully love it!

    spaced shop now sig bar

    Stampin’ Up! Supplies Used
    Stamps – Love you to the Moon
    Ink – Midnight Muse, Raspberry Ripple, Markers (Midnight Muse, Summer Starfruit, Raspberry Ripple, Chocolate Chip)
    Paper – Whisper White, Summer Starfruit, Raspberry Ripple
    Accessories – Watercolor Wonder washi tape, Stitched Satin Ribbon (Midnight Muse)

  • Last Minute Valentine Card Ideas from Leadership

    Last Minute Valentine Card Ideas from Leadership

    I have had a TON of cards sitting on my camera begging to get edited and shared with the world, and finally I had time yesterday to spend most of the day editing them.  So, with Valentine’s day just around the corner, I thought I would share some of the great card swaps I received at Leadership that are perfect for giving to a loved one on Friday.

    created by Robbie Chandler

    Isn’t Red, Gold, and Black such an awesome color scheme?!  I love how she did a bunch of gold embossing over the red base and the black cardstock (that she then punched out with the Petite Petals punch).  Then add some gold washi tape and the gold baker’s twine and just a touch of red glimmer paper.  Very elegant!

    created by Kim Allen

    A less traditional card but really fun and whimsical.  I love the sentiment from the Love You to the Moon set and I think the punched out moon for the rocket to fly around is so cute (yes the moon is part of the stamp image but I like the layering with a different color of cardstock.  And the Razzleberry button with white bakers twine is a nice touch at the top of the banner.

    created by Dawn Walker-Randall

    And finally a more traditional Valentine’s Day card with the red and white, and hearts!  This uses the heart framelits and see that cool flower background on the bigger heart?  That is the Petals-a-Plenty embossing folder that embossed the Pool Party paper and then they inked it!

    Check out my video tutorial for coloring the embossed flowers with this folder here

    So some totally fun ideas to give you a few more ideas while you still have time to create!  I’ll have at least one or two more ideas for you this week, but hopefully this gets you started!

    spaced shop now sig bar

  • Some Valentine Treat Fun for a Blog Hop

    Thank you so much for joining us for our January Stylin’ Stampin’ Squad Blog Hop!  Love is in the air and our talented group of design team members have a Whole Lotta Love Goin’ On as we are excited to be sharing some NEW Occasions Catalog goodies and some Valentine’s Day projects with you this month!

    As you hop along, please be sure to comment and show some love on every blog!  We are always excited to hear from our followers!

    You should have just left stop number 15 on the Stylin’ Stampin’ Squad blog hop – the fabulous Annie Lee. If so, you are in the right spot. If a link doesn’t work or you get off track, you will find  the full blog hop lineup below.

    —————————————————————————-

    So, for the blog hop today, I started and stopped on at least 2 different projects and designs.  Normally that wouldn’t be a bad thing, but with all the crunching to get ready for Leadership, it meant a little last minute creating.

    Thankfully the first project I have to share I was able to get done early!

    A “Wheely” Cool Valentine Card

    I recently got this Love You More Valentine’s Day stamp set and just love this globe image.  But the part that I really thought was fun with this card was the red flowers on the right side of the card front.

    Know what it is?

    Yup, a WHEEL STAMP!  Betsy’s Bloom is the name.  It’s been ages since I pulled them out, but they sure do make a striking background for your card sometime using exactly the color you want.

    Add a bit of ribbon for a finishing touch (and to cover up if you rolled your wheel a little less than exactly straight, ha ha! Winking smile )

    Send a Valentine Treat this Year

    I had one more idea that I wanted to create to share today.  It was an idea in my head that I didn’t have time to complete it before heading to the airport so I punched out a few shapes, grabbed some paper, ink, and stamps… and headed to Houston.

    Turns out, I got to my hotel and set out to create the idea in my head and I discovered that I left my paper trimmer at home.  Oops!  So, check out the ideas and don’t mind the not quite perfect cuts since I had to make due with my little paper snips for all the paper in the project other than the red Chevrons (Chevron punch) and the Heart (lg Full Heart Punch)!

    The idea for this project is a little treat you can send or give to a special someone.  It’s another stamp set from the Love You More set again… I was inspired by the arrow images and thought I would turn a small Hershey bar into it’s own love arrow!

    If you want to make your own, all you need to do is:

    • Wrap a chocolate bar with a patterned paper from the Fresh Prints designer paper stack in the new Occasions catalog and adhered the arrow images from the stamp set for my central point.
    • Stamp the same arrow w/ sentiment (“straight to my heart”) on a strip of Whisper White cardstock. 
    • Adhere a thin strip of Soft Suede cardstock (approx 3/8” strip) across the middle of your stamped image.
    • Punch out a set of chevron pieces from Real Red using the Chevron punch and a heart from Real Red using the Heart punch.
    • Adhere the Whisper White strip to a piece of Soft Suede cardstock for matting.
    • Adhere the wrapped chocolate over the center of the arrow so that it covers all but the “Straight to the Heart” sentiment.
    • Done!

    So I hope you enjoyed my projects today and check out more great projects on the hop using the links below.

    Blog Hop Participants:
    SSS blog hop next arrow

    1. Anastasia R. of Stampin’ Blondie
    2. Cynthia R. of Ink-a-Doodle Creations
    3. Dawn S. of Dawn’s Creative Chalet
    4. Kathy P of Katrina P’s Creative Corner 
    5. Pamela W. of Stinky Tofu
    6. Diana E. of Stampin’ Fun with Diana
    7. Darla R. & Nancy K. of Stampin With Darla and Sisters
    8. Jamie H. of Unique Ink
    9. Rose C. of Stamp with Rose
    10. Kim R. of Stamping with Kim
    11. Darcy J. of DJ’s Stampin’ Place
    12. Bree R. of Craft-Somnia
    13. Kristina M. of Mama’s Sanity
    14. Annie L. of Love Me Cards
    15. Jennifer B. of NW Stamper  <— YOU ARE HERE
    16. Tonya B. of Stampin’ with Tonya
    17. Heidi B. of Stuck on Stampin
    Interested in updates from Leadership 2014?
    I’ll be spending the next few days in Houston, TX getting filled with new project ideas and updates from Stampin’ Up!  I’ll be trying to share what I can
    via my Facebook page and then coming back in the evening and sharing a summary of what I saw. 

    So enjoy all the inspiration today and stop back by tomorrow to see what’s happening in good ol’ Texas!

    spaced shop now sig bar

  • Pretty Snowflake Fun with Vellum

    I recently held my Vellum technique class and one of the favorites from the class was this holiday card:

    One of my favorite things that I love to do with vellum is run it through the BigShot because it makes the coolest bright white image over the frosted white of the vellum cardstock.  Then I love sponging on the back side of my embossed image to add a pop of color.

    Turns out it is perfect for using with the Northern Flurries embossing folder for snowy snowflakes.  Though next time I think I would add a bit of glitter and sparkle to the front of the card for an extra magical touch!

    In this example, I attached a piece of embossed vellum to the top of a Whisper White cardbase with it only being adhered to the left edge of the card front.  By only adhering it to one side, the vellum pops up just a little and gives you a softer look.

    Project Supplies Used

    So give it a try and let me know what you think!

    spaced shop now sig bar

  • Thanksgiving Album from the Tablescape Setting Kit

    I was given one of the Tablescape Setting kits this fall and while I thought it was cute for it’s intended purpose – making neat table settings and food labels – I knew I wasn’t going to be hosting Thanksgiving this year and realistically, wouldn’t be needing table decorations. 

    This is how the kit is designed to be used

    IMG_2608

    But, I decided to create a mini-scrapbook album instead!  I used all of the pocket cards to become pocket pages in my album and turned the black squares into photo frames (I just need to print the photos from yesterday to add them to the pages).  You get 20 pages for your album and still end up with LOTS of supplies left over!

    Here are a few of the pages I created:

    Many of the double pages, I’ll put a photo of the family member from Thanksgiving and use the insert page to write a bit about what they are thankful for this year and memories of or from them.


    Other pages will just have pictures or descriptions from our day together.


    I plan to punch holes in the pocket pages and use rings to hold the pages together.

    All you need to complete this project is the Tablescape Bundle and some brown ink and a sponge (I used Soft Suede).

    The bundle includes everything you see above including the Thankful For single stamp.

    So, hopefully this gives you some ideas for preserving your favorite memories!

    spaced shop now sig bar

  • A Starry Christmas Wreath for a Card

    Yesterday I shared a post highlighting the 4 holiday different cards I made using this month’s Paper Pumpkin kit, which made some cute Christmas cards.  Well, I ended up with extra star garlands and I had seen a very simple card by Lyssa Zwolanek that used the star garland as a wreath and I thought it looked super cute, so I just had to make my own!

    My favorite thing about this type of card is that it is a perfect way to use up the odds and ends lying around your craft table.  This card used:

    If you didn’t get this month’s Paper Pumpkin, you could recreate this look by using the small star punch from the Merry Minis Punch Pack and then use a sewing machine or hand stitch … or if you aren’t much of a sewer, like me, you can do some faux stitching with a white pen for a similar effect!


    spaced shop now sig bar

  • Fun Ideas for Gift Giving for a Holiday Blog Hop!

    As promised in my 12 weeks of Christmas newsletter yesterday, today I’m back with a fun blog hop to give you even more ideas for the holiday season!  So sit back and enjoy the ideas!


    Thank you so much for joining us for the November Stylin’ Stampin’ Squad Blog Hop! This month our projects focus on Christmas. While we have yet to give thanks this month, some of us are already thinking about sending Christmas cards, what kind of packaging to present gifts in and how we want to deck our halls. On this month’s blog hop we are showcasing many of the Stampin’ Up! products that are available in the Holiday Catalog. You will see everything from cards to gift tags to 3-D décor and gift packaging. We hope you enjoy seeing how we use the products to create our projects and feel inspired to come up with some great projects of your own.  Remember you can order all of the products showcased from your Stampin’ Up! Demonstrator.

     You should have just left stop number 13 on the Stylin’ Stampin’ Squad blog hop – the oh so fabulous Pam Wu. If so, you are in the right spot. If a link doesn’t work or you get off track, you will find the full blog hop lineup below.

     Holiday Gift Box & Card

    So, my project set that I wanted to show you today was a neat way to use some of the latest from the Holiday catalog as well as taking advantage of the current specials (Holiday Tag It Bundle, which includes the box, Cherry Cobbler ribbon, and Baker’s Twine I used) and sales (Weekly Deals – Burlap Ribbon!) to make these gifts for an even better deal! 🙂  Because, seriously who doesn’t love the thrill of getting a deal on your holiday gifts?

    Anyway, so this is what I created:

    Window gift box with Best of Snow hedgehogs

    This is the very quick to assemble window gift box that has a belly band made of the Burlap ribbon (who knew this stuff was going to be this great to work with) a bow of the 1″ Cherry Cobbler ribbon (which I might add is way softer than you think it is going to be!!) and a tag made with favorite bundle right now, the Tags 4 you stamp set and Bracket Label punch.

    Now, one of the things I love doing with this Tags 4 You stamp set is to add a bit of Dazzling Details to make it super sparkly.  It is always super hard to photograph but I think I finally caught it. 🙂
    Dazzling details tags 4 you

    Can you see the sparkle?  I added the glitter to all of the white parts of the tag plus to the centers of the “o”s.  Just for a little pop.

    And on the side, this isn’t just any plain old burlap ribbon… oh no… this is CUSTOM baby!!  I grabbed my Chevron background stamp and Gumball Green ink and stamped some chevrons around the ribbon.  Isn’t it a fun touch?

    Window gift box with stamped burlap ribbon

    And in case you were wondering, those adorable hedgehogs in the window?  Those are actually from the new Best of Snow stamp set that came out this month.  I just had to get the set because not only does it have the hedgehogs, but it has a cute snowman, a snowflake (that fits the Festive Flurries framelits!) and a stamp that matches the Bracket Label punch!  Sweet, right?
    Best of Snow card with gift boxHere is what it looks like when you pull the card out, but I love how you can see them perfectly through the window of the card.  I again used the burlap ribbon and then had a background from the Season of Style designer paper pad.  Its quick, easy, and super cute.

    Now imagine that hedgehog circle on top of a cute belly band or gift inside the box.  A cool way to package up your gifts in a way that looks adorable in every stage.

    So I hope you enjoyed my ideas for you today and maybe found some gems in the Holiday catalog you hadn’t noticed before.  There are lots more ideas for you on the hop today so check them out and have fun!

    Blog Hop Participants:

    1. Pam S. of Stampin’ in the Sun
    2. Dawn S. of Dawn’s Creative Chalet
    3. Darcy J. of DJ’s Stampin’ Place
    4. Annie L. of Love Me Cards
    5. Cynthia R. of Ink-a-Doodle Creations
    6. Jamie H. of Unique Ink
    7. Kim R. of Stamping with Kim
    8. Tonya B. of Stampin’ with Tonya
    9. Diana E. of Stampin’ Fun with Diana
    10. Heidi B of Stuck on Stampin’
    11. Bree R. of Craft-Somnia
    12. Anastasia R. of Stampin’ Blondie
    13. Pamela W. of Stinky Tofu
    14. Jennifer B. of NW Stamper <—- YOU ARE HERE!
    15. Kristina M. of Mama’s Sanity
    16. Shellie G. of Craft Smashup


    spaced shop now sig bar