Northwest Stamper

Category: Holiday Projects

  • Festival of Trees–a Christmas Card and a Gift Certificate Holder

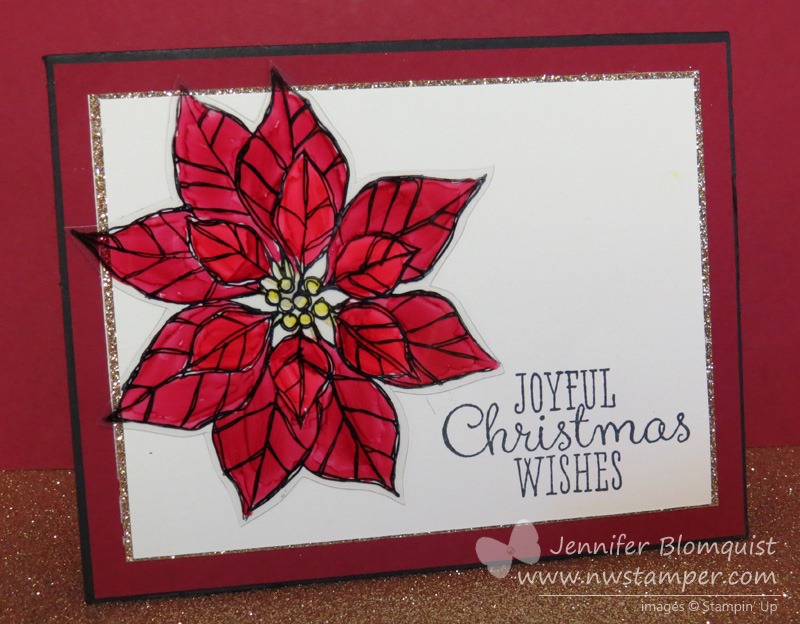
    I thought I was done with my Christmas projects, but I found 4 more I wanted to share with you. Smile  I had been having fun the last week or so and thought I’d share them with you before Christmas is officially over!  Especially since some of the accents on the projects are part of the Year-End Clearance Sale!  Including:

    imageimageimage

    #1 – Festival of Trees Gift Certificate Holder

    Yes, there is still time to get a gift certificate if you need last minute stocking stuffer (just email me at jennifer@nwstamper.com).  It won’t come in the cute holder, but you could make your own if you are feeling crafty tonight!

    I had to pull out a lot of my Holiday Catalog goodies because I had been neglecting some of them… like the Trim the Tree designer paper stack and this AWESOME Red Satin Woven Ribbon.  And of course there is the easy and funky Festival of Trees stamp set.

    I mounted the trees on a Deco Label die cut that I popped up with Stampin’ Dimensionals so I could slide the ribbon underneath to allow it to be opened and closed as necessary.  Then on the inside I added more trim for the gift certificate by adhering a strip of cardstock on the bottom of the inside to form a pocket and then used the matching Trim the Tree designer paper to accent it.  What a fun present!

    And then, since this was an odd size (7” x 4”) I needed to figure out an envelope.  Then it hit me!  I have an Envelope Punch Board and can make my own custom envelope!  I reached for my Under the Tree specialty designer paper because it was made from Kraft cardstock and so it is heavier (ie – will hold up better in the mail) AND it is stiff enough that it helps smooth out the bumps to make sure bow and embellishments on the front of the holder don’t get caught up in the post office.   Plus it just looked cool. Smile

    Under the Tree kraft envelope for gift certificate

    Ok, then on to matching project #2

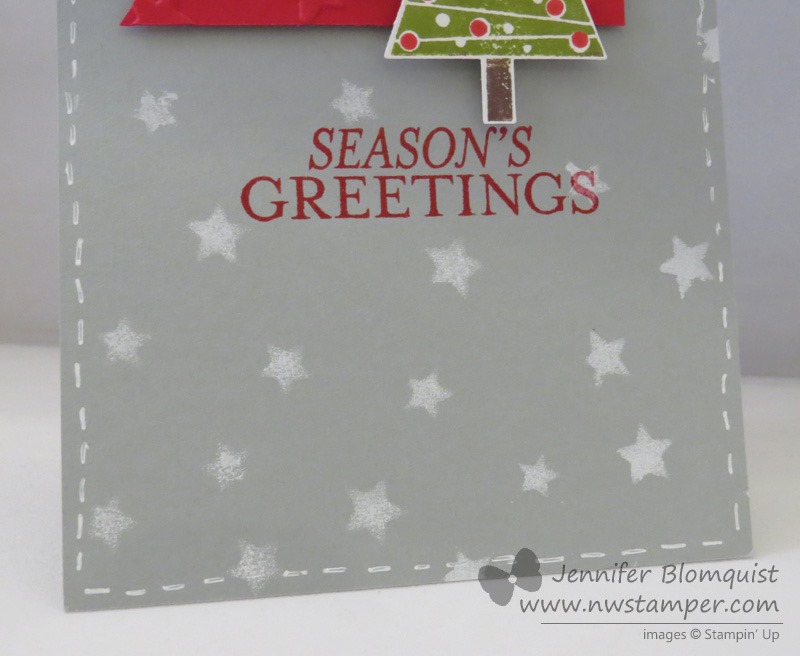
    #2 –  Festival of Trees Christmas Card

    I thought this coordinated so well, I’d share it today too.  This also uses the Festival of Trees stamp set but adds the sentiment from the Endless Wishes stamp set (sniff, sniff… so sad Endless Wishes didn’t make it onto the carry over list!  Love those snowflakes and sentiments!)

    I really liked the color and weight of the Under the Tree specialty designer paper, it added to the vintage feel I was going for, so I used that for the Red and Kraft trees pattern paper in the background.  Then I was back with more sparkle paper for the front tree and then the little Christmas tree from the Clearance Rack Merry Minis Punch Pack.  It is just such a cute accent!  I even had to use it for the inside as well.

    See the little green trees on the inside? Fun, right?

    I hope you have a wonderful Christmas eve full of fun Family and holiday traditions – or at least good times remembering some special Holiday memories!

    NWstamper signature_thumb[9]

    order online button for sig 3_thumb[4]

    Project Supplies Used:
    (if you are reading this in email, click here to see the list of supplies)


  • A Vintage Feel for a White Christmas Snow Scene Card

    Alright, are you ready for the last card in my Christmas card series?  I LOVE this card!  Seriously one of my favorites this year.  It was a mix and match of a few different cards using the White Christmas stamp set (which I’m SO SAD is not carrying over at this point).  But I really liked the vintage-y feel.

    Tips for making this card:

    • Start out with a Sahara Sand card base and base for your stamped image.  Then stamp the snow scene from White Christmas in black ink before you start covering it with snow.
    • Create the snow by sponging the ground with Whisper White craft ink (and YES! You can still get it from Stampin’ Up!) and stamp your falling snow with the same ink.
    • Add highlights and coloring in your snowman using the Chalk Pen.  It creates a bolder white, and while its not the best for coloring in large areas, the smaller space of the snowman is just the right size.
    • Punch out a star shape after you’ve stamped your trees so you can get it just where you’d like and then glue a piece of Gold glimmer paper behind it for just the right amount of sparkle.  And by gluing the paper behind the hole, it makes it a bit more subtle than when you punch out a gold star and glue it on top.
    • Add some sponging and emboss your card base to finish out the look!

    Need a last minute gift?

    There are 2 great last minute gift ideas that you can buy now and print out today!

    1. Give a Gift Certificate!
      Email me at jennifer@nwstamper.com and I can email you a gift certificate to print out today!  You can get it in any increment you choose and they can use it whenever they’d like for whatever they’d like!
    2. Give the gift of Monthly craft projects with Paper Pumpkin!
      Shop online for Prepaid Paper Pumpkin subscriptions and you will also receive a gift card you can print out to give the recipient with the code for them to redeem their monthly subscription.  You can get 1, 3, 6, or 12 month subscriptions and they get everything they need for fun projects each month!

    NWstamper signature_thumb[9]

    order online button for sig 3_thumb[4]

    Project Supplies Used:
    (if you are reading this in email, click here to see the list of supplies)

  • Brushed Gold Bright and Beautiful Star Christmas Card

    Yesterday I started sharing some of my Christmas cards from classes and today I’d thought I’d share another.  This was my first chance playing with the Brushed Gold cardstock, and let me tell you, it is Fabulous!

    I was playing with different ideas when I came up with this card, but in the end, I loved the simplicity of it with lots of pretty touches.

    Tips for making this card:

    • Die cut the larger star using the Star Framelits from Stampin’ Up directly from your card base.  Then fill the hole by gluing a piece of pretty cardstock (like this Brushed Gold) to the inside of your card.  It makes it pretty inside and out!

    • Tie around some glitzy baker’s twine and then fray the edges after you knot it to give it a softer touch.
    • Use the Bright & Beautiful stamp set to stamp and cut out with the Star Framelits, a central focus point to layer inside your star cutout in the card base.
    • Add a simple rhinestone to the center of the star and color it with Blendabilities for some subtle sparkle that coordinates!

    See, easy peasy!  But lots of shimmer and sparkle.  Oh, and I forgot to mention, the Brushed Gold cardstock is heavier weight than I was used to with cardstock, which makes it great as a layer or even a card base.  Really adds some feel good heft to your cards!

    Shop online and use the hostess code XMUM7PJZ and I’ll get them in the mail to you ASAP or you can purchase a set or just the instructions.  Check out this post for more details.

    Happy Monday!

    NWstamper signature_thumb[9]

    order online button for sig 3_thumb[4]

    Project Supplies Used:
    (if you are reading this in email, click here to see the list of supplies)

  • Holiday Gift Bag for Christmas using Seasonally Scattered

    How about something a little different today – a fun gift bag that is WAY QUICKER to make than you might expect using the Seasonally Scattered stamp set and those great chevron printed bags from Stampin’ Up.

    I created this for the Convention Display boards this last summer (yes, I’m still working on finishing up sharing all the projects for that! Smile) and I was asked to make some 3D projects for each the stamp sets I was given.  I started adding a little bit here and there and finally it all came together in a fun festive bag.

    Tips for making this project:

    • Start by gluing down a tea lace doily to the front of the preprinted chevron bags from Stampin’ Up.  The preprinted bags are great for small treats or gifts and since they already have the pattern it makes it easy to just add a little bit here and there and have it look great.
    • I stamped the Merry sentiment from the Seasonally Scattered stamp set on a piece of scrap paper and cut it out.  Layer over some scrap Old Olive cardstock and tear the edges of the Old Olive paper so it is just longer and taller than the stamped image.
      That is right… just tear… no tricks or special tools.  I usually just rip my paper pulling at a slight angle so I expose some of the core of my cardstock for a more textured look.
    • Loop some seam binding ribbon and adhere to the back and you can add everything to your doily with Stampin’ Dimensionals!

    • Then just punch out some extra banners using the Banner punch ( 1- Cherry Cobbler, 1- Old Olive, 1- Whisper White stamped with the snowflakes from the merry sentiment stamp)
    • Stuff your bag and then staple some Gold Sequins and the banners to the top corner to keep it closed!

    The only part that takes any time with these bags is the cutting out of the Merry sentiment, but you could use a framelit and die cut it to make it even faster!

    NWstamper signature_thumb[9]

    order online button for sig 3_thumb[4]

    Gratitude Month Week 1 Free Tutorial – Kinda Eclectic Thank You Card

    Shop online & use hostess code UCJDBQH4
    See the Catalogs online – Annual Catalog  |  Holiday Catalog  |  Holiday Supplement
    Save more when shopping – Weekly Deals  |  Clearance Rack

    Project Supplies Used:
    (if you are reading this in email, click here to see the list of supplies)

  • Wondrous Wreath Gratitude Card for the Fun n’ Crafty Blog Hop

    Wondrous Wreath Gratitude Card for the Fun n’ Crafty Blog Hop

    Fun n Crafty Blog Hop badgeIn keeping with the theme of Gratitude this month, a few of us from the Fun n’ Crafty Stampin’ Up! demonstrator team put together a mini-blog hop based around the theme of Gratitude.  This was my card I wanted to share with you today!


    I LOVE this Wondrous Wreath stamp set and matching framlits, especially because you can easily cut out your wreath both outside AND IN and have all the little leaf shapes. Smile

    For this card, I used more “Fall” colors instead of the reds and greens like I did on my Christmas Wreath card.  I used the following colors:

    • Hello Honey ink for the full wreath stamp with all the leaves
    • Soft Suede ink for the partial wreath stamp with about 1/4 of the leaves
    • Blackberry Bliss ink for the berries and the bow

    And speaking of the bow, how awesome is it that you don’t have to hand cut that either! Smile  I stamped my bow and cut it out with the matching die but I’ve seen super pretty cards using glimmer paper for the bow or just plain cardstock as well.  Gotta love having options.

    Then you can kind of see the card base is stamped as well.  I used the Hardwood background stamp ….
    (TIP – I love my clearmount stamps, but when it comes to background sized stamps, I ALWAYS recommend to my customers to get them in wood.  Sure, you save a little space when you get it in clear, but then you have to get the $17 clear block to use with it, and in the case of a stamp like this, it is pain in the rear to get the sticker on right onto the back of the stamp!  I just think it is way easier and often more economical to get the background stamps in woodmount.  Though I’ll still love you if you decide you want it in clear. Smile )

    but anyway, I used the Hardwood background stamp in the same color as the paper, which in this case was crumb cake.

    I also made this card the same except for using Sahara Sand as my background instead of Crumb Cake.  Both are pretty… not sure which I like better, actually.  Swing by my Facebook page and cast your vote which paper you like better!

    And now, check out a few more ideas for sharing gratitude this month!:

    10353106_10204078100138887_7954284539736439010_n

    We don’t have a long list this this month so it’s easy to check everything out and enjoy the inspiration!  And please leave Sara and Pam some love on their blogs… I know it would mean a lot to them. Smile

    NWstamper signature_thumb[9]

    order online button for sig 3_thumb[4]

    Gratitude Month Week 1 Free Tutorial – Kinda Eclectic Thank You Card

    use hostess code UCJDBQH4
    See the Catalogs online – Annual Catalog  |  Holiday Catalog  |  Holiday Supplement
    Save more when shopping – Weekly Deals  |  Clearance Rack

    Card Supplies Used:
    (if you are reading this in email, click here to see the list of supplies)

  • How to Make Really Cute Star Boxes with the Many Merry Stars Kit (with VIDEO!)

    Have you heard me talking about this cute Many Merry Stars project kit yet?  I LOVE it! 20141020TH_HolidaySupplement_en-US It is part of the new Holiday Supplement that just launched today.

    And before you roll your eyes and say, “another catalog?” let me tell you that it is just a few more cute projects and coordinating elements that are a fun addition to what you’ve already seen in the holiday catalog.  The main items is a new stamp set that goes with the Stars framelits along with this awesome Many Merry Stars kit that I’ll be sharing with you today!  Plus, there are some new project life goodies that are perfect for documenting the holidays or for putting together a December Daily album!  (I’ll be talking more about December Daily in the near future).  And some new ways to see some great card kits.   But FYI – the new items in the Holiday Supplement are while supplies last, so don’t delay too long if you see something you love!

    Check out the Holiday Supplement here

     But for today, let me introduce you to the Many Merry Stars boxes!  (And YES! I have a video further down in this post!)

    Many Merry Stars Project Kit

    So stinkin’ cute, right?!  Here is everything you get in the kit… it was actually pretty hard for me to get a picture of all of it. Smile

    In the kit you get the supplies to make 26 3D Stars including:

    • Front and back of 26 different stars made out of Kraft cardstock & gold glimmer paper
    • the side pieces to hold the front and back together – WITH adhesive already on!
    • 2 sheets of die cut printed stars, banners, and bow pieces for embellishment
    • 2 sheets of white die cut banners and tags
    • 1 sheet of cherry cobbler stickers (words & stars)
    • Gold baker’s twine
    • Silver sequins
    • 20 wood snowflake elements
    • Gold Glimmer paper works and star decorations
    • Tips and instruction sheet

    So, for example, on the big star you can see I used some of the sticker words, some gold glimmer accents, the silver sequins, awesome wood snowflakes, and some of the gold baker’s twine.

    For most of the pieces, I used the Tombow liquid glue but in some cases I pulled out my glue dots (for the sequins) and my Stampin’ Dimensionals (for the ampersand).

    You can make big stars or smaller stars….

    And they are super easy to make too!

    Check out the video below to see how easy it is to make these stars.  I walk through making this cute red star (above) from start to finish!

    (If you are reading this in email, click here to see the video on my blog)

    I’ll be sharing more project ideas with this kit over the next few weeks and will be holding a class in November for you local folks!  So, keep an eye out for those!  And if you have any questions or would like to know more, just let me know!

    spaced shop now sig bar

    Project Supplies Used:

  • NEW Class by Mail! Endless Wishes Card Gift Set & Desk Organizer

    I’m so excited to share a new class that I just finished the samples for – the Endless Wishes card gift set!  This was a compilation of many of my favorite new (and returning!) holiday goodies that gave me lots of fun time playing and experimenting and being really stinkin’ glad I got them!  You know… Endless Wishes stamp set, Trim the Tree paper, Stars embossing folder, Stars framelits, etc.  Sigh… so much to love!

    Here is one of the cards where I really got to play a lot with new stuff – what do you think?  Are you loving stars yet?

    The best part of this was that I got to put this class together with one of my downline – Tanya Cabral and so we’ve worked together to design some really fun cards to share at our class in early November (Nov 3rd for those of you in the area that would like to attend. Smile)

    Tips for creating this card:

    • The Endless Wishes stamp set is a returning favorite and is fabulous because you have the script font and the small type font.  Mix and match – INCLUDING COLORS – for really unique and trendy looks to your cards.
    • Tie your card together with similar elements – in this case the Stars embossing folder and the Star framelits!  The subtle tie-in helps keep your card cohesive without being busy.
    • Sponge the edges of your die cut elements to help them stand out from the background.  Here I sponged the star with Early Espresso ink and a sponge dauber.

    Ok, and so this isn’t a tip, but don’t you just love that plaid?  It makes it look like the card has a cozy scarf, don’t you think?

    And that is just one of SIX fabulous cards and yes, you see that cozy plaid in a desk organizer that you can actually use year round!  See, I think ahead. Winking smile 

    Endless Wishes Gift Set Class

    If you would like to try out these fun designs, I have a few options for you!

    IN PERSON – Join me on November 3rd at 7pm at the Round Table Pizza in Bellevue (Overlake) where you will get to make 6 cool & unique cards plus a cute desk organizer that will hold all of your cards from the class plus space for any additional cards you have at home or make in the future! 
    You’ll receive your own pack of Trim the Tree design paper, a pack of 20 notecards & envelopes, plus all the extra supplies you need to make the cards and printed instructions so you can make more later! 
    Cost is only $25 or for only $40 get the kit+your own personal stamp set (SAVE over15% on the stamp set this way over the cost of the set + tax&shipping from the catalog!)
    RSVP here

    KIT BY MAIL – Get all the pieces precut and mailed to you in a kit to make all 6 cards and the desk organizer,
    plus step-by-step instructions, all the extra designer paper from the Trim the Tree paper stack and 14 additional cards & envelopes!
    BONUS – get a bottle of Cherry Cobbler dazzling details FREE with the kit by mail
    Cost is only $25+$5 shipping


    SAVE! Add the stamp set with your kit and save over 15% on your stamp set!
    Get everything listed above PLUS your own personal personal Endless Wishes stamp set
    Cost is only $40+$5 shipping


    INSTRUCTIONS ONLY – Get access to the instructions for all 6 cards plus the desk organizer so you can use your supplies at home to make these cute projects.
    Instructions will include all the dimensions, supplies used, and tips for making them as easy as possible!
    Cost is only $4.95  (that is less than $1/project!)


    Note – I will have instructions ready for emailing by Monday of next week.  Class kits will mail out the week of the 28th.

    I had so much fun designing these cards with Tanya that I KNOW you’ll have fun putting them together. Smile 

    spaced shop now sig bar

    Card Supplies Used:
    click on any of the photos below for more details and easy shopping!

  • Sweet and Simple Christmas Card with Wondrous Wreath

    Nothing like some Christmas cards to start getting me in the mood for the holiday season!  The late fall/winter time is my favorite time of the year!  Yes, there is Christmas and even my birthday, but I just love all the joy that is everywhere, the twinkling lights, the shimmer and sparkle that you see everywhere.  Today the Stylin’ Stampin’ Inkspiration girls are sharing some Christmas card joy and this is my card I wanted to share:

    Isn’t it so cheery?!  I love how easy this stamp set is to make these fun wreaths.  You get three stamps that each add a little bit more to the wreath:

    1. The leaves of the wreath
    2. A few accent leaves of the wreath
    3. The berries for the wreath

    Plus there are handle guides ON THE STAMP that help you line up everything just right!

    I was going to try to explain lining it all up, but I realized you would be so much better served by a video, so I’ll put one together for you very soon!

    Tips for making this card:

    • I like to start with a white 3.5”x3.5” piece of white scrap paper and stamp your image with all the leaves so that the guide (an extra “tail” of the photopolymer stamp) is pointed towards one corner.
    • Stamp your second image with the accent leaves over the top with it’s guide pointing towards the same corner (using the corners helps you remember how to line up your stamps)
    • The berries, just stamp however looks nice to you!

    • Keep it simple by using the matching framelits (Wonderful Wreath – and you might as well get the bundle, because you know you will want it and then you get 15% off both!) to cut out the wreath with both the inside and outside cutting at the same time.
    • And just cut out some cardstock with the included bow framelit to make a pretty bow!  Add a pearl for extra bling.
    • The sentiment even fits inside the fabulous Decorative Label punch.
    imageimage

    Make this at my Holiday Card Stamp-a-Stack!

    If you are coming to my Holiday Card Stamp-a-Stack, you’ll get to make 3 of this card; so you’ll get lots of practice lining up your wreaths. Smile   There is still time to RSVP if you’d like to come!

    Holiday Card Stamp-a-Stack #1
    Jennifer’s House in Bellevue, WA
    10/18/2014 at 1pm
    Make 12 cards – 3 each of 4 designs with envelopes for only $25
    They will be lots of ideas that you can replicate if you want to make more! 
    (Holiday Card Stamp-a-Stack #2 with more card ideas will be Nov 15th)
    RSVP here


    And don’t forget to check out the Stylin Stampin’ Inkspiration blog for even more fun holiday card ideas!

    spaced shop now sig bar

    Card Supplies Used:
    click on any of the photos below for more details and easy shopping!

  • New Gentle Peace Christmas Stamp Set and the new Weekly Deals

    Have you seen the cute new photopolymer stamp set that just came out – Gentle Peace?  I know some people were disappointed there weren’t many religious Christmas stamps and so this may be just up your alley!

    Gentle Peace stamp set

    Gentle Peace stamp images

    Gentle Peace Photopolymer Stamp Set

    I just love how they make this look with Blendabilities, or you can make it look even more realistic by doing the Stained Glass Window technique

    And just because I heard recently that some people had missed the other Christmas Photopolymer stamps that came out recently, here is a reminder. Smile 

    Christmas bliss stamps

    Christmas Bliss Stamp Set


    New Weekly Deals for 10/14-10/20 are here!

    Don’t forget to check out the newest deals that came out today too.

    Click any of the pictures below to start shopping online. Smile  (If you don’t see the pictures, click here to see all the weekly deals online)

    Seriously, that mustache die just looks like so much fun.  Especially for Santa’s beard!

    image

    And I do love those Window Gift Boxes for holiday gifts and craft fairs!

    spaced shop now sig bar

    Hostess Code:  C2HYWWQM Use this Hostess Code and receive a free gift!
    (Please do not use the Hostess Code if your order is $150 or more)

  • Santa Boxes & More with the Curvy Keepsake Die

    With the Holiday Catalog released yesterday, one of the things that you find with any catalog are those products that you see and think, “eh, sure that is cute enough but I can’t imagine really using it”.  Well, I decided to go out on a limb and get one of those items – the Curvy Keepsake Box thinlit die.  I thought it looked kind of interesting but I didn’t know if I would use it… turns out, it is going to be one of my most used holiday catalog purchases!  So-many-cute-boxes-to-make!!!  All thanks for Lynn Starzl for getting me hooked on the possibilities including this box:

    This was the thank you gifts I made for my Stamp & Share event last weekend.  I gave them to each presenter and inside the box were little variety packs of embellishments from the Holiday Catalog plus the Dazzling Details bottle with a tag made from the Curvy Keepsake Box die and one of the new All is Calm Snowflake embellishments.  Here is what the die set looks like:

    Curvy Keepsake Box die

    Curvy Keepsake Box die set

    So when the Stylin’ Stampin’ Inkspiration girls did Friday Favorite’s today, I knew what I was going to pick!

    Tips for this project:

    • You will need to cut two pieces of cardstock to make these boxes, use Fast Fuze or Sticky Strip to adhere them together to make sure you don’t have your box falling apart later!
    • Do you embellishing and/or stamping on your box AFTER you cut out the shape but BEFORE you assemble your box
    • Tie your handles together with a box so it is easy to get into and out of the box without cutting or ripping anything
    • Use the magnetic platform to make sure your die doesn’t move when cutting out the box sides


    Holiday Weekend Special!

    ** All orders through 9/1 using the hostess code PA6NRD4S will receive a FREE project kit with all the supplies you need to make one of those Santa boxes plus a cute Pumpkin box as well!   Start shopping here **


    Want a sneak peek at what the pumpkin looks like?

    See!  I told you!  Totally cute and versatile.  And I have even more projects planned with this box and a class to go with it!  I’m not kidding there are a bunch of different ideas out there. Smile

    Oh!  And you see the sentiments on each of the tags?  That is using the new Good Greetings stamp set that is available as part of the new Host Promotion that runs now through the end of October. Get this stamp set for FREE and in addition to your regular hostess benefits.  Yup, totally free bonus stamp.  Whoop whoop.

    What do you need to do to get it?
    Get your friends together for a stamping night with qualifying orders, host a qualifying online Stampin’ Up party, get some friends and start a Stamp Club with me, or just place a $300 order and it is yours!  email me to get you started!

    Well, it is the kick off to the holiday weekend!  I hope you have a wonderful and safe Labor Day weekend.  I may be away from my email off and on throughout the weekend so if you email me me, know I will get back to you but it might take slightly longer than normal.

    spaced shop now sig bar

    Santa Box Supplies Used:

  • A Christmas Card with a NEW Tree Punch for the NEW Holiday Catalog!

    Yay!  Today is the day!  The new Holiday Catalog is here!  Over at the Stylin’ Stampin’ Inkspiration blog, we are sharing some of our favorite new items from the Holiday Catalog.  Did I mention – Yay! It’s here!?  ha ha!

    image

    View the Holiday Catalog here

    Shop Online for all the new Goodies here
    (PS – I have some very special project kits using the Curvy Keepsake box that I’ll be sending out to anyone who orders from me using hostess code PA6NRD4S through 9/1!)

    But I don’t want to just tell you that the catalog is here… how about I share a project made from the catalog as well?

    This card uses a lot of new products from the holiday catalog and actually comes together really easily!  I was inspired by a card created by Rita Wright for this sample. 🙂

    Tips for making this card:

    • Use the new Stars mask from the Annual catalog and sponge over Smoky Slate cardstock with Whisper White craft ink.  I recommend using a Sponge Dauber because it helps your ink go on very solidly and smoothly.

    • When using a mask, make sure you “daub” – just tap down over the mask!  If you try to rub side to side, you risk bending up part of your mask and/or getting ink under the outline shape you want to be coloring.
    • Add some faux stitching with your white gel pen around the edge of the card to keep all those stars in Smile
    • Use the new stars embossing folder from the Holiday catalog to emboss some Real Red cardstock for your banner to tie into the masked stars
    • The Festival of Trees stamp set is AWESOME because (1) there is a PUNCH to match the tree!  And you know I’m a sucker for punches.  And (2) because this is a photopolymer set, you can stamp your main tree image in green & brown, and then it is super easy to stamp the red ornaments in the holes.  Seriously!!  I thought it was going to be a pain to line up but it was cake.  Ahhh, sometimes photopolymer is exactly the right way to go!

    So if you are thinking at all about holidays (halloween, fall, Hannukah, Christmas, etc) check out the Holiday Catalogand have fun!

    Shop online here & don’t forget!
    Use hostess code PA6NRD4S through Labor Day and I’ll be sending out adorable Santa and Pumpkin project kits using the new Curvy Keepsake boxes to everyone who orders.  I’ll have a peek at those tomorrow!

    LAST DAY for FREE PRODUCT too!

    Just a reminder that today is the last day for the Starter Kit special as well! I would love to have you be a member of my stamping community and join our fun swapping, sharing, chatting group as a demonstrator.  Whether you are looking to get a great deal on a chunk of your holiday catalog wishlist or want to earn extra money for holiday gift giving, now is a great time to do it!

    Photo: Just a reminder, only 2 more days of the starter kit bonus promotion!  I'd love to have you join my demonstrator family.  Have questions?  Post them here and I'll make sure to answer them all!

    Get $150 in products for only $99 and FREE shipping!  Get started picking your goodies now. Smile

    Have questions, I’m here to help!  Just email me at jennifer@nwstamper.com and I’ll get back to you asap.

    spaced shop now sig bar

    August Online Stamp Club Hostess Code – TT2NETD4
    Use this code to get free exclusive tutorials & project kit! Learn more

    Card supplies used:

  • Joyful Christmas Blendabilities Card–LAST DAY for these Stamps!

    Joyful Christmas Blendabilities Card–LAST DAY for these Stamps!

    Last night I held my Blendabilities technique class and it was a lot of fun chatting, stamping, and sharing with everyone who came out!  I wanted to share one of the cards I used as a sample in the class last night:

    This card uses the Joyful Christmas stamp set from the Holiday Carryover List – which ENDS TODAY!  So, make sure you’ve checked it out and let me know ASAP if you would like anything.  I’ll be putting in a group order today and can add you to the list.

    Tips for this card:

    • Stamp your image on a window sheet using Stazon Ink.  Then FLIP the window sheet over and color with your Blendabilities marker on the other side to give you the color you want.  DO NOT color on the same side that you stamped on
    • Use a thin mat of Glimmer Paper to add just the right amount of sparkle to your project
    • Adhere your colored image with glue dots to your paper

    Like I said, this stamp set is one of the many great sets going away TODAY, so check out the Carryover List and let me know ASAP if you would like anything.

    VIEW THE HOLIDAY CARRYOVER LIST HERE


    Also, you CAN get these Carryover items as part of your Starter Kit if you would like to join my team and get $150 in product for only $99 and get all the discounts and perks of being a demonstrator.  Get started here.


    spaced shop now sig bar

    August Online Stamp Club Hostess Code – TT2NETD4
    Use this code to get free exclusive tutorials & project kit! Learn more


    Card Supplies Used: