Northwest Stamper

Category: 3D & Decor

Get 3D & Decor project ideas including boxes, bags, tags, displays, and craft fair ideas.   You will learn how to create these fun projects using paper, stamps, punches, and items from around the house.  These are the perfect way to create or wrap a custom, handmade gift.

  • Samples from the Stamp & Share

    Whew!  What a fun but busy weekend.  I’m working on getting everything together for my Tuesday Technique Night on Blendabilities so I thought I would share a few of the awesome ideas that were on display at the Stamp & Share this weekend!

    If you didn’t catch what this event was, it was a demonstrator event that I’ve been putting together where we can get together and share ideas, stamping techniques, projects, and just have a great time with fellow demonstrators.  For this event we had two stamping presentations:

    Stacey Lane showed us how to make CUTE ornaments using the Simply Pressed clay and our stamps!

    2014-08-23 13.33.39

    And Kathy Thisted shared tips and information on Blendabilities.

    2014-08-23 13.56.04

    And of course there were lots of samples to look at as well.

    These were some of the cards in the card contest for the event:

    2014-08-23 13.42.48

    2014-08-23 13.42.40

    My photos turned out terribly of the boards but this was some of the Holiday Catalog cards on display:

    2014-08-23 16.36.37

    2014-08-23 16.36.29

    My presenter gifts were these fun Santa boxes made with the upcoming Curvy Keepsake Box (I’m totally doing a class with this box to show you all the AMAZING people and animals you can make with this!)

    2014-08-23 16.36.44-2

    And more ideas on display including a canvas from Ikea colored with Blendabilities (did you know this started out as Black and White from the store??)

    2014-08-23 16.38.23

    A fun card using the Banner punch created by Karen Trainer:

    2014-08-23 16.17.45

    And awesome card by Sandra Alonzo and amazing ornament by Nichole Smith using the Bright & Beautiful stamp set and star framelit (still available as a free bundle when you buy a Big Shot or at 15% off if you just want the bundle!  Only through the end of the month!)

    2014-08-23 16.37.09

    It was a super fun afternoon and thank you so much to everyone who was able to make it!  I look forward to making the next one even better. Smile 

    Want to join me for our next event?  Don’t forget, you can join my team right now and get $150 in product including Holiday Catalog items for only $99!  (get started here) or if you are already a demonstrator, email me at jennifer@nwstamper.com and I’ll put you on my email list to let you know when the next one is scheduled!

    spaced shop now sig bar

    August Online Stamp Club Hostess Code – TT2NETD4
    Use this code to get free exclusive tutorials & project kit! Learn more

  • Muslin Birthday Treat Bag with Amazing Birthday

    It’s Stamp Set Focus day over at Stylin’ Stampin’ Inkspiration and today everyone is playing with the Amazing Birthday stamp set!  I had so much fun using it for the convention display boards this summer and I love it’s versatility! 

    So today I’m going to shake things up a bit… I’m not sharing a card!  Gasp! I know, what is wrong with me? Winking smile  I don’t often do 3D projects but I do have to admit I love embellishing some of the premade treat bags and boxes.  Especially these Muslin Bags from Stampin’ Up because they are so soft and have such fun textures to work with.  What do you think?

    Tips for this project:

    • You can stamp on the Muslin Bags with any of your Stampin’ Up inks, but for longer and more solid staying power, grab your Stazon Ink for best results – like I did with the cake images.
    • If you are really crafty – aka have a sewing machine, which I do not – you can sew your ribbons together and even onto the bag.
      If you are like me and DON’T own a sewing machine, I attached the Melon Mambo 1/8” taffeta ribbon to the Chevron Natural ribbon using Sticky Strip.  Then I used hot glue to attach the Chevron ribbon to my bag.  I made sure to put a piece of cardboard inside my bag while glueing just in case any glue oozed through (none did, but I wanted to be extra sure).
    • I used the Banner Framelit to cut out the Thankful sentiment.  Then I took that same framelit and traced the outside of the framelit shape on a piece of Melon Mambo cardstock and cut it out with scissors to create the mat piece.

    • For the gold foil, layer a long strip of foil onto your banner shape and then just use your snips to cut out the banner end to match the cardstock piece underneath.
    • Add subtle sparkle by dotting Dazzling Details all over the front and back of the bag.  Just make sure to give it enough time to sit out to dry!

    These bags would be perfect for goodie bags or thank you gifts for a birthday party or other celebration!  Just mix and match your colors and you are good to go!

    One Week Only!

    Join my crafty crew, the Fun n’ Crafty Stampers and receive an EXTRA $25 in free product with your Starter Kit!  That is $150 in goodies for only $99! If you’ve been considering starting your own business, making some money to cover your craft supplies, or just want to get your supplies at a discount, this is a great deal and an awesome time to become a member of my stamping group from across the US!  Learn more here

    spaced shop now sig bar

    August Online Stamp Club Hostess Code – TT2NETD4
    Use this code to get free exclusive tutorials & project kit! Learn more

    Project Supplies Used:

  • Project Life Cards Make Great Altered Picture Frames!

    Project Life Cards Make Great Altered Picture Frames!

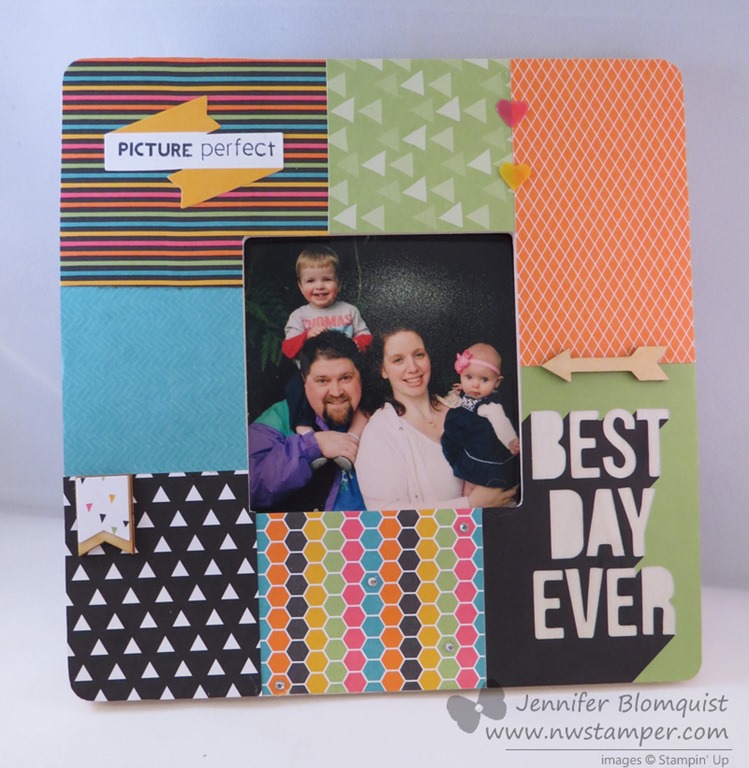
    By now, You’ve probably heard of Project Life and know the cards in each kit are great for quick and easy scrapbooking (if you want to learn more about project life, I have a video about it here).  But when they gave a set to us to use for the 2014 Stampin’ Up Convention display boards and use in other ways, I found myself looking at them in a different light.  And thus, this altered picture frame came to be!

    I loved this project and even my non-crafty hubby liked it and said he wanted one for his desk at work!  Thankfully the frame is only $1 at Michaels and another set of Everyday Adventure Project Life by Stampin’ up is easy to come by!  So, I’ll be creating another one soon for him. 
    See all the cards in the kit here.

    The idea was to take this chunky frame and then start layering the cards around the edges to create a tiled design.  It all started with the Best Day Every card that is found in the Everyday Adventure Accessory Kit.  I thought it was cool because it is die cut so that you see through the card to whatever is behind it, so I thought it would look neat showing the wood of the frame through the letters.

    From there I started laying out other cards that I thought had cool complimentary colors and patterns to fill up the frame.  Once I had the plan, I could flip over the frame and trace the edges of the frame on the back of the Project Life card for any given spot.

    Then just trim off the extra paper and glue to your frame.  In my case, I ended up using the Tombow Liquid Glue.  And then finish up the seams by adding some embellishements from the Accessory kit (like those clear hearts) and other items in my craft room (like the rhinestones on the honeycomb card and the wooden accents such as the arrow and banner piece).

    It actually came together really quickly and easily.  And did you realize, that the Banner Punch actually is the same width and just a smidge shorter than the banners in the Wooden Accents?  Cool huh?

    Finally, I didn’t use it a lot, but I love the Remember This Project Life stamp set and it turned out to be perfect for stamping one of the stickers from the Accessory kit and balancing out everything on my frame!

    Its an easy and inexpensive idea for a great gift!

    Wanna Make This With Me?

    I’m running a Project Life Night class next Monday and RSVPs are closing first thing tomorrow morning!  We will be making lots of fun projects including:

    • 2 page pocket page scrapbook layout
    • 3 cards
    • 2 gift ables including a picture frame similar to the one I made in this post.

    You will get everything you need to make the projects plus have lots of extra Project Life cards to take home and keep!  All for only $25

    RSVP now to participate in this fun class!  RSVP here to join me in person at the Redmond Panera at 7pm on 7/28

    ~OR~

    Get the To-Go Kit!  You will get all the supplies you need to create the projects including basic adhesive for your picture frame, PDF pictures of all the projects, and instructions for how to make the projects.  Only $35 shipped anywhere in the US!


    Project Supplies Used

    So, think outside the Scrapbooking box and enjoy your Project Life cards in all kinds of new ways. Smile 

    spaced shop now sig bar

    July Online Stamp Club Hostess Code – 7RDHVEKR
    Use this code to get free exclusive tutorials & project kit! Learn more

  • Stampin’ Up Display Stamper 2014 Submission

    Stampin’ Up Display Stamper 2014 Submission

    So, every year I go to the Stampin’ Up convention… and every year I’m blown away by the amazing ideas and inspiration on all the different display boards.  (To see what I’m talking about, here are a few past posts I’ve done showing the display boards.)  Well, this year they are doing a call for display board stampers and to throw your hat in the ring, you need to pull together some of your best/favorite projects and put them together in one post to show your style and ability.  So, I thought it would be a fun way to flip through my past projects and put them together to share with you here.  And maybe they will love them too and I’ll get to share even more ideas on a display board at the Stampin’ Up Convention 2014!

    oh, and PS – if you love the idea of checking out all the display boards, don’t forget that anyone who joins Stampin’ Up as a demonstrator right now will get free registration to convention this summer!  So, you just get yourself to Salt Lake City, and you can be blown away by inspiration for FREE!  Yay!  Email me at jennifer@nwstamper.com for more details if you are interested or check out this page to learn more about the perks of being a demonstrator!

    So Here You Go!
    3 Cards

    so very grateful colored

    So Very Grateful Thank You

    Burlap and Gold Masculine Card (blog post here)

    Negative Heat Embossing with Pleasant Poppies (blog post here)

    1 Scrapbook Page

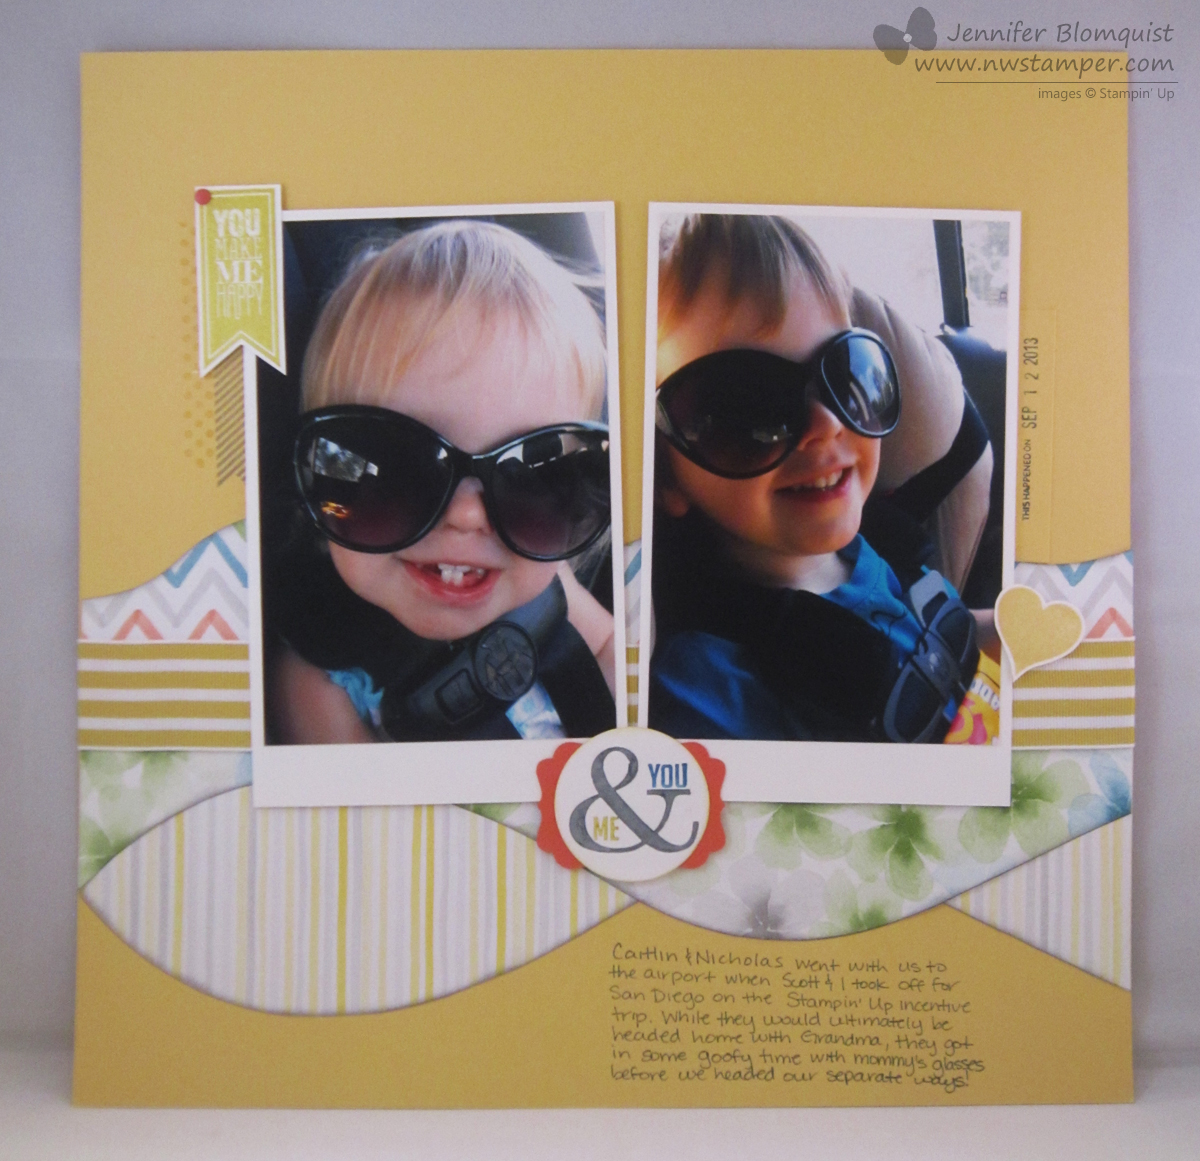
    This was so hard for me to narrow down and decide which scrapbook page to show.  I think my favorite layout may actually be this older one, but I figured the one I’d show here is this –

    Perfect Pennants with Watercolor Wonder Waves (blog post here)

    Or maybe it is just that these photos always make me smile!

    2 3D items

    Ok, this is where I don’t make and post nearly enough.  So here is what I decided was the nicest from things I actually designed myself – instead of flat out copies of what other people had created. Smile

    Card organizer for holding cards and envelopes (blog post here)

    Easter Treat Bag (blog post here)

    Awww.  So much fun to walk down memory lane.  I hope you enjoyed the ideas and inspiration. Smile

    spaced shop now sig bar

    April Online Stamp Club Hostess CodeG4VQJ7VB
    Use this code to get free exclusive tutorials & project kit!Learn more

  • Quick Spring Easter Treat Bag Tutorial with Punch Art Daffodil!

    Quick Spring Easter Treat Bag Tutorial with Punch Art Daffodil!

    Happy Easter weekend! I don’t know about you, but we still need to do a lot of our prep for Easter.  Today we’ll be spending time coloring Easter eggs – and I’ll be making sure I have everything I need for Easter baskets and Easter dinner! 

    (PS – don’t forget to enter the Retirement List Prediction Contest!  It is free to play along and you could win up to $30 in free Stampin’ Up products!)

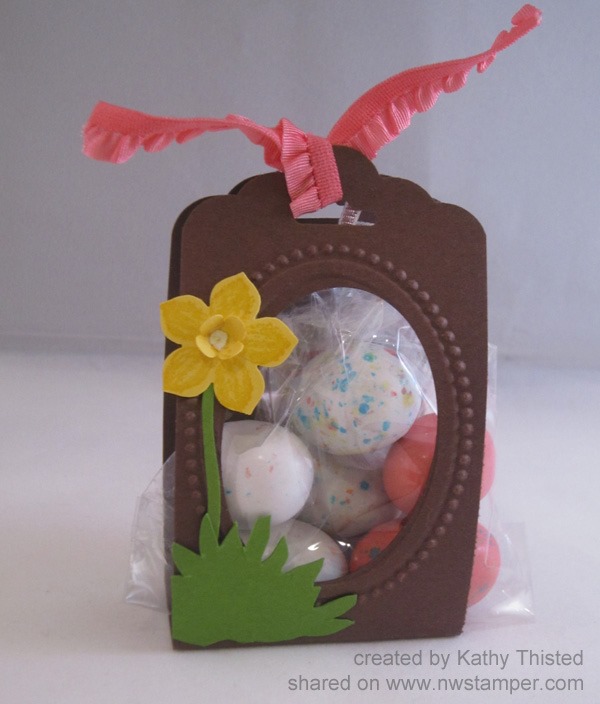
    So, back to Easter treats!  I thought I would share a quick spring or Easter treat idea that you can pull together at the last minute!  This was created by my Mom, Kathy Thisted, for our Fun n’ Crafty team Stamp & Share a few weeks ago and I just love it.

    Scallop Tag Topper & Punch Art Treat Bag

    There are lots of fun elements to this treat bag, but the nice thing is that with a few punches, it is super quick to make!

    Start with a 2”x8” piece of cardstock (this is Chocolate Chip) and score at 3-1/2” x 4-1/2” to help it stand up on it’s own.  Then, grab the Designer Frames Embossing Folders and use the oval to one to emboss your frame. 

    Use the Extra Wide Oval Punch to punch out the center of your oval.  LOVE that it is an almost perfect match!

    Punch both ends of the strip of cardstock with the Scallop Tag Topper Punch to give you that pretty finished look!

    Then grab your Petite Petals punch  and the four petal flower punch from the Bitty Punch Pack to make your Daffodil.  I punched one of each shape out of Daffodil Delight cardstock.

    In the sample, the flower is stamped first using the Petite Petals stamp set – and I think it definitely adds something to it.  But for the sake of this tutorial, I didn’t end up stamping.  I hope you don’t mind. Smile 

    Fold up the small punched flower and adhere it to the center of your larger flower with liquid glue or a glue dot!  I love how my mom colored in the center of the little flower with the White Gel pen for a little extra definition!

    Add a scrap of cardstock for the stem and grass at the bottom.  Want to hear a fun trick?  Stamp out one of the flower heads from the Too Kind stamp set and then cut it out and use the backside for your grass!  Neat huh?

    image

    Add some candy, tie it with a ribbon and you are done!  Easy Peasy!


      Reminder! Get your guesses emailed in!

      If you haven’t gotten in your guesses for my Retirement List prediction contest, don’t forget to get those in!  You have until tomorrow afternoon but since I know many folks will be busy with Easter activities, you may want to send them in today. Smile 

    Pick 10 stamp sets from the annual catalog that you think will be retiring and email me your list to jennifer@nwstamper.com.  If you have the most guesses correct when the list is posted Monday morning, you will win a shopping spree from me!  See all the details here.

    spaced shop now sig bar

    April Online Stamp Club Hostess CodeG4VQJ7VB
    Use this code to get free exclusive tutorials & project kit! Learn more

  • Sale-a-Bration countdown with Scallop Tag Punch Boxes

    Ok, after spending almost an hour fighting with my computer on formatting of this blog post, I’m just giving up and I hope you don’t mind if it scrolls a little long! 🙂 I’m starting the Sale-a-Bration countdown today and so I’ll be spending the next 4 days sharing Sale-a-Bration projects, and I just know I will have a bunch to share, so I figured I’ll post a few each day to fill you up with ideas! scallop tag punch boxes Last weekend was my first ever Stamp & Share for my group of Fun n’ Crafty demonstrators.  I am so grateful for these ladies and I wanted to make sure I was helping created events and opportunities for everyone to get to know each other, stamp together, and share ideas.  So, I put together an afternoon of stamping fun and business tips.  It was a huge success and I can’t wait to start planning the next one as I’d love to hold these each quarter! This time, I had some great presenters who shared some tips and tricks for some of our tools – specifically the Scallop Tag punch and the Thinlit flip dies.  Kathy Thisted (below) shared on the Scallop Tag punch. She had a TON of good ideas and tips but I’ll share the one that was new and exciting to me!  The idea that you can punch paper that is larger than 2”! I know, that shouldn’t be as mind blowing to me as it is, but I thought you could only punch paper that was 2” or less; but she showed how you can make borders, cut box flaps, and more with larger paper.  The big trick though to making sure you have the scallop edge where you want is to mark the front of your punch with a piece of paper or post-it showing where the edges of the tag opening are.  That way, you can align your score lines or markings on your paper so that the scallop tag end is exactly where you want it! Then she shared a bunch of great boxes including this one – all using some great Sale-a-Bration items including the Sweet Sorbet paper, See Ya Later stamp set, Banner punch, Sweet Sorbet accessories, and the Heartfelt Banner kit :

    It is a simple 2” strip of cardstock that has been folded in half to make your basic bag shape.  Then add small strips of cardstock to the sides (adhering to the inside of your tag) to make the walls to keep your goodies from falling out the sides!  (side note – aren’t those little banners stinkin’ cute sticking out from behind the label framelit cut out?) Next was another box she made, only this time she took two of the flaps and cut the ends using the scallop tag punch.  The opposite flaps were trimmed and decorated.  But the scallop top makes for a cute decorative touch and a great place for a ribbon to tie your box closed.

    Oh!  I totally forgot to point out the coolest part!  See that canvas banner on the side of the box?  Guess where it is from?  And no, she did not hand cut it! Give up?  It is from the Heartfelt Banner kit!!  How clever to cut up the banner kit into cute pieces to use in other projects.  Love that multi-purpose functionality. I just LOVED this third box though.

    Another tall box with the scallop tag punch… but my favorite touches?

    1. The belly band with the huge flower using the Blossom Punch
    2. Tying the Sweet Sorbet twine through the top and anchoring it with a Vintage Faceted button!  Those buttons are really pretty but I never know what to do with them.  Looks like this is a really good answer! Smile

    So, hopefully you saw some fun ideas and inspiration here.  Have a question about one of the boxes?  Leave me a comment or shoot me an email at jennifer@nwstamper.com and I’ll see if I can get the details for you!

    Don’t forget, everything you see here that is from Sale-a-Bration is going away after Monday March 31stSo take advantage of the last 4 days of Sale-a-Bration

    image

    image
    (Yes! There is still time for a last minute facebook or online party!)

    image

    So, have fun and I’ll be back with more ideas for you soon!

    spaced shop now sig bar

    March Online Stamp Club Hostess CodeXEWP4DFD
    Use this code to get free exclusive tutorials & project kit! Learn more


    Supplies Used (click any picture for descriptions or to add to your shopping cart)

    133324s
    125603s
    127555s
    109070s
    132982s
    125598s
    131390s
    124005s
    117193s
    133521s
    133522s
    133533s
    133514s
    133519s
  • Super Fun Spring Wreath with the Burlap and Blooms Kit

    Super Fun Spring Wreath with the Burlap and Blooms Kit

    So, I can make cards.  And I can make scrapbook pages.  I can even make boxes and bags out of paper.
    But when it comes to making cute home décor items, I have to admit I struggle a little bit.  Not because I can’t make them, but because the interior-decorating eye doesn’t come naturally to me and so I never think them up!

    My sister-in-law, on the other hand, doesn’t scrapbook or stamp, but her home has the CUTEST walls around!  I always go over to her place and get inspired to try to make my house look a little more crafty and put together.

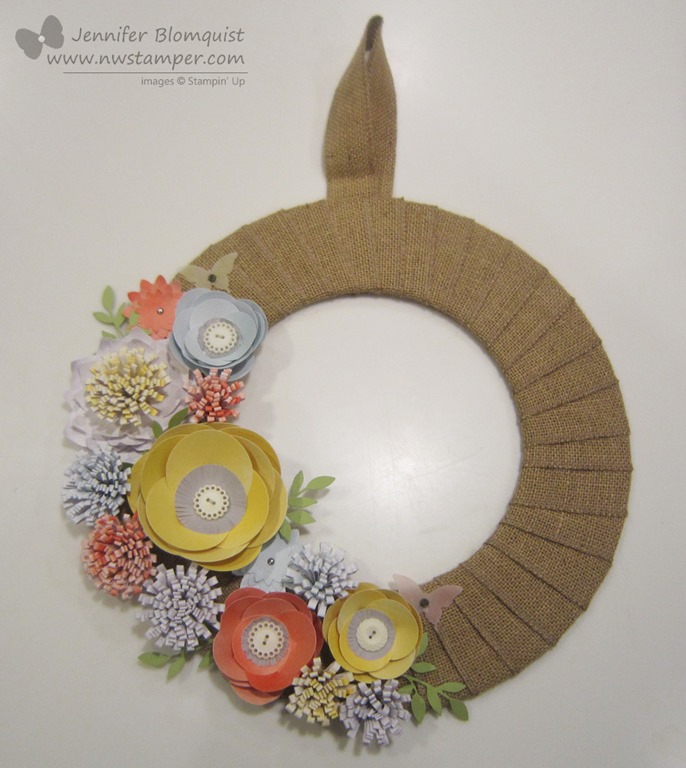
    But check it out ….. I totally made this and I LOVE IT!!

    It looks so crafty and fancy and cute… but the best part, I didn’t have to think of much of anything at all and all the tedious work was done for me!  Yay!

    So, I pulled this all together from the Burlap and Blooms Wreath Kit from Stampin’ Up.
    image

    All I needed was a little bit of time – which can be tricky with two small kiddos who always want to craft with you if they see you at your craft table and you are trying to wield a hot glue gun! – and some adhesive.   Oh, and some scissors for a smidgen of fringing – but only on the grey circles in the middle of the big flowers.

    The biggest problem I had was that the instructions were a bit brief and so I had to figure out what I was doing by my best interpretation.  But in case you are a more visual learner, I put together a video that walks you through how to make each of the flower types in the kit!

    Video Tutorial for making the Flowers in the Burlap and Blooms Kit

    (If you are reading this post in email, and can’t see the video – click here to check it out on my YouTube channel)

    Finally, I wanted to add a few little details that were my own –

    I had so much fun making this wreath that I’m thinking of giving her this one and then getting another one to make for me to keep!  She just moved, so it would make a perfect housewarming gift, don’t you think?

    And don’t forget,
    if you grab 1 kit for you + 1 kit for a gift + the Elegant butterfly punch = 1 FREE sale-a-bration stamp set/paper/punch/accessory of your choice!  Score!

    So, give it a try and if you have any questions, feel free to email me at jennifer@nwstamper.com or leave me a comment and I’d be glad to help clarify things for you!

    spaced shop now sig bar

    Stampin’ Up! Supplies Used

    Ink – Calypso Coral, Daffodil Delight
    Paper – Pear Pizzazz cs, Vellum cs
    Accessories – Burlap and Blooms Wreath kit, Multipurpose liquid glue, Hot glue gun, Big Shot, Little Leaves sizzlit, Elegant Butterfly punch, Vintage Trinket embellishments

  • The Gift Bow Die is Back!

    Do you remember all the super cute creations that were made with the Gift Bow Die over the holidays?  I was shocked that the die wasn’t carried over when the Holiday catalog ended, but then I checked my computer today and IT IS BACK!

    Gift Bow die

    Gift Bow Bigz Die – #129977

    See, you can make cute FLAT bows for your cards like this :

    How perfect would that be for Father’s Day?  Details for how to make this bow are here.

    Or make bows for gifts like this:

    (These are gift boxes my Mom and I made for craft fairs this fall!  If you are curious to see the insides or want one, you can see the details here.)

    Plus, the bows are super easy to make too!  Check out this video for how to make the different bow shapes:

    Get your Gift Bow Die online here

    Have fun, and I’d love to see/hear what you create!

    spaced shop now sig bar

    Stampin’ Supplies Used

    Stamps – Seasonal Sayings
    Ink – Chocolate Chip
    Paper – Gumball Green, Cherry Cobbler, Whisper White, Season of Style designer paper (retired)
    Accessories – Burlap Ribbon, Regals candy dots, Big Shot, Gift Bow die, Crystal Effects

  • Birthday Celebrations with a Treat Topper and Card

    2013-12-20 11.51.12Earlier this week, Nicholas (my now 4yr old) had the chance to celebrate his birthday with his Preschool class.  It’s a special circle time they call a “Birthday Circle” and they all sit around and the birthday child can have mom/dad/siblings come in for the circle while they share photos or something special about each year the birthday child lived. 

    And treats…. we “get” to provide treats.

    Now, the school is, um, “progressive” I’ll say and so they are very particular about what kinds of treats you can bring.  The list looks something like this:

    fruits and vegetables – or – 100% fruit – or -dried fruit – or –

    a snack from one particular organic company.  ~Done~

    Now, I am still trying to get my “Crafty Mom” cred, and so I couldn’t just send him in with applesauce squeezies… oh no, they had to be CUTE applesauce squeezies!  So this is what I created for him:

    2014-01-14 09.09.03

    Isn’t that lizard so adorable?

    So, I sat down the night before (at 10:45 pm, talk about last minute!) and started coloring this one stamp from the Tag It stamp set with my markers so I could stamp 18 of these guys for the treats.  Then I cut each of them out using the coordinating Chalk Talk framelits…. oh and adding the tag hole from the same framelit set.  Do a little sponging and then just the right twine to tie them off. 

    (psst – sneak peek alert!  This twine is from one of the accessory sets available as a freebie during Sale-a-Bration!)

    I got them all ready and sent them in to school, but then I figured the teacher needed a little thank you as well, so I had to make a card for her too using the same theme.  You know everything has to be coordinating!

    Ta-Da!

    Same idea but just a little mixing around of extra accessories and embellishments to turn it into a card.

    I needed some bright paper to match the bright colors in the stamped image  (I got lazy, no tag this time) and and then the AWESOME candy dots to break up the pattern of the paper and tie it into the birthday image.

    So see, it is like a coordinating set!

    Card Supplies Used

    Stamps – Tag It
    Ink – Crushed Curry, Markers:  Gumball Green, Real Red, Crushed Curry, Island Indigo, Early Espresso
    Paper – Crushed Curry cs, Whisper White Cs, Real Red cs, Quatrefancy specialty designer paper
    Accessories – Early Espresso Bakers Twine, Candy Dots (Brights, Regals, Neutrals), 2 1/2” Circle punch, Chalk Talk framelits, Stampin’ Dimensionals, Sponge Daubers, twine (SAB)

    So, don’t forget to try something simple and cute when you need a treat for something.  It doesn’t have to be complicated to be fun and appreciated by the recipients… even if they are 3 yrs old!  Smile 

    Want to see more great Birthday Card ideas?

    Today over on the Stylin’ Stampin’ Inkspiration blog, we are sharing different Birthday card ideas.  This was mine, but there are lots of other ideas and variety to check out.  So, hop on over and see what other cute ideas you can try.


    spaced shop now sig bar

  • Some Valentine Treat Fun for a Blog Hop

    Thank you so much for joining us for our January Stylin’ Stampin’ Squad Blog Hop!  Love is in the air and our talented group of design team members have a Whole Lotta Love Goin’ On as we are excited to be sharing some NEW Occasions Catalog goodies and some Valentine’s Day projects with you this month!

    As you hop along, please be sure to comment and show some love on every blog!  We are always excited to hear from our followers!

    You should have just left stop number 15 on the Stylin’ Stampin’ Squad blog hop – the fabulous Annie Lee. If so, you are in the right spot. If a link doesn’t work or you get off track, you will find  the full blog hop lineup below.

    —————————————————————————-

    So, for the blog hop today, I started and stopped on at least 2 different projects and designs.  Normally that wouldn’t be a bad thing, but with all the crunching to get ready for Leadership, it meant a little last minute creating.

    Thankfully the first project I have to share I was able to get done early!

    A “Wheely” Cool Valentine Card

    I recently got this Love You More Valentine’s Day stamp set and just love this globe image.  But the part that I really thought was fun with this card was the red flowers on the right side of the card front.

    Know what it is?

    Yup, a WHEEL STAMP!  Betsy’s Bloom is the name.  It’s been ages since I pulled them out, but they sure do make a striking background for your card sometime using exactly the color you want.

    Add a bit of ribbon for a finishing touch (and to cover up if you rolled your wheel a little less than exactly straight, ha ha! Winking smile )

    Send a Valentine Treat this Year

    I had one more idea that I wanted to create to share today.  It was an idea in my head that I didn’t have time to complete it before heading to the airport so I punched out a few shapes, grabbed some paper, ink, and stamps… and headed to Houston.

    Turns out, I got to my hotel and set out to create the idea in my head and I discovered that I left my paper trimmer at home.  Oops!  So, check out the ideas and don’t mind the not quite perfect cuts since I had to make due with my little paper snips for all the paper in the project other than the red Chevrons (Chevron punch) and the Heart (lg Full Heart Punch)!

    The idea for this project is a little treat you can send or give to a special someone.  It’s another stamp set from the Love You More set again… I was inspired by the arrow images and thought I would turn a small Hershey bar into it’s own love arrow!

    If you want to make your own, all you need to do is:

    • Wrap a chocolate bar with a patterned paper from the Fresh Prints designer paper stack in the new Occasions catalog and adhered the arrow images from the stamp set for my central point.
    • Stamp the same arrow w/ sentiment (“straight to my heart”) on a strip of Whisper White cardstock. 
    • Adhere a thin strip of Soft Suede cardstock (approx 3/8” strip) across the middle of your stamped image.
    • Punch out a set of chevron pieces from Real Red using the Chevron punch and a heart from Real Red using the Heart punch.
    • Adhere the Whisper White strip to a piece of Soft Suede cardstock for matting.
    • Adhere the wrapped chocolate over the center of the arrow so that it covers all but the “Straight to the Heart” sentiment.
    • Done!

    So I hope you enjoyed my projects today and check out more great projects on the hop using the links below.

    Blog Hop Participants:
    SSS blog hop next arrow

    1. Anastasia R. of Stampin’ Blondie
    2. Cynthia R. of Ink-a-Doodle Creations
    3. Dawn S. of Dawn’s Creative Chalet
    4. Kathy P of Katrina P’s Creative Corner 
    5. Pamela W. of Stinky Tofu
    6. Diana E. of Stampin’ Fun with Diana
    7. Darla R. & Nancy K. of Stampin With Darla and Sisters
    8. Jamie H. of Unique Ink
    9. Rose C. of Stamp with Rose
    10. Kim R. of Stamping with Kim
    11. Darcy J. of DJ’s Stampin’ Place
    12. Bree R. of Craft-Somnia
    13. Kristina M. of Mama’s Sanity
    14. Annie L. of Love Me Cards
    15. Jennifer B. of NW Stamper  <— YOU ARE HERE
    16. Tonya B. of Stampin’ with Tonya
    17. Heidi B. of Stuck on Stampin
    Interested in updates from Leadership 2014?
    I’ll be spending the next few days in Houston, TX getting filled with new project ideas and updates from Stampin’ Up!  I’ll be trying to share what I can
    via my Facebook page and then coming back in the evening and sharing a summary of what I saw. 

    So enjoy all the inspiration today and stop back by tomorrow to see what’s happening in good ol’ Texas!

    spaced shop now sig bar

  • Birthday Celebration Fun Framed Art

    I was going through my projects and pictures I’ve taken of inspirational ideas and I stumbled across this picture of an AWESOME framed stamped art that fellow demonstrator Karen Trelfa created.  She shared this with us at Founder’s Circle and I totally forgot about it.  But wouldn’t this be a cool thing to create?

    The cool thing about it is that it uses different random bits that you have around home and in your stamping supplies to create a cool collage effect to help celebrate any holiday or event.

    Some of the supplies found in this art:

    • The Alphabet Press embossing folder to make the textured background behind all the punched and decorated squares
    • Most of the squares use squares out of different patterns from the Birthday Basics designer paper
    • Stamped images from different sets including: Sketched Birthdays, Flower Shop, Sweets for the Sweet, A Fitting Occasion, and Label Love
    • The Cupcake Punch
    • Marina Mist 1/8” Taffeta Ribbon
    • Glimmer Brads
    • And misc cardstock and ink

    But I just think the look of all the different layered elements just looks so cool!  What do you think?

    Last Day of Giveaways for the Birthday Celebrations!

    I have been having so much fun sharing ideas and sharing some of my scrappy stash with all of you over the last few days!  Thank you for joining the fun with me!  For my last day of

    Northwest Stamper Birthday Weekend Giveaway – Day 4

    image

    For the last day, I’m giving away a sampler of all the papers in the current Annual catalog!  You’ll get 78 6×6 sheets of double sided cardstock.  This is a fun way to get to see in person all the different designs and have enough to make multiple cards or projects from each sheet.

    Enter to win today’s giveaway by any combination of the following:

    • Leave a comment on this blog post sharing what is your favorite type of project to create!
    • Visit my facebook page and leave a comment today’s card post sharing if you sent out Christmas cards this year or if you were like me and have waited until the very last minute. Smile
      While you are there, don’t forget to make sure you’ve liked my page and are getting notifications to ensure you catch all the fun!
    • Place an order online or by emailing me at jennifer@nwstamper.com and get 2 extra entries

    Good luck!  I’ll be drawing all the winners tomorrow morning and announcing them here on the blog!

    If you want to enter for the prior days, you still have time.  Make sure to visit Day 1, Day 2, and Day 3 here on the blog and over on facebook to get entered.


    spaced shop now sig bar

  • Fun Ideas for Gift Giving for a Holiday Blog Hop!

    As promised in my 12 weeks of Christmas newsletter yesterday, today I’m back with a fun blog hop to give you even more ideas for the holiday season!  So sit back and enjoy the ideas!


    Thank you so much for joining us for the November Stylin’ Stampin’ Squad Blog Hop! This month our projects focus on Christmas. While we have yet to give thanks this month, some of us are already thinking about sending Christmas cards, what kind of packaging to present gifts in and how we want to deck our halls. On this month’s blog hop we are showcasing many of the Stampin’ Up! products that are available in the Holiday Catalog. You will see everything from cards to gift tags to 3-D décor and gift packaging. We hope you enjoy seeing how we use the products to create our projects and feel inspired to come up with some great projects of your own.  Remember you can order all of the products showcased from your Stampin’ Up! Demonstrator.

     You should have just left stop number 13 on the Stylin’ Stampin’ Squad blog hop – the oh so fabulous Pam Wu. If so, you are in the right spot. If a link doesn’t work or you get off track, you will find the full blog hop lineup below.

     Holiday Gift Box & Card

    So, my project set that I wanted to show you today was a neat way to use some of the latest from the Holiday catalog as well as taking advantage of the current specials (Holiday Tag It Bundle, which includes the box, Cherry Cobbler ribbon, and Baker’s Twine I used) and sales (Weekly Deals – Burlap Ribbon!) to make these gifts for an even better deal! 🙂  Because, seriously who doesn’t love the thrill of getting a deal on your holiday gifts?

    Anyway, so this is what I created:

    Window gift box with Best of Snow hedgehogs

    This is the very quick to assemble window gift box that has a belly band made of the Burlap ribbon (who knew this stuff was going to be this great to work with) a bow of the 1″ Cherry Cobbler ribbon (which I might add is way softer than you think it is going to be!!) and a tag made with favorite bundle right now, the Tags 4 you stamp set and Bracket Label punch.

    Now, one of the things I love doing with this Tags 4 You stamp set is to add a bit of Dazzling Details to make it super sparkly.  It is always super hard to photograph but I think I finally caught it. 🙂
    Dazzling details tags 4 you

    Can you see the sparkle?  I added the glitter to all of the white parts of the tag plus to the centers of the “o”s.  Just for a little pop.

    And on the side, this isn’t just any plain old burlap ribbon… oh no… this is CUSTOM baby!!  I grabbed my Chevron background stamp and Gumball Green ink and stamped some chevrons around the ribbon.  Isn’t it a fun touch?

    Window gift box with stamped burlap ribbon

    And in case you were wondering, those adorable hedgehogs in the window?  Those are actually from the new Best of Snow stamp set that came out this month.  I just had to get the set because not only does it have the hedgehogs, but it has a cute snowman, a snowflake (that fits the Festive Flurries framelits!) and a stamp that matches the Bracket Label punch!  Sweet, right?
    Best of Snow card with gift boxHere is what it looks like when you pull the card out, but I love how you can see them perfectly through the window of the card.  I again used the burlap ribbon and then had a background from the Season of Style designer paper pad.  Its quick, easy, and super cute.

    Now imagine that hedgehog circle on top of a cute belly band or gift inside the box.  A cool way to package up your gifts in a way that looks adorable in every stage.

    So I hope you enjoyed my ideas for you today and maybe found some gems in the Holiday catalog you hadn’t noticed before.  There are lots more ideas for you on the hop today so check them out and have fun!

    Blog Hop Participants:

    1. Pam S. of Stampin’ in the Sun
    2. Dawn S. of Dawn’s Creative Chalet
    3. Darcy J. of DJ’s Stampin’ Place
    4. Annie L. of Love Me Cards
    5. Cynthia R. of Ink-a-Doodle Creations
    6. Jamie H. of Unique Ink
    7. Kim R. of Stamping with Kim
    8. Tonya B. of Stampin’ with Tonya
    9. Diana E. of Stampin’ Fun with Diana
    10. Heidi B of Stuck on Stampin’
    11. Bree R. of Craft-Somnia
    12. Anastasia R. of Stampin’ Blondie
    13. Pamela W. of Stinky Tofu
    14. Jennifer B. of NW Stamper <—- YOU ARE HERE!
    15. Kristina M. of Mama’s Sanity
    16. Shellie G. of Craft Smashup


    spaced shop now sig bar