Northwest Stamper

Category: Decor

Get ideas for creating custom home decor and altered items for fun gifts and decor tailored to your favorites! These project ideas include framed art, decorated notebooks, book marks, and other altered projects.

  • Project Life Cards Make Great Altered Picture Frames!

    Project Life Cards Make Great Altered Picture Frames!

    By now, You’ve probably heard of Project Life and know the cards in each kit are great for quick and easy scrapbooking (if you want to learn more about project life, I have a video about it here).  But when they gave a set to us to use for the 2014 Stampin’ Up Convention display boards and use in other ways, I found myself looking at them in a different light.  And thus, this altered picture frame came to be!

    I loved this project and even my non-crafty hubby liked it and said he wanted one for his desk at work!  Thankfully the frame is only $1 at Michaels and another set of Everyday Adventure Project Life by Stampin’ up is easy to come by!  So, I’ll be creating another one soon for him. 
    See all the cards in the kit here.

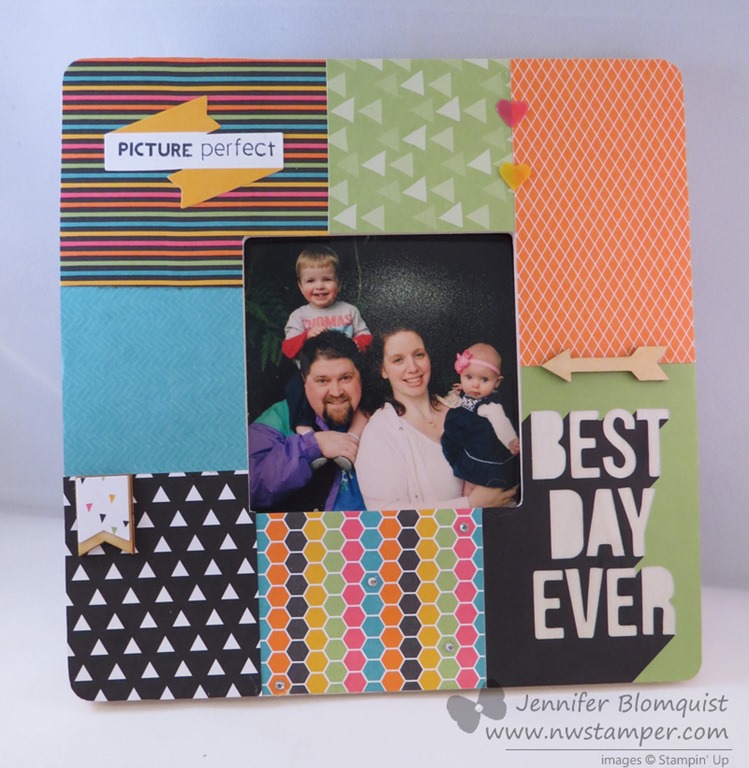
    The idea was to take this chunky frame and then start layering the cards around the edges to create a tiled design.  It all started with the Best Day Every card that is found in the Everyday Adventure Accessory Kit.  I thought it was cool because it is die cut so that you see through the card to whatever is behind it, so I thought it would look neat showing the wood of the frame through the letters.

    From there I started laying out other cards that I thought had cool complimentary colors and patterns to fill up the frame.  Once I had the plan, I could flip over the frame and trace the edges of the frame on the back of the Project Life card for any given spot.

    Then just trim off the extra paper and glue to your frame.  In my case, I ended up using the Tombow Liquid Glue.  And then finish up the seams by adding some embellishements from the Accessory kit (like those clear hearts) and other items in my craft room (like the rhinestones on the honeycomb card and the wooden accents such as the arrow and banner piece).

    It actually came together really quickly and easily.  And did you realize, that the Banner Punch actually is the same width and just a smidge shorter than the banners in the Wooden Accents?  Cool huh?

    Finally, I didn’t use it a lot, but I love the Remember This Project Life stamp set and it turned out to be perfect for stamping one of the stickers from the Accessory kit and balancing out everything on my frame!

    Its an easy and inexpensive idea for a great gift!

    Wanna Make This With Me?

    I’m running a Project Life Night class next Monday and RSVPs are closing first thing tomorrow morning!  We will be making lots of fun projects including:

    • 2 page pocket page scrapbook layout
    • 3 cards
    • 2 gift ables including a picture frame similar to the one I made in this post.

    You will get everything you need to make the projects plus have lots of extra Project Life cards to take home and keep!  All for only $25

    RSVP now to participate in this fun class!  RSVP here to join me in person at the Redmond Panera at 7pm on 7/28

    ~OR~

    Get the To-Go Kit!  You will get all the supplies you need to create the projects including basic adhesive for your picture frame, PDF pictures of all the projects, and instructions for how to make the projects.  Only $35 shipped anywhere in the US!


    Project Supplies Used

    So, think outside the Scrapbooking box and enjoy your Project Life cards in all kinds of new ways. Smile 

    spaced shop now sig bar

    July Online Stamp Club Hostess Code – 7RDHVEKR
    Use this code to get free exclusive tutorials & project kit! Learn more

  • Super Fun Spring Wreath with the Burlap and Blooms Kit

    Super Fun Spring Wreath with the Burlap and Blooms Kit

    So, I can make cards.  And I can make scrapbook pages.  I can even make boxes and bags out of paper.
    But when it comes to making cute home décor items, I have to admit I struggle a little bit.  Not because I can’t make them, but because the interior-decorating eye doesn’t come naturally to me and so I never think them up!

    My sister-in-law, on the other hand, doesn’t scrapbook or stamp, but her home has the CUTEST walls around!  I always go over to her place and get inspired to try to make my house look a little more crafty and put together.

    But check it out ….. I totally made this and I LOVE IT!!

    It looks so crafty and fancy and cute… but the best part, I didn’t have to think of much of anything at all and all the tedious work was done for me!  Yay!

    So, I pulled this all together from the Burlap and Blooms Wreath Kit from Stampin’ Up.
    image

    All I needed was a little bit of time – which can be tricky with two small kiddos who always want to craft with you if they see you at your craft table and you are trying to wield a hot glue gun! – and some adhesive.   Oh, and some scissors for a smidgen of fringing – but only on the grey circles in the middle of the big flowers.

    The biggest problem I had was that the instructions were a bit brief and so I had to figure out what I was doing by my best interpretation.  But in case you are a more visual learner, I put together a video that walks you through how to make each of the flower types in the kit!

    Video Tutorial for making the Flowers in the Burlap and Blooms Kit

    (If you are reading this post in email, and can’t see the video – click here to check it out on my YouTube channel)

    Finally, I wanted to add a few little details that were my own –

    I had so much fun making this wreath that I’m thinking of giving her this one and then getting another one to make for me to keep!  She just moved, so it would make a perfect housewarming gift, don’t you think?

    And don’t forget,
    if you grab 1 kit for you + 1 kit for a gift + the Elegant butterfly punch = 1 FREE sale-a-bration stamp set/paper/punch/accessory of your choice!  Score!

    So, give it a try and if you have any questions, feel free to email me at jennifer@nwstamper.com or leave me a comment and I’d be glad to help clarify things for you!

    spaced shop now sig bar

    Stampin’ Up! Supplies Used

    Ink – Calypso Coral, Daffodil Delight
    Paper – Pear Pizzazz cs, Vellum cs
    Accessories – Burlap and Blooms Wreath kit, Multipurpose liquid glue, Hot glue gun, Big Shot, Little Leaves sizzlit, Elegant Butterfly punch, Vintage Trinket embellishments

  • Birthday Celebration Fun Framed Art

    I was going through my projects and pictures I’ve taken of inspirational ideas and I stumbled across this picture of an AWESOME framed stamped art that fellow demonstrator Karen Trelfa created.  She shared this with us at Founder’s Circle and I totally forgot about it.  But wouldn’t this be a cool thing to create?

    The cool thing about it is that it uses different random bits that you have around home and in your stamping supplies to create a cool collage effect to help celebrate any holiday or event.

    Some of the supplies found in this art:

    • The Alphabet Press embossing folder to make the textured background behind all the punched and decorated squares
    • Most of the squares use squares out of different patterns from the Birthday Basics designer paper
    • Stamped images from different sets including: Sketched Birthdays, Flower Shop, Sweets for the Sweet, A Fitting Occasion, and Label Love
    • The Cupcake Punch
    • Marina Mist 1/8” Taffeta Ribbon
    • Glimmer Brads
    • And misc cardstock and ink

    But I just think the look of all the different layered elements just looks so cool!  What do you think?

    Last Day of Giveaways for the Birthday Celebrations!

    I have been having so much fun sharing ideas and sharing some of my scrappy stash with all of you over the last few days!  Thank you for joining the fun with me!  For my last day of

    Northwest Stamper Birthday Weekend Giveaway – Day 4

    image

    For the last day, I’m giving away a sampler of all the papers in the current Annual catalog!  You’ll get 78 6×6 sheets of double sided cardstock.  This is a fun way to get to see in person all the different designs and have enough to make multiple cards or projects from each sheet.

    Enter to win today’s giveaway by any combination of the following:

    • Leave a comment on this blog post sharing what is your favorite type of project to create!
    • Visit my facebook page and leave a comment today’s card post sharing if you sent out Christmas cards this year or if you were like me and have waited until the very last minute. Smile
      While you are there, don’t forget to make sure you’ve liked my page and are getting notifications to ensure you catch all the fun!
    • Place an order online or by emailing me at jennifer@nwstamper.com and get 2 extra entries

    Good luck!  I’ll be drawing all the winners tomorrow morning and announcing them here on the blog!

    If you want to enter for the prior days, you still have time.  Make sure to visit Day 1, Day 2, and Day 3 here on the blog and over on facebook to get entered.


    spaced shop now sig bar

  • Getting Creative with the Christmas Star Stamp

    Woo hoo!  Today is the day that I’m heading to Utah for Founder’s Circle and I don’t think I could be any more excited!  5 days to relax, stamp, explore, and socialize with some amazing stampers and demonstrators – what could be a better vacation? 

    I’ll be blogging from my trip in Utah as well as offering a Founder Circle special while I’m away!  So, be sure to stop back by the blog to catch all the excitement.


    But, while I’m traveling, I wanted to make sure to share with you some new project ideas using the Christmas Star holiday single stamp

    This stamp is an elegant way to decorate or create for the holidays.  And the coolest part is that it is super easy to make it pop-out into a 3D star!  But more on that in a minute. Smile 

    Now, first thing, I’ll warn you – this stamp is bigger than you think.  I ordered the stamp and didn’t really pay attention to what clear block the flyer listed that was required for it.  I assumed one of my medium blocks would work – NOPE!  It takes the biggest block (block F).

    Yup.  That is a 4.25” x 5.5” card base and the Christmas Star next to it!

    Now, you may be wondering what can I do with a stamp that big? 

    Why, make cute cards and home décor projects, of course!  Smile The first thing I did was make a Christmas card with the star.

    I decided to go for a more vintage-y feel and so I stamped on Crumb Cake paper with my Cherry Cobbler ink.  Sponge the edges with Crumb Cake ink and then add a touch of sparkle with some Silver Glimmer paper.  Pretty, no?

    Then I wanted to play with the fact that you could make the star into a 3D star.

    How do you make the Christmas Star pop up?
    1. Stamp your Christmas Star image on a piece of white cardstock
    2. Cut out the star (yes, you need to hand cut this, but it isn’t as bad as you think)
    3. Fold the star in half using the white lines that radiate out from the center of the star as guidelines.
    4. Use your bone folder to press each fold line (you should fold in half 5 times)
    5. Set your star on a table or flat surface and then gently squeeze the sides in to cause the center of the star to push up off the table. 
    6. Your star should stay dimensional and you can now add it to your projects!

    Once I made my star, I knew I had to put in on something, so I made this rosette ornament.

    I cut two strips of 1.75” x 11” pieces of Wild Wasabi cardstock and then scored it at 1/4” increments.  Then I could fold my paper back and forth to create the accordian look. 

    Glue the ends of each strip together to make one big circle and then push the center down flat to make my rosette.  Now, I haven’t made many rosettes before, and I’m a complete newbie to my hot glue gun…. so, when I had to hot glue the middle of my rosette together so it would stay flat, it got a bit messy!  But it works, and I covered it up, so you’d never know!

    Then I just added a circle of Silver Glimmer paper (adhering with hot glue again) and then added my star (adhering with glue dots) to the top.  Punch a hole in the rosette and run some of the new Silver 1/8” taffeta ribbon from the holiday catalog and you have yourself an ornament!

    Oh, and the rhinestone!  Don’t forget the rhinestone in the center of the star!

    So see, there are lots of cute things you can do with this stamp – even if it is big!

    Founders Circle Special – Double Rewards All Weekend Long!

    Since I can’t take you all with me to Founder’s Circle this weekend, I thought I would try to do something special to celebrate anyway.

    So, from 9/18–9/22, receive DOUBLE your reward punches for each purchase!

    That is right! For every $40 you order, you will receive two punches on your punch card and be that much closer to receiving a free stamp set of your choice!

    See how Northwest Stamper Reward Punches work

    and as an extra thank you,

    Everyone who places an order between now and 9/22 will be entered to win a free Christmas Star stamp and Rhinestones!

    So, have a great weekend and I’ll see you back on here soon!

    spaced shop now sig bar

  • April Showers bring May Flowers with the Bloomin’ Boutique Kit

    Happy May Day!  Have you seen the new Bloomin’ Boutique kit that just came out on Monday?  If you are looking for something pretty to inspire you on your desk at home (which is what I think my office needs) or as a fun gift for someone, then this may be right up your alley.

    Bloomin Boutique Kit


    When you get the kit, it includes:

    • 2 sheets of preprinted and precut flowers on 12″ X 12″ cardstock; makes 13 flowers using Pool Party, Gumball Green, Calypso Coral, Daffodil Delight, and Rich Razzleberry
    • 13 Vintage Faceted Buttons
    • 13 green floral wire stems

    Pretty, right?  There even is a video for how it all goes together.  Check out the video below to see how quick these can go together.


    These kits are while supplies last, so if you are looking to make some May flowers for yourself, you can pick it up from the online store here- Bloomin’ Boutique Project Kit.

    —————————————————————

    And yes! You can get this kit as part of your hostess rewards or on a workshop order!

    Don’t forget that if your order or party is $350 or more, you will get an extra $30 in free hostess rewards making it a total of $80 in freebies you can grab.

    Or join my Fun n’ Crafty group and get a bonus $30 to spend on your starter kit.

    Both offers are available until May 30th!


    Until next time!  Happy Stamping!


    To Order Stampin’ Up! Products Anytime, click here!

    See the Latest Availability & PDFs of all the retiring stamps and accessories here

  • Holiday Blog Hop with the Stylin’ Stampin’ Squad!

    Last month I was honored to be asked to join a group of very talented guys and gals for a monthly blog hop showcasing fresh ideas using Stampin’ Up! goodies.  Given how it feels like the last couple months have been crazy busy, I figured having a deadline and a theme to work with would be fun to try, so I had to say yes!

    First up, I was asked to show a 3D item and since I had recently bought this alterable kit for a Christmas countdown, I thought it would be a fun place to start.

    I LOVE the Christmas season and it is the one time of year that I for sure pull out decorations and try to get in to the season.  So, when I saw this kit for a wood Christmas countdown tree, I couldn’t wait to get it and take it home to decorate!

    This is what it looked like when I got it home (well, after I cut apart the number tags):

    raw christmas countdown tree

    I do have to say, this project got me well over my fear of Exacto knives!  I used mine A LOT in cutting apart the tags and trimming my paper to my cut out shape.  Now if only Stampin’ Up! still sold those big grid self healing mats that I see 10 yr+ demos using, I would be set!

    Anyway, I used a few of my holiday catalog toys to decorate my tree this year.

    Candlelight Christmas dsp sampleI used pattern paper from the elegant Candlelight Christmas specialty designer paper for my tree and some Chocolate chip cardstock for the base (and you can kind of tell in the picture, but I grabbed my trusty sponge daubers and inked up the edges of the wood so it would blend in a bit better – like the Chocolate Chip ink on the piece that is pointed at the camera).

    I used a different pattern from the same pack to cover my numbers tags which hang from hooks on the front of the tree.

    After all the paper was stuck to the wood, I went ahead and mod podged the whole thing.  I figured that if I coated the paper layer, then if I wanted to change up the decorations over the years, I could do that and the base tree would still look nice.  We’ll see if that is how it works in practice though over the next few years!

    Then, to decorate, merry minis punch pack sampleI strung some Rhinestone strands and punched out lights using the cute Merry Minis punch pack.  I also used the star from this punch pack to make the star for the top of my tree.  I punched the star out of the Champagne Glimmer paper (such AWESOME paper) and then put it on a 3/4” circle which was then placed in a 1 1/4” scallop circle – also new from the Holiday catalog. Smile

    The circle ornaments are actually just punched designs from the same Candlelight Christmas paper pack and then sponged around the edges for some definition.

    Finally, one of the rules of the blog hop was to use current Stampin’ Up! products only.  And while I cheated a little because I accidentally used a retired Big Shot alphabet set for the numbers on my countdown tags (it was Timeless Type for those of you that are interested), I needed to figure out what to do for my “title” on my tree.

    I knew I wanted it to says “days til Christmas” but I didn’t have a stamp that said that and I was too lazy to go upstairs to my computer to find something I liked on My Digital Studio. Smile So, I improvised from the stamps in my craft room and replicated the tiny letter stickers you see in scrapbooking stores.

    IMG_1707

    I grabbed my Made for You stamp set and got to work inking it up with my marker and stamping a million times to get the letters I wanted.  Then I just cut them out and pieced them together at the bottom of my tree.  The “Christmas” sentiment was from a different stamp set – Petite Pairs – and again, was just inking up part of the stamp and cutting it out.

    made for you

    I thought it was kind of clever! Smile

    Alright, and I think I’m supposed to share a card as well… and I know this post is getting super long, so I’ll try to be fast!

    Ok, so this card was put together using the Christmas tree countdown as inspiration.  I used the same colors and elements to create a quick 4.25” x 4.25” holiday card.  Just layer a few punches and you are good to go!

    So, I hope you enjoyed the projects I have to share with you today and if you want even more ideas, hop along and check out the other great stuff my “Stylin’ Squad” buddies have in store for you!  Since I’m the last person on the tour, click the button below to head to the start of the tour and hop away.


    Blog Hop Participants:

    1. Shellie G. of Creative Electica
    2. Annie L. of Love Me Cards
    3. Pam S. of Stampin’ in the Sun!
    4. Nancy B. of Lady Stamps-A-Lot
    5. Rose C. of Stamp with Rose
    6. Tonya B. of Stampin’ with Tonya
    7. Dawn S. of Dawn’s Creative Chalet
    8. Darcy J. of DJ’s Stampin’ Place
    9. Kim R. of Stamping with Kim
    10. Terry B. of Goin’ Over the Edge
    11. Justin K. of JK Cards
    12. Heidi B. of Stuck on Stampin’
    13. Jennifer B. of Northwest Stamperthat’s me!

    To Order Stampin’ Up! Products Anytime, click here!

    Its INK-REDIBLE December!
    Get a FREE set of 10 ink pads with a qualifying order or party; or get them free when you join the Stampin’ Up! family! Learn more

    Are you earning your Northwest Stamper Rewards?
    Every order gets you closer to your FREE stamp set! Click here to learn more!

  • Happy Halloween! Plus some tips for your Artist’s Tray

    Halloween is finally here and while I didn’t get all of the projects I meant to get done for Halloween, I did have some fun this weekend getting ready with the kids.  I love the fun crafts and activities that go with the holiday season.  In this case, carving pumpkins, painting little pumpkins,IMAG0631


    or in Caitlin’s case, trying to eat the paint for painting pumpkins! 🙂

    IMAG0630


    But I also thought I would share my Halloween craft project, too.  This is the Halloween Artist’s Tray project that Stampin’ Up! offered as part of a promotion when you joined Stampin’ Up! (or had someone join your group during the promo period).  It was way cuter in person than I expected and I got some friends together to make it.

    Halloween Printer's Tray


    Artist Tray Tips:

    I thought I would share some tips that I discovered while making the tray, in case you have this project at home still to make or you want to make something similar!

    • I adhered all of my inserts to my tray using slim velcro dots.  This was to make it easier to pull out and replace the inserts with a different holiday or design so I can use this tray year round.  Then I can reuse the inserts each year. In this picture, I took a slim velcro dot and cut it in half so it would hold the top and the bottom of the paper down.  The easiest way to apply your velcro is to stick both sides of the velcro together and put them into the tray.  You’ll have adhesive exposed, and then you can just press your paper into the space and know your velcro will be lined up.


      Halloween Printer's Tray close up

    • Use a stamp-a-ma-jig and grid paper if you care about precision in lining up your images (like the gravestone images in the bottom left space).  I positioned my paper in the center of the grid paper, so my paper was always lined up the same way and used the stamp-a-ma-jig to make sure I was stamping the same depth in each time.
    • When making your rosettes, use hot glue to hold them together.  If you use the silicone mat, it is SUPER EASY and NO MESS!!  I’m serious, I was a little afraid of my hot glue gun but the mat made it so easy and I LOVE it! 
    • And one more rosette tip, if you have to make a half rosette (like the orange one in the bottom right), you will have to hold it in a half circle shape and add lots of glue.  Make sure you squeeze the center together tightly!  I didn’t and my rosette was too big. Oops!
    • The project called for a bow in the Striped Satin ribbon near the polka dot designer series paper.  Normally I don’t have a problem with bows…. um, this time…. I couldn’t make a nice bow no matter what I did!  So, if it doesn’t work for you, chuck it!  You don’t need a bow for a cute project. 🙂
    • Ok, last tip – When you hang your banners from the top of the tray handle and adhere to the back of the tray, your banners may or may not hang how you like.  I ended up using a glue dot to hold the middle banner in place on one of the tray lips so I knew it would hang how I like.

    Alright, so those are my tips for now.  I’ll be making more inserts and can’t wait to share them with you in the future.  If there is interest, I’ll put together some kits for you to make your own as well!


    But until, then, have a very Happy and Safe Halloween!  From me and my monsters, to you. 🙂

    IMAG0600_BURST001IMAG0606

    To Order Stampin’ Up! Products Anytime, click here!

    Check out the 2012 Holiday Catalog

    Are you earning your Northwest Stamper Rewards? Every order gets you closer to your FREE stamp set! Click here to learn more!

  • Make Your Own Craft Tote with your Big Shot!

    I’ll tel(l you up front that this project requires sewing, which means you know I didn’t make it myself. Smile  Instead, my fabulously talented friend Annie Lee created this for me using some of the Springtime Vintage fabric I gave her (and Yes! This is one of the fabrics that is on clearance right now for only $0.99!)

    Isn’t it super awesome?!  I have it sitting by my craft table all the time.  Though what I love about it is that I feel like even the sewing newbie like me could make this!

    stampin up fabric caddy

    See, the trick to me is cutting lots of squares out of the fabric using the Scallop Square Bigz die.  It gives you consistent sized pieces for your projects, its easy, and did you know you can run multiple layers of fabric through in one pass through your Big Shot?

    Wha-Bam!!  Talk about speedy cutting for your sewing project, right? Smile

    Anyway, the caddy is 2 squares long on each side with a divider down the middle.  Then divide one half again to give you the three compartments.  Does that make any sense?  I think, this took 22 Scallop Squares (one on the outside and one on the inside for each square you see).  She also stitched in some of the retired – so sad – stitched 5/8” Rose Red grosgrain ribbon.

    Wanna see it again from another angle?  Oooh… Pretty!

    stampin up fabric caddy front

    Now just think for a minute how expensive these totes are in the stores… now imagine how much money you save when you buy this fabric from the clearance rack for only $0.99 for 3 extra-large fat quarters.  Um, yeah, you would probably save enough to buy some goodies to stuff your bag with.  hee hee… or maybe that is what I would do.

    Shop online to snag your fabric now

    PS – Did you know, that if you decided to sign up with Stampin’ Up! as a demonstrator this month, not only would you get the $125 worth of product for $99, plus the free Halloween project kit, but you would also receive 20% off your order of fabric.  So, those $0.99 fabric sets just got knocked down to about $0.79!  Just saying!


    To Order Stampin’ Up! Products Anytime, click here!

    Are you earning your Northwest Stamper Rewards? Every order gets you closer to your FREE stamp set! Click here to learn more!

  • Convention 2012 Display Boards!

    One of the big reasons to go to convention is to see all the tons of amazing samples and displays.  They have huge boards that are organized by common colors (so you get a rainbow effect as you walk along the boards), by artisan award finalists, and boards full of samples using the stamp sets we are given at convention.  That is a lot of samples!!

    So, to help you get started with some new ideas here are some of the display boards to give you lots and LOTS of ideas!

    IMAG0006IMAG0001 (4)IMAG0005 (2)IMAG0005IMAG0006IMAG0012IMG_0457IMG_1048IMG_0028IMG_0029IMG_0032IMG_0042IMG_0050IMG_0051IMG_0043IMG_0052IMG_0054IMG_0056

    Whew!  So are you feeling inspired yet?  I told you there are so many amazing ideas there.  I decided this year that I’m going to pick a few of my favorites and use them in my classes and for blog posts of the coming year.  So, thank you to everyone who contributed to these boards for sharing the amazing ideas!

    So, I’d love to hear… leave a comment here or on my facebook page with with cards from the boards are your favorites!

    To Order Stampin’ Up! Products Anytime, click here!

    Are you earning your Northwest Stamper Rewards? Every order gets you closer to your FREE stamp set! Click here to learn more!

  • Something Different–a Fabric Credit Card Holder!

    I thought today I would share something different then my usual card/paper craft project, plus it is a great example of what you can use with some of the fun 60% off items in the Stampin’ Up! Clearance Rack!

    This is a cool little project that my friend Annie Lee made for me that I use every single day!  This was made as a business card holder but I started using it as my credit card wallet and I love it!

    stampin up fabric card holder closed


    So, this used some of last year’s Candy Cane Christmas fabric and the Big Designer Buttons.  She sewed two pieces of fabric together for the cover (so there is cute striped fabric on the inside and polka dot fabric on the outside).  The clever part is she took a hair rubber band and stitched it between those two layers on one side to be used as the “clasp”.  There is also a line of stitching half way between the two short edges to hold the fabric together and make a clean fold for the wallet to fold in half around.  Finally, she added another polka dot fabric piece to each side to make the pockets.

    stampin up fabric card holderstampin up fabric card holder inside

    Add a button to the front and it works awesome!  Having a diaper bag with me all the time, it is nice to be able to have a small wallet for my credit cards that I can put in the pocket and not have it take up too much space in my overstuffed bag. Smile

    If you want to make your own, there is still some retired fabric and a few colors of these designer buttons in the Clearance Rack for a great deal!!  The retired fabric is only $3.99 and the buttons are only $3.59!  Didn’t I tell you it is an awesome deal?   That is 60% off!

    Well, hope you have a great Friday…. and only 4 days until I’m off to the Stampin’ Up! convention!

    To Order Stampin’ Up! Products Anytime, click here!

    Are you earning your Northwest Stamper Rewards? Every order gets you closer to your FREE stamp set! Click here to learn more!

  • Fabric Pocket Tissue Holder

    So, I’ve said it before and I’ll say it again, I’m not a sew-er.  As in, I don’t own a sewing machine or wouldn’t know what to do if placed in front of one if I had to do anything other than push the pedal down and move my fabric forward.  🙂

    I do, however, have a great demo friend name Annie Lee who loves sewing and when I was getting ready for the Northwest Women’s Show, offered to take some of my Stampin’ Up! designer fabric and make some project samples with it.

    In this case, it is a fabric holder for those pocket tissue packs using the retiring Candy Cane Christmas fabric (right now its 70% off too! Total steal! Check out all the designer fabric options):

    stampin up fabric pocket tissue holder


    I mean, seriously, who wouldn’t feel a bit cheered up with these bright and fun colors when you are feeling under the weather?

    stampin up fabric pocket tissue holder filled


    So, a huge THANK YOU to Annie for showing me some super fun ideas for when I get over my fear of the sewing machine and try it out myself.


    To Order Stampin’ Up! Products Anytime, click here!

    Get them before they are gone! Items are selling out so don’t miss out!

    Retiring Stamps | Retiring Accessories | Retiring Décor Elements

    Are you earning your Northwest Stamper Rewards? Every order gets you closer to your FREE stamp set! Click here to learn more!

  • Altered Clipboard Countdown Ticker

    Have you ever looked at your stash of supplies, whether scrapbooking paper or office supplies, and realized you had more than you thought? That was me after organizing my craft room at the end of last year.  So I joined a group of girl friends in declaring a 100-project challenge!


    For this challenge, you are supposed to create 100 projects using the supplies you have before you buy more stuff.  You are allowed to declare exceptions – like I said I could get more adhesive, supplies for my Stampin’ Up! classes, and page protectors for scrapbook albums.  However, soon after starting the challenge, I realized I was having a hard time remembering what number I was on, and so I decided to make myself a little countdown ticker.


    I found a smaller clipboard at a local craft store for $1 and so I snagged it and brought it home to decorate – hey it counts as one of my projects that way!

    I dug into my retired designer paper and found that I had tons of this Junior Varsity pattern and so grabbed a pack and got to work.  I covered the front and the back of the clipboard with designer paper and then used the Big Shot to cut out a title using the Go Go Boots alphabet dies I got on the Clearance Rack.

    Then for the numbers, I used my Simple Numbers Bigz die to cut out two sets of 0-9 numbers.  Then I created cardstock tags that could be clipped up and traded out as I worked my way through my projects.

    After I finished, I thought I should have made the title or decoration on the clipboard more generic so I could use it for all kinds of other countdowns – but I guess that means I can make more and they’ll count as another project! 😉


    To Order Stampin’ Up! Products Anytime, click here!