Northwest Stamper

Tag: stylin stampin inkspiration

  • Distressing, Burlap, and Work of Art for Masculine Monday
    Distressing, Burlap, and Work of Art for Masculine Monday


    ~~ Shop the Holiday Extravaganza Now through Dec 2nd.
    Don’t miss 1-Day Only doorbusters today ONLY!  see the details ~~
    ~~ Join Stampin’ Up with me & pick out $125 in any catalog or sale items to receive for only $74.25!~~


    Amidst all the excitement and hubbub of the Online Extravaganza that started today, over at the Stylin’ Stampin’ Inkspiration blog, we are sharing some different ideas for those masculine cards we all need throughout the year.  This was my contribution

    This was one of those cards where you just start slapping things  and in the end you call it good. Smile

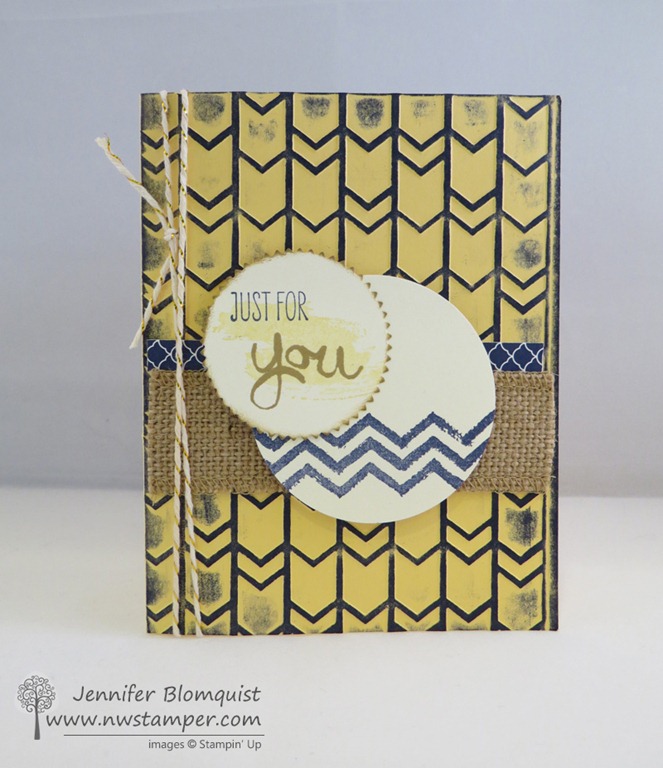
    I started by embossing a So Saffron card base with the Arrows Embossing folder (which happens to be only $5 with today’s doorbuster sale!) and then colored the embossed parts using Night of Navy ink and my brayer.

    (check out a video for how to color with a brayer here)

    I added some Night of Navy designer paper and some burlap ribbon to break up the embossed pattern…. you know, gotta have some burlap on all your masculine cards. Smile

    Finally I used my Work of Art stamp set to help with my central sentiments.

    side view work of art distressed card with arrows embossing folder

    Like I said, a little bit of this and a little bit of that… but sometimes that is all you need.

    Want this or other embossing folders for only $5? Make sure to grab them today as part of the 1-Day Doorbusters happening today only.  Shop the sale here.

    NWstamper signature_thumb[9]

    order online button for sig 3_thumb[4]

    Project Supplies Used:
    (if you are reading this in email, click here to see the list of supplies)

    Built for Free Using: My Stampin Blog

  • Santa Boxes & More with the Curvy Keepsake Die

    With the Holiday Catalog released yesterday, one of the things that you find with any catalog are those products that you see and think, “eh, sure that is cute enough but I can’t imagine really using it”.  Well, I decided to go out on a limb and get one of those items – the Curvy Keepsake Box thinlit die.  I thought it looked kind of interesting but I didn’t know if I would use it… turns out, it is going to be one of my most used holiday catalog purchases!  So-many-cute-boxes-to-make!!!  All thanks for Lynn Starzl for getting me hooked on the possibilities including this box:

    This was the thank you gifts I made for my Stamp & Share event last weekend.  I gave them to each presenter and inside the box were little variety packs of embellishments from the Holiday Catalog plus the Dazzling Details bottle with a tag made from the Curvy Keepsake Box die and one of the new All is Calm Snowflake embellishments.  Here is what the die set looks like:

    Curvy Keepsake Box die

    Curvy Keepsake Box die set

    So when the Stylin’ Stampin’ Inkspiration girls did Friday Favorite’s today, I knew what I was going to pick!

    Tips for this project:

    • You will need to cut two pieces of cardstock to make these boxes, use Fast Fuze or Sticky Strip to adhere them together to make sure you don’t have your box falling apart later!
    • Do you embellishing and/or stamping on your box AFTER you cut out the shape but BEFORE you assemble your box
    • Tie your handles together with a box so it is easy to get into and out of the box without cutting or ripping anything
    • Use the magnetic platform to make sure your die doesn’t move when cutting out the box sides


    Holiday Weekend Special!

    ** All orders through 9/1 using the hostess code PA6NRD4S will receive a FREE project kit with all the supplies you need to make one of those Santa boxes plus a cute Pumpkin box as well!   Start shopping here **


    Want a sneak peek at what the pumpkin looks like?

    See!  I told you!  Totally cute and versatile.  And I have even more projects planned with this box and a class to go with it!  I’m not kidding there are a bunch of different ideas out there. Smile

    Oh!  And you see the sentiments on each of the tags?  That is using the new Good Greetings stamp set that is available as part of the new Host Promotion that runs now through the end of October. Get this stamp set for FREE and in addition to your regular hostess benefits.  Yup, totally free bonus stamp.  Whoop whoop.

    What do you need to do to get it?
    Get your friends together for a stamping night with qualifying orders, host a qualifying online Stampin’ Up party, get some friends and start a Stamp Club with me, or just place a $300 order and it is yours!  email me to get you started!

    Well, it is the kick off to the holiday weekend!  I hope you have a wonderful and safe Labor Day weekend.  I may be away from my email off and on throughout the weekend so if you email me me, know I will get back to you but it might take slightly longer than normal.

    spaced shop now sig bar

    Santa Box Supplies Used:

  • Wonderful Word Bubbles for a I Love You Card

    Today I have to share a card that I created for a set of Pictogram Punches stamp set focused display board cards for our Stylin’ Stampin’ Inkspiration convention board.  I knew I had to get this set when I first saw it in the catalog, but when I had to create 4 different cards AND make sure they were cute enough to have on display next to some other very talented ladies… well, I knew I had to get creative.  And somehow this came out:

    YAY!  Isn’t it a fun card?  I often feel like I’m in a design rut when I’m staring at stamps and cardstock on my craft table and so I always get excited when I get my brain going in a totally different direction and something that isn’t a hot mess comes out! Winking smile

    Insight into the design process for this card:

    1. I started out with the idea that it would be fun to use the Word Bubble framelits (which by the way happen to be one of the dies that you can get FREE or discounted this month with the Big Shot special… just saying!)
      Anyway, I knew I wanted to use the framelits, but I had to use the Pictogram Punches stamp set, so I set out figuring out which image would work and I liked how the I {heart} U image looked and fit in the squarish word bubble.  So that settled that as my central image.
    2. Then I decided to use more word bubbles to emphasis my sentiment.
      So I pulled them all out and started experimenting with how to layer them together.  I ended up with something like this:

    3. Awesome…. now to figure out paper.
      I decided to use the Back to Black designer paper since I wouldn’t have to worry about it being too busy color-wise.  I could just focus on mixing and matching patterns.  I pulled out all the papers and picked 4 patterns that I thought would work in the small format of the die cuts and would go together ok.
    4. Somewhere in here I decided that I needed to add some texture to the card… either that or I had an extra piece of Sahara Sand that had already been embossed with the Stylish Stripes embossing folder and I decided to use that.
      I have a tendancy to do that… see something laying on my desk and jamming it into whatever project I’m working on at the moment.  You might say I’m desperate to use up scraps that I can’t bear to recycle or toss!
    5. I also thought that I needed a pop of color to break up the black and white, so here comes the Silver Baker’s Twine and then a splash of Real Red taffeta ribbon.
    6. Then I started putting down my die cut pieces.  Here is what it looks like before the sentiment got added.
      Yeah, I’m too lazy to actually trim off parts of the word bubbles so they just get flipped around so extra bits are hidden by the main sentiment. Smile

    7. Finally, I stamped the sentiment and cut it out using my Word Bubble framelits.  And for a final touch of color, I stamped again with Real Red ink and punched out the heart using the Itty Bitty Accent Punch Pack and layered that on top with yet another dimensional.


    Each card is like a puzzle, you just have to keep moving and turning the pieces until they suddenly all fit!  Eventually – and with a big enough hammer – they will fit for you. Smile

    And if you want to try this at home, don’t miss out on getting these framelits and the Somethin’ Somethin’ stamp set for FREE with the purchase of a BigShot or get the bundle for 15% off through the end of the month.


    Thanks for stopping by and congrats to everyone with Stylin’ Stampin’ Inkspiration for making to 1 year of regularly awesome projects, ideas, and inspiration!
    Now you can follow us on Pinterest or even like Stylin’ Stampin’ Inkspiration on Facebook!

    spaced shop now sig bar

    August Online Stamp Club Hostess Code – TT2NETD4
    Use this code to get free exclusive tutorials & project kit! Learn more

    Card Supplies Used:

  • Stamp Set Focus on Kinda Eclectic with the Stylin Stampin Girls

    Over at the Stylin Stampin’ Inkspiration blog, today they are doing a Stamp Set Focus – where everyone uses the same stamp set and creates something different with it.  Which is awesome because you get a bunch of ideas for one stamp set.  This time they are doing the Kinda Eclectic stamp set and if you’ve been following my blog at all, you know I’m kinda a fan…. ok, or maybe a big fan!  So, of course I was going to play along.

    This was a display board card I created but ended up not actually making it onto the boards  I know it’s not blow-you-away-amazing, but I thought there were some fun touches so I wanted to make sure to share them with you.  Who knows, maybe you’ll take one of these ideas and use them in an even better way on your own projects!  (Just be sure to send me the link so I can love on your project! Smile)

    Tips for creating this card

    • See that swoosh below the main stamped image?  Do you recognize it?  Look familiar?  It is my VERY FIRST use of my Ampersand embossing folder!  That is right, that is the left side of the ampersand embossed image.  Just because your stamp or embossing folder images look like one thing… doesn’t mean you can’t use them for completely different things!

    • Another thing along those lines is my sentiment – “life is good”.  This is from the Project Life Remember This stamp set.  Which makes you think you need to be a scrapper or someone digging in to Project Life to use.  Nope!  This set is fabulous for Project Life AND your everyday cards.  I think this card could be used for a congratulations card or a thinking of you card at a minimum, don’t you?
    • Use those sequins off that Gold Sequin trim.  Pull a couple off the end of the strand and adhere with a glue dot for a bit of understated bling.  Highlight your sentiment and add a little somethin’ to your butterfly while your at it.
    • Sometimes when I need that one-extra-touch to my cards… you know, those times when you sit back and go, “this needs something… nothing big… but something”.  One thing I look to is paper piercing.  And if you want it to be straight and event and all pretty looking, then you have to have the Essentials Paper Piercing Pack.  I swear, I use that card with the rows and rows of holes the most!  I use it to perfectly place brads in the corners as well as times like this when I want a row of holes and don’t want them to be all over the place.  Easy peasy!

    So don’t forget to check out what everyone else created for great inspiration.

    Then I’ll only have one question for you… have you got your copy of Kinda Eclectic yet?  Smile  If not, lets fix that shall we?  hee hee

    spaced shop now sig bar

    August Online Stamp Club Hostess Code – TT2NETD4
    Use this code to get free exclusive tutorials & project kit! Learn more

    Card Supplies Used:

  • Friday Favorite–Amazing Birthday the Display Board Swap Card
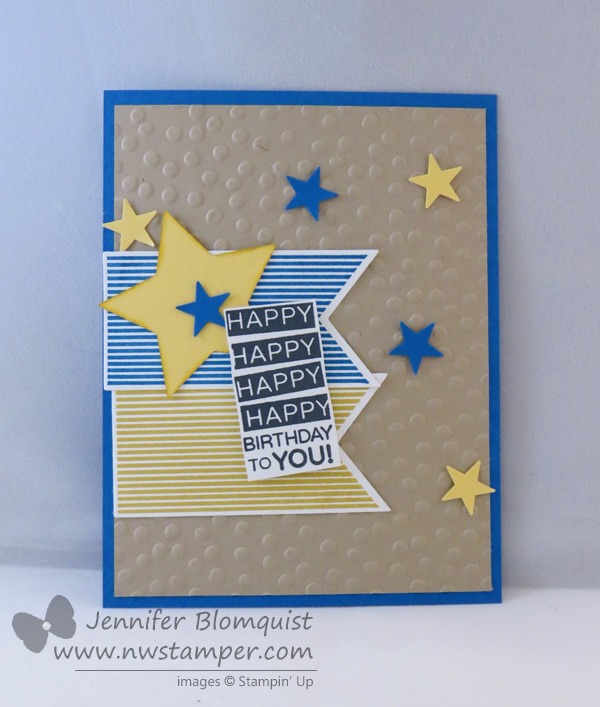
    Friday Favorite–Amazing Birthday the Display Board Swap Card

    Today over on the Stylin’ Stampin’ Inkspiration blog, the girls are sharing some of their favorites items.  I thought I would do a spin on that and share one of my favorite Convention Display Board cards and the stamp set that I loved working with – Amazing Birthday.  Like I’ve said before, I really like that this set is not just about Birthday but can be used for thanks, guys, or anything in between.  But in this case, I stuck to birthday and my favorite shape of the season – STARS!! No joke, I am so digging the stars thing right now and when I finished this card, it was the first one from the set of display board projects that I really got excited about.  So much so that I used it for our group swap where we picked on of our cards from the board to create and trade.

    (SPOILER ALERT! If you love stars, get excited because in the upcoming Holiday Catalog, there is a stars embossing folder & a stars confetti border punch!!! Um, yes please!!)

    Tips for creating this card:

    • Pick a neutral color and then two contrasting colors (I picked Crumb Cake, Pacific Point, and Hello Honey) and then repeat them all over your card.  Don’t be afraid to use a non-traditional color for your shape like blue for stars.
    • Offset your die cut images for a more interesting look.  You’ll notice that I had the Hello Honey banner aligned with the edge of the Crumb Cake whereas the Pacific Point is aligned to the edge of the card base.
    • Sponge the edge of bigger cardstock elements (like the the bigger star) to help them have more dimension even if you don’t pop them up on a dimensional.  Often just using the same color as the cardstock is enough.
    • When die cutting a shape with the matching framelit, like I did here with the banners, USE the Magnetic Platform!  Yes, you can use a post-it note… or the hope really hard methods Winking smile  but you will have a better time getting an even edge around your images when you use the magnetic platform because it is strong enough to keep the framelit where you set it!

    Card Supplies Used

    Oh, I forgot to mention, the sentiment is actually hand cut out… and yes, that Happy doesn’t have the dark line to the left of the “H”… that is intentional. Smile When I was doing this for a swap, I cut long strips for Whisper White cardstock (around 1.25” wide) and stamped my sentiment on the strip and then trimmed down with my snips to the narrower width. But this is a fun color combination, so grab some cardstock and give it a try with your projects.  I hope you enjoy it as much as I did!

    spaced shop now sig bar

    July Online Stamp Club Hostess Code – 7RDHVEKR Use this code to get free exclusive tutorials & project kit! Learn more

  • Throwback Fun with Some Old Stamps and New
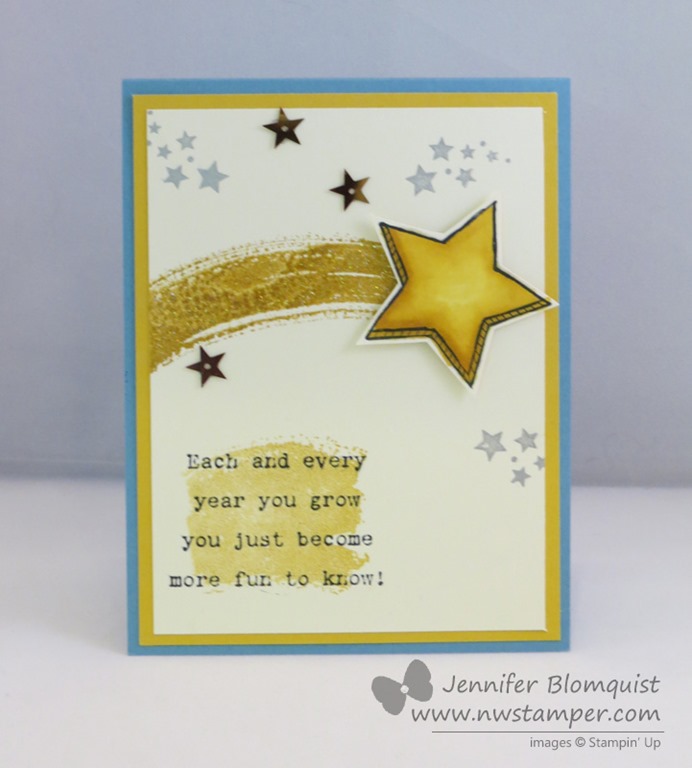
    Throwback Fun with Some Old Stamps and New

    Today is the Stylin’ Stampin’ Squad blog hop and I LOVED the theme idea this month.  Our task was to take our “oldest” stamp and our “newest” stamp.  How fun is that!  I had fun looking through my retired stamps that I’ve been holding on to to see what was my oldest set.  I had a hard time deciding but in the end found a stamp set I had almost forgotten I had – It’s Your Birthday.  And for the newest sets, I had to use my Be The Star set (Love, Love, Love this set!) with a little bit of Work of Art for good measure.

    As you hop along, please be sure to comment and show some love on every blog! We are always excited to hear from our followers! You should have just left stop number #2 on the Stylin’ Stampin’ Squad Blog Hop – Darcy at Stampin’ DJ.  If so, you are in the right spot. If a link doesn’t work or you get off track, you will find the full blog hop lineup below.

    So, here is my share for you today:

    I just love this sentiment from the It’s Your Birthday stamp set.  Honestly, that is pretty much the reason why I keep holding on to this set because everything I see it, I think of all the cards and scrapbooks I can make for my kids where this is such a true sentiment!


    And the birthday sentiments just go so perfect with the Be The Star stamp set.  It has a matching set of framelits which I have been using like crazy… guess I’m on a star kick right now.  But I had seen the idea of using the long swoosh from the Work of Art stamp set to make a star tail and I had a flash of inspiration!

    (Be the Star stamp set & Work of Art stamp set)

    The nice thing about the new Firm Foam ink pads from Stampin’ Up is that they transfer a lot more ink – this gives you a saturated image as well as, if you move fast, the ability to heat emboss with your regular classic ink pads!  So, that enabled me to have 3 different types of shine on my card.

    1. Iridescent Ice embossing powder – after stamping my swoosh, I immediately added the embossing powder and heat set.  Voila!  A shimmering star tail!
    2. In Color Sequins
    3. Silver Ink – for a few more background stars to complete the sky.  Did you see that there is actually ink refills for the gold and silver pads now???  YAY!

    And that star is colored with the new Blendabilities and a little help from Mr. Color Lifter.

    Seriously, if you haven’t gotten your Blendabilities yet…. well, lets just say you won’t be sad if you take the plunge!  I colored the star using the three Daffodil Delight markers and then lightened up a spot in the middle using the Color Lifter.  I got it a little too light so I had to go back and color over with the lightest color, but I think in the end it didn’t turn out too bad!

    And for my final touch, I first inked up my little swoosh image from the Work of Art stamp set and *stamped it off one time* on scrap paper and then stamped in the corner of my card front.  It made it just light enough to be a great background for my sentiment.

    So I hope you enjoyed my contribution, and hop along to check out what everyone else picked for their old & new!

    Blog Hop Participant List:

    1. Erica B. of Stamping Starlette
    2. Darcy J. of DJ’s Stampin’ Place
    3. Jennifer B. of Northwest Stamper  <—YOU ARE HERE
    4. Diana E. of Stampin’ Fun with Diana
    5. Donna S. of Organized Chaos
    6. Cynthia R. of Ink-a-Doodle Creations
    7. Kim R. of Stamping with Kim
    8. Kathy P. of Katrina P’s Creative Corner
    9. Shellie G. of Craft Smashup

    PS – If you didn’t catch the news on my Facebook page, the Clearance Rack should be updated today (7/10) with new goodies for you!  So, make sure to check it out as soon as you can because some items may go fast!

    I’ll be putting in a group order if I have interest by 10:30 AM pst, so if you want to join in on that let me know at jennifer@nwstamper.com.
    (note – if you are hopping and have a demonstrator, make sure to contact them as they would love to help you out!)

    spaced shop now sig bar

    July Online Stamp Club Hostess Code7RDHVEKR
    Use this code to get free exclusive tutorials & project kit!  Learn more

  • Quick & Easy Thank You Card with Stampin’ Up Blendabilties
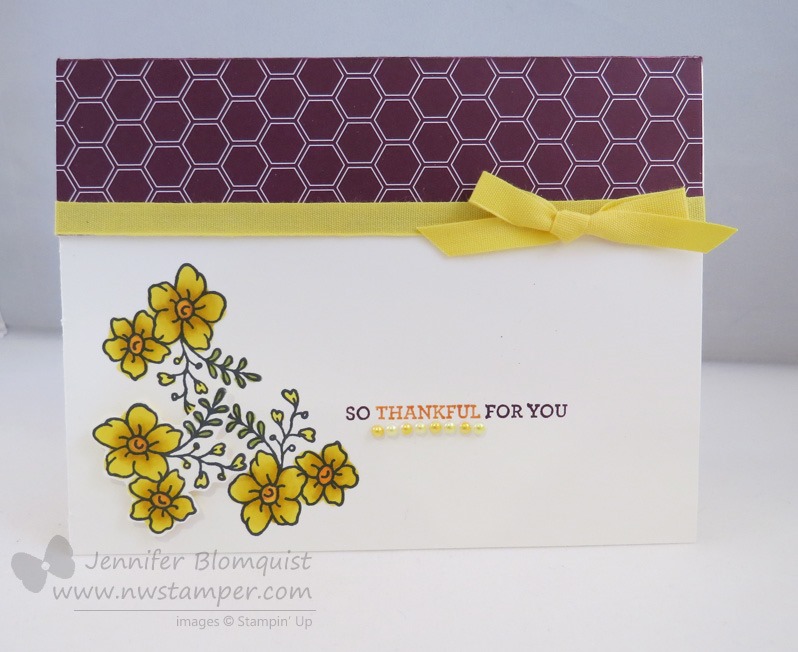
    Quick & Easy Thank You Card with Stampin’ Up Blendabilties

    Today over at Stylin Stampin’ Inkspiration, the girls are sharing Quick and Easy cards.  Now, you know me… I LOVE quick and easy stuff – it is my go to style for cards.  Well, most of the time anyway.  So, I thought this card would be a perfect contribution to the theme:

    I had the chance to play with the new I Like You hostess stamp set because my mom recently earned it.  ~ side note, it is SO awesome when you have a nearby family member who loves crafting as much as you and gets different stamps and dies as you! ~

    Anyway, I thought this set would be perfect for using with Blendabilities (don’t forget, they come out TOMORROW!!!)  I not only used them to color in my flowers, but I also used them to color in my pearls.  Yup, that is right, double duty!

    You can color:

    • Pearls
    • Rhinestones
    • Ribbon
    • Clear Buttons

    Just to name a few.  All you have to do is pick your favorite colors and go at it.  In this case, I used the medium and light Daffodil Delight Blendabilities markers.

    And just to add some depth, I cut out one of the set of flowers and popped it up on dimensionals.  I promise, it is still quick… and easy.  The nice thing with the white paper base and for the raised image, you can be imprecise with your cutting and no one will notice!

    Finally, I had made a promise to myself that this year I’m going to use more designer paper.  I love it all and end up hoarding it so that at the transition of catalogs, I have a TON left over and of course want all the new stuff.  So, I’m working to use what I have and enjoy it!

    In this case I used the Moonlight Designer Series Paper stack and then added some texture by using the new Daffodil Delight cotton ribbon.  It is so soft and flexible to work with.

    Stampin’ Up Supplies Used:

    You can make this same card with whatever you have in your stash.  So whip up a bunch of quick thank you cards to have on had and enjoy that paper!

    spaced shop now sig bar

    June Online Stamp Club Hostess CodeACANDKB4
    Use this code to get free exclusive tutorials & project kit!  Learn more

  • SSI Friday Favorite–Label Thinlit Cards!
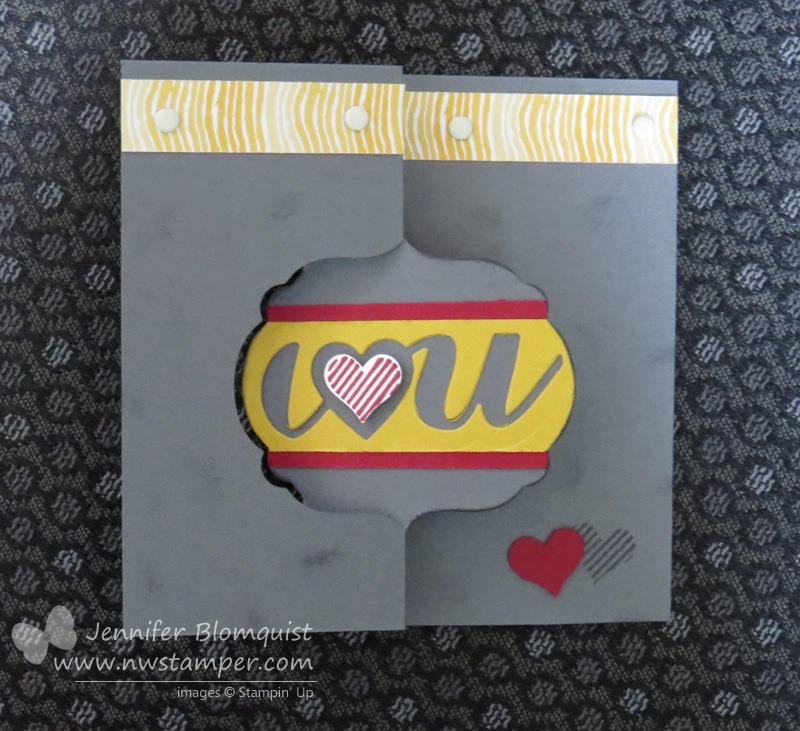
    SSI Friday Favorite–Label Thinlit Cards!

    Yay, I’m back with a project to share with you!  Over on Stylin’ Stampin’ Inkspiration some of the girls are sharing their favorite items from the Stampin’ Up catalog and I had to get in on the action and share a newly re-discovered favorite of mine – the Thinlit Flip Card Dies!

    See, I schedule these technique classes each month but usually have NO IDEA what samples I’m going to be doing in the classes until about a week or so out from the class.

    (Yes, I know I should get better that the whole idea of preplanning and premaking my class samples… I totally will…. someday….)

    But as I was working on the samples for Monday’s Beyond the Basic Flip Card class, I was creating different variations of default Label flip card and the Circle flip card – and holy cow was it super fun!!!

    I love that this type of card is so easy to make thanks to the dies.  I mean, seriously, you get this super crazy cool flipping action and all it takes is one run through the Big Shot?!  Scoring and detailed cutting is done —  SOLD!  Seriously, once I started playing with variations, I ran out of time before I could make them all. Smile

    This card was actually a left over “oops” card where I didn’t mean to cut it short the way I did.  So, when closed it is basically a 4-1/4” x 4-1/4” card.

    To make a Square Flip Card:

    • Cut your paper to 4-1/4” x 11”  (you are actually going to end up with a chunk cut off the end, but you can save it and use it in a different project, right? Smile )
    • Turn it so the short end is lined up in the upper, left corner of the framelit and the long edge is going along the top of the thinlit die.
    • There will be a gap between the bottom of your cardstock and the bottom of the thinlit die.
    • Run it through your Big Shot (or other die cutting machine) and it cuts and scores it all for you! 
    • Decorate and you are done!

    I had fun pairing my cut outs (the I <3 U comes with the flip card die) with the little heart stamp and punch from the Itty Bitty Accents punch pack and Pictogram Punches stamp set

    Stampin’ Up! Supplies Used:

    If you are coming to my Beyond the Basic Flip Card class (6/30 at 7pm), you’ll be doing a variation on this specific card, only with an added twist!  You’’ll love it!  Don’t forget to RSVP if you haven’t already.

    Not local?  I’m putting together an online class with videos and pdfs going over all the variations we’ll be talking about in class!  Shoot me a message if you want to be notified when the class is ready to go (hopefully very soon).

       ———————————————————

    And just a reminder… this weekend only.

    stampin up adhesive stock up sale

    View details here


    spaced shop now sig bar

    June Online Stamp Club Hostess CodeACANDKB4
    Use this code to get free exclusive tutorials & project kit!  Learn more

  • A Quick Thank You With Oh Hello

    A Quick Thank You With Oh Hello

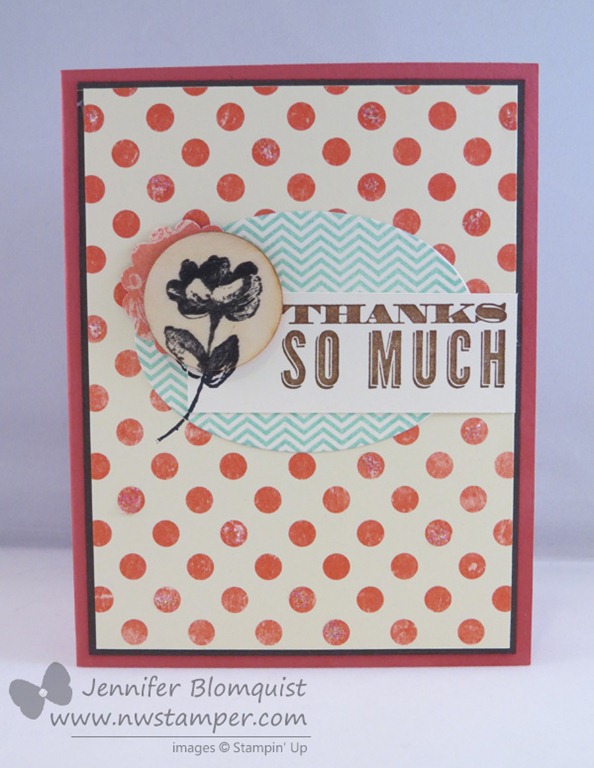
    I know yesterday I promised a post today with more variations of the Rainbow Happy Watercolor card I shared yesterday… but then I remembered this afternoon that I was supposed to be sharing a card using the soon-to-be retired Oh Hello stamp set as part of the Stylin Stampin’ Inkspiration blog team!  Oops!

    So, I gave the stamp set some love this afternoon and here is my card to share with you:

    You see, I also have a TON of designer paper to get through, so why not enjoy it by using it as the big background of my card?  This is from the Etcetera designer paper pack.

    And because I thought the polka dots needed a little extra something, I used my Dazzling Details for some extra bling….

    Can you see it?  I always have the hardest time taking pictures that really show off the sparkle. Smile 

    And finally, did you notice my FAVORITE part of the card?  I’ve had these Wood embellishments for a while but its only recently that I’ve really started reaching for them and man they are a fun way to do something different with your project!

    You see, I love dimension and I love texture… so something that gives me both is always fab.

    I stamped my flower from the Oh Hello set on the wood chip using Stazon so it wouldn’t feather and bleed in the woodgrain.  Then I stamped again on the front of the card – BEFORE – I glued down the wood piece so I could use if for a new take on the old Spotlight technique.

    And in case you are curious, the chevron oval is actually the stamp from the Oh Hello stamp set and I cut it out with an Oval Framelit because, well, I had them and so why not?

    Don’t Forget – Check out the NEW weekly deals that were released today!

    Enjoy and I’ll be back tomorrow with those extra Happy Watercolor Rainbow card variations. Smile 

    spaced shop now sig bar

    May Online Stamp Club Hostess CodeZUBHUEK6
    Use this code to get free exclusive tutorials & project kit!Learn more

    Stampin’ Up! Supplies Used
    Stamps – Oh Hello
    Ink – Pool Party, Soft Suede, Stazon Black
    Paper –Etcetera designer paper, Primrose Petals, Early Espresso, Very Vanilla
    Accessories – Big Shot, Oval Framelits, Retro Fresh wood accents, Dazzling Details, 1-1/4” Scallop Circle punch

  • Lovely Lattices with the Chevron Border Punch
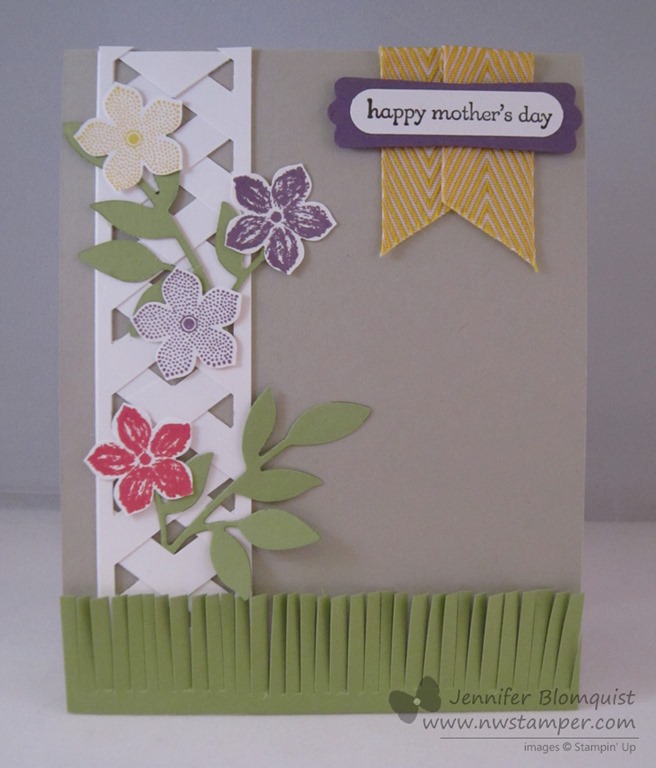
    Lovely Lattices with the Chevron Border Punch

    Today is my day to share some ideas over on the Stampin’ Stylin’ Inkspiration blog and I thought I would share with them and you a technique that has been around for a while but I only recently gave it a try myself – making lattices with the Chevron punch!  If you haven’t tried it yet, this is an easy technique that has lots of possibilities.

    To get started, here is the card that was my first attempt with this idea:

    It was my chance to play with a few of the fun new tools from the Occasion catalog including:

    So, when I would see that lattice or similar looks on other cards, I always thought it was really hard and complicated.  I wasn’t sure that I could make it myself, but I finally figured that since I had the Chevron Punch I ought to at least give it a try. 

    Turns out it is easier than I thought!  Wanna see how to do it yourself?

    Start out with two 1.25″ x 5.5″ strips of cardstock.  Punch the chevron pattern on each one.  Here is where I lined up the first edge of my cardstock to get started punching so that I had the right amount of spacing.

    Now, after you punch the first set of chevrons, slide the paper over and continue punching along the paper strip.  Make sure you only see silver through the punched chevrons as you go!  Otherwise your chevrons will be uneven and won’t braid together very well.

    Once you are done, you should have two strips of cardstock that look about the same.  Lay them next to each other on the table so the chevrons are pointed in the opposite directions.

    Now, start “braiding” the paper.  That is lay the two strips on top of each other in this orientation and start tucking the chevron tips so that the top layer chevron tips are *behind* the chevron tips of the back piece of paper.  I know that is a little confusing to read in text, but if you look up close, this next picture might help!

    Wha-bam!  You have a handy dandy snazzy lattice to use in your projects. 🙂  Now, because you braided them together, your final piece is actually a little bit longer than 5-1/2″.  So you can position it how you’d like on the front of your card and trim off the extra – so, no worries if your ends look a little strange.

    Tuck in some flowers… add some butterflies… stamp your background with the Hardwood stamp set and you have a really fun card!

    I hope you enjoyed this little tutorial!  I highly recommend giving it a shot.  There are so many fun things you can do with this technique.  For example, check out another idea for something you can do if you make this lattice with two different colored strips of cardstock!

    In this case, I used Melon Mambo and Whisper White, then I glued it over a piece of Pear Pizzazz cardstock for bright look on white.  What do you think?  Pretty right?  Smile  So give it a shot and get creative and you may just love what comes out!

    spaced shop now sig bar

    April Online Stamp Club Hostess CodeG4VQJ7VB
    Use this code to get free exclusive tutorials & project kit! Learn more

  • Masculine Monday with Burlap, Woodgrain, and Word Bubbles!

    Masculine Monday with Burlap, Woodgrain, and Word Bubbles!

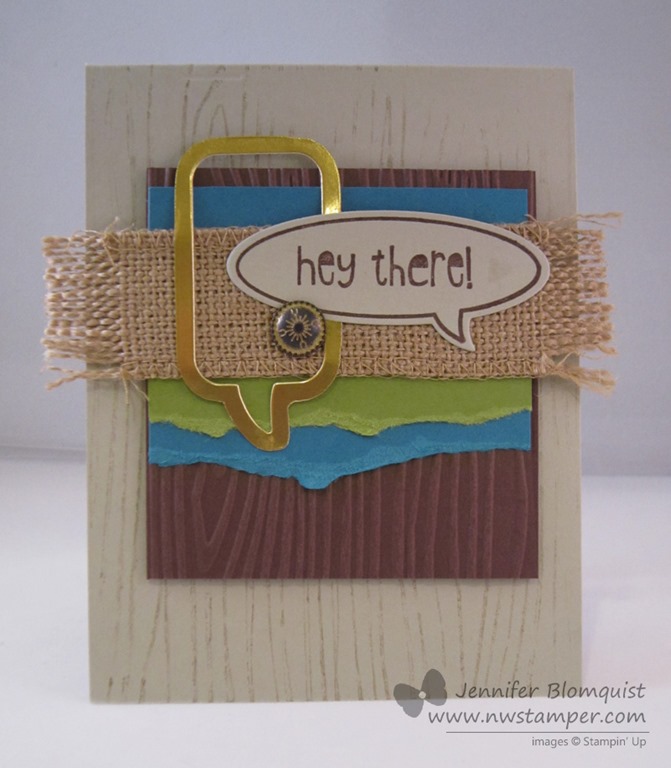
    I know many of us struggle with masculine cards.  I often find it so easy to reach for my flowers and rhinestones and pinks and whatnot; but when I need to make a card for a guy, those go-to items suddenly don’t seem to be quite the right fit.  Well, as luck would have it, today over on the Stylin’ Stampin’ Inkspiration blog, they are sharing some cards for Masculine Monday (and WOW are there some stunners!)  So, I wanted to participate with the design team and I wanted a guy card for my upcoming card class at the Scrapyard Chicks Spring Workshop, so I grabbed some burlap ribbon, some scraps of paper, and got to work!

    Can I just say… I LOVE how this turned out.  It has a lot of fun touches to it without being super over the top or fussy.

    The class I’m teaching in April focuses on 6 different techniques and for this card, I was showing off a neat different way to use your embossing folders…. as a stamp!  That is right, that grainy background on the card base – it is actually stamping using the Woodgrain embossing folder.

    So how does that work?

    1. You take your ink pad and slide it along the raised side of your embossing folder.
    2. Close the embossing folder over your card front so the ink is where you want it (basically, make it look like you are about to run it through the Big Shot)
    3. Do NOT actually run it through the Big Shot, instead use your bone folder to burnish the embossing folder and impress the ink onto your card base
    4. Open up the folder and admire your stamping work. Smile


    The other think I really liked about this card was the mixing and matching of the word bubbles.  I stamped the “Hey There” with the Just Sayin’ stamp set and then cut it out with the Word Bubbles framelits (and yes, get the bundle!  They are both cute Winking smile).

    But then I needed something more, so I grabbed some of the Gold Foil paper and cut out a different word bubble shape from the framelits.  Now, when you look at the paper that now has a word bubble sized hole in it, you will see that the framelit die embossed a faint line from the outer edge of the die (as opposed to the inner edge of the die where the cutting occurred).  So in this case, you can use that faint line as a cutting guideline and cut along that share to give you this cool metallic word bubble outline!

    Oh, and I actually did emboss the Chocolate Chip paper with my embossing folder… I like the contrast of the stamped woodgrain and the embossed woodgrain.

    So, what do you think?  I really liked how it turned out and can’t wait to share it at the workshop in a month!


    spaced shop now sig bar

    March Online Stamp Club Hostess CodeXEWP4DFD
    Use this code to get free exclusive tutorials & project kit! Learn more

    Stampin’ Up! Supplies Used
    Stamps – Just Sayin’
    Ink – Soft Suede, Chocolate Chip
    Paper – Sahara Sand, Old Olive, Island Indigo, Chocolate Chip, Whisper White, Gold Foil
    Accessories – Big Shot, Word Bubble framelits, Vintage Brads, Woodgrain embossing folder, Burlap ribbon

    Favorite products:

    134820s
    127821s
    132140s
    117273s
    132622s
  • Create a Flower with Petal Parade

    Create a Flower with Petal Parade

    Turns out I’m the queen of last minute!  I knew that I was on-deck for a card for the Stylin’ Stampin’ Inkspiration design team this week and I really did keep meaning to create some fun flower for our “Create a Flower” theme today.  But next thing I know, it is 9:15 last night and I’m working away on a card for a workshop this weekend when I suddenly get the reminder to have my card posted.  Oops!

    Well, the card I was working on had a stamped flower, but it wasn’t a particularly unique use of the stamp.  So, I quickly put my thinking cap on for what was some flower I could create that was different than just the typical stamped flowers that you punch out.  (Don’t ask me why I didn’t think of using my new spiral flower die!)  But a hare-brained idea to create a layered punch art flower with the Petal Parade stamp set came to me and this is what turned out:

    petal parade punch art flower

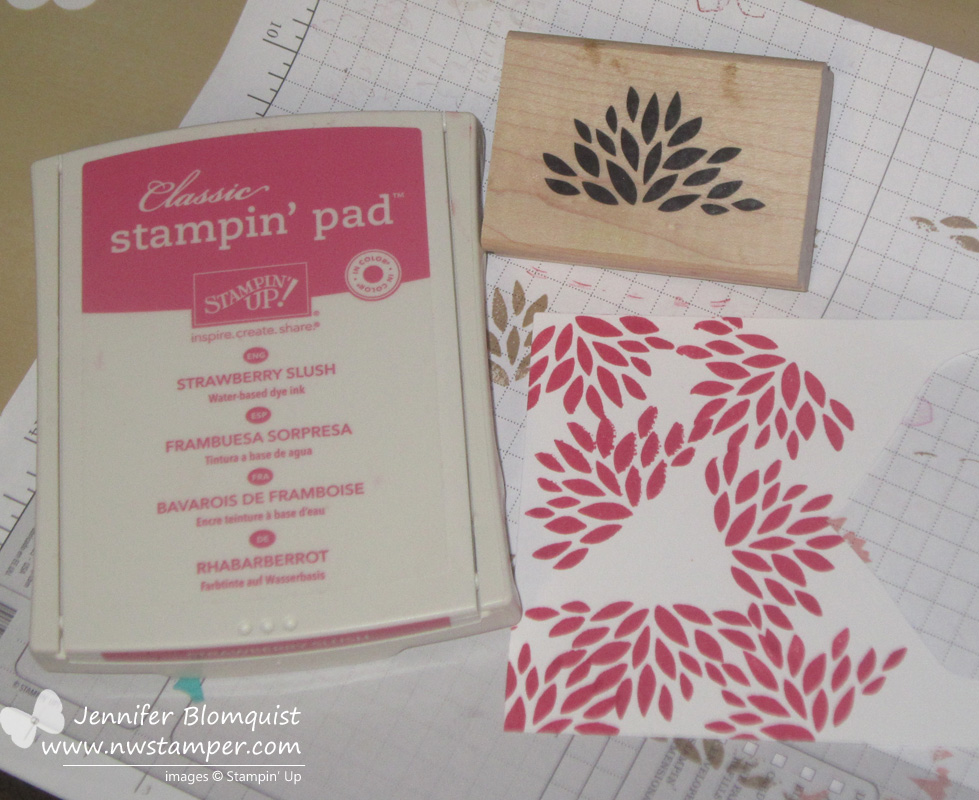
    So, aside from the sentiment, all the stamping for this came from the Petal Parade stamp set!  Some mixing and matching of ink, stamps, and punches and it came together.

    For reference, here is what the stamp set looks like:

    petal parade SAB 2014

    First was the base layer of the flower – I stamped the half flower image from the stamp set onto white paper in a random pattern.  I actually tried to make a triangle out of the flower image and then fill in the gaps with random stamping to fill it out.

    Petal Parade flowers

    Then for the subsequent layers it was straight forward stamping and then punching it out.

    Top layer – The larger round flower in Strawberry Slush
    Layer 2 –  The daisy like flower in Crushed Curry
    Layer 3 –  The larger round flower in Calypso Coral
    Base layer – Random stamping of the half flower in Strawberry Slush

    petal parade punch art flower

    I to a white piece of paper and cut out of the middle a flower shape using the Floral Frames Framelit and sponged both the outside edge and the inner cut-out edge of the flower with some Crumb Cake ink.  Then I could just glue that to a Crushed Curry card base and glue down my flower punchouts to the middle of the flower.

    I made a couple leaves out of the artsy chevrons from the stamp set and cut them out and adhered them to the sides of the flowers.

    Then just add a few pearls, a sentiment, and some really bad random stamping (seriously, don’t look too close! 🙂 ) and you have yourself a card!

    So what do you think?  Ok for a last minute idea for a punch art flower?  Hopefully it at least gave you some ideas to try at home!

    spaced shop now sig bar

    March Online Stamp Club Hostess Code – XEWP4DFD
    Use this code to get free exclusive tutorials & project kit! Learn more


    Supplies Used:

    133602s
    127012s
    118874s
    119850s
    119861s
    129404s
    133188s
    119247s
    113439s