Northwest Stamper

Tag: sincere salutations

  • Last Call for the 2011-2012 Stampin’ Up! Catalog

    Its finally here, the VERY LAST DAY you can order from the 2011-2012 catalog.  Don’t forget to double check your wish lists against the retirement lists so that you don’t miss out on something you’ve been waiting for.

    Retiring Stamps | Retiring Accessories | Retiring Décor Elements

    You can shop in the online store, or contact me at jennifer@nwstamper.com to place your order.  I’ll be checking email through midnight tonight so I’ll be able to get all the last minute requests in.

    Here is my fond farewell to some of my favorite stamp sets and accessories:


    Thank You Kindly Stamp Set, Berry Blossom designer paper, and Bouquet Blossom Triple layer punch


    Awash with Flowers stamp set


    Curvy Verses stamp set, Paisley Petals designer paper, Rhinestone Brads


    Beary Best Friends stamp set, Blushing Bride In Color papers


    Paisley Petals designer paper


    Sincere Salutations stamp set, Flirtatious designer paper, Bouquet Blossom triple layer punch


    Tree Trimmings stamp set, Many Merry Messages stamp set, Frightful Sight designer paper

    So, act fast to grab what you love – Shop Online or email me ASAP at jennifer@nwstamper.com to make sure you get what you want –  and I’ll be back tomorrow with the digital version of the new catalog and all the information for the new catalog season! 🙂

    To Order Stampin’ Up! Products Anytime, click here!

    Get them before they are gone! Items are selling out so don’t miss out!

    Retiring Stamps | Retiring Accessories | Retiring Décor Elements

    Are you earning your Northwest Stamper Rewards? Every order gets you closer to your FREE stamp set! Click here to learn more!

  • Bordering on Romance Thank You

    The end of a catalog year always leaves me with stamps and accessories that I’m so happy are going to continue being available… and stamps that I’m sad are going away.  This card has both!

    Bordering on Romance Thank You

    I love that Bordering on Romance is carrying over but boy am I sad that Sincere Salutations is being retired. I swear, this was always my go-to set for versatile sentiments that could be dressed up or down. I’m sure I’ll find a new favorite down the road, but I’m not letting go of my set for a while I think. 🙂

    So, I made this card to send to a customer to thank her for a recent order and it was a great excuse for me to try blending and coloring using markers.  I used 3 different pinks to color in my flowers – Pink Pirouette, Regal Rose, and Blushing Bride markers, and layered the colors and then did additional blending with my Blender Pen.  I started by coloring in the entire petal with the lightest pink, then did some shading with the middle tone pink (Blushing Bride), and then finished out with accent highlighting with the darkest pink (Regal Rose).  I think it turned out pretty well, huh?

    The rest is pretty straightforward loving with my Big Shot (framelits and the lattice embossing folder).  Add some Paisley Petals designer paper and some basic pearls.

    What stamp set will you miss the most when they retire in a week?


    To Order Stampin’ Up! Products Anytime, click here!

    Get them before they are gone! Items are selling out so don’t miss out!

    Retiring Stamps | Retiring Accessories | Retiring Décor Elements

    Need a copy of the 2012-2013 Stampin’ Up! catalog? Click here!


    Bordering on Romance Thank You Card Recipe:

    Stamps: Bordering on Romance, Sincere Salutations
    Ink: Rose Red ink pad, Pink Pirouette marker, Regal Rose marker, Blushing Bride marker, Garden Green marker, So Saffron marker
    Paper: Paisley Petals designer paper, Crumb Cake cs, Blushing Bride cs, Basic Grey cs, Whisper White cs
    Accessories: Big Shot, Labels framelits, Square Lattice embossing folder, Basic Pearls, Blender pen

  • Mixed Bunch: From Scrapbook Sketch to a Card

    Last weekend, I did a presentation at the Northwest Women’s Show that was based around the idea that you can take one of the many scrapbook sketches out there and use them even if you are not a scrapbooker.  I don’t know about you, but while I like designing cards, sometimes my brain just isn’t working and so it is so nice to have a sketch or design to borrow from.  Often I will use the Stampin’ Up! idea book and catalog and just tweak a card that they use as a sample, but sometimes a scrapbook sketch is perfect!  As in this case:


    Mixed Bunch card from scrapbook sketch


    I cased a scrapbook layout made by a friend and mixed it up using my Stampin’ Up! supplies (I posted about it recently) and so I took the same elements of the scrapbook page and just shrunk them down a lot to make them fit on a card.

    One of my favorite elements of the original scrapbook page was the color blocked row along the bottom of the layout.  In my version of the scrapbook page, I had taken pieces of cardstock and ran them through my Big Shot with an embossing folder to give them texture; so I did the same thing with my card…only much smaller.

    I also kept the Crumb Cake strip to separate the color blocking from the bottom of the card and the white background.  Then I added in the baker’s twine to keep going with my texture theme.  Now, with a card, I didn’t really have room for both a picture (or stamped image) and the flower, so I decided to keep the flower since I’m totally digging this Mixed Bunch stamp set right now.  And then I stamped my sentiment in the same color (Rich Razzleberry) as my title on my scrapbook page.

    Overall, I love how this card turned out and that I didn’t have to think too hard since I was just copying another design of a scrapbook layout!

    So, here is the challenge for you – take a scrapbook page that you found somewhere and turn it into a card!  Post a link here in the comments of my blog or on my facebook page.  I’d love to see what you come up with.


    To Order Stampin’ Up! Products Anytime, click here!

     First Tooth Scrapbook Page Recipe: 

    Stamps:  Mixed Bunch, Sincere Salutations
    Ink:  Wisteria Wonder classic, So Saffron classic, Rich Razzleberry classic
    Paper: Chocolate Chip cardstock, Whisper White cs, Wisteria Wonder cs, Pink Pirouette cs, Rich Razzleberry cs, Lucky Limeade cs, So Saffron cs, Island Indigo cs, Crumb Cake cs, Concord Crush cs, Very Vanilla cs
    Accessories:  Blossom punch, Scallop Trim border punch, 1” circle punch, Wisteria Wonder bakers twine, Big Shot, Perfect Polka Dots embossing folder, Stampin’ Dimensionals

  • A Slightly More Masculine Thank You

    Today I wanted to share the last of the cards we made at a recent class of mine.  The other cards all were flowery or included pink so I figured I ought to try to come up with something for the more manly folks in your life.  (Plus I really wanted to use my Stripes embossing folder for the Big Shot!)

    So this is meant to be a quick and easy card you could make when you need a thank you card and everything you have in you drawer is too girly.  This was also one of my first times pulling out the First Edition specialty designer paper.  It’s a lighter-weight paper, so its kind of fun to play with – even when you are just doing something as simple as tearing an edge.

    Oh, and did I mention that the Stripes embossing folder is one of the items you can get FREE during Sale-a-Bration?  Smile
    (It’s easy to miss in the SAB catalog, but it’s there!)

    So, while I’m still trying to figure out just what defines a “masculine” card; I think this will work for now!

    To Order Stampin’ Up! Products Anytime, click here!

    Stripes Thanks So Much Card Recipe:
    Stamps: 
    Sincere Salutations

    Ink:  Rich Razzleberry classic
    Paper: First Edition specialty designer paper, Rich Razzleberry cardstock, Soft Suede cs, Pear Pizzazz cs
    Accessories:  Stripes embossing folder, BigShot, Gold Brads, Stampin’ Dimensionals, Snail adhesive, Paper Piercer

  • More Strength and Hope Card Ideas

    In a continuation of yesterday’s post, here are the other two cards we made using the new Strength and Hope stamp set (missed the first two cards, you can check them out here).  The second card uses the “joy fold” technique to create a unique flap style card.  They are actually really easy to make and can be a fun way to do something a little different with your cardmaking.

    Strength and Hope butterfly hello cardStrength and Hope joy fold card

    To make the joy fold card, you need to cut two pieces of your base cardstock:  1 piece that is 4-1/4” x 8-1/4” and 1 piece that is 3” x 8”.  Score the larger piece at 5-1/2” and score the smaller piece at 4”.  Decorate the 4-1/4 x 5-1/2” piece with patterned paper if desired (I use the pink designer paper) then adhere the 3” x 8” piece of cardstock in the center of the 4-1/4” x 5-1/2” space so that the score line of the smaller cardstock is on the right side of the card.  Decorate the remaining flaps and areas of cardstock as desired.  You will end up folding the small flap from the card base inside of the 3” x 8” piece you adhered to the center of the card.  Then close the center piece over the little flap.  I promise, it is way easier than it sounds! 🙂

    Get Free Card Kits!

    Since I have extra card kits and want to continue to support the cause, I’m offering free card kits when you purchase this stamp set. Yesterday and today I posted the four cards we made and while supplies last, anyone who orders this stamp set from me can pick 2 of the 4 cards we made and I’ll send you the kits so you can make them at home with your new stamp set.  Everything will be precut and ready for you to stamp and assemble!  Just send me a note to jennifer@nwstamper.com when you place your order with which cards you want and I’ll get them on the way to you!

    Click here to shop online 24/7 and start earning your NW Stamper rewards!

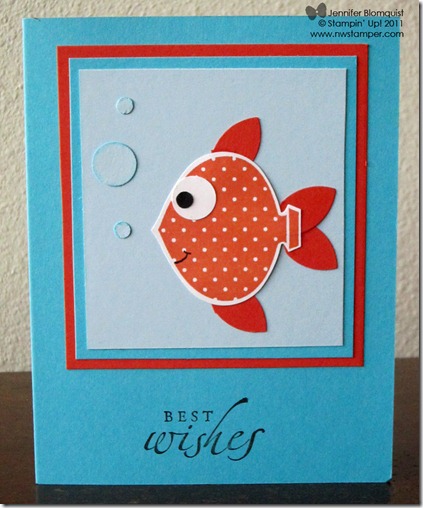
  • Fishy Best Wishes to You!

    Thursday night I held my first event with my new Bellevue/Redmond Card Makers meetup group.  We had a small group but it was fun to meet some local gals and great to have the forced motivation to get my craft room unpacked!  I’ll admit it, I didn’t get the craft supply boxes opened until that morning. :)  Thankfully, I knew I had extra supplies from the card we did for my last get together in CA, so I didn’t have to do design work, just find and gather the supplies.

    This was the fun fishy punch art card we made:

    I found this card on Lyssa Zwolanek’s blog and loved it so much I had to share it with others. Isn’t he just the CUTEST?!  The fun part is that this card uses some punches in very non-traditional ways.

    1.  For the body, I used an ornament stamp from the Delightful Decorations stamp set and punched it out with the Ornament Punch.

    2.  Then I punched out a flower using the 5 petal flower and trimmed off the petals to use for fins.

    3.  Then I used the 1/2” circle punch and the 3/16” punch on my Crop-a-dile for the bubbles and eye.

    Fun, huh?  Give it a try and you can have your own cutey fish too.  Need one of the punches or supplies?  You can get it now in the online store

    Click here to shop online 24/7 and start earning your NW Stamper rewards!

    Best Wishes Recipe:
    Stamps: 
    Delightful Decorations, Sincere Salutations
    Ink:  Tangerine Tango, Basic Black, Bashful Blue (sponging around the bubbles)
    Paper:  Tempting Turquoise CS, Tangerine Tango CS, Bashful Blue CS, Whisper White CS, Basic Black CS
    Accessories:  Ornament punch, 5 Petal flower punch, 1/2” circle punch, Crop-a-dile, Sponge Daubers, Basic Black Stampin’ Write marker

  • Birthday Butterflies and a Get Well Card

    Alright, so last time I shared with you the Love card we made at my card night.  So, today I wanted to share the other two cards we made that night.  Both are inspired by cards I found in an old Stampin’ Up! Idea Book & Catalog.  Of course they turned out pretty different, and I wish it wasn’t against Stampin’ Up! copyright rules or I would show you a picture of the originals next to the version below.  Oh well, you just get to enjoy the version I made then. Smile 

    First was a clean and simple get well card.  I love this stamp from the Wellness Wishes set.  It just makes me want to hug the puppy and say,” Awwwww”.  So, we used watercolor pencils to color him in (and I’ll admit the girls that night did a much more artistic and cool version of watercoloring than I did).  We wrapped around some Black satin ribbon and then added a Circle brad.  The So Saffron cardstock was popped up using dimensionals and its as simple as that!

    Tip:  If you are going to use watercolor pencils on Whisper White paper, I recommend using a blender pen to moisten the pencil coloring.  You can use a water pen, but I find that it is too easy for there to be extra water, which causes your paper to wrinkle up a bit.

    Finally, we did a birthday card.  Well, really it was a neutral card and I put out the entire Sincere Salutations set so some people did birthday, some did thank you, while others did Thinking of You.  Got to love a sentiment set that has it all in interchangeable sizes.  We used a background stamp (Pretty Petals) to add a pattern to the base Crumb Cake layer.  Then, stamped the butterflies from the Dreams Du Jour set and sentiment on a Very Vanilla piece.  Tear off a corner of your Vanilla paper and add a Designer Button and you are ready to go.

    Tip:  Crumb Cake ink makes a great subtle color on your neutral papers like in this case.  You can get a great shadow effect by stamping your image on the paper in Crumb Cake and then stamping your image with a darker ink (in this case Concord Crush) on a piece of scrap paper and layering it over one of the Crumb Cake images.  Slightly offset your cutout and the base image will show enough to look like a shadow!

    Interested in making cards like these?

    If you like these cards and are in the San Francisco area, I’d love to have you join me at one of my upcoming events.  Check out my calendar or contact me to set up your own private event for free with you and your friends!  I’d love to show you how to make more fun cards and scrapbook layouts!

    Thanks for visiting!

  • Simple holiday cards with a side of bling

    Well, December is finally here and like usual I suddenly realize that I need to get my Christmas cards put together and my mailing list organized.  Thankfully I was running a technique night this last Tuesday and so we created three fun holiday cards.  The actual card designs aren’t too complicated as the focus was more on some fun techniques to add some bling to your cards.  These cards were tons of fun to make and look much better in person than in the photos. 🙂

    Technique 1 – Stained Glass Window

    For this card, the bling came in the form of sparkle on a colored window sheet image.  To do this, start by stamping your preferred image onto a window sheet using Staz-on ink.  Squeeze some crystal effects onto a piece of plastic or some waxy paper (I like using the backing that is left behind when you peel off the sticker labels for your stamp sets).  Add a drop or two of reinker dye and some dazzling diamonds glitter.  Mix together and apply to your stamped image with a paintbrush.  Once that has dried, attach your window sheet (ink side down) to your card front using brads or your favorite adhesive (just note that if you use adhesive it will show through unless you cover it up with another card element.

    Stamps: Christmas Classics
    Inks:  Staz-on black, Soft Suede classic ink, Old Olive reinker
    Paper: Soft Suede CS, Whisper White CS, Merry Moments DSP
    Accessories:  Gold brads, Scallop edge punch, paper piercier and mat pack, Crystal Effects, Dazzling Diamonds glitter, Close to Cocoa marker (to color in the trunk)

    Technique 2 – Brayer Resist

    I had been seeing some fabulous samples using the new Bride specialty DSP.  If you haven’t seen the paper before, it is a white (or black or ivory) paper with either stripes or the swirly pattern in shiny foil of the same color.  While this is pretty and elegant on its own, it is also perfect for coloring because the shiny part resists ink.  So, for this card, we inked up our brayer and rolled it over the paper to create the design on the bottom half of the card.  It can take a few rolls to get the color coated evenly but gives you tons of options with only one package of paper and a few ink pads.

    Stamps: Sweet Season, Sincere Salutations
    Inks: Night of Navy classic ink
    Paper:  Bridesmaid DSP, Whisper White CS, Bashful Blue CS
    Accessories:  Organza ribbon, Scallop circle punch, brayer, Frost Crystal brads, paper piercer, Stampin dimentionals

    Technique 3 – Shimmer Paints

    So, this is the hardest effect to see in a photo but adds a subtle shine to your projects.  It is also the easist and fastest technique of all.  Ink up your image (don’t you just love the Dasher stamp from the under $10 section of the catty??) and set the stamp aside BEFORE you stamp.  Next, take your shimmer paint container and shake it up.  Open it up and set the lid in front of you.  Now, you should be able to take a sponge dauber and pick up the shimmer paint from the inside of the paint container lid.  Sponge the paint on top of your inked stamp (in my case I just sponged over the antlers).  NOW, stamp your image onto your paper.  You will see the color come through but with a shimmery effect where you applied the paint.  I then used the dauber which had some ink and some shimmer paint left on it from daubing the stamp rubber and used that to distress the edge of my square paper.  It gave it a really nice shimmery brown all around the edge.

    Stamps:  Dasher
    Inks: Chocolate Chip classic
    Paper:  Merry Moments DSP, Real Red CS, Chocolate Chip CS, Very Vanilla CS
    Accessories:  Sponge Dauber, Frost Shimmer Paint, Chocolate Chip 5/8″ ribbon

  • One more card using the BigShot

    Hi all!  I know, its been a little bit since I posted on my blog and I blame it all on the Twilight series of books by Stephanie Meyer!  My friend Kally got me hooked on the series and I found myself spending the last two weeks spending my lunch breaks and evenings powering though all four books in the series plus watching the movie and all the behind the scenes extras.  It is seriously addictive! 🙂 


    bigshot_bestwishes_wmBut I managed to pull out of the books to get things together for my technique night this week.  Like I mentioned before, we met at a Roundtable Pizza and it actually worked reasonably well.  The biggest problem was that where we were sitting didn’t have the best light after the sun went down.  But if we were in the offical meeting room area I think it would have been fine.  I’m thinking I’ll try hosting my card class there on the 27th (the class is open for more people to come, email me if you want to join in!) 


    Here is the final project we did for the Technique Night.  We used texture plates and an embosslit for this card.  These are probably my two favorite items for the bigshot and what pushed me over the edge to buy mine.  Texture just makes everything cooler and having a perfectly embossed AND cut-out image in one is awesome too.  Add in the fabulous kiwi kiss satin ribbon and a half pearl and you’re done!

  • Using Crystal Effects

    babybestwishes_wm1So tonight was our Crystal Effects night, and I think everyone learned something new – myself included!  I ended up staying up late last night as I kept finding new ways to use crystal effects that I wanted to try.  If you haven’t heard of crystal effects, it is this great thick clear liquid laquer for using on craft projects.  The most straightforward use is to add a bit of gloss or shine to your projects by applying some Crystal Effects on top of a stamped image.  However, there are a ton of fun and creative other uses. 

    I made a few samples of some different techniques last night.  So we talked about those different ideas and then set to work making a few items to take home.  Tonight we made Faux brads, Laquered die cuts, and a card using colored Crystal Effects on a transparency.  However, here are some of the different ideas for how you could use crystal effects:

    1. Add a touch of gloss to a stamped image
    2. Use crystal effects as a base for glitter.  Drop some crystal effects onto a stamped image and then cover in glitter.  Tap off excess glitter and allow to dry.
    3. Create Faux Brads by punching out a circle of paper and placing it over a glue dot.  Add some crystal effects to the top and you are ready to go!
    4. Create dew drops by dropping some crystal effects onto wax paper or the backing for the stickers from your stamp sets.  Add a bit of reinker color to make different colored drops.
    5. Color with crystal effects by mixing some crystal effects and reinker, and then using a brush or toothpick, color in a stamped image for a colored, glossy effect.
    6. Make a 3D embellishment by drawing a shape with crystal effects on wax paper (or the sticker backing) and then pouring glitter on top.   Allow to dry and then pop-off.
    7. Create laquered die cuts.  Cut out a shape in chipboard (in my case, I cut out the left over piece from a chipboard die cut after I popped out the die cut).  Glue the chipboard to a piece of designer paper.  Fill in the die cut space with crystal effects and allow to dry.
    8. Make glittering transparencies.  Mix some crystal effects with some reinker and dazzling diamonds.  Use a paintbrush to apply the colored crystal effects to the backside of a stamped transparency.  Allow to dry and attach to your card or project.

    techniquece

  • Fun with heat embossing

    Last night was both a technique tuesday and a historic presidential election.  So, we ended up combining the two events into an election watch party in the living room and technique tuesday in the dining room. 🙂 We had a small group but had fun trying out a few different ways to add texture and interest to your projects with embossing.  I just had to share the cute cards we made.

    emboss_monkey1 The first card we made was a bit of traditional embossing.  We stamped the Thinking of You image in versamark on the Chocolate Chip card stock and then embossed with gold embossing powder.  We then stamped the sock monkey image straight onto whisper white and then I stamped the flower image using markers.  Finally, we used the versamarker pen to color in the flower petals and embossed those with gold again.  (I also couldn’t help myself and had to sponge the edges with more mustard and chocolate chip ink.  Not sure I love the results but they aren’t bad either!)


    emboss_thankyou The second card we made used embossing as a color resistor.  We first stamped the flower images using versamark and then embossed with clear embossing powder.  Then we were able to sponge on top with baja blue and pacific point inks to bring out the embossed flowers.  Finally, we straight stamped the thank you image, punched it out, and used a dimensional to attach it to the card.  Very quick and very fun.

  • Early holiday greetings

    Next month I will be starting my Christmas card stack classes where you can add a personal touch to your holiday greetings by making your own christmas cards.  In anticipation of this class, I’ve started trying out some different christmas designs.  This was a very quick and simple card that gave me a chance to break out some of my new ribbon and complete a card with minimal supplies needed.

      Recipe:
      Stamps:
    Baroque Motifs, Sincere Salutations
      Ink: Chocolate chip
      Paper: Kiwi Kiss CS, Whisper White CS, Bella Rose DSP
    Accessories: Ridinghood Red Taffeta ribbon, Stampin Dimensionals

    Images copyright 1990–2008 Stampin’ Up!