Northwest Stamper

Tag: seattle area card classes

  • New Projects, New Classes, & New Weekly Deals!

    New Projects, New Classes, & New Weekly Deals!

    I can’t believe that summer is winding down… its been fun, its been crazy… but I have to admit I’m looking forward to school starting back up and the family getting back on the regular routine. Smile  Can anyone relate?

    Over the last few weeks, we’ve had so much going on that I haven’t done a lot of creating and thus the blog got a bit neglected.  But finally over the last week, I’ve started finding my way back into my craft room and after some time spent CASE’ing some great cards I feel like the mojo is coming back!  Here is some of what I’ll be photographing for the blog today:

    2015-08-18 09.20.41-1

    I also have new classes going up on the schedule today too!  Including:

    • August 25th – Terrific Techniques: Exploding Boxes (in person or class by mail)
    • August 30th – Watercolor Wishes Card Stamp-a-Stack
    • September 3rd – Monthly Card Night
    • September 19th – Holiday Card Series – Class #1:  Festive Flurry Snowflakes! (in person or class by mail)
    • September 29th – Terrific Techniques: Getting the most out of the Tag Topper Punch  (in person or class by mail)
    • plus the rest of the class calendar through the end of December!

    And don’t forget the retreat coming up in October!

    NW Crafty Escape Weekend

    So watch for details about these soon or email me at jennifer@nwstamper.com if you are interested in joining me for a specific class!

    New Weekly Deals are out too!

    11889497_1647155485531277_8400223478533016799_n

    Shop the weekly deals online here

    Ok, now I’m off to update the calendar, photograph projects, and finish putting together some special surprises to share.  Smile

    NWstamper signature_thumb[9]

    order online button for sig 3_thumb[4]

  • NEW Class by Mail! Endless Wishes Card Gift Set & Desk Organizer

    I’m so excited to share a new class that I just finished the samples for – the Endless Wishes card gift set!  This was a compilation of many of my favorite new (and returning!) holiday goodies that gave me lots of fun time playing and experimenting and being really stinkin’ glad I got them!  You know… Endless Wishes stamp set, Trim the Tree paper, Stars embossing folder, Stars framelits, etc.  Sigh… so much to love!

    Here is one of the cards where I really got to play a lot with new stuff – what do you think?  Are you loving stars yet?

    The best part of this was that I got to put this class together with one of my downline – Tanya Cabral and so we’ve worked together to design some really fun cards to share at our class in early November (Nov 3rd for those of you in the area that would like to attend. Smile)

    Tips for creating this card:

    • The Endless Wishes stamp set is a returning favorite and is fabulous because you have the script font and the small type font.  Mix and match – INCLUDING COLORS – for really unique and trendy looks to your cards.
    • Tie your card together with similar elements – in this case the Stars embossing folder and the Star framelits!  The subtle tie-in helps keep your card cohesive without being busy.
    • Sponge the edges of your die cut elements to help them stand out from the background.  Here I sponged the star with Early Espresso ink and a sponge dauber.

    Ok, and so this isn’t a tip, but don’t you just love that plaid?  It makes it look like the card has a cozy scarf, don’t you think?

    And that is just one of SIX fabulous cards and yes, you see that cozy plaid in a desk organizer that you can actually use year round!  See, I think ahead. Winking smile 

    Endless Wishes Gift Set Class

    If you would like to try out these fun designs, I have a few options for you!

    IN PERSON – Join me on November 3rd at 7pm at the Round Table Pizza in Bellevue (Overlake) where you will get to make 6 cool & unique cards plus a cute desk organizer that will hold all of your cards from the class plus space for any additional cards you have at home or make in the future! 
    You’ll receive your own pack of Trim the Tree design paper, a pack of 20 notecards & envelopes, plus all the extra supplies you need to make the cards and printed instructions so you can make more later! 
    Cost is only $25 or for only $40 get the kit+your own personal stamp set (SAVE over15% on the stamp set this way over the cost of the set + tax&shipping from the catalog!)
    RSVP here

    KIT BY MAIL – Get all the pieces precut and mailed to you in a kit to make all 6 cards and the desk organizer,
    plus step-by-step instructions, all the extra designer paper from the Trim the Tree paper stack and 14 additional cards & envelopes!
    BONUS – get a bottle of Cherry Cobbler dazzling details FREE with the kit by mail
    Cost is only $25+$5 shipping


    SAVE! Add the stamp set with your kit and save over 15% on your stamp set!
    Get everything listed above PLUS your own personal personal Endless Wishes stamp set
    Cost is only $40+$5 shipping


    INSTRUCTIONS ONLY – Get access to the instructions for all 6 cards plus the desk organizer so you can use your supplies at home to make these cute projects.
    Instructions will include all the dimensions, supplies used, and tips for making them as easy as possible!
    Cost is only $4.95  (that is less than $1/project!)


    Note – I will have instructions ready for emailing by Monday of next week.  Class kits will mail out the week of the 28th.

    I had so much fun designing these cards with Tanya that I KNOW you’ll have fun putting them together. Smile 

    spaced shop now sig bar

    Card Supplies Used:
    click on any of the photos below for more details and easy shopping!

  • Sweet and Simple Christmas Card with Wondrous Wreath

    Nothing like some Christmas cards to start getting me in the mood for the holiday season!  The late fall/winter time is my favorite time of the year!  Yes, there is Christmas and even my birthday, but I just love all the joy that is everywhere, the twinkling lights, the shimmer and sparkle that you see everywhere.  Today the Stylin’ Stampin’ Inkspiration girls are sharing some Christmas card joy and this is my card I wanted to share:

    Isn’t it so cheery?!  I love how easy this stamp set is to make these fun wreaths.  You get three stamps that each add a little bit more to the wreath:

    1. The leaves of the wreath
    2. A few accent leaves of the wreath
    3. The berries for the wreath

    Plus there are handle guides ON THE STAMP that help you line up everything just right!

    I was going to try to explain lining it all up, but I realized you would be so much better served by a video, so I’ll put one together for you very soon!

    Tips for making this card:

    • I like to start with a white 3.5”x3.5” piece of white scrap paper and stamp your image with all the leaves so that the guide (an extra “tail” of the photopolymer stamp) is pointed towards one corner.
    • Stamp your second image with the accent leaves over the top with it’s guide pointing towards the same corner (using the corners helps you remember how to line up your stamps)
    • The berries, just stamp however looks nice to you!

    • Keep it simple by using the matching framelits (Wonderful Wreath – and you might as well get the bundle, because you know you will want it and then you get 15% off both!) to cut out the wreath with both the inside and outside cutting at the same time.
    • And just cut out some cardstock with the included bow framelit to make a pretty bow!  Add a pearl for extra bling.
    • The sentiment even fits inside the fabulous Decorative Label punch.
    imageimage

    Make this at my Holiday Card Stamp-a-Stack!

    If you are coming to my Holiday Card Stamp-a-Stack, you’ll get to make 3 of this card; so you’ll get lots of practice lining up your wreaths. Smile   There is still time to RSVP if you’d like to come!

    Holiday Card Stamp-a-Stack #1
    Jennifer’s House in Bellevue, WA
    10/18/2014 at 1pm
    Make 12 cards – 3 each of 4 designs with envelopes for only $25
    They will be lots of ideas that you can replicate if you want to make more! 
    (Holiday Card Stamp-a-Stack #2 with more card ideas will be Nov 15th)
    RSVP here


    And don’t forget to check out the Stylin Stampin’ Inkspiration blog for even more fun holiday card ideas!

    spaced shop now sig bar

    Card Supplies Used:
    click on any of the photos below for more details and easy shopping!

  • Another Star Card with Pictogram Punches
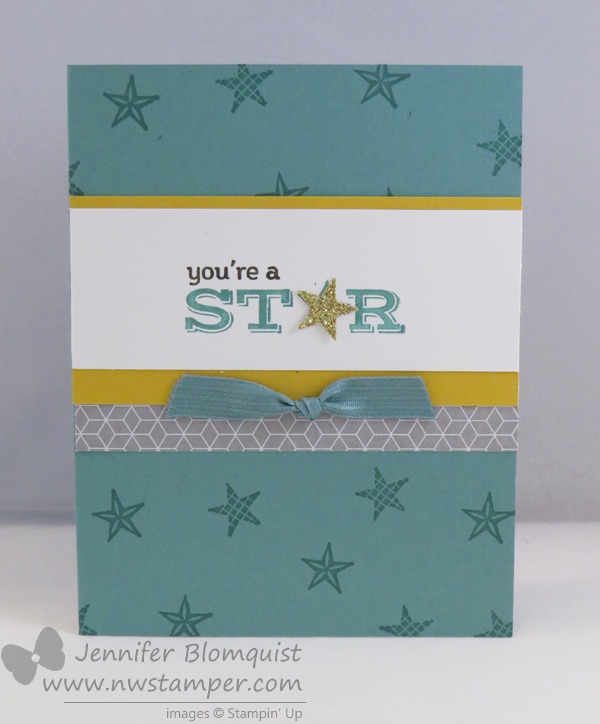
    Another Star Card with Pictogram Punches

    Happy Friday!  It’s going to be a busy one around here between swim lessons, lego summer camp, a vet appointment, and trying to finish finalizing my samples for Monday’s Let’s Make Birthday Cards class.  But, its always nice when the work is fun work!  And if you are in the Seattle/Bellevue area – I’d love for you to join me for my last class before convention!

    Let’s Make Birthday Cards
    7/14 at 7pm
    Panera in Redmond
    details and RSVP here

    Ok, so on to the card share for today… I thought I’d continue the star theme from yesterday with this little guy:

    This is one of the cards the folks in my online In Color Club received in their packets last month.  We were focusing on Lost Lagoon but I just loved the pop of Gold Gimmer Paper and Hello Honey cardstock (which by the way will the be color you all will be getting this month!)

    See, I love this Pictogram Punches stamp set because of all the cute little stars and hearts that are part of the words.  You can either leave them stamped, or punch out your own matching shape to add some extra dimension to your sentiment.

    imageimage

    Pictogram Punches Stamp Set

    Itty Bitty Accent Punch Pack

    I kept it simple by using one of the stars in the set to stamp out my background on the card and then just used the matching punch from the Itty Bitty Accent Punch Pack to make the Gold Glimmer star for the center of the card.

    Yay for star power!  Smile   Have a wonderful Friday!

    Card Supplies Used

    spaced shop now sig bar

    July Online Stamp Club Hostess Code – 7RDHVEKR
    Use this code to get free exclusive tutorials & project kit! 
    Learn more

  • Fun w/ Thinlits & a Flip Card Class

    Fun w/ Thinlits & a Flip Card Class

    I normally forget to post here on the blog reminders about my upcoming classes and events until the day before, not always the best time to advertise, huh?  But today I’m actually remembering and so I wanted to share a little about my next class that is coming up on Monday June 30th that is all about using the Thinlit dies in fun ways!image

    Beyond the Basic Flip Card

    6/30/2014 – 7pm at Panera in Redmond ~OR~ get the TO-GO class kit my mail
    RSVP here or email me at jennifer@nwstamper.com

    So the idea is that you have your basic flip card (shown above) where you pull open the left flap and the center circle or label shape flips over to reveal a message on the other side.  They are really cute and can be fun to decorate – and did I mention SUPER EASY thanks to the die!  Honestly, I had never tackled this type of card because I was nervous exact-o knives would be involved.  Smile  But once they came out with a die that did it all for me…. heck ya!  I was all over it!

    image

    The cool part is there are lots of variations you can do with these cards that are really fun and give you lots of variety with the single die.  So, in the class we’ll walk through the basics of using the die for the base card and then jump right in to some fun variations.

    • like changing the orientation of the card
    • to have a spinner in the middle of your flip shape
    • having an extra flap for more space to write your sentiments
    • to even doing a double flip (or more!) card!

    In class we’ll be using both the dies:

    imageimage
    Circle Thinlit DieLabel Thinlit Die

    I’ll have extra samples of flip cards to give you more ideas, but you’ll go home with completed cards that you made doing the different variations.

    image

    It should be a lot of fun and a nice change from your typical cards!

    I hope you can join me either in the class or virtually through class videos for the TO-GO option!  RSVP here or email me at jennifer@nwstamper.com


    spaced shop now sig bar

    June Online Stamp Club Hostess CodeACANDKB4
    Use this code to get free exclusive tutorials & project kit!  Learn more

  • Mixed Medley Hanging Christmas Wreath Card

    Thanks to everyone who sent their good luck wishes or stopped by my Stampin’ Up! booth at the Seattle Creating Keepsakes Convention!  It was fun to set up as a vendor this year though it turned out to be quite the eventful weekend with my entire family getting taken out suddenly by the stomach flu.  But everyone made it through and life is getting back to normal – and I look forward to having some new crafting friends in the future from the show. 🙂

    Well, today I thought I’d share a card we made in one of this year’s Christmas stamp-a-stacks.  Each month we have been doing a different set of cards and this was one of the first.

    Merry Christmas hanging wreath card


    The designer series paper makes it look a little like you are looking out the window to a snowy forest to me, do you see it?

    Merry Christmas hanging wreath card close upThen we made a “wreath” to hang on the bottom part of the card.  We started by taking some Cherry Cobbler baker’s twine and gluing the two ends together and under the Cherry Cobbler cardstock so that you have a loop on your card front.  Then use a Stampin’ Dimensional to glue down the twine where the wreath will be – because you are using a foam dimensional, you can make the loop spreadout so that it looks kind of like a triangle…. does that make any sense? 🙂

    Basically make your loop of bakers twine look like a teardrop and stick the dimensional across the fat base of your teardrop to hold it in place.  Then cover up your dimensional with your stamped images from the Mixed Medley hostess set.


    Come Stamp With Me!

    Just a reminder that I have a few classes coming up that I’d love to have you join me for!  Visit my events calendar or email me at jennifer@nwstamper.com to RSVP and save your spot!

    • Friday – 11/16 – Build Your Stash Card Class!
      • Join me at Panera in Redmond as we make a set of fun all occasion cards using the latest cute stamps, papers, accessories, and techniques!  It’s a great night out for your and your friends.  $15 or free with a minimum order
    • Monday – 11/19 – Build Your Stash Card Class! (afternoon session)
      • Same class as the friday card class only in a convenient afternoon timeframe.  Hosted at my house in Bellevue, WA.
    • Sunday – 11/25 – Christmas Card Stamp-a-Stack LAST ONE!!!
      • It’s the last Christmas Card class of the season and we’ll be finishing up our holiday cards!  We’ll be making 3 each of 4 great designs, plus you’ll be going home with your envelopes so you are ready to sign and mail before the holiday rush!  $25 early bird price when prepaid by 11/17, $30 afterwards.

    Hope to craft with you soon!


    To Order Stampin’ Up! Products Anytime, click here!

    Its INK-REDIBLE November!
    Get a FREE set of 10 ink pads with a qualifying order or party; or get them free when you join the Stampin’ Up! family! Learn more

    Are you earning your Northwest Stamper Rewards? Every order gets you closer to your FREE stamp set! Click here to learn more!

    imageMixed Medley Hanging Christmas Wreath Card Recipe

    Stamps: Mixed Medley
    Ink: Gumball Green, Cherry Cobbler marker, Chocolate Chip Marker
    Paper: Gumball Green, Cherry Cobbler, Chocolate Chip, Whisper White, Snow Festival designer series paper
    Accessories: Gumball Green stitched satin ribbon, Big Shot, Woodgrain Embossing Folder, 1” Square punch, Glue Dots, Cherry Cobbler baker’s twine, Stampin’ Dimensionals

  • Summer Smooches Card Blitz

    I am very lucky to be back in the same area as my many levels up-upline because she holds large group meetings a couple times a year.  Recently Alisha Linn showed some fun card ideas and so I’ve made a couple of tweaks and then put them together into a class to share with my customers and friends. We’ll be making a set of cards using the new Summer Smooches designer paper, the coordinating Bright Blossoms stamp set, and matching In Colors and Brights Collection cardstock and accessories. And punches…so many fun punches!

    Well, today I wanted to share one of the cards and a cool detail I learned with it!  Here is one of 6 cards we will be making at the class:


    Now, I think it is a cute card, but I love the idea of making dimensional paper buttons this way!  They are each made by punching out multiple circle punches to layer from your cardstock and then the top “button” is made into a button by punching two holes with your 1/16” hole puncher.  Cute, huh?


    So, are you curious to see everything we will be making and getting in the class kit for this event?  I thought I’d show you all the ideas so you could see some ideas for using your Summer Smooches designer paper and Bright Blossoms stamps.


    If you are in the Seattle area and are interested in attending the class in person, let me know.  The class is on 6/24 at 1:30pm in Redmond.  It’s a packed kit for this class and includes:

    • Supplies to make all 6 dimensional cards.  Papers will be precut and ready for you to stamp, punch, and assemble
    • Envelopes for all of your cards
    • 6 half sheets from the Summer Smooches designer paper(so a 6″x12″ sheet of each different double-sided design)
    • A full package of Rhinestone basic jewels
    • A half sheet of foam dimensional dots
    • A personal tape runner, so you will have awesome adhesive to hold all the layers and ribbon 🙂
    • Printed instructions for each card so you can make more later!

    All that for only $35!  RSVP’s with your payment must be received by 9am on June 18th to enable me to ensure I order enough supplies for everyone.

    Save $5 off the class fee!  The last day for the Early Bird Discount is 6/14! 

    Learn more and RSVP here


    If you think the cards are cute but aren’t in the area, I can make kits by mail for you.  It will include everything listed above and all punched pieces will be pre-punched for you.  I am not able to pre-stamp images but I’ve included an option to add in the coordinating Bright Blossoms stamp set we will be using on the cards so you can play along right away!

    Summer Smooches Kit Options (all prices include shipping)

    To Order Stampin’ Up! Products Anytime, click here!

    Are you earning your Northwest Stamper Rewards? Every order gets you closer to your FREE stamp set! Click here to learn more!

    Looking for Designer Paper or Ribbon Samplers?  Get yours now!