Northwest Stamper

Tag: everyday adventure

  • Bright Banner Birthday Card using Project Life + Double Reward Points!

    Just popping in for a quick blog post because I wanted to share with you another bright and fun project.  How about a celebration card with lots of cheery colors?

    See that bright pattern I used for the big banner?  I was getting tricky and instead of using designer paper, I used a card from the Project Life Everyday Adventure set!  I die cut it using my Banner framelits and matted it with a Black banner.

    Then grab some coordinating Cardstock and punch some little banners using the Banner punch.  I topped it off with some twine and then it was time to get some sparkle on!  Courtesy of the 2013 In Color sequins.

    I even had to add a sequin to the sentiment from the Yippee Skippee Stamp set.  Can’t leave any part unblinged. 🙂

    Gratitude Month Week 3 Thank You Gift!

    All this week, get DOUBLE PUNCHES on your Northwest Stamper Reward card!  Yep!  All orders through Sunday are giving you a way to earn a free stamp set from me even faster!

    For every $40 you spend (before tax and shipping) earn 2 punches on your punch card.  At 10 you’ll get to pick a free stamp set to receive totally free!

    And just a reminder of the newest Weekly Deals:

    weekly deal 11-18-14

    Have a wonderful week and I’ll be back with more projects for you soon!

    NWstamper signature_thumb[9]

    order online button for sig 3_thumb[4]

    Project Supplies Used:
    (if you are reading this in email, click here to see the list of supplies)

  • A Quick Card Using Project Life Cards Plus Weekly Deals and a GIVEAWAY!

    Did you realize that the Project Life cards aren’t just for scrapbooking or memory keeping?  Yup! It’s true!  Check out how I used two of the cards to create a fun card that you can send to anyone – no stamping required!

    I cut my card base out of Bermuda Bay cardstock and then had to trim down one of the 4”x6” cards (the blue and white striped card).  There was a spot on the card where there some extra spacing of white that made sense when you were using it as a 4”x6” card but not so much when you were mounting it on a card.  So I trimmed it down to 4” x 5.25” and then took the extra 3/4” strip and added it over the white wide band to cover that up and add some extra fun striping (see the black arrow in the picture below to where I glued it).

    Then I used some black cardstock to mount my 3”x4” HI card from the Everyday Adventure card kit and added a bit of ribbon and rhinestones and mounted it to the front of my card.  Done and Done!

    Get this card kit and more for FREE with a new Giveaway that just launched today!

    Project Life giveaway

    Stampin’ Up! is doing a giveaway of either their entire Project Life line or 100 first prizes of your choice of card kit and accessory pack.  How awesome is that?  Plus, if you share it with your friends, you get extra chances to win.  And who doesn’t like free, right?  Maybe you AND your friends will win and can all get your photos organized together. Smile Its a easy and fun way to get those photos off your computer and into a cute photo album without the muss and fuss! Get entered here –http://bit.ly/1wz8yxu

    Weekly Deals

    Check out the latest deals that went live today!  You can click any image below to shop or get more details or see them all online here.

    NWstamper signature_thumb[9]

    order online button for sig 3_thumb[4]

    Card Supplies Used:
    (if you are reading this in email, click here to see the list of supplies)

  • Project Life Cards Make Great Altered Picture Frames!

    Project Life Cards Make Great Altered Picture Frames!

    By now, You’ve probably heard of Project Life and know the cards in each kit are great for quick and easy scrapbooking (if you want to learn more about project life, I have a video about it here).  But when they gave a set to us to use for the 2014 Stampin’ Up Convention display boards and use in other ways, I found myself looking at them in a different light.  And thus, this altered picture frame came to be!

    I loved this project and even my non-crafty hubby liked it and said he wanted one for his desk at work!  Thankfully the frame is only $1 at Michaels and another set of Everyday Adventure Project Life by Stampin’ up is easy to come by!  So, I’ll be creating another one soon for him. 
    See all the cards in the kit here.

    The idea was to take this chunky frame and then start layering the cards around the edges to create a tiled design.  It all started with the Best Day Every card that is found in the Everyday Adventure Accessory Kit.  I thought it was cool because it is die cut so that you see through the card to whatever is behind it, so I thought it would look neat showing the wood of the frame through the letters.

    From there I started laying out other cards that I thought had cool complimentary colors and patterns to fill up the frame.  Once I had the plan, I could flip over the frame and trace the edges of the frame on the back of the Project Life card for any given spot.

    Then just trim off the extra paper and glue to your frame.  In my case, I ended up using the Tombow Liquid Glue.  And then finish up the seams by adding some embellishements from the Accessory kit (like those clear hearts) and other items in my craft room (like the rhinestones on the honeycomb card and the wooden accents such as the arrow and banner piece).

    It actually came together really quickly and easily.  And did you realize, that the Banner Punch actually is the same width and just a smidge shorter than the banners in the Wooden Accents?  Cool huh?

    Finally, I didn’t use it a lot, but I love the Remember This Project Life stamp set and it turned out to be perfect for stamping one of the stickers from the Accessory kit and balancing out everything on my frame!

    Its an easy and inexpensive idea for a great gift!

    Wanna Make This With Me?

    I’m running a Project Life Night class next Monday and RSVPs are closing first thing tomorrow morning!  We will be making lots of fun projects including:

    • 2 page pocket page scrapbook layout
    • 3 cards
    • 2 gift ables including a picture frame similar to the one I made in this post.

    You will get everything you need to make the projects plus have lots of extra Project Life cards to take home and keep!  All for only $25

    RSVP now to participate in this fun class!  RSVP here to join me in person at the Redmond Panera at 7pm on 7/28

    ~OR~

    Get the To-Go Kit!  You will get all the supplies you need to create the projects including basic adhesive for your picture frame, PDF pictures of all the projects, and instructions for how to make the projects.  Only $35 shipped anywhere in the US!


    Project Supplies Used

    So, think outside the Scrapbooking box and enjoy your Project Life cards in all kinds of new ways. Smile 

    spaced shop now sig bar

    July Online Stamp Club Hostess Code – 7RDHVEKR
    Use this code to get free exclusive tutorials & project kit! Learn more

  • Project Life by Stampin’ Up & the Everyday Adventure kits

    Project Life by Stampin’ Up & the Everyday Adventure kits

    project-life-by-stampin-up-kit.jpg

    This blog post is a looong time coming!  I actually recorded a video about the basics of Project Life, an intro into the differences between Project Life by Stampin’ Up (#plxsu), and about putting together your own project life layout.

    Then the video sat on my computer unedited for a long time.  Oops!  🙂 So, today I thought I would get it off of my computer and share them with you.

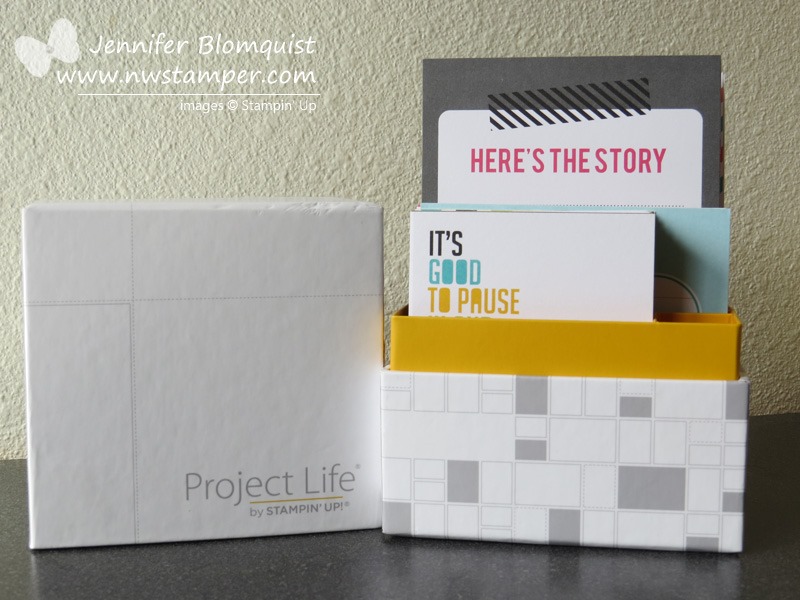
    About Project Life and How Project Life by Stampin’ Up is Different

    When Project Life by Stampin’ Up came out, I had customers, downline, and demonstrator friends who had all heard of Project Life or pocket page scrapbooking but didn’t really understand what it was all about.  So I found myself sharing all about it because I had become a fan not too long before it was announced Stampin’ Up was partnering with Becky Higgins to create exclusive Project Life card kits and accessories.  I thought it might be useful to share with others as well, so I did a little video about it as well sharing what PL is all about and how Stampin’ Up card kits are different than what you have gotten before.  (if you are reading this in email the video below won’t show up, so click here to view the blog post w/ videos)

    In a nutshell:

    • The Stampin’ Up cards (by Becky Higgins) have square corners instead of round
    • You get 1 card of each design instead of a bajillion multiples
    • The core kits give you 4×6, 3×4, AND 4×4 cards
    • The accessory packs are a combination of specialty cards, embellishments, stickers, and washi tape!

    Putting Together a Project Life Scrapbook Page

    The thing I really like about Project Life and all the pocket page albums, is that it makes scrapbooking really fast.  So, I like the idea that I’ll actually get some of my pictures off of the computer and into an album where I will ACTUALLY LOOK at them.  Plus maybe even have notes about the events. 🙂 I have way too many photos printed waiting to be scrapped and even more sitting on my computer.  My goal is to get the photos in albums and then I can take my time to make bigger, fancier layouts of the special moments and photos.

    See, I don’t know about you, but I tend to take a ton of pictures at any given event or time and then when I look at them, I have like 20 photos I want to keep and enjoy.  Unfortunately, that gets really hard to put in a scrapbook page nicely unless you have the time to edit them all to be much smaller pictures.  I figure this way I can print and save them and enjoy them.

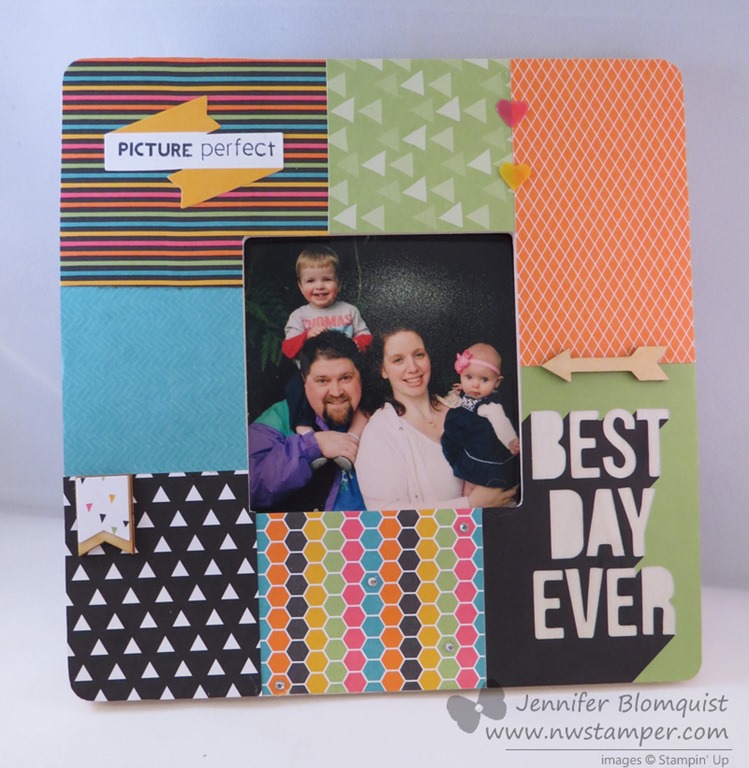
    Here is the first layout I created using the Everyday Adventure Project Life card kit and accessory pack:

    I walk through actually putting it together in the following video:

    Wanna See ALL the Everyday Adventure Cards?

    The one problem I have with many of the Project Life kits, no matter who the manufacturer is that it is hard to tell what you are going to get in the card kits.  You see a few samples and so you can get the general color scheme, but you take a leap of faith you will like the different designs.  So I thought I would take a picture and share ALL of the designs for the Everyday Adventure Project Life Card Kit so you could see for yourself. 🙂   Just click any picture to see the zoomed in image of the cards.

    Everyday Adventures 4×6 Cards (front side)

    Everyday Adventure 4x6 cards

    Everyday Adventures 4×6 Cards (back side)Everyday-Adventure-4x6-cards-backs.jpg

    Everyday Adventures 4×4 Cards (front side)

    Everyday-Adventure-4x4-cards-front.jpg

    Everyday Adventures 4×4 Cards (back side)

    Everyday-Adventure-4x4-cards-back.jpg

    Everyday Adventures 3×4 Cards (front side) – group 1

    Everyday-Adventure-3x4-cards-set-1-front.jpg

    Everyday Adventures 3×4 Cards (back side) – group 1

    Everyday-Adventure-3x4-cards-set-1-back.jpg

    Everyday Adventures 3×4 Cards (front side) – group 2

    Everyday-Adventure-3x4-cards-set-2-front.jpg

    Everyday Adventures 3×4 Cards (back side) – group 2

    Everyday-Adventure-3x4-cards-set-2-back.jpg

    Everyday Adventures Accessory Pack

    Everyday Adventure Accessory Pack by stampin up

    Whew!  That was a lot of cards!

    If you are interested in picking up your own packs, you can find them here:

    If you have any questions or would like to see more videos on creating with Project Life, let me know!  I’d be happy to share. 🙂

    spaced shop now sig bar

    July Online Stamp Club Hostess Code7RDHVEKR
    Use this code to get free exclusive tutorials & project kit!  Learn more

  • Trying out Project Life By Stampin’ Up – My First Layout

    I know by now it is old news that Becky Higgins (creator of Project Life) has partnered with Stampin’ Up to create exclusive lines of Project Life cards, accessories, and even a corner punch.  I had been just starting to get into Project Life when this announcement came out and I was stoked!  Especially because I would now be able to have cards that coordinated both in patterns and colors with stuff I already had in my stash! So, here is the first layout I put together using my new goodies: Everything in this layout is from the Everyday Adventure kit and accessory pack.  Can I just say I LOVE, LOVE, LOVE the idea of an accessory kit!  Maybe someone else does it out there, but I haven’t seen it with the Becky Higgins kits and We R Memory Keepers card sets.  Why do I love them?  They give me a little bit of lots of awesome bits to embellish up my cards and I don’t have to think about what I have that would match.  See? image

    Everyday Adventure Accessory Pack

    (Do you notice a theme?  I love kits and don’t like having to think about which things match. Smile  Seriously, I love scrapbooking kits that come with paper, embellishments, and die cuts because I know I have a little bit of everything to put my layouts together!) So anyway, for the most part, I just used the cards from the Everyday Adventure card kit and then I may add on or two little accents to a handful of them.  Like in the close up below, you see that card in the upper right?  It looked exactly like that (minus my journaling of course) and I just added a bit of the blue washi tape along the top as a bit of trim. And then, of course, the green arrow and black letters that spell “maple classroom” are stickers from the accessory pack. Oh and that bit of orange at the bottom of the green card?  That is a little acetate (think window sheet) colored piece from the accessory pack.  The doodling look on that card?  Totally printed on, thank goodness! Smile And as my last trick, I used some of that same blue washi tape again to layer a 3×4 PLxSU card  (I’m just going to use the PLxSU to make it less typing when I’m trying to say Project Life by Stampin’ Up… sound ok?  Ok, cool!)  Anyway, I layered a 3×4 PLxSU card on top of a 4×6” PLxSU card and stuck with Washi Tape for a fun layered look.  And if you can’t read it, the quote says “Everyday is a new Adventure” which I thought was PERFECT for this layout because it was about Nicholas being a in a new class at school.  His new adventure. Stampin’ Up! Supplies Used

    And let me say, I’ve been using these cards for MORE than scrapbooking as well.  I made some cards and other fun non-scrapbooking/non-card projects using them for the display boards for convention… so I can’t share them until July, but I’m SO EXCITED to be able to share them then!

    –>>  Plus, stop by the Stylin Stampin Inkspiration blog for even more great ideas for the PLxSU kits (there are 5 different ones available!)  See all the great ideas here

    I hope this gave you some ideas and you can give it a shot yourself!

    spaced shop now sig bar

    June Online Stamp Club Hostess CodeACANDKB4 Use this code to get free exclusive tutorials & project kit!  Learn more