Northwest Stamper

Tag: easter

  • Project Ideas for Stampin’Up 2016 OnStage Display Board Stamper Submission

    Project Ideas for Stampin’Up 2016 OnStage Display Board Stamper Submission

    I’m so excited to be headed to Salt Lake City in April for the first OnStage Live event in North America!  This is the new live event (think Convention) that Stampin’ Up holds to kick off the new catalogs, share new ideas, and get everyone inspired.  I’ll be headed there with a portion of my Fun n’ Crafty stampers team and know it will be great.

    This year, they are bringing back Display Stampers… so they have invited folks to submit some of their favorite/best projects that they think represent their style for a chance to be selected to create projects for the display boards at OnStage.  I thought it would be fun to throw my hat in the ring since I love creating; but my goodness it was hard to narrow down my favorites.  Here are a few that I think give a few ideas.  So, either way, I hope it gives YOU some inspiration!

    3 Card Ideas

    Card 1 – Balloon Celebrations

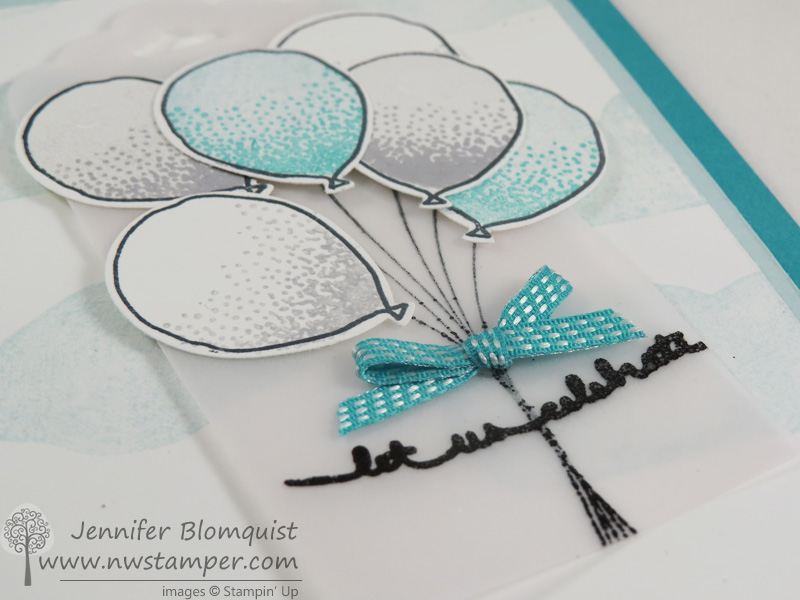
    For my first card, I thought I’d share one I made for our team swap using the Balloon Celebrations and vellum.

    I haven’t gotten the blog post written quite yet, but here is a close up of some of the details that are always so hard to see in the full card pictures:

    Balloon celebrations vellum celebrate card close up

    The strings and words are heat embossed on the vellum scalloped topped tag and then the balloons are stamped and punched out on top.  Then add a little bow with the Bermuda Bay stitched ribbon for a final touch.

    Blog post is up!  See more details for this card here

    Card 2 – Fun with Washi Tape

    This was a card I put together to show a couple different ways to use washi tape… as a background and with the masking tape technique to create the background Lost Lagoon stripes.

    It is a little hard to see, but the “thank you” is stamped on a Project Life grid card on the bottom and shows through a hole to the Project Life grid card that is covered in Washi Tape on top!

    Full blog post for this project here

    Card 3 – Bear Hugs & Party Pants Collar Fold Card

    I finally decide to add this card in because I thought it was a fun and different way to use the bear from the Bear Hugs stamp using a fold that hasn’t been used lately for your paper (the folded back Collar Fold).

    Party Pants Collar Fold bear birthday card

    So, Display Stamper Reviewers… those flowers are for you. 😉

    Also, it is hard to see, but I added Crystal Effects to the balloons on the patterned paper, which makes this paper EXTRA AWESOME!  Really, you should try it with your paper at home!

    Bear Hugs with Party Pants Birthday Card close up

    Whew, that was hard and there is so much more I want to show you now, but I guess I’ll have to wait for future blog posts. 🙂

    Full blog post for this card is here

    Scrapbook Page

    Next up, I needed to put together a scrapbook page.  I’m proud to say this came entirely from my brain and I am really happy with how it turned out.

    Legoland Pirate scrapbook page with Botanical Blooms paper 2

    I mixed the Botanical Gardens designer paper and the Corrugated Cardstock for my background with the Going Global stamp set to add color and boyish fun with the page.

    3D Projects

    Finally I had to put together two 3D projects… always the hardest for me!  But I still had fun playing with ideas for the recent holidays.

    Easter Gift Bag with Honeycomb Happiness and the Sunburst Thinlit

    I had so much fun playing with all my new stuff and the Gift Bag Punch Board to pull together this Easter treat bag –

    Doesn’t the Sunburst thinlit make such a great sun for behind our adorable chick?!

    Full blog post with all the details here

    Envelope Punch Board Valentine Owl Treat Bag

    I guess I’ve had a thing for punch boards lately.  This time I used the Envelope Punch board to create a little treat bag for Valentines.  Then I pulled out my trusty owl punch to make a cute little mascot for our project.

    Full blog post for this project here

    Bonus Card

    I LOVE this card but wasn’t sure if it would count because it isn’t the standard size – it is a 4 1/4″ x 4 1/4″.  So putting here for bonus option just because I think you might like it too.

    Full blog post with VIDEO TUTORIAL here

    So thank you for stopping by and thank you to the Display Stamper Reviewers for checking this out and your consideration!  I can’t wait for OnStage!

    NWstamper signature_thumb[9]

    order online button for sig 3_thumb[4]

  • Easter Punchart Throwback Card and a FREE SHIPPING announcement!

    I had remembered that I had a card that I LOVED that was a punch art bunny, and so I decided today to go digging it out to remind myself what it was.

    original blog post here

    Isn’t that bunny super cute??

    Well, since he uses some retired punches (like the small oval and the itty bitty punch pack) I thought I’d share how you could make this guy with punches that are still available.  He comes out a little bit larger, but still oh so cute.

    For a size comparison, here is how your new bunny is going to turn out:

    Easter bunny punch art

    I know, I’ll have to turn him into a completed card later, but I wanted to show you quick how to pull this bunny together!

    how to make a punch art bunny

    What you will need is the following:

    Punch out 3 of the ovals, two for the ears and one for the “feet”.
    Punch out one each of the circles for the head and body
    Punch out the smallest flower from the Boho Blossom punch for the tail

    You may notice in the bunny card at the top of the page, I sponged the edges of all the pieces to help them stand out a little better.  I like sponging with Sahara Sand for a subtle color that don’t look too dirty on the bunny.

    Layer together starting at the top of the bunny and finishing by tucking the last oval punch underneath the bottom of the bunny.  Easy and done!

    how to make a punch art bunny instructions

    It’s Coming!!  Free Shipping & my Spring Adhesive Sale!

    image

    Starting on Monday, Stampin’ Up will be giving ALL orders (except expedited orders) free shipping no matter the minimum amount!  So, make sure you get those wishlists ready!

    Plus on top of that, I’ll be running my Spring Adhesive Sale! Stock up on your favorite adhesives at big discounts!

    Make sure you are on my mailing list to get all the details first!  Sign up here

    NWstamper signature_thumb[9]

    order online button for sig 3_thumb[4]


  • Easter Punch Art & Why You Should Buy the Clearance Easter Egg Dye Kits

    Easter Punch Art & Why You Should Buy the Clearance Easter Egg Dye Kits

    Happy Easter!  I hope you have a wonderfully bright and peaceful day!  Today we’ll be hoping for sunny skies, family easter egg hunts, and spending time with our extended family in the area.

    But while we are doing that, I wanted to share an idea with you to consider as you see the Easter supplies go on sale in the stores starting tomorrow (or maybe even today).  Consider grabbing those Easter Egg dying kits while they are on clearance, and here is why…

    So, last night we pulled out our eggs and coloring kit to start dying some eggs.  I needed something to cover our counter…. turns out my used Stampin’ Up grid paper made a nice lining. Smile  (See there is a reason I don’t throw them away after classes!)

    2014-04-19 20.01.03

    We made our eggs like normal… add 3 Tablespoons of Vinegar to a cup and drop the dye tablets in.  After they are done fizzing, add your 1/2 cup water to each cup.  Then dunk your eggs and let them soak and dye the shells.  I also couldn’t find the box the dye tablets came in, so I had to create my own egg holder!  I took a cereal box and kitchen scissors and cut 12 holes in the top of the box.  Then I could set each egg on top of a (poorly) cut hole to dry!

    2014-04-19 20.17.32

    Now, this is the fun part!  Once you are done with your eggs, you still have lots of dye left over.  So I grabbed some of my ribbon from my craft room and started throwing them in the cups and letting them soak up the color!

    2014-04-19 20.25.26

    In these cups, I have 4 pieces of the 7/8” Cotton Ribbon and 2 pieces of the White Organza Ribbon.

    And this is how they turned out:

    2014-04-20 10.46.35

    Pretty huh?  Now to create some fun projects with my custom colored ribbons! Smile

    I hope you have a wonderful rest of your weekend.  And a few quick reminders:

    Last Call for the Retirement List Prediction Contest!

    Don’t forget to get your guesses in by tonight for what 10 stamp sets you think will be retiring!  You have a chance to win your favorites from the retiring list for free.  Email me your guesses to jennifer@nwstamper.com and find out tomorrow who the winner is!

    FREE SHIPPING starts tomorrow!

    If you didn’t see on my Facebook page, Stampin’ Up will be offering Free Shipping tomorrow through Friday for all orders – which is perfect timing as the retirement list comes out on Monday!  So, get your orders ready and don’t forget to use hostess code G4VQJ7VB to received this month’s free online stamp club tutorials and if your order is over $40, you will receive the make & take project in the mail too!
    (note – if your order is going to be over $150, don’t use the hostess code so you can receive the hostess benefits!)

    spaced shop now sig bar

    April Online Stamp Club Hostess CodeG4VQJ7VB
    Use this code to get free exclusive tutorials & project kit!Learn more

  • Quick Spring Easter Treat Bag Tutorial with Punch Art Daffodil!

    Quick Spring Easter Treat Bag Tutorial with Punch Art Daffodil!

    Happy Easter weekend! I don’t know about you, but we still need to do a lot of our prep for Easter.  Today we’ll be spending time coloring Easter eggs – and I’ll be making sure I have everything I need for Easter baskets and Easter dinner! 

    (PS – don’t forget to enter the Retirement List Prediction Contest!  It is free to play along and you could win up to $30 in free Stampin’ Up products!)

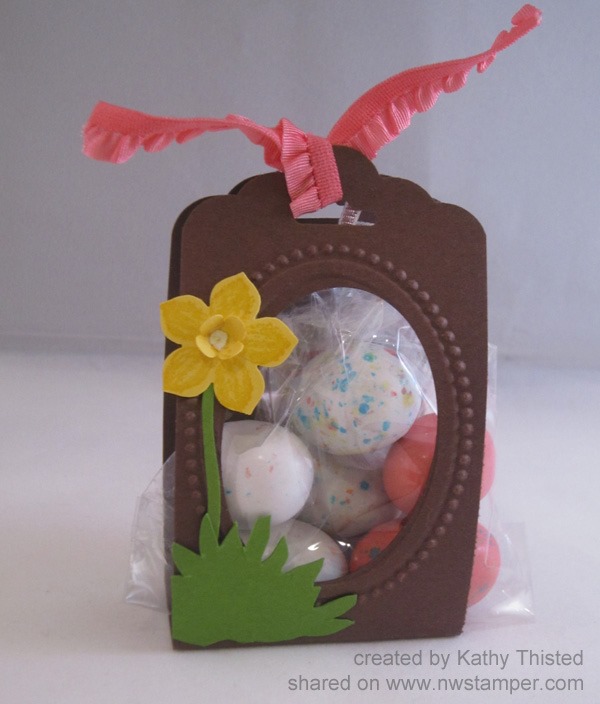
    So, back to Easter treats!  I thought I would share a quick spring or Easter treat idea that you can pull together at the last minute!  This was created by my Mom, Kathy Thisted, for our Fun n’ Crafty team Stamp & Share a few weeks ago and I just love it.

    Scallop Tag Topper & Punch Art Treat Bag

    There are lots of fun elements to this treat bag, but the nice thing is that with a few punches, it is super quick to make!

    Start with a 2”x8” piece of cardstock (this is Chocolate Chip) and score at 3-1/2” x 4-1/2” to help it stand up on it’s own.  Then, grab the Designer Frames Embossing Folders and use the oval to one to emboss your frame. 

    Use the Extra Wide Oval Punch to punch out the center of your oval.  LOVE that it is an almost perfect match!

    Punch both ends of the strip of cardstock with the Scallop Tag Topper Punch to give you that pretty finished look!

    Then grab your Petite Petals punch  and the four petal flower punch from the Bitty Punch Pack to make your Daffodil.  I punched one of each shape out of Daffodil Delight cardstock.

    In the sample, the flower is stamped first using the Petite Petals stamp set – and I think it definitely adds something to it.  But for the sake of this tutorial, I didn’t end up stamping.  I hope you don’t mind. Smile 

    Fold up the small punched flower and adhere it to the center of your larger flower with liquid glue or a glue dot!  I love how my mom colored in the center of the little flower with the White Gel pen for a little extra definition!

    Add a scrap of cardstock for the stem and grass at the bottom.  Want to hear a fun trick?  Stamp out one of the flower heads from the Too Kind stamp set and then cut it out and use the backside for your grass!  Neat huh?

    image

    Add some candy, tie it with a ribbon and you are done!  Easy Peasy!


      Reminder! Get your guesses emailed in!

      If you haven’t gotten in your guesses for my Retirement List prediction contest, don’t forget to get those in!  You have until tomorrow afternoon but since I know many folks will be busy with Easter activities, you may want to send them in today. Smile 

    Pick 10 stamp sets from the annual catalog that you think will be retiring and email me your list to jennifer@nwstamper.com.  If you have the most guesses correct when the list is posted Monday morning, you will win a shopping spree from me!  See all the details here.

    spaced shop now sig bar

    April Online Stamp Club Hostess CodeG4VQJ7VB
    Use this code to get free exclusive tutorials & project kit! Learn more