Northwest Stamper

Tag: crop weekend

  • Another Northwest Crafty Escape Weekend is in the Books!

    So, you see… back in October of last year, I thought it was a BRILLIANT idea to run my next Northwest Crafty Escape Weekend (the twice-a-year retreats I hold in Bellevue, WA) in April, the weekend IMMEDIATELY FOLLOWING the Stampin’ Up OnStage event in Salt Lake City.  It will be fun, I said!  I’ll have lots of new displays and samples, I said.  I’ll have the scoop to share on the upcoming annual catalog…

    and all of those things were true. Smile  And we had a TON of fun!

    But I also neglected to think of how little sleep I get when I’m at OnStage… plus how little sleep I get when I’m at the retreat weekends.  And so, let me just say, back to back amazing crafting weekends are fun, but not nearly enough sleep is involved. Smile  But in the end, it was totally worth it and it has been great (though the fall retreat will be a bit more spaced out from OnStage than this time!)  So, I thought I’d share some of the photos from the event so you can see what I’ve been up to!

    NW Crafty Escape Weekend spring 2016

    So the weekends always start with me clearing out much of my craft room so I can take all my tools with me for people to use

    2016-04-24 16.48.02

    And then I cart everything over to the hotel we run the Crafty Escape Weekend at!  This time was great because our group size grew enough that we needed 2 banquet rooms, which made it fun having more space and room to craft, spread out, and goof off!

    We had displays, a crop store, a swap my stuff table (which was seeing some amazing items being gifted on that table this weekend!), and of course, everyone got their own large space.

    2016-04-22 19.40.11

    2016-04-22 19.40.21

    And I think for all of about 3 hours total of the event, I even had my table clean so I could craft on it. Smile

    2016-04-23 00.04.30

    It was like my mobile command center for all things retreat plus some personal crafting at the end of each day.

    I always start out the weekend with a goodie bag full of fun crafty stuff plus a make & take packet with details for projects they can make with the items in their goodie bag.  In this case, I designed 6 cards for them to create using their goodie bag and the tools over on the tools buffet.2016-04-22 18.43.01

    I love how the name placecards and other elements really make the tables cheery each time!  This was my table with my completed Enjoy the Little Things project kit all done and set up.  Isn’t it cute!?

    2016-04-23 09.35.12

    Oh, and you see the water bottles that were decorated with some designer paper and the Flower Fair stamped flowers?  Check out what one of the gals at the retreat did with hers!

    2016-04-23 13.27.06

    She took it off the water bottle and then picked off some of the extra flowers from her namecard and made them into cute cards!  I LOVE it!

    We had crafty challenges, like this one to use at least 3 products from the goodie bag in one project

    2016-04-23 18.23.10-1

    I ran some classes (3 total over the course of the weekend)

    2016-04-23 10.51.01

    Ate some yummy food

    2016-04-23 11.56.35

    And folks got a lot of crafting done… and not just paper crafts!

    2016-04-23 13.29.26

    I also love our Pajama Party we run on Saturday night.

    2016-04-23 22.26.03

    I usually give out challenges for the evening and my favorite was to show us your Crafty Super Hero costume.  I think this was Lady Crafts a Lot and Sir Inky Fingers… or I may have the names a little wrong, but I LOVED the creative costumes!

    2016-04-23 20.10.53

    2016-04-23 20.12.55

    Professor Paper

    IMG_1574

    And the super villian – OOPS, who knocks their drink all over your almost completed project Smile

    IMG_1571

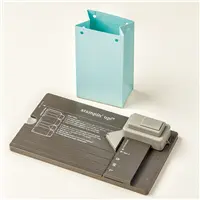
    And we learned what happens when you try to run an embossing folder through the big shot with the magnetic platform (PSA – either your BigShot cutting plate or your embossing folder will not make it out alive!)

    2016-04-24 13.28.46

    But I still managed to get some creating done while I was there, which if you know how much I talk at retreats, you know that is an impressive feat!

    2016-04-24 11.43.16

    So, all in all, another fun weekend full of friends, crafts, and lots of laughs!

    Next up… Northwest Crafty Escape Weekend – Fall Fun!
    September 2016

    I’m trying to finalize the dates of our next Northwest Crafty Escape Weekend… it should be Sept 16-18, but I’ll be able to confirm that by the end of the week.  Consider joining us next time and be a part of the fun!


    NWstamper signature_thumb[9]

    order online button for sig 3_thumb[4]

  • More Fun and Cute Gifts from the Northwest Crafty Escape Weekend!

    More Fun and Cute Gifts from the Northwest Crafty Escape Weekend!

    I’m back today to share the little table gift for the last day of the Northwest Crafty Escape Weekend.

    These are super fun purses made with the Gift Bag Punch Board following a great design by Brenda Quintana aka QBee

    Tips for making this purse:

    • I picked the ribbons for the handles and then chose my cardstock for the base of the purse to match!  Love that Stampin’ Up makes it so easy to match!
    • Use your Fast Fuse to hold your purse together and make sure it won’t pop open with goodies inside.
    • Make a cutie tag to go with using the sentiment from the Watercolor Wings stamp set and it punches out perfectly with the Note Tag punch!
    • Cut your paper to cover the back of your purse and front flap by cutting it at 3 1/8 x 4 1/8″.
    • I used candy dot brad bases and the 1/4″ punch to make the closure.  It is a tight fit but it totally works!

    The purses I made use the new Stitched Satin ribbons in the pretty new colors (I followed Brenda’s ideas and used Melon Mambo, Pacific Point, and Crumb Cake).  And of course the patterns from the lovely Pretty Petals designer paper.  Front and back even!

    And have to have some fun treats inside!

    It was another fun day at the Northwest Crafty Escape Weekend yesterday too!  We made lots and lots of messes, and the tables were piled to overflowing so you know it was a good day!

    And in the afternoon, some folks had signed up to do my Sprinkles of Life Class…

    So everyone got their kit and we had a table with all the supplies for folks to share.

    IMG_0217

    I’ll have the dates up for the next one in October posted tomorrow!  I hope you can join us!

    NWstamper signature_thumb[9]

    order online button for sig 3_thumb[4]

    Project Supplies Used:

  • Fun Floral Frames Flowers for Northwest Crafty Escape Weekend Decorations

    Fun Floral Frames Flowers for Northwest Crafty Escape Weekend Decorations

    I was so excited to finally kick off my first crafty retreat weekend!  I have  been wanting to run these for AGES but had a hard time finding a venue.  But I finally found a great hotel that is amazing to work with and so this weekend is the first of what I plan for 2x a year Northwest Crafty Escape Weekends!  (next one coming in October!)

    To kick things off, I had goodies on the table for everyone that arrived and made a cute floral decoration using the Floral Frame dies for them.

    northwest crafty escape weekend pillow gifts and floral frames flowers day 1

    I thought I would share more about it because I love how it turned out and it was such a fun use for the Floral Frames Framelits.

    Each one used 4 of the 5 dies in the set and after making the flower (more on that in a minute), I attached it to a wooden barbeque skewer that was then placed in one of the new Sketched Dot Tag a Bag Gift Bags that were filled with M&Ms and tied closed.

    Plus I had to add to the front of the flower one of the new Bold Butterfly Thinlits cut out of the Dazzling Diamonds glimmer paper.  So sparkly!!

    For the flower itself, I used:

    • The largest die shape in Crushed Curry
    • The 2nd largest die shape in Watermelon Wonder
    • The 3rd largest die shape in Bermuda Bay
    • The 2nd smallest die shape cut out 3 Cucumber Crush cotton paper pieces

    I sponged the edges in all the flowers in Watermelon Wonder. And then directly layered the watermelon and bermuda layers together and then used an Antique Brad to hold the Cucumber Crush cotton paper to the layered flowers.  Then crinkle up the cotton paper to give them some texture.  Add those layers to the Crushed Curry flower with Stampin’ Dimensionals.

    I’m excited for the rest of the weekend.  Here are a few more pictures of what our set up is like:

    our room

    2015-06-12 18.10.54

    I have just a few Paper Pumpkin kits with me for sale as part of my Crop Store Smile

    2015-06-12 18.11.17

    Punches and tools for anyone to borrow

    2015-06-12 15.30.00

    And a few inspiration boards for the event too!

    2015-06-12 18.11.24

    Check back tomorrow for more project and other pictures from the event!  This has been so much fun so far, I’m already working on locking in the date for our next one in mid-October!


    NWstamper signature_thumb[9]

    order online button for sig 3_thumb[4]

    Project Supplies Used: