Northwest Stamper

Tag: convention display boards

  • Quick and Easy Thank You card with Kinda Eclectic

    I hope you don’t mind one more card using Kinda Eclectic but I think this one is pretty different from a lot of the other cards I showed you.  I’m sharing it as part of the Stylin’ Stampin’ Squad’s Quick & Easy Cards post for today.  So check out my contribution:

    See, quick… easy… and just a little bling to keep it sparkly fun!  It was another display board card and I was sad to see it didn’t make it up on the boards this year… but I noticed another card that had a similar design so I can understand why they had to pick one.  So this is mine and if you order from me in the next month or two, don’t be surprised if one of these guys makes it to your mail box as a thank you for your order!

    Tips for making this card:

    • The green polka dots are the polka dot image from the Kinda Eclectic stamp set, stamped twice on the card front.  If you have the clear-mount version of the stamp set, you can “best guess” line up the images (which is what I did for this card… total eyeballing and luck!) or get precise by grabbing your Stamp-a-ma-jig (see it here).
    • Use In Color Sequins to add a little sparkle to your dots (and help cover up any that didn’t stamp perfectly!).  I used a glue dot to hold them down which gives you a little dimension as well!
    • Wrap some linen thread  around the inside edge of your card (right next to the red cardstock) to add some subtle texture and keep everything from blending together.

    As you can tell, this card comes together quick with very few layers (yeah, like 1 – ha ha) and just a few of those embellishments you get because they are so cute but you always forget to use!  Pull them out and enjoy them.  Smile

    LAST DAY for the Buy 3 Get 1 Free Paper promotion

    So, since I’m the one who is totally prone to remember a sale is ending the day after the sale is finished, I thought I would try to help you not be me and let you know that TODAY is the LAST DAY for this promotion.  You can check out Tuesday’s post where I shared my 3 favorite designer paper packs and card samples for each one.  So, check them out and you can pick them up before 11:59pm MST tonight using the following link:

    See all the paper on sale here

    Join me tomorrow when I promise to share a project that is NOT Kinda Eclectic or Amazing Birthday… you know, because I gotta keep mixing it up for you, right?  Winking smile  But I will tell you that they will help give you an idea for a new promotion starting tomorrow!!  (Lets just say if you’ve been wanting a BigShot, you are going to be getting a sweet package in the month of August!)

    spaced shop now sig bar

    July Online Stamp Club Hostess Code – TT2NETD4
    Use this code to get free exclusive tutorials & project kit! Learn more

    Card Supplies Used:

  • Birthday Banner Card with Amazing Birthday

    Alright, lets continue on the Convention Display Board sample roll…. you see, I have 24 projects that I want to share and so this is going to take us a while.  But that just means you know there will be fun projects on the horizon, right?!  Well, today I’m back with another of the Amazing Birthday stamp set cards.  For this one I stuck to the Birthday theme and instead played with the idea of lots of banners.

    See what I mean?  All Banners… All the Time… whabam!  Smile 

    I was having fun with the 2013-2015 In Colors (you know all those Strawberry Slush, Crisp Cantaloupe, Pistachio Pudding, etc ones) and trying to keep it really simple.  The only complicated thing – aside from having to use the Big Shot – is tying the knots onto the Gold Baker’s twine to highlight the sentiment in the center. 

    Tips for making this card:

    • The stamps in the Amazing Birthday stamp set are perfect matches for 1-1/4” Circle punch AND the Banner Framelits!  So, stamp to your hearts content knowing you don’t actually have to fussy cut everything by hand.
    • After cutting your stamped banner pieces, layer them on your card overlapping each other and starting at different heights.  The uneven-ness of the card will make it more visually interesting and will hide any imperfections you may have gotten when stamping or cutting out your banners.
    • Wrap your Gold Baker’s Twine around your card in straight lines first. THEN take a second (and third) piece of twine and tie them each in a knot.  Trim the ends and adhere over your long pieces of twine using glue dots. 
      Or you can tie your knot around one of the pieces of twine so that you don’t distort the straight line of the base baker’s twine, but also have something for your knot to hold onto.
    • I love the fact that the gold foil part of the twine is just wrapped around the more natural colored fiber.  That makes it easy when you are trimming your ends to UNWRAP some of the gold foil so you can leave it longer than the natural cotton twine.  This gives you some extra “tinsel” hanging out of your knot.

    This is a great card to do in a class or when you just want something that is fun but doesn’t require a lot of brain power or measuring to pull together.  Any time you can layer die cut pieces, the easier it is in my book! 

    Hope you enjoyed this card.  I’ll be back tomorrow with another quick and easy card, only this time using the Kinda Eclectic stamp set.  See you back here tomorrow!

    spaced shop now sig bar

    July Online Stamp Club Hostess Code – TT2NETD4
    Use this code to get free exclusive tutorials & project kit! Learn more

    Card Supplies Used:

    foo

  • Using Project Life Cards…for CARDS! Red & Gray Love Card

    Happy Monday! Today I thought I would share a super fast and simple card that I created using the Everyday Adventure Accessory pack from Project Life by Stampin’ Up!  As we were working on our projects for the convention display boards, we were sent a set of Project Life cards and accessories and invited to create some projects using the supplies in a “non-traditional” way.


    I saw the heart die-cut card from the accessory pack and thought it would be a fun core element to a card.  So I grabbed my Pictogram Punches stamp set and was excited to discover that the I <3 You stamp was an exact fit!

    Tips for making this card:

    • Cut a some glimmer paper 1/8” larger than your base paper (so in this case, the grey striped card was 3”x4”, so I cut my Real Red glimmer paper to 3-1/8” x 4-1/8”).  This gives you a very fine border around your main image and just a hit of sparkle to light it up.  It is a great way to add the sparkle without overwhelming the card with lots of bling!
    • Take a strip of scrap paper and turn it into a fun stripe for the background of your card.  In this case, I took a wide piece of Smoky Slate cardstock and glued it diagonally across the card front.  Then I flipped over my card and trimmed along the edges of the card base to cut off the extra paper that was hanging over the edge of the card.
    • Love those matching punches & stamp sets!!  The new Itty Bitty Accent Punch pack is a set of 3 punches for only $16.95 for all of them.  The heart and star are new sizes and all perfectly match with the Pictogram Punches stamp set.  The shapes are used in the sentiments for the set and so you can easily add a pop of color or glimmer to your project and no fussy cutting required!


    I have 1 spot left in my Project Life Night class tonight!
    If you’d like to come play more with Project Life with me, I’m running a class tonight and have 1 kit left so RSVP now and it is yours!  We’ll be making 2-3 cards, a 2 page scrapbook page, AND a giftable or two!  If you can’t make it in person but would like your kit to-go, I can do that too.  I’ll include a PDF of pictures of the projects and instructions along with a full set of Project Life cards for you to keep. Smile
    In person – 7/28 at Panera in Redmond from 7-9pm
    To – go – just email me at jennifer@nwstamper.com and I’ll get everything set up for you.

    Card Supplies Used:


    spaced shop now sig bar

    July Online Stamp Club Hostess Code – TT2NETD4
    Use this code to get free exclusive tutorials & project kit! Learn more

  • Stampin’ Up 2014 Holiday Catalog Sneak Peeks!

    Stampin’ Up 2014 Holiday Catalog Sneak Peeks!

    2014 Stampin' up Holiday catalogSo, I’ve been hearing that a lot of folks are eager for sneak peeks from the holiday catalog and while I don’t have copies of the new catalog yet – I can get those on August 1st – I do have my photos from convention that I can share!  So, I thought I would put them all in one place for you to have a chance to scroll and see lots of what is coming out soon at the end of August!  So get ready for a lot of scrolling!

    Some quick side notes:

    • We are not allowed to show pictures of the inside of the catalog, just the cover.  So we are limited to the samples and displays from convention until I place my preorder and start creating and sharing more of what I have here at home.
    • Want a copy of the Holiday catalog?  If you have a demonstrator, make sure they know you are waiting for yours – we get to order and start mailing ours in August!  If you don’t have a demonstrator, let me know you want one!  I’ll be automatically mailing out copies to all of you who have ordered from me in the last 6 months – so, don’t worry, you’ll get yours early!  Then after August Stamp Club, I’ll start mailing out extra copies to folks who request them.
    • Want to get your hands on Holiday items early?  Did you know that if you join my Fun n’ Crafty group of demonstrators, you could see the entire catalog online AND get your favorites first in August!?  No selling required!  Email me (jennifer@nwstamper.com) to chat about how you can get $125 in Holiday catalog items for only $99 with free shipping.  THEN get 30% off your first order of $150 or more!  You’ll also get in on the perks of being in my group such as joining our Holiday catalog card swap, participate and get inspired on our Facebook group, chat with us on our monthly team call, and more!  I’d love to have you be a part of our stamping family.

    Ok, so… now on to the good stuff!  The pictures!  I swear I had a few more but I’m still trying to figure out where they went… so hopefully you can enjoy these in the meantime!

    Halloween Stuff

    holiday-catalog-2014-tag-stamps-and-new-punch.jpg


    New stamp set and matching punch… also notice the rope/twine and that is a new sheer Cherry Cobbler ribbon

    holiday-catalog-2014-new-designer-paper.jpg

    New halloween and thanksgiving paper

    Halloween-wreath-Stampin-Up-2014.jpg

    Simply Created Halloween wreath kit

    Halloween-wreath-Stampin-Up-2014-2.jpg

    The Halloween wreath includes instructions and supplies for a cool beaded spider

    Thanksgiving Stuff

    stampin-up-holiday-catalog-display-board-1.jpgstampin-up-holiday-catalog-display-board-4.jpg

    New feather framelits and those are gold metal buttons on the top left!

    30-days-of-gratitude-banner.jpg

    30 days of Gratitude banner Simply Created project kit

    30-days-of-gratitude-banner-in-project-life.jpg

    The 30 Days of Gratitude banner pieces fit great in Project Life pockets!

    Thanks-gratitude-flip-book.jpg

    Or make a gratitude flip book

    Thanks-gratitude-flip-book-inside.jpg

    Thanksgiving-wreath-picture-frame-stampin-up.jpg

    Stamp a Thanksgiving wreath in a picture frame and add my FAVORITE new wooden elements!

    Christmas Stuff

    stampin-up-holiday-catalog-display-board-3.jpg

    I thought this wreath stamp set and framelits was interesting… then I tried it out.  Now I LOVE it!

    holiday-catalog-wreath-stamp-with-framelit.jpg

    jennifer-blomquist-and-patty-bennett-convention-2014.jpg

    Patty Bennett and I with our stamped wreaths

    holiday-catalog-sneak-peak.jpg

    Terrible picture but you can kind of see the stars confetti border punch and a new stamp too

    santa-tag-with-mustache-die.jpg

    Another use for the mustache framelit.

    stampin-up-christmas-gift-tag-with-tree-punch.jpg

    New tree stamp set and matching punch!

    stampin-up-holiday-catalog-display-board-5.jpg

    New snowflake flip card die

    snowflake-flip-card-thinlit-stampin-up.jpg

    gift-card-holder-framelit.jpg

    Gift card holder framelit die and tags

    nordic-buttons-holiday-catalog-2014.jpg

    Fun nordic like button and a peak at the new designer paper stack in the upper corner

    stampin-up-holiday-catalog-display-board-2.jpg

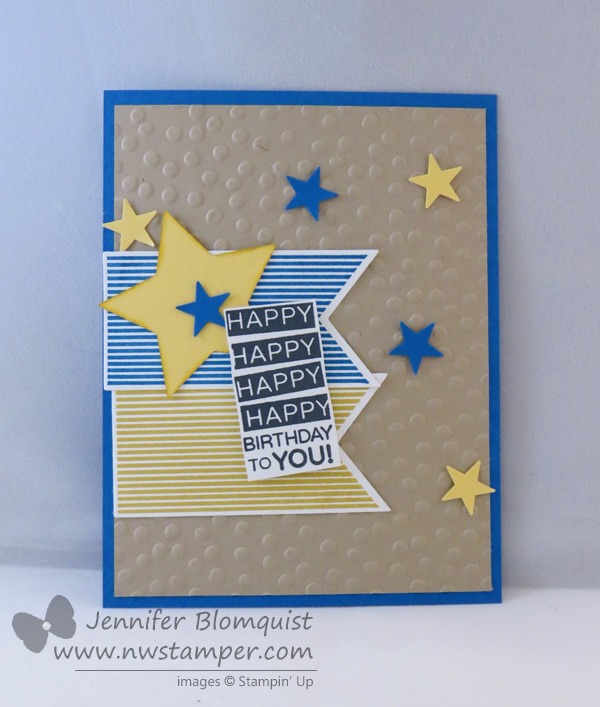
    New paper  (there is a stamp set and framelit that makes those houses!) and a new star stamp set that matches the stars framelit

    Project Life

    holiday-catalog-display-boards-project-life-1.jpg

    A new project life kit is coming too!  #PLxSU

    holiday-catalog-display-boards-project-life-2.jpg

    holiday-catalog-display-boards-project-life-3.jpg

    And of course it has it’s own accessory pack

    holiday-project-life-by-Stampin-up.jpg

    More Tools and other cool Stuff

    stampin-up-gift-box-punch-board.jpg

    New Gift Box punch board

    stampin-up-gift-box-punch-board-sample.jpg

    This is the smallest size box it makes

    printed kraft paper for boxes

    New printed kraft paper that is thicker and meant for using with the punch boards so it won’t rip.

    stampin up holiday catalog embossing folder

    New embossing folder with a stamp set that is a similar style

    Stampin up mini stapler

    New mini stapler (LOVE THIS!!!)  First thing I bought.
    Note – this is a DIFFERENT size mini staple than the Tim Holtz mini stapler  (this is slightly bigger)

    new holiday catalog stamp set

    Another new stamp set that we got free at convention

    seasonally scattered display board 1

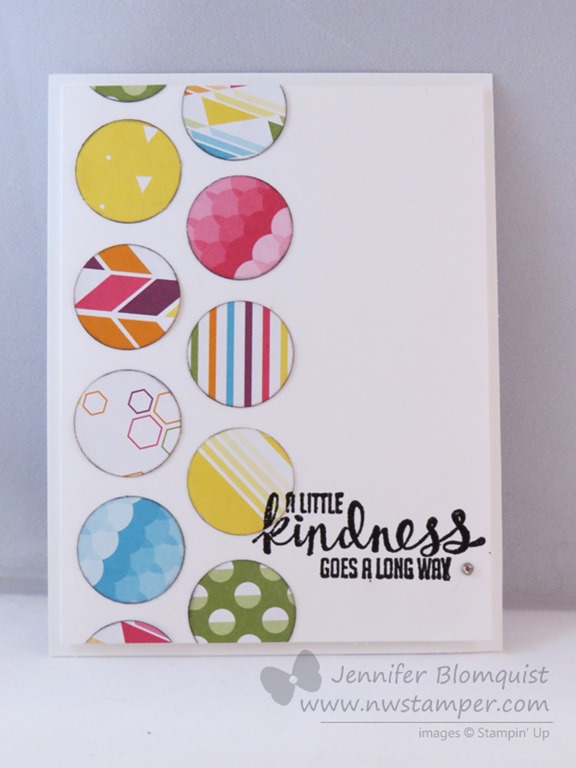
    New stamp set called Seasonally Scattered!  This is one we created a bunch of projects for the display boards (3 of the cards above were mine!)  So you’ll be seeing a lot more samples with this from me very soon.

    So, like I said, lots of cool and fun things coming.  And there are still a TON more that I didn’t get a chance to photograph.  So, stay tuned to check them all out and all the super cute projects you know everyone is going to be making with them.

    And just a reminder to what I said above in case you can already tell your wishlist is growing:

      • Want a copy of the Holiday catalog?  If you have a
        demonstrator, make sure they know you are waiting for yours – we get to
        order and start mailing ours in August!  If you don’t have a demonstrator,
        let me know you want one!  I’ll be automatically mailing out copies to all
        of you who have ordered from me in the last 6 months – so, don’t worry,
        you’ll get yours early!  Then after August Stamp Club, I’ll start mailing
        out extra copies to folks who request them.
      • Want to get your hands on Holiday items early?  Did
        you know that if you join my Fun n’ Crafty group of demonstrators, you could see
        the entire catalog online AND get your favorites first in August!?  No
        selling required!  Email me (jennifer@nwstamper.com) to chat about
        how you can get $125 in Holiday catalog items for only $99 with free
        shipping.  THEN get 30% off your first order of $150 or more!  You’ll
        also get in on the perks of being in my group such as joining our Holiday
        catalog card swap, participate and get inspired on our Facebook group, chat with
        us on our monthly team call, and more!  I’d love to have you be a part of
        our stamping family.


    spaced shop now sig bar

    July Online Stamp Club Hostess Code – 7RDHVEKR
    Use this code to get free exclusive tutorials & project kit! Learn more

  • Friday Favorite–Amazing Birthday the Display Board Swap Card

    Friday Favorite–Amazing Birthday the Display Board Swap Card

    Today over on the Stylin’ Stampin’ Inkspiration blog, the girls are sharing some of their favorites items.  I thought I would do a spin on that and share one of my favorite Convention Display Board cards and the stamp set that I loved working with – Amazing Birthday.  Like I’ve said before, I really like that this set is not just about Birthday but can be used for thanks, guys, or anything in between.  But in this case, I stuck to birthday and my favorite shape of the season – STARS!! No joke, I am so digging the stars thing right now and when I finished this card, it was the first one from the set of display board projects that I really got excited about.  So much so that I used it for our group swap where we picked on of our cards from the board to create and trade.

    (SPOILER ALERT! If you love stars, get excited because in the upcoming Holiday Catalog, there is a stars embossing folder & a stars confetti border punch!!! Um, yes please!!)

    Tips for creating this card:

    • Pick a neutral color and then two contrasting colors (I picked Crumb Cake, Pacific Point, and Hello Honey) and then repeat them all over your card.  Don’t be afraid to use a non-traditional color for your shape like blue for stars.
    • Offset your die cut images for a more interesting look.  You’ll notice that I had the Hello Honey banner aligned with the edge of the Crumb Cake whereas the Pacific Point is aligned to the edge of the card base.
    • Sponge the edge of bigger cardstock elements (like the the bigger star) to help them have more dimension even if you don’t pop them up on a dimensional.  Often just using the same color as the cardstock is enough.
    • When die cutting a shape with the matching framelit, like I did here with the banners, USE the Magnetic Platform!  Yes, you can use a post-it note… or the hope really hard methods Winking smile  but you will have a better time getting an even edge around your images when you use the magnetic platform because it is strong enough to keep the framelit where you set it!

    Card Supplies Used

    Oh, I forgot to mention, the sentiment is actually hand cut out… and yes, that Happy doesn’t have the dark line to the left of the “H”… that is intentional. Smile When I was doing this for a swap, I cut long strips for Whisper White cardstock (around 1.25” wide) and stamped my sentiment on the strip and then trimmed down with my snips to the narrower width. But this is a fun color combination, so grab some cardstock and give it a try with your projects.  I hope you enjoy it as much as I did!

    spaced shop now sig bar

    July Online Stamp Club Hostess Code – 7RDHVEKR Use this code to get free exclusive tutorials & project kit! Learn more

  • Clean & Simple and BRIGHT Kinda Eclectic Card for the Stampin’ Up Display Boards

    Clean & Simple and BRIGHT Kinda Eclectic Card for the Stampin’ Up Display Boards

    Today is one of those quick and simple days… you know, when you need a card or want to get some crafting in but either don’t have the time or the mojo to come up with something elaborate or clever.  I thought I’d share one of the cards I created for the 2014 Stampin’ Up Convention display boards that fits the bill nicely! 

    All you need is a circle punch and some extra paper and you pretty much have a card!  The best part is this design works with pretty much any paper you have, though I really liked the bright colors and bold patterns from the Sweet Taffy designer paper to contrast with the white cardstock base.

    Tips for making this card

    • Cut a smaller piece of Whisper White cardstock to adhere your punched pieces so you can trim off the parts that hang over and have dimension and a clean border with that piece popped up off the card base.
    • Sponge the edges of your punched circles (I used a 1” circle punch and Basic Black ink) to help them be more defined and stand out from your base cardstock.
    • Glue your circles in a line and have full circles hanging off the ends to help you get the size and spacing right.  THEN, turn over your cardstock and trim off the extra parts of the circles.
    • Heat emboss your sentiment for an extra bit of shine and pizzazz.

    Mix and match different colors and papers for a different look each time!

    Card Supplies Used

    Need more inspiration?  Check out all the amazing display stampers I had the privilege of creating with for this year’s boards:

    2013-2014 Convention Display Stampers
    Cathy Caines
    Anja Beckmann
    Jennifer Blomquist
    Jeanna Bohanon
    Amy Bollman
    Erica Cerwin
    Chelsey Christenson
    Becky Cowley
    Ilina Crouse
    Lynda Day
    Shari Fritz
    Lyssa Griffin Zwolanek
    Mary Haugen
    Krista Jensen
    Jane Lee
    Nance Lempinen-Leedy
    Charlet Mallett
    Sarah Naber
    Allison Okamitsu
    Amy O’Neill
    Breelin Renwick
    Sarah Sagert
    Cindy Schuster
    Jennifer Timko
    Ashley Van Camp
    Kimberly Van Diepen
    Mercedes Weber
    Alanna Wharf

    spaced shop now sig bar

    July Online Stamp Club Hostess Code – 7RDHVEKR
    Use this code to get free exclusive tutorials & project kit! Learn more

  • Amazing Birthday Thank You Card–Display Board Sample

    Amazing Birthday Thank You Card–Display Board Sample

    I’m back!  Display Board Stamper logoI made it home from the 2014 Stampin’ Up convention and had a great time.  As I mentioned before, I was honored to be invited to create samples for the display boards this year.  Everyone coming to convention received 3 stamp sets – Amazing Birthday, Kinda Eclectic, and Seasonally Scattered (coming soon in the 2014 Holiday Catalog).  So, as display stampers, we received our sets early and were asked to make 8 projects for each stamp set.  I will admit, this was an intimidating task, especially when I learned the caliber of stampers who were joining me with creating for the boards.  I eventually decided to just think of it as “they will make the stunning over the top cards and I’ll make the simpler card class versions” Winking smile.

    I wasn’t allowed to post or share my samples until after Convention, so here we are and I’m excited to start sharing with you!

    Thank You card with Amazing Birthday

    When I first saw this stamp set, I kept thinking I needed to make birthday cards.  But then it hit me, there is this sentiment that doesn’t need to be birthday at all!  So, I started pulling different colors and stamped images together to create this card.

    But you want to know the best part?  I mailed this card in to Stampin’ Up in the beginning of June (so they could get the Display Boards together in time) and then on the last day of convention, Shelli Gardner showed this card during her main stage presentation!

    Sure they aren’t exactly the same, but my the similarities are there!  It made me feel extra proud of my card that I could have had a little moment where my design idea overlapped with the creative inspiration from the head of Stampin’ Up!

    In both cases, we used the striped banner stamp to form a layer between the Starburst pieces – hers pointed out and mine pointed in (you can’t see the banner tips because they are under the Pumpkin Pie starburst.  Plus that super fun Surprise circle for our center element.  With everything popped up on dimensionals of course!

    Oh, here is the stamp set we were both working form so you can see what we were using!image

    Amazing Birthday stamp set (wood mountclear mount)

    Card Supplies Used:

    Also, many of the Display Board stampers are sharing their convention projects up on a Convention 2014 Display Board Stampers board on Pinterest.  So, watch that board for lots more great ideas over the next month or two!

    spaced shop now sig bar

    July Online Stamp Club Hostess Code – 7RDHVEKR
    Use this code to get free exclusive tutorials & project kit! Learn more

  • Stampin’ Up! Convention 2013–Day 3 Wrap Up

    Well convention wrapped up this weekend and ended with a bang!  I’ve been traveling ever since (flew home Saturday night then flying out to Arizona to visit family on Sunday)!  But I wanted to share some of the fun of the last day of Convention too.  So here we go!

    More amazing swap cards

    Every time I go to convention, I save some of my swaps to trade each day.  That way I can have fun swapping cards each day and this year I was so glad I still had cards on the last day since there were some fabulous cards being swapped then.  Like this adorable card:

    2013-07-20 08.18.33

    If this is your card or you know whose card it is, let me know so I can give appropriate credit.

    General Sessions

    Then it was on for more stamping presentations and business classes.  First up was Sara Douglas (Shelli Gardner’s daughter) who always shares some amazing projects.  This was no exception!

    2013-07-20 09.41.55

    First she showed some great class ideas that share some adorable banner project.  The first up was a cute halloween banner.

    2013-07-20 09.42.05

    2013-07-20 09.45.43

    Don’t forget this banner kit and accessory kit are one of the options available free as part of the Pick a Project bonus when you sign up as a demonstrator between now and August 31st!

    Next up was an adorable mini album out of a place setting project kit (also available as a Pick a Project bonus) and a cute set of Christmas cards.

    2013-07-20 09.51.592013-07-20 09.56.25

    More Milestone Marches

    I also have to give a shout out to my mom who reached her 5 year milestone and got to march across the stage which is awesome, especially with a big crowd clapping and cheering for you. Smile  So CONGRATS, MOM!  (she is just to the right of Darla who is waving to the camera)

    2013-07-20 10.39.48

    And that was just the morning!  I spent lunchtime meeting Shelli Gardner

    2013-07-20 13.05.24

    Lots of Display Boards

    And checking out display boards (I thought it was cute that they spelled out “Inspire Create Share” out of the cards on the boards.

    2013-07-20 13.29.572013-07-20 13.29.272013-07-20 13.29.39

    2013-07-20 13.32.36

    Closing Session

    The more business classes and closing session.  I loved some of these scrapbooking projects that were shown using the This and That journal and a new cool divided page scrapbook album.

    2013-07-20 16.30.332013-07-20 16.44.15

    We learned about Stampin’ Up!’s investment in innovation and change and it got me excited to try new things and see how I can do more different things.  I’ll be putting together some new offerings but if you have suggestions for what you would love to see from me, please shoot me a message at jennifer@nwstamper.com or leave me a comment!

    Session ended with a bang – literally! 

    2013-07-20 18.05.49And more prizes too!  The very last prize patrol gave 25 people every single stamp set in the holiday catalog!!! WOW!  Then they ended with a final giveaway for everyone – another super fun stamp set called Yippie Skippie!

    2013-07-20 18.08.33

    It was the end of an awesome few days full of gifts, learning, inspiration, and friends!  I can’t wait to come back next year.  If you want to join me, don’t forget to save the date – the week of July 14th (most likely wed or thursday through Saturday)

    2013-07-20 18.10.57

    This was my 5th convention and tonight I’ll finish uploading all my pictures so you can get the rest of the feel of it.  Smile Then on to posting more projects that inspired me here on the blog.  Until then, have a fabulous day!

    spaced shop now sig bar

  • Snow Much Fun Convention Swaps & Checkin Day!

    Woo hoo!  Convention is here and it was a busy day in Salt Lake City for me yesterday.  I spent the first night in town (Tuesday night) finishing up my swaps and getting settled in after arriving late in the evening.  I wanted to use Dazzling Details (Stampin’ Up!’s glitter glue) on my cards so I glittered them up and had them all out to dry around the room. Smile


    swaps out 1swaps out 2


    The end result, I think, turned out pretty nice.  Unfortunately I had a heck of a time taking a picture in the light of the hotel room that shows the glitter, but I think you can tell here:

    Snow Much Fun Swap 2012Snow Much Fun Swap 2012 close up


    This was one of my two swaps and today I can’t wait to swap like crazy.  I’ve already seen some super cute cards and I know there will be tons more today!

    But yesterday was filled with picking up our bags:

    IMAG0120

    and visiting Momento Mall!  (If you want to see more Momento Mall photos, check out my facebook page where I posted a bunch of pictures from yesterday)IMAG0003

    Then we got an early peak at display boards and product showcases including checking out the new trimmer!  Did you know that the new trimmer has a lock so that the plastic blade guide (where you slide the cutter up and down) so that it doesn’t flop open when you are putting it in your bag for crops?  And the numbers are under the laminate on the platform so they won’t rub off??  Oh, I hope they announce that it is releasing soon!

    IMAG0002_COVER IMAG0136

    Well, General Session starts at 8:30 and then it is off to make & takes and classes!  I’ll be posting some to my facebook page throughout the day and then I’ll try to post more pictures tonight of more convention goodies.

    And don’t forget my Convention Week specials!!

    Don’t forget, get a FREE INK PAD and be entered in a CHANCE TO WIN a $25 GIFT CERTIFICATE when you place your order with me this week.

    Any order of $50 or more can pick out your favorite color of the new style of firm foam ink pad, and every order is entered into a drawing to win the gift certificate.  Shop online or email me your order at jennifer@nwstamper.com and I’ll get you all taken care of!

    Well I’m off!  I’ll share more later!

    To Order Stampin’ Up! Products Anytime, click here!

    Are you earning your Northwest Stamper Rewards? Every order gets you closer to your FREE stamp set! Click here to learn more!