Northwest Stamper

Category: Techniques

  • Check out that NEW Fun n’ Crafty Blog Hop!

    10383580_10204078098778853_972456530417495748_nWelcome to the Fun n’ Crafty Blog Hop for June! I’ve been seeing the amazing talent of the folks in my Fun n’ Crafty group of demonstrators and I thought it would be fun for us to start a monthly hop to showcase everyone’s work and give you lots of ideas around different themes.

    I’m so excited for this inaugural blog hop and hope you enjoy all the inspiration.  This month we will be showcasing project ideas from the NEW Stampin’ Up annual catalog. So make sure to check out the list of stops on the hop at the bottom of this post to see them all!

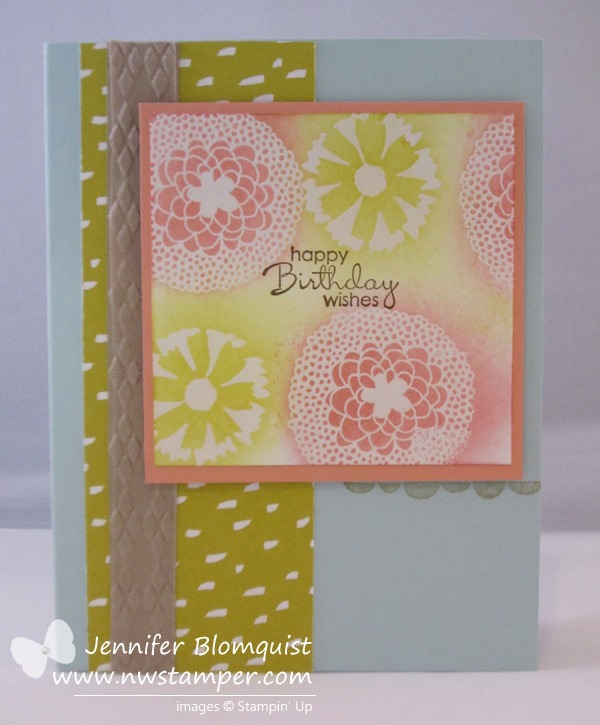
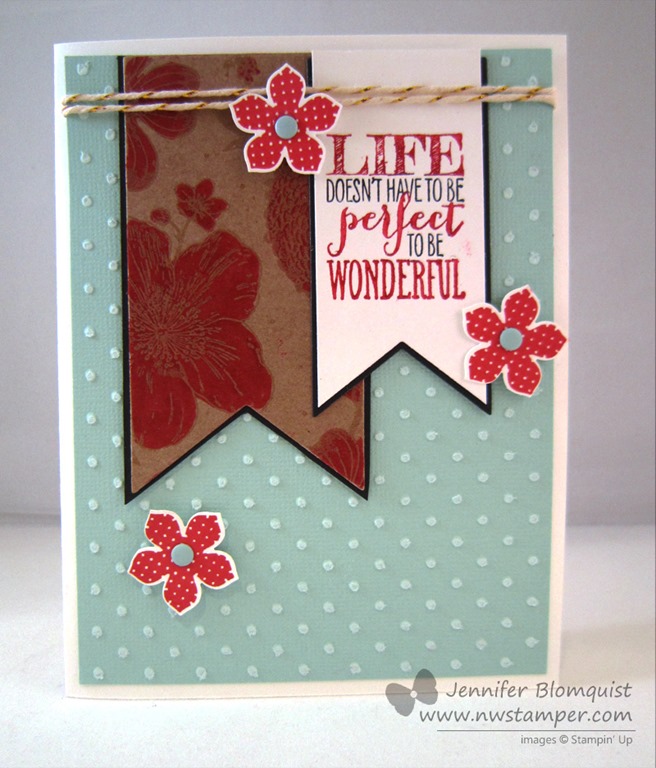
    So, here is my contribution… a lovely catalog CASE only my card is using the new Blended Blooms stamp.

    Here is my inspiration for the card… you can find it on page 170 in your catalog.  It is showing the new Sweetbriar Rose stamp, which I don’t have…and I don’t have the paper yet either.  But that is ok, you just make it work with what you have!image

    There were lots of cards and projects that I saw that I really wanted to try but this one jumped out at me and I had to give it a go.   I liked the idea of coloring directly on a non-white cardstock and I figured it was a good excuse to bust out my Blendabilities markers.  (Stampin’ Up’s new alcohol ink markers ~ available now to demonstrators and coming soon to everyone later this summer)

    And I’m pretty excited because this is my first real attempt using my Blendabilties and I think it turned out pretty well.  Now imagine how this would look on white cardstock!

    I loved all the little touches in this card too.  From the bit of White Tea Lace Doilies to the faux stitchiing at the edge of each piece of designer paper… because you KNOW I don’t have a sewing machine or the time to do much of any hand stitching. 🙂

    Now one thing you’ll learn from using Blendabilities is that they do bleed through the paper.  Thankfully, in some cases, it actually looks pretty pretty on the inside. Don’t you think?

    I made one more card but in the interest of time, I’ll share it later this week so you can move on to see some of the other great projects in the hop!

    So make sure you visit the links below and make sure to leave them some love by commenting and letting them know what you think of their interpretations!

    Blog Hop Participants:


    And if you are thinking of joining Stampin’ Up (or just want to get your hands on Blendabilities now!) take advantage of the $50 Starter Kit promotion through the end of June.  And if you join with myself or one of the folks on the blog hop, we’d love to welcome you into our Fun n’ Crafty stampers group and invite you to participate in our hop too!

    spaced shop now sig bar

    June Online Stamp Club Hostess CodeACANDKB4
    Use this code to get free exclusive tutorials & project kit!  Learn more

     vintage-Blended-Blooms-thank-you-card.jpgStampin’ Up Supplies Used
    Stamps – Blended Blooms, Hip Notes

    Ink – Memento Black, Mossy Meadow, Blendabilities Marker sets (Daffodil Delight, Pumpkin Pie), Crumb Cake marker
    Paper – Crumb Cake cardstock, Whisper White cardstock, Regals Designer Series Paper Stack
    Accessories – Banner punch, Tea Lace Doilies, Essentials Piercing Pack, Piercing Pad, Piercing tool

  • Pop Up Card in a Box featuring Create a Cupcake

    Pop Up Card in a Box featuring Create a Cupcake

    The new Stampin’ up catalog is here and while I excitedly placed my first order from it yesterday, I thought I would show a few projects today and tomorrow that feature some fun ideas and products that are going away after tomorrow.  The first project (well both today and tomorrow) will be card in a box – just in two different sizes!

    This one features the Create a Cupcake stamp set that is retiring after tomorrow.  I’m a bit sad because I really like the sentiments that go with this set…. here is the sentiments I used from the set for the backside of the card.

    Now you may be thinking… how is this considered a CARD when it looks like a BOX?  Check it out, here is what it looks like in an envelope:

    Crazy, right?!  It totally fits!  That is the brilliance of this card design.  It folds down flat to be a mailable card but when the recipient pulls it out of the envelope it pops open to be a box with fun jiggly bits that can sit on their table or shelf.

    This is what it looks like when it is collapsed flat after they pull it out of their envelope.

    I thought my outside needed something which is why I added the Coastal Cabana cardstock with some stamping from the Perfect Pennants stamp set.  I also used that same set for the front “Make a Wish” sentiment too.  So happy this set at least is continuing on into the new catalog. Smile

    And if you like the cupcakes, (they really do make fun birthday cards)… or as one person said, muffins for her holiday baking.  You have two options right now:


    Create a Cupcake Stamp Set (retiring 6/4)~OR~  Cupcake Partyboth of which coordinate with the Cupcake Punch
    imageimageimage


    These cards aren’t hard to make, just time consuming to decorate if you get fancy.  Smile  I have to find my instructions for putting them together but I’ll post them TOMORROW if you want to stop back by to see the other horizontal design for this style of card.


    I’m getting ready to close my first Product Sampler / Product Share for the new catalog! If you are interested in samplers for the new designer papers or ribbon, make sure you let me know ASAP!  Details can be found here.

    spaced shop now sig bar

    June Online Stamp Club Hostess CodeACANDKB4
    Use this code to get free exclusive tutorials & project kit!  Learn more

  • A Summery Emboss Resist Card plus LAST DAY for Free Shipping!

    A Summery Emboss Resist Card plus LAST DAY for Free Shipping!

    Before I get to the card for today, I wanted to remind everyone that today is the LAST DAY for Free Shipping on any Stampin’ Up order.  So, if you were thinking of grabbing your favorites from the retirement lists before they sell out, or you’ve been eyeing that big purchase – don’t miss out on the extra savings with free shipping! 
    Shop Online Now  |  View the Retiring Stamps list  |  View the Retiring Accessories list

    Ok, now on to the card!

    Have I mentioned how much I love doing emboss resist cards?  Today I thought I would quickly share another sample I made for my embossing class using the Petal Parade stamp set from the Sale-a-Bration catalog from this year.  See.. it is possible for me to do this technique with a stamp set other than Lovely & Lacy!  ha ha.

    I love how it looks like citrus and lemonade to me with the pinks and the yellows.  That is actually Crisp Canteloupe and Summer Starfruit as the inks for this card; they actually go together really well don’t you think?

    To make it, I recommend stamping your sentiment in the middle FIRST! 

    And then randomly stamp your images using versamark. 

    Heat emboss with clear embossing powder to give you your shapes. 

    Then take your yellow sponges and starting from the MIDDLE of each embossed shape, sponge in a spiral pattern to get the saturation of color that you want

    Once you have all your colors added, uses a little extra of one of the colors to sponge the in-between spaces to fill in all the white gaps.  That is it!

    Oh, the other thing I wanted to show you from this card… embossing ribbon!  That is right, you heard me…. embossing RIBBONSmile 

    image

    It’s a little hard to tell the texture from the photo, but this is piece of the Crumb Cake seam binding ribbon that I placed over a piece of Crumb Cake cardstock to give it a bit of stiffness.  Once it is glued down – and I recommend glue stick for adhering the ribbon – then you can run it through the Big Shot in an embossing folder.  It gives you the texture and fabric look of ribbon, customized to any embossing folder pattern you have!  It’s actually really cool.

    And don’t forget to get in on the FREE SHIPPING that is ending TODAY.  So if you have been looking at some items and want to save a little bit of money. Visit my online store and take advantage of the free shipping – especially combined with clearance rack and weekly deals!

    spaced shop now sig bar

    April Online Stamp Club Hostess CodeG4VQJ7VB
    Use this code to get free exclusive tutorials & project kit! Learn more

    Stampin’ Up! Supplies Used
    Stamps – Petal Parade, Petite Pairs
    Ink – Early Espresso, Summer Starfruit, Crisp Cantaloupe, Crumb Cake, Versamark
    Paper –Pool Party, Whisper White, Crisp Cantaloupe, Crumb Cake, Sweet Sorbet designer paper
    Accessories – Big Shot, Argyle embossing folder, Heat gun, embossing buddy, clear embossing powder, Stampin’ Dimensionals

  • Black & White Negative Heat Embossing with Pleasant Poppies

    Black & White Negative Heat Embossing with Pleasant Poppies

    I have had a card pinned on Pinterest for ages that used this cool split image with one half one color and the other half a different color.  So, when I was working on cards for my embossing class, I just had to give it a try and my Pleasant Poppies stamp set was the perfect choice to give it a go, since I knew it was a big stamp and the line art would make it easy to do.

    So this is what I came up with and love how it turned out!

    How do you do it?  It is easier than you think!  I started with two pieces of 2” x 4” cardstock – one in Basic Black and one in Whisper White.  Set them side by side to make a square and then ink up your image with Versamark ink. 

    Stamp your image across both pieces of paper at the same time and then separate the papers.  Use white embossing powder on the black cardstock and black embossing powder on the white cardstock.  Heat it up and then glue the pieces back down onto your card front so that the images are lined up.

    Easy Peasy!

    You will notice that my card has some embossed speckles.  That is because I didn’t use my embossing buddy.  So, as a reminder always use your embossing buddy!

    Give it a try with any color and have fun!

    spaced shop now sig bar

    April Online Stamp Club Hostess CodeG4VQJ7VB
    Use this code to get free exclusive tutorials & project kit! Learn more

  • Quick Spring Easter Treat Bag Tutorial with Punch Art Daffodil!

    Quick Spring Easter Treat Bag Tutorial with Punch Art Daffodil!

    Happy Easter weekend! I don’t know about you, but we still need to do a lot of our prep for Easter.  Today we’ll be spending time coloring Easter eggs – and I’ll be making sure I have everything I need for Easter baskets and Easter dinner! 

    (PS – don’t forget to enter the Retirement List Prediction Contest!  It is free to play along and you could win up to $30 in free Stampin’ Up products!)

    So, back to Easter treats!  I thought I would share a quick spring or Easter treat idea that you can pull together at the last minute!  This was created by my Mom, Kathy Thisted, for our Fun n’ Crafty team Stamp & Share a few weeks ago and I just love it.

    Scallop Tag Topper & Punch Art Treat Bag

    There are lots of fun elements to this treat bag, but the nice thing is that with a few punches, it is super quick to make!

    Start with a 2”x8” piece of cardstock (this is Chocolate Chip) and score at 3-1/2” x 4-1/2” to help it stand up on it’s own.  Then, grab the Designer Frames Embossing Folders and use the oval to one to emboss your frame. 

    Use the Extra Wide Oval Punch to punch out the center of your oval.  LOVE that it is an almost perfect match!

    Punch both ends of the strip of cardstock with the Scallop Tag Topper Punch to give you that pretty finished look!

    Then grab your Petite Petals punch  and the four petal flower punch from the Bitty Punch Pack to make your Daffodil.  I punched one of each shape out of Daffodil Delight cardstock.

    In the sample, the flower is stamped first using the Petite Petals stamp set – and I think it definitely adds something to it.  But for the sake of this tutorial, I didn’t end up stamping.  I hope you don’t mind. Smile 

    Fold up the small punched flower and adhere it to the center of your larger flower with liquid glue or a glue dot!  I love how my mom colored in the center of the little flower with the White Gel pen for a little extra definition!

    Add a scrap of cardstock for the stem and grass at the bottom.  Want to hear a fun trick?  Stamp out one of the flower heads from the Too Kind stamp set and then cut it out and use the backside for your grass!  Neat huh?

    image

    Add some candy, tie it with a ribbon and you are done!  Easy Peasy!


      Reminder! Get your guesses emailed in!

      If you haven’t gotten in your guesses for my Retirement List prediction contest, don’t forget to get those in!  You have until tomorrow afternoon but since I know many folks will be busy with Easter activities, you may want to send them in today. Smile 

    Pick 10 stamp sets from the annual catalog that you think will be retiring and email me your list to jennifer@nwstamper.com.  If you have the most guesses correct when the list is posted Monday morning, you will win a shopping spree from me!  See all the details here.

    spaced shop now sig bar

    April Online Stamp Club Hostess CodeG4VQJ7VB
    Use this code to get free exclusive tutorials & project kit! Learn more

  • Lovely Lattices with the Chevron Border Punch

    Lovely Lattices with the Chevron Border Punch

    Today is my day to share some ideas over on the Stampin’ Stylin’ Inkspiration blog and I thought I would share with them and you a technique that has been around for a while but I only recently gave it a try myself – making lattices with the Chevron punch!  If you haven’t tried it yet, this is an easy technique that has lots of possibilities.

    To get started, here is the card that was my first attempt with this idea:

    It was my chance to play with a few of the fun new tools from the Occasion catalog including:

    So, when I would see that lattice or similar looks on other cards, I always thought it was really hard and complicated.  I wasn’t sure that I could make it myself, but I finally figured that since I had the Chevron Punch I ought to at least give it a try. 

    Turns out it is easier than I thought!  Wanna see how to do it yourself?

    Start out with two 1.25″ x 5.5″ strips of cardstock.  Punch the chevron pattern on each one.  Here is where I lined up the first edge of my cardstock to get started punching so that I had the right amount of spacing.

    Now, after you punch the first set of chevrons, slide the paper over and continue punching along the paper strip.  Make sure you only see silver through the punched chevrons as you go!  Otherwise your chevrons will be uneven and won’t braid together very well.

    Once you are done, you should have two strips of cardstock that look about the same.  Lay them next to each other on the table so the chevrons are pointed in the opposite directions.

    Now, start “braiding” the paper.  That is lay the two strips on top of each other in this orientation and start tucking the chevron tips so that the top layer chevron tips are *behind* the chevron tips of the back piece of paper.  I know that is a little confusing to read in text, but if you look up close, this next picture might help!

    Wha-bam!  You have a handy dandy snazzy lattice to use in your projects. 🙂  Now, because you braided them together, your final piece is actually a little bit longer than 5-1/2″.  So you can position it how you’d like on the front of your card and trim off the extra – so, no worries if your ends look a little strange.

    Tuck in some flowers… add some butterflies… stamp your background with the Hardwood stamp set and you have a really fun card!

    I hope you enjoyed this little tutorial!  I highly recommend giving it a shot.  There are so many fun things you can do with this technique.  For example, check out another idea for something you can do if you make this lattice with two different colored strips of cardstock!

    In this case, I used Melon Mambo and Whisper White, then I glued it over a piece of Pear Pizzazz cardstock for bright look on white.  What do you think?  Pretty right?  Smile  So give it a shot and get creative and you may just love what comes out!

    spaced shop now sig bar

    April Online Stamp Club Hostess CodeG4VQJ7VB
    Use this code to get free exclusive tutorials & project kit! Learn more

  • The Wow Factor of Coloring on Natural Composition Specialty Paper!

    The Wow Factor of Coloring on Natural Composition Specialty Paper!

    Have you experienced the coolness of the Natural Composition Speciality Paper?  Once again, I have another project that I can’t believe I haven’t shared yet and my favorite part of it is how the Natural Composition paper makes it look!

    I created this card for a class last month and was playing with a few of my favorite things:

    • Core’dinations cardstock – I used the Pool Party core’dintations cardstock and ran it through my BigShot with the Perfect Polka Dots embossing folder.  Then I sanded off the top of the dots to help them pop a little bit more.
    • Petite Petals stamps & punch – I have to admit I’m totally falling in love with these little flowers!  And the fact that they are so easy to punch out is just awesome!
    • Gold Baker’s Twine – Turns out it just always is the perfect touch of subtle sparkle on your projects.  It took me months to start using it but now I LOVE using it!
    • Perfect Pennants stamp set – the sentiment is my favorite sentiment from the Occasions catalog!
    • and finally – Natural Composition Paper!

    The Natural Composition Specialty designer paper does not look very special in the main catalog and in fact, just about everyone I have in class that uses it tells me that they didn’t think it looked interesting in the catalog but they love it once they try it.  Because you can do things like this:

    So, the thing it it is a stiffer cardstock that looks a bit like cardboard or a stiff kraft cardstock.  But then on one side of the paper there is a clear embossed pattern.  So you can do cool stuff like sponging or coloring!

    In this case, we colored over the flower images with a Real Red marker and after it starts soaking in a little bit to the paper, it will wipe off the embossed image and you get a really cool defined image.  Don’t you think?’

    You can do this with any color or ink (if you want to sponge it) and it is pretty fool proof.  You can’t really mess it up.  Got to love that!

    spaced shop now sig bar

    April Online Stamp Club Hostess CodeG4VQJ7VB
    Use this code to get free exclusive tutorials & project kit! Learn more

    Stampin’ Up! Supplies Used
    Stamps – Perfect Pennants, Petite Petals
    Ink – Markers (Real Red, Basic Black), Real Red
    Paper –Pool Party cord’inations cardstock, Whisper White, Basic Black, Naturals Composition specialty designer paper
    Accessories – Big Shot, Pennants Framelits, Petite Petals punch, Gold Baker’s twine, Candy Dots (Subtles), Perfect Polka dots embossing folder, sanding block

  • Have You Seen This in my Thank You Cards?

    Have You Seen This in my Thank You Cards?

    I send out Thank You cards to everyone who places an order with me – sometimes I get a little behind (like in February when we had health issues at home) but I try to make sure I get caught up.  Well, yesterday, I was finishing up the last batch of Thank You cards and getting them ready to mail when I realized I do something that may seem strange to some folks.  So, I thought I’d share a little background today.

    So, what is it that I do that is odd?  Well, when I send out my thank you cards, instead of writing my note on the inside like I normally do for birthday cards, congrats, sympathy, etc, I write my note on a post-it note and put THAT inside the card!

    post it note in thank you card

    I always thought it was clear why I did that… I want to send you a Thank You for your order, but I also want to GIVE you a card that you can use for ideas or for giving away to someone else!  So, I write my note on a post-it so you can pull out and reuse the card.  If you want to keep it for ideas or for yourself, that is awesome.  If you want to share it with someone else, that is great too.

    I was talking with someone I gave a card to recently and when I mentioned I had written on the post-it note so she could re-use it if she wanted, she was surprised and shared that she hadn’t even thought of that.  Smile 

    So, thank you for ordering with me… please enjoy your card, however you choose!  Oh, and want to see the front of this card?  I can’t believe I haven’t shared it yet!

    lovely and lacy emboss resist

    Love, love, love this Lacy & Lovely stamp set!  Pair it with Primrose Petals and some emboss resist technique and it is a really pretty card.  I think I need to spend some more time with my Primrose Petals papers and ribbon before they go away next month! 

    spaced shop now sig bar

    April Online Stamp Club Hostess CodeG4VQJ7VB
    Use this code to get free exclusive tutorials & project kit! Learn more

    lovely and lacy emboss resistStampin’ Up! Supplies Used
    Stamps – Lacy & Lovely
    Ink – Versamark, Primrose Petals, Early Espresso
    Paper –River Rock (retired), Primrose Petals, Whisper White
    Accessories – Heat Gun, Clear embossing powder, embossing buddy, Primrose Petals stitched satin ribbon, glue dots, sponges


    Favorite Supplies:

    122887s
    102283s
    103083s
    109130s
    129053s
    126844s
    101610s
  • Beautiful Effects with Markers for an Easter Card

    Beautiful Effects with Markers for an Easter Card

    I had one more card to share with you this week from my Occasions Catalog swapl  This time it is a gorgeous card from Stacey Lane who never fails to stun me with her creations.  In this case, there are so many great touches but I was actually stuck admiring her awesome coloring of the tulips.

    But first up, here is her card:

    See, so much cute going on from the embossed cardstock to the hint of washi tape and just a few pearls for an elegant touch!

    But like I mentioned before, check out the flowers!

    I’ll admit, the reason I like stamping is because I’m not an artist that knows how to draw or paint.  But I can combine colored stamp images to make something cute.  However, I am going to have to give this two toned coloring a try!

    I know once we get the Blendabilities alcohol markers, this will be piece of cake… but I realized that I can even do something like this with my markers or blender pens that I have now!

    All you need to do is pick out 2 complimentary colors and start by coloring in the lighter color throughout the whole image.  Then use the darker color to highlight or shade parts of your image (in this case the bottoms of the tulips and some of the tips of the leaves).  Just a little goes a long way to an amazing effect.  Don’t you agree?

    So, hopefully you’ve been enjoying the posts all week with some of the great inspiration from the Fun n’ Crafty gals!  I love seeing what they create and share each month and we would love to have you join us!  Don’t forget that during Sale-a-Bration, the Stampin’ Up! starter kit comes with a bonus of an EXTRA $25 in anything you want in the kit!  So, for only $99, you can pick out $150 in supplies to start creating with!  Whether you are looking for a great way to connect with others who love this hobby and get a discount on all your orders or would love to find a way to earn some extra money to support your habit or pay some bills, we’d love to have you join us!

    Learn more about the benefits of getting started!


    spaced shop now sig bar

    Virtual Stamp Club Hostess CodeBNDDMDVU
    Use this code to get free exclusive tutorials & project kit! Learn more

  • Triple Time Stamping (almost) with Petite Petals

    So, I wanted to try a different idea for stamping where I did a background with random stamping and thought the new Petite Petals would be a fun stamp set to do it with. 

    I’ll admit, I completely did it WRONG but I think I covered up my oops well enough… what do you think?

    So, the way this card was a mistake was that the way you’re SUPPOSED to do this technique is:

    1. Cut a piece of white cardstock smaller than your card base
    2. Hold your smaller piece of cardstock down on your card base and random stamp your images all over the card base AND the smaller piece of cardstock so that some images are stamped across BOTH pieces of paper.
    3. Adhere your smaller piece of cardstock to a slightly larger piece of cardstock for a mat to break up the stamped images.

    Here is how I stamped it: 

    1. Random stamp your cardbase with lots of cute images
    2. Cut your smaller piece of cardstock
    3. Hold your smaller piece of cardstock over the stamped cardbase and realize that some of the images are supposed to overlap
    4. PANIC
    5. Grab a scrap piece of paper and eyeball stamping the flowers on the smaller piece of cardstock so they look like they were stamped overlapping both pieces of paper.
    6. Adhere your smaller piece of cardstock to a mat and call it good enough! Smile 

    See, it was pretty close for eyeballing, huh?

    Then I wanted to add a few more details and started adding bits and pieces.

    I started with the sentiment (I LOVE this phrase from the Perfect Pennants stamp set) and then matted it with some extra punches from the decorative label punch.

    Then I needed a little more, so I added some paper piercing around the inside of the matted cardstock and a bit of crochet ribbon to add a vintage touch.

    And next time… I’ll actually stamp it the right way and it will go sooooo much faster! Winking smile 

    spaced shop now sig bar

    Stampin’ Supplies Used

    Stamps – Perfect Pennants, Petite Petals
    Ink – Melon Mambo, Tempting Turquoise, Rich Razzleberry, Basic Grey
    Paper – Very Vanilla, Basic Black, Rich Razzleberry
    Accessories – Crochet Trim, Decorative Label punch, Essentials Piercing template, Paper Piercing tool, Piercing pad

  • Background of Butterflies using Wheel Stamps

    Today’s card share is an idea for how to use your wheel stamps.  It is a simple idea and just involves using a jumbo wheel to create a background for your card.  Hope you like butterflies!

    In this case, I wanted to use the Butterfly Collection Jumbo Wheel.  I thought it would be a great set of images for the background of a card.  Here is what the wheel looks like:

    image

    So, to cover the entire front of my card, you only have to roll the wheel twice!  Not too hard, huh?  I used the same color ink as my cardstock to let you see the butterflies without it being too busy.  If you wanted it even subtler, then I would use Versamark as your ink.

    Wheel Stamp Techniques:

    1. Start rolling your wheel before you get to your paper where you want the stamp to show up.  This headstart makes sure you are getting the right pressure and direction that you want.
    2. Ink up your wheel using ink pads for more color options.  Ink them up by rolling in one direction, like you were inking up a paint roller for your home.
    3. Use a thick plastic ruler to help guide your wheel when doing a second pass so you keep it going the direction you want it to go.

    Want to see what I mean and more tips for Wheel Stamping?  I have a video on Wheel Stamp basics to talk about the different types of wheels and share a number of tips for successful stamping.  (if you are reading this in email, click here to see the blog post with the embedded video)

    Stampin’ Supplies used

    Stamps – Butterfly Collection jumbo wheel, Oh Hello
    Ink – Wisteria Wonder, Primrose Petals, Chocolate Chip, Pear Pizzazz
    Paper – Wisteria Wonder, Whisper White
    Accessories- Corner Rounder punch, Bitty Butterfly Punch, Crushed Curry Chevron ribbon, Stampin’ Dimensionals, Pearl basics

    Order any of the supplies and more in my online store

    I’ll admit wheels are a bit neglected in my stamp collection, but they can be a lot of fun to use and perfect for the job.  So, grab your wheels and give them another go!

    spaced shop now sig bar

  • Penguin Punch Art Tutorial & Birthday Giveaway Winners!

    Alright, after fighting with cameras and computers… I finally finished the Penguin Punch art tutorial video!  I swear normally it doesn’t take nearly this much effort to create and share a video but I feel accomplished for showing the technology who is boss.  ha ha!

    So, I shared this card last week:

    And now, here is how to make these cute penguins at home!

    (note–if you are reading this post via email, you may need to click over to the blog to actually view this video)

    Now, on to the good stuff!

    Birthday Weekend Celebration Winners!!

    Thanks to everyone who visited and commented here and on my facebook page!  It was so fun to hear everyone’s favorite holiday traditions, treats, and more.  Smile  Plus it was nice to hear I’m not the only one behind on mailing out Christmas cards!

    I did a random draw of everyone who commented on the blog posts and corresponding facebook posts and here are the winners

    • Day 1 – Tag a Bag Accessory Kit & Silver Sparkle Dazzling Details  :  Saundra W
    • Day 2 – Neutral Candy Dots & Brad Bases   :  Audrey R
    • Day 3 – This & That washi tape & Brights Designer Buttons  :  Meredith
      • Day 4 – Designer Paper Sampler  :  Carla B

    Congrats to all the winners!  Email me at jennifer@nwstamper.com with where you would like me to send your goodies and I’ll get them out to you this week.

    Thanks again for celebrating with me and have a great holiday!

    spaced shop now sig bar