Northwest Stamper

Category: Thank You

  • Fun with Flower Shop stamps and Doilies

    Just a quick card share today – this was another card we made at our recent club night.  I was playing with a little bit of everything at my craft table to create this texture-rich card.

    The one thing that is a little different about this card, but can be hard to tell when looking at it, is that we actually cut the white Tea Lace Doily in half and overlapped the pieces so that the total size of the doily is a little bit smaller than normal. That let us have the look of the doily without it taking over the entire width of the card.

    The nice thing is that the Calypso Coral chevron ribbon covers up the seam where we glued together our halves of the doily so no one would ever know!

    Add some Naturals Specialty Composition paper and some images from the Flower Shop stamp set and you have yourself a card!

    Stampin’ Up! Card Supplies
    Stamps:  Flower Shop, Teeny Tiny Wishes
    Ink:  Pear Pizzazz, Calypso Coral
    Paper:  Pear Pizzazz, Naturals Composition designer paper
    Accessories: Tea Lace doily, Calypso Coral chevron ribbon, Subtles Buttons, Pansy Punch, 2-1/2” Circle punch


    spaced shop now sig bar

  • Make a Thank You Card for World Card Making Day

    If you didn’t know, today is World Card Making day!  It is a celebration of our love of crafting around the world along with the joy of sharing these handmade pieces of art with others to lift them up and help them have a better day. 

    WCDstart

    Well, I decided to celebrate by participating in the Operation Write Home blog hop.  They invited bloggers to create a thank you card using one of their over 150 card sketches (so if you need some inspiration, here is another great place to check out!)

    The mission of Operation Write Home is to provide cards to the troops overseas so that they have something special to send home to their loved ones for birthdays, holidays, or just whenever they need to reach out to life and friends back home.  Truly a great cause! (to learn how you can help, click here)

    So, here is the card I created to share today:

    It was inspired by this sketch – #123.  Fun sketch, huh?

    123

    This card uses the same technique I showed yesterday for coloring images you embossed with your embossing folders. It is super easy and quick and gives you more options for looks using your embossing folders.

    Check out the video for coloring your embossing folder images on yesterday’s blog post here.

    So, thank you for stopping by and if you would like to see more fabulous handmade thank you cards, make sure you stop by the bloghop over at – http://operationwritehome.org/starsandstamps

    Card Supplies for this Card (all Stampin’ Up!):
    Stamps – A Round Array
    Ink – Chocolate Chip, Real Red
    Paper – Primrose Petals, Chocolate Chip, Whisper White, So Saffron
    Accessories – Chocolate Chevron Ribbon, 7/8″ Scallop Circle punch, 1-1/4″ Scallop Circle punch, Label Bracket punch, Big Shot, Petals-a-Plenty embossing folder, brayer, Stampin’ Dimensionals

    spaced shop now sig bar


    Looking for Holiday Ideas?  Make sure you are on the list for my 12 weeks of Christmas newsletter!  Sign up today for a project-a-week direct to your inbox.  Join Now

  • Make 20 Cards in a Snap with the Everyday Occasions Kit

    Have you been wishing you had a fast way to create a pile of handmade cards to have on hand that you’d be proud to send out?  And do it without breaking the bank too!  If so, you should check out this new Everyday Occasions kit

    When we were at Founder’s Circle last week, they told us that these kits were finally going to be releasing this week.  They are meant to be a great introduction to someone who has never stamped before; but I have to say after looking at the cards, that it looks like fun to me!  Like this love card, how fun is it?!

    Since this is meant for the new stamper, all the elements are precut and pre-punched so it makes it quick and easy to assemble.  The kit comes with a 7 piece stamp set that enables you to make a ton of different types of cards including:

    • Happy Birthday
    • Thank You
    • Congratulations
    • For You
    • Love
    • Thinking of You

    Wanna see them?  Check it out!

    I know, cute…. right?  And I love that they can be used for girls or guys!

    The best part? Its only $29.95… so that is less than $2 a card!  Plus you have ink and a stamp set you can use later.  Way better than getting a card in the store!

    Want to see what you get for that?  Here is the scoop –

    image

    View the full Everyday Occasions flyer with pictures of all the card samples

    This may not be available through the online store, so if you are interested in purchasing a kit, please email me at jennifer@nwstamper.com and I will get back to you right away to get you all set up with a kit!


    Well, I’m off to work on holiday card samples for my 12 weeks of Christmas newsletter (get on the list now) and upcoming Holiday Card Stamp-a-Stacks.  I’ll be back tomorrow with some fun projects to share!


    spaced shop now sig bar

  • Spotlighting Paper Piercing for a Fab Blog Hop on Tools!

    Thank you so much for joining us for the September Stylin’  Stampin’ Squad Blog Hop! This month we are focusing on the tools of the stampin’ trade. Specifically, each of our favorite stamping tools. It’s amazing the kinds of tools that have been created to help us along in our paper-crafting addictions.  This month’s blog hop will showcase many of the Stampin’ Up! tools that are now available to us in the 2013-2014 Stampin’ Up! Idea Book and Holiday Catalog and even a couple of products that are so new they aren’t in either catalog. We hope you enjoy seeing how we use the old and new tools and are inspired to come up with some great projects of your own.

    You should have just left stop number 9 on the Stylin’ Stampin’ Squad blog hop – Stuck on Stampin’. If so, you are in the right spot. If a link doesn’t work or you get off track, you will find the full blog hop lineup below.


    Ok, so are you ready to see what I picked for my favorite tool?  I was going to pick punches (since, have you seen my wall of punches??) but that was well covered.  And so I decided to go with the less popular tool – the paper piercer and templates!

    I promise the picture above includes all three of the templates included in the Essentials pack, but its hard to see, so here is a better picture of all of the options available to you in the pack.

    image This is my absolute favorite pack because I cannot live without my straight rows of piercing holes.  It is the simplest thing, but I use it all the time!  Now, I love the shapes and patterns as well, and have found they give lots of possibilities even if you don’t own the coordinating punch or framelit.

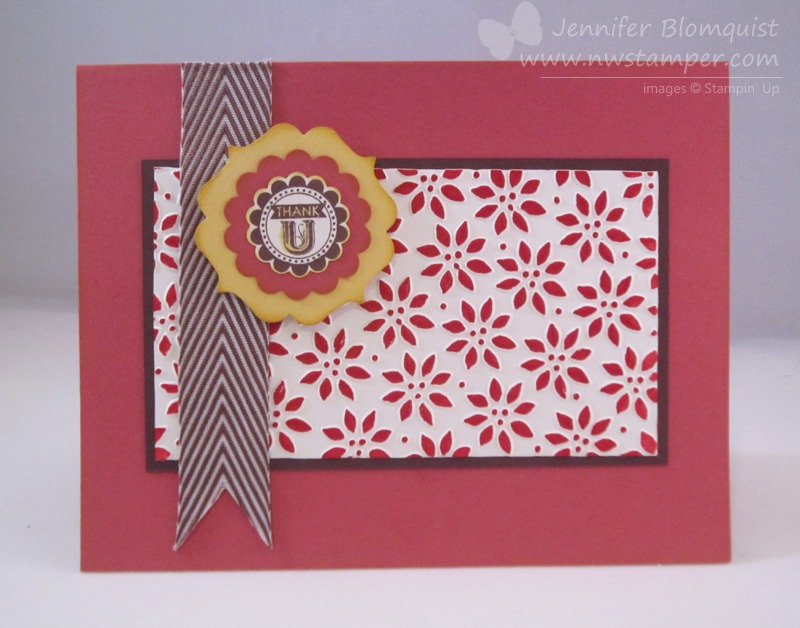
    But to show you 3 of the ways I use my piercer, I created this card to share today:

    Can you spot all 3 uses of the piercing tool and template?  Smile  Keep reading to see if you caught them all!

    1.  Creating Faux Stitching

    One of the coolest techniques I know with this tool is the faux stitching technique and it is so easy to do as well.  Yes, you can pierce your holes and then grab needle and thread and stitch on your cards…. or you can just do this.

    Line up the more widely spaced straight line holes of your paper piercing template so that the seam between two pieces of paper (in this case, patterns from the Etcetera designer paper) is exactly in the middle between the two lines of holes.

    how to use a piercing template for faux stitchingUse your piercing tool to poke each hole and then draw your stitch lines in with your favorite color marker.  Looks pretty real, huh?

    2.  Spotlighting with Pierced Patterns

    Since there are so many patterns on the templates, sometimes they are perfect to coordinate with a punch or framelit for an extra accent.  In this case, I loved how the oval of holes helps accent the sentiment in the center of the scallop oval punch out.  You could do some faux stitching with this as well, but I thought the simple look was a bit nicer.

    You can also do this without needing to use a punch.  Use any of the shapes to accent a stamped image on any project you are working on.

    3.  Precision Placement of Brads

    how to line up piercing template for corners

    Ok, this is my go-to use for my paper piercer and template – placing brads.  I am a pretty loosey-goosey card maker and stamper.  I’m ok if my image is a little skewed (hey, its artistic that way!) and if I didn’t quite get that bow right.  But one thing I can’t stand, is if an element that is supposed to be symetrical – like brads in a row or in the corners of a paper – comes out slightly off.

    So I ALWAYS pull out my piercing template when I’m going to add brads to a project so I can make sure they are spaced evenly apart and the same distance in from each corner.

    To do that, you just align the black solid line on the template along the edge of your paper and then pick the same hole in the corner to use for placement.  Then just use the same corner of the template for each corner on your paper and you will get perfect corners every time!

    So, there you have it…. did you figure out all 3?

    I also wanted to take a quick moment to show one other little trick I did on this card…. yeah, it has nothing what so ever to do with piercing, but I thought it was cool.  It was how I got the doily for the background of the card.

    two tone sponging on paper doilies I took a single doily and folded it in not-quite-half.  Then I took a piece of scrap paper and placed it between the top and the bottom piece of the doily.  I sponged the top piece in Pool Party; then I opened it up and sponged the bottom side with Midnight Muse.  It gives a neat effect with no cutting and only one doily!

    and back to paper piercing…

    I did a class on Paper Piercing a while back and so I thought I’d share a card we made in that class that gives you even more ideas for how you can user the piercing tool and template.


    So I hope you enjoyed all the tips and ideas, and now are inspired to get out your piercing templates and start creating!

    For even more inspiration and ideas for using the tools you have at home, keep on hoping and visit Bree for some fun with the Simply Scored!

    Blog Hop Participants:

    1. Shellie G. of Craft Smashup
    2. Pam S. of Stampin’ in the Sun!
    3. Tonya B. of Stampin’ with Tonya
    4. Dawn S. of Dawn’s Creative Chalet
    5. Darcy J. of DJ’s Stampin’ Place
    6. Pamela W. of Stinky Tofu
    7. Kim R. of Stamping with Kim
    8. Justin K. of JK Cards
    9. Heidi B of Stuck on Stampin’
    10. Jennifer B. of NW Stamper <— YOU ARE HERE!
    11. Bree R. of Craft-somnia
    12. Diana E. of Stampin’ Fun with Diana
    13. Jennifer C. of Happy 2 Scrap 4 Life
    14. Jamie H. of Unique Ink
    15. Kristina M. of Mama’s Sanity

    spaced shop now sig bar

    Card Supplies Used
    Stamps- Express Yourself (hostess set)
    Ink- Midnight Muse, Calypso Coral, Pool Party
    Paper – Very Vanilla, Whisper White, Daffodil Delight, Etcetera designer paper
    Accessories – Paper piercer, piercing mat, Essentials Piercing Template, Scallop Oval punch, sponge daubers, white doilies, Mini Brads, stampin’ dimensionals

    Help me better plan future classes, online offerings, tutorials, and events –  take this quick survey on in-person and online class offerings and you’ll be entered to win!  Take the survey now!

  • Adding a Splash of Washi to Your Cards

    So turns out when I start working on something, I can get really focused on that task.  In the case of last week, that task wasn’t any of the handful of crafting projects and event prep I needed to work on, but instead was an even more daunting task – picking a preschool for Nicholas!  2013-08-23 12.29.45

    Awww….aren’t they getting so big? Smile 

    I thought it would be a quick and easy thing to figure out, and I’d be back working on my other projects right away.  But, no…. there are so many choices and variations.  Thankfully, we were able to find some good options and start the process for getting him enrolled, so now I’m able to get back in the crafty mindset!

    And first on the docket – Thank you cards!

    I always like to send thank you cards to everyone who places an order with me and I wanted something bright and cheery to remind us that summer hasn’t quite ended yet!

    I used 3 of my favorite items right now:  Washi tape, Flower Shop bundle, and the Oh Hello stamp set to put this together.

    Card Supplies Used
    Stamps –
    Oh Hello, Flower Shop
    Ink – Island Indigo, Daffodil Delight, Rose Red, Gumball Green
    Paper – Rose Red, Whisper White
    Accessories – Posy Punch, Gingham Garden washi tape, Stampin’ Dimensionals

    So, if you’ve ordered with me in the last few weeks… check your mailbox for your own copy of this card!

    If you’ve ordered with me in the last month and NOT received a card, please let me know!  There have been some hiccups in the Stampin’ Up! ordering system and some demonstrators have not been receiving notice about orders placed.  I want to make sure I’m giving you the best possible service, so if you haven’t heard from me, let me know so I can fix it. Smile 


    But no matter what, THANK YOU for stopping by and please come back soon!


    spaced shop now sig bar

  • Very Vintage Butterfly Thank You (Convention CASE)

    Every year that I go to convention, I get caught up in swapping.  The idea of taking a bunch of card fronts with you to convention and then trading them with everyone else so that you can get new ideas to take home and share… or copy… or hang on your wall and drool over!

    Well, I’ve learned from the one year that I showed up with NO SWAPS, and proceeded to spend my first night there trying to make as many swaps as I could from the crafting supplies I happened to bring with me; that I LOVE swapping.  I love seeing an amazing card from across the room and running up and saying,”swapping?”  Its like the thrill of finding an amazing deal at the department store.

    But the problem is, I come home with 50-100 card fronts and proceed to take pictures of them and then they sit in a box forgotten until I’m cleaning my room and find them again.

    Which is very sad….

    So, I decided this year, that I would not only share them on my blog, but I’d also use them for inspiration in my classes as well.  (Which really is one of the main points for swapping anyway!)  So, for class this month, I CASE’d (copy and share everything) two fabulous swap cards and I just had to share this one with you!

    Card case’d from a design by Julie Leblanc

    There are a few reasons why I love this card…

    1.  The color combination (why do I always forget about Perfect Plum?)

    2.  The touch of sparkle with the Silver Glimmer Paper

    3.  The fact that this card uses NO WHITE PAPER at all!

    I know it is silly, but that last point was kind of profound to me.  I’m so used to stamping on Whisper White paper with a colored ink that I didn’t think of stamping on Crumb Cake paper.

    And then there is the really cute butterflies.  I had to change this up from the original because I didn’t have the Papillion Potpourri that she used,  Instead I used the Best of Butterflies stamp set and the Elegant Butterfly punch to make them.  They are stamped with Basic Black ink and then sponged on top with the Perfect Plum ink. Neat effect, huh?


    And in class, I had someone emboss a little bit higher up the page than they meant and so they left their first attempt behind and made a second card.  So, I finished out the card with her “boo-boo” and the rest of the supplies only this time I used the Lacy & Lovely stamp set for my sentiment and drew around it with a marker.  I think it turned out just fine! Smile

    So I hope you liked this card as much as I did and I will have another fun card that we case’d tomorrow using the lovely Flower Shop stamp set and punch!  See you tomorrow!


    spaced shop now sig bar

  • Quick & Easy Thank You Card for a new Design Team!

    Today is the kick off for a new blog that I’m excited to be a design team member for – Stylin’ Stampin’ Inkspiration!  It is a blog that will have daily posts to help give you new ideas and project challenges to inspire new ideas for you to try at home!  Most of the posts will have a particular theme and have many of the design team members showing you different takes on that theme.  Fun, right?

    So, the theme for today was Quick & Easy Cards and you know that is right up my alley!  I love clean and simple and with 2 small kids, quick is key.  So, here is my take on the idea:

    I will tell you this card was inspired by a card I saw from my friend, Katy Kirwan, and while the finished project doesn’t really look anything like what she created, I still like them both. Smile 

    To create my card, I created my own designer paper by using the Chevron background stamp from Stampin’ Up! and then layered on the punched out sentiment.  It still needed a little something, so I added some of the Pear Pizzazz Chevron ribbon (sshhh, don’t tell anyone I used two different greens on this card!) and while I was worried the fact that the stamped and the ribbon chevrons go in different directions, I still think it totally works!

    Card Supplies Used (all Stampin’ Up unless noted)

    Stamps – Designer Typeset Photopolymer Stamp Set, Chevron Background
    Ink – Pistachio Pudding, Baked Brown Sugar
    Paper – Whisper White, Baked Brown Sugar, Pistachio Pudding
    Accessories – Petite Curly Label Punch, Stampin’ Dimensionals, Pear Pizzazz Chevron Ribbon

    So, what do you think?  Quick? Easy?  But totally fun!  I’m actually using this for my Cute & Classic Card Class tonight, so hopefully they have fun with it too! 

    And if you are looking for more quick and easy ideas, hop on over to our Inkspiration blog and check out all the fab ideas for more great projects. 

    image

    Oh, and before I forget!

    It’s Here! The Stampin’ Trimmer Rotary Attachment is now Available!

    imageOk, I may be the only person on the planet who is excited about this, but I-CANNOT-WAIT to order my rotary trimmer attachment

    Why do I care so much?

    I have found that I really LOVE my Stampin’ Trimmer and the little blades that come with it work great.  But when you are cutting grittier material (like glimmer paper) or want to cut more than one sheet of cardstock at a time, the little blades just don’t do as good a job. 

    So I had been periodically missing my rotary cutting board (except not missing the fact that that Fiskars board could not cut a cardbase straight if I had to!).  But now I have the best of both worlds!  This replaces the clear arm and track for the little blades and the rotary attachment is available as of 8/9/2013!  So, I’ll be ordering mine today and will let you know how it goes. Smile 


    spaced shop now sig bar

  • Quick Thank You Cards with Chalk Talk

    I’ve been learning something about myself this week – when I’m in the middle of a big task, I have a hard time focusing on other things.  So, in this case, when I completely pull apart my craft room,

    Messy Craft Room

    I was having a heck of a time bringing myself to do any new crafting or even work on blog posts.  Instead I have been focused on organizing my stamps, converting my woodmount stamps to the new woodmount cases, and figuring out what items I can bring myself to part with for my craft garage sale August 17th & 18th (the pile is growing for sure!)

    But my room is just about ready to go – and I promise I’ll share pictures of the reorganized space this weekend – so I wanted to stop back over here on the blog to say hello and share a set of cards that my mom, Kathy Thisted, made for me that I thought were so cute!

    I loved these little mini thank you cards and thought they were a fun way to use the new Chalk Talk stamp set.  Since the stamp set coordinates with the Chalk Talk framelits (and gets you a discount when you buy both in a bundle), many of the samples I’ve seen used the framelits with the stamps.  So I loved seeing some quick ideas using the stamps without the dies.

    image

    Card Supplies Used
    Stamps- Chalk Talk
    Paper- 2013-2015 In Colors, Basic Black
    Ink- Whisper White craft ink
    Accessories- White gel pen, Natural Trim ribbon, White 1/4” grosgrain (retired), striped grosgrain ribbon (retired), White embossing powder, heat gun

    Blog Hop Tomorrow!
    Join me tomorrow as it is the monthly blog hop as well the kick off of a new blog that I am an inaugural design team member for!  Should be lots of fun. Smile   See you tomorrow!


    spaced shop now sig bar

  • A New Way to Color Your Stamped Images with Marker

    Recently, my mom showed me a new way to try coloring in your images with your markers.  To show me what she was talking about she created this card:

    It uses the new Flower Shop stamp set and punch sitting atop the stem from Field Flowers.  Great idea, huh?

    Now, to do the coloring, she took a lighter colored marker (in this case, the Crisp Cantaloupe marker) and then swiped one side of the marker tip along the side of the Calypso Coral ink pad.  This gives you a darker side to the marker. 

    Then you can color in your stamped image and twist your marker as you are coloring so you end up getting both tones forming a cute spectrum of color on your image.  Now if it is a little hard to see, she created the following examples to help show it better:

    On the left is a flower colored in with a blender pen, the middle is using the two-tone effect, and the right flower is colored in only using the Crisp Cantaloupe marker.  There was more of a difference between the three than I expected!

    And I thought the whole card was a neat idea so I created a simpler version to send out as a customer thank you card this month.  So if you’ve placed a Stampin’ Up! order with me in June, you’ll have one of these in your inbox soon!

    Stampin’ Up Supplies Used:
    Stamps – Flower Shop, Field Flowers, Petite Pairs
    Ink – Calypso Coral, Pistachio Pudding, Daffodil Delight, Baked Brown Sugar, Crisp Cantaloupe marker
    Paper – Whisper White, Subtles Designer Series Paper stack (top card), Pistachio Pudding cardstock (bottom card)
    Accessories – Posy Punch, Itty Bitty punch pack, Pearls, Distressing tool


    spaced shop now sig bar

  • Playing with Photopolymer Stamps

    The stamping world has had Photopolymer stamps for quite a while and I used to try to play with my “completely clear” stamps.  I love the idea that I could see totally through the stamp so that I knew precisely where I was stamping.  However, I discovered that not all clear stamps are created equal.  I have some that have turned yellow on me (even without me using them… gasp! I know, right? how can you have stamps that never get inky? Winking smile) and I have some that frustrated me because I couldn’t get a crisp image no matter what I tried.

    Well, Stampin’ Up! held off while they tried to figure out a formula for making these stamps without some of these issues.  Then they started coming out with their own designs.  So, I decided to give them a shot and then thought I’d share what I did.

    I grabbed the Designer Typeset stamp set, which was the first set they came out with.  See, this is what it looks like when you get it…. no box, just a ton of cute little clear stamps in a plastic sleeve.

    designer typeset photopolymer stamps

    And out of the sleeve….Designer Typeset photopolymer stamps

    Then I set to work and created this as one of my first cards:

    designer typeset photopolymer thank you card

    I know, it is totally simple, but it gave me a chance to experiment and learn a few things… like:

    • Don’t be afraid to bend your stamps!
      If they can bend and stay on the block, then it is perfectly fine to stamp them that way.  If they won’t stay on the block, you’ve bent it too far. Smile
    • Be prepared and ok that your stamped lines aren’t going to be super thin
      When you push on the stamp to transfer your ink to paper, the photopolymer compresses and stretches a little, so you get slightly fatter lines than you maybe expected.
    • If you have the letters, lay them out on your paper for placement – THEN push the block down on them to ink up.
      So in this case, I stamped the banners first.  Then I laid out my letters in exactly the spot I wanted them to be on my banner.  How to line up letters with photopolymer stamps on a card
      THEN I pressed my clear block down on top of the letters.   That way I could ink them up all at the same time and stamp knowing they would go exactly where I wanted them to go!

    How to line up letters with photopolymer stamps

    • The juicier the ink pad the better!
      Yes I know, it goes without saying… but still.  I did see slight differences when I used my old style ink pads with my new ink pads.

    photopolymer stamps ink pad comparison


    If you want to see more tips, check out this video I made all about the Photopolymer stamps:

    If you can’t see the video, check out the direct link here.

    So, if you think it is something fun to try and play with, Stampin’ Up! just came out with their 5th photopolymer stamp set – Wanderlust.  But here is the complete list:


    Wanderlust photopolymer stamp set


    I still love my rubber stamps… but I definitely think completely clear stamps have a place in my stamp room too!

  • New Catalog Weekend & Stamps are on Sale!

    Sometimes I hear about the promotions that will be starting up in the near future, and sometimes I log into the Stampin’ Up! website for demonstrators and I’m surprised by a new sale that is being announced.  I figured that since we have the two big catalogs out this weekend that there would be no way they would have anything extra….. WRONG!

    I was so EXCITED because Stampin’ Up! is offering 3 fabulous greeting stamp sets for 25% off!

    Grab-Your-Greetings-Flyer_s


    Now, I already love the Petite Pairs stamp set…I love it for cards like this:

    or this:


    But I’ve been wistfully eyeing the Sweet Essentials since it came out last year and I think between the retirement of my beloved Curly Cute and this sale, I think this will be the weekend I finally get it!

    So check your wishlist and if Petite Pairs, Sassy Salutations, or Sweet Essentials are on there, enjoy snapping them up for a fab deal!

    Product Share Reminder:

    I also wanted to mention that if you were interested in one of my product shares, please make sure you have let me know this weekend so I can enough supplies for everyone!  You can check out all the options and details here – Get your New Catalog Product Samples Here or grab a copy of the PDF with pictures:

    2013 Stampin' Up Annual Catalog Product Shares

    Get the Available Product Samplers PDF

    Have a fun & inky weekend!

  • Teacher Appreciation Card for Cute Card Thursday

    It’s the last Thursday of the month, which means it is my final week as guest designer over at Cute Card Thursday.  This week is a fun challenge, the theme is

    Too Cool for School

    Now, since I’ve been out of school long enough, all I could think of were 80’s movies (like Ferris Bueller’s Day Off) or the fact that we are nearing the end of the school year and I know enough teachers and how hard they work that they deserve a little appreciation.

    So to all the teachers out there…. THANK YOU for your hard work this year!

    When I started flipping through my paper and supplies, I knew I wanted to use my Storytime designer paper for the card.  I mean, look at these patterns, don’t they just scream school house to you? Smile

    image

    It is totally a Dick and Jane book!

    Anyway, this is one of those paper packs that I pull out and think… awww its so cute!  And then I argue with myself about whether I need more of it because it is so cute or if I’m ok with using the last few scraps and getting excited about new paper designs coming out soon!  I guess I have a few more days before it retires on June 3rd as long as it doesn’t sell out before then!

    So while I ponder my final list of “have to haves” from the retiring Spring Catalog and Annual Catalog, hop on over to Cute Card Thursday to check out the other cute school-themed cards and even submit your own for the challenge!

    Get You Copy of the NEW Stampin’ Up! Catalog – Request yours here!

    Try Out the 2013 New Product Samplers! – Get the Details Here

    Order Stampin’ Up! Products Anytime, click here!

    See the Latest Availability & PDFs of all the retiring stamps and accessories here

    Card Supply List (all items Stampin’ Up! unless noted)

      • Stamps – Made for You**
      • Paper – Crumb Cake, Chocolate Chip, Storytime designer paper**
      • Ink – Chocolate Chip, Whisper White
      • Accessories – Real Red stitched grosgrain ribbon, Brights Designer buttons**, sponge daubers, corner rounder punch
        ** denotes items retiring by 6/3