Northwest Stamper

Tag: washi tape

  • Peek-a-boo Washi Tape Card with a Quick Tip video tutorial

    **LAST DAY!  Don’t miss out on the Stock Up & Save Sale!**


    I’m so excited to share these cards with you today.  Not only because I love them, but also because I actually have a Quick Tip video tutorial to go with them!  Turns out I really enjoy putting videos together… who knew?  Anyway, let me share with you a fun card that you can reproduce with these punches or your favorites at home.

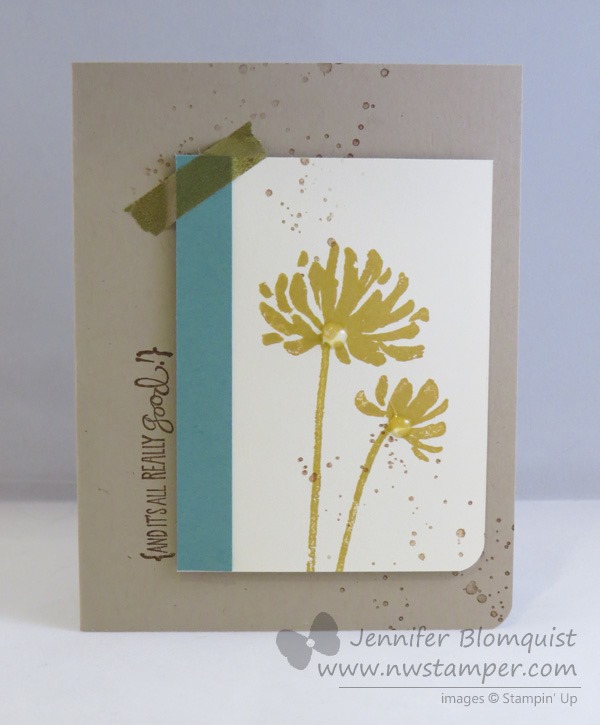
    There are two main “fun” elements to this card – the washi tape strips and the layering of punches for the butterfly centerpiece. 

    First, here is how you would create the butterfly centerpiece:

    1. Punch out a butterfly (this is the Elegant Butterfly punch) from a piece of scrap Whisper White cardstock
    2. Set aside the punched out butterfly and grab the scrap paper with the butterfly hole in it.  Punch out a 2-1/2” circle using the 2-1/2” Circle punch so that the butterfly hole is in the middle of the circle.
    3. Sponge the edge of the circle with Coastal Cabana ink
    4. Punch out a 1-3/4” circle from a piece of Soft Suede scrap paper
    5. Set aside the punched out circle and grab the scrap paper with the circle hole in it.  Punch out a 2-3/8” scallop circle using the 2-3/8” scallop circle punch so that the 1-3/4” circle is centered in the middle of the scallop circle.
    6. Adhere the scallop circle to the front of the 2-1/2” sponged circle
    7. Adhere to the front of your card using Stampin’ Dimensionals

    The other tip I have for you today is laying down your washi tape!  For my cards I used the sets from Stampin’ Up (Retro Fresh above, Beach House below).  You just lie three strips across your card front so that you can position your butterfly over the tape for a pop of color. 

    Video Tutorial – Check out this video for a quick tip for how to make sure you Washi Tape goes on straight.  (note – if you are reading this in email, click here so you can view the video)

    Now, as you saw in the video you can use different colors of paper and washi tape to give slightly different looks to your card.  Here is what the exact same design looked like only with Strawberry Slush cardstock and the Beach House washi tape:

    Let me know what you think about the video!  Please leave a comment and let me know if you’d like me to do more and even better, if you prefer quick tip videos, walkthrough for projects, or product reviews!  I so appreciate the feedback!

    spaced shop now sig bar

    Hostess Code:  C2HYWWQM Use this Hostess Code and receive a free gift!
    (Please do not use the Hostess Code if your order is $150 or more)

    Card Supplies Used

  • Another Catalog CASE with Too Kind and Hello Honey

    Another Catalog CASE with Too Kind and Hello Honey

    Last week, I participated in a Blog Hop with other gals from my Fun n’ Crafty team of demonstrators (which you should totally join, by the way, with the $50 limited time starter kit deal. 😉 )  We all picked a project in the 2014-2015 Stampin’ Up catalog and made our own version.  This was a card I made for the hop but ended up not posting that day:

    And this was the card I saw in the catalog that I was inspired by:

    image

    Obviously, I had a few differences, starting from the stamp set ; but that is because I didn’t own the stamp set in the picture.  So instead I looked through my shelf of stamps and decided to grab my Too Kind set instead.  It is the same idea, a solid image flower, just with different shapes. Smile  I also wanted to play with my new inks including the Hello Honey and Lost Lagoon.

    I also thought my flowers needed a little something so I added a drop of Crystal Effects in the center of each flower.  A little shiny center for each one!

    I was asked recently when I showed this card in a class I was asked how I got the splatters on the card.  In this case, I used the stamp set Gorgeous Grunge – really, it is the perfect set for little background touches!

    Stampin’ Up Supplies I Used

    I love the new catalog and its layout for getting lots of new ideas and inspiration.  So, check it out (you can see it online here) and give it a try!

    spaced shop now sig bar

    June Online Stamp Club Hostess CodeACANDKB4
    Use this code to get free exclusive tutorials & project kit!  Learn more

  • Watercoloring fun with Happy Watercolor and the Wondercolor Notecards

    Watercoloring fun with Happy Watercolor and the Wondercolor Notecards

    Tonight I’m holding a class that I call Watercolor Wonder Fun.  I wanted to challenge myself to have fun creating with some of the items in the Watercolor Wonder suite…. I love challenges like this where I have limited supplies and have to come up with something different and fun. 

    So I started out with the Watercolor Wonder Notecards… did you know they are made out of watercolor paper so you can do your watercoloring directly on them?

    Then I added some glitz like the Gold Baker’s twine…. I can’t believe I’ve almost used up a complete spool already!

    Then I thought I’d try out the Gold washi tape (called Watercolor Wonder washi tape) and some of the Gold Sequins…. not too back when you make them a subtle trim under your sentiment huh?

    But most of all, they all use the Happy Watercolor stamp set.  I’m so terribly sad that it WILL NOT be in the new catalog in June.  So if you love it like I do, make sure to get it before the end of May. 

    image

    And yes, these Watercolor Wonder notecards come with a lot of the color and flower images pre-printed on them.  So they can be super fast and easy cards to start with and create with!

    Check out the entire Watercolor Wonder Suite online here.

    spaced shop now sig bar

    May Online Stamp Club Hostess CodeZUBHUEK6
    Use this code to get free exclusive tutorials & project kit!Learn more

    Stampin’ Up! Supplies Used (all cards pictures)
    Stamps – Happy Watercolor
    Ink – Chocolate Chip, Basic Grey, Coastal Cabana, Real Red, Crushed Curry, Stazon
    Paper –Watercolor Wonder notecards, watercolor paper, Whisper White, Calypso Coral
    Accessories – Aqua Pen, Gold Sequins, Gold Baker’s Twine, Stampin’ Dimensionals, Watercolor Wonder washi tape

  • Last Hurrah for Wheel Stamps

    Last Hurrah for Wheel Stamps

    Wheel stamps are one of those things that have been around for YEARS!  Like, as long as I’ve been stamping, there have been wheel stamps.  In fact, when I signed up as a demonstrator with Stampin’ Up, you got a wheel handle and wheel stamp by default in your kit!  Over time, I’ve collected a few but like many people, didn’t use them very often for one reason or another.  But they are handy and definitely have their unique purposes. 

    For example, when my mom was decorating for a winter event, she bought white paper tablecloths and when walked up and down the table running a snowflake wheel with blue ink in the handle to create a customized and inexpensive festive spread!  Isn’t she clever?

    But now all things wheel are on the retirement list and going away at the end of the month, so I had to share a couple recent cards I made with my birthday Builder Wheels.

    I loved the idea of builder wheels because you could mix and match designs, or in the case above, leave the center part blank and have exactly enough room to tie a ribbon!  One run of the wheel and my stamping is done and perfectly spaced. Smile 

    It was also handy for mixing and matching designs for diagonal stamping.  In this case, the Happy Birthday, the candles, and the blue stripes were all in the wheel handle at the same time.  Then I just added a little washi tape to the top and bottom for some extra lines but I didn’t have to worry about stamping again and keeping things lined up. 

    You know I love the easy way out!

    I enjoy my wheel stamps, even though I forget to pull them out because they aren’t on the shelf next to my stamps.  The new catalog has new background builder stamps which will be photopolymer stamps that are like if you took a wheel stamp and unmounted them.  (So a long, skinny clear stamp).  I’m excited for these new styles of stamps, but I think I will miss wheels as well.  It is MUCH easier to stamp as 12×12 scrapbook page or photo mat for a picture frame when you don’t have to worry about lining up your stamped ends.  But for cards, I think these new stamps will be easy and fun.

    What do you think?  Will you miss the wheels?

    spaced shop now sig bar

    May Online Stamp Club Hostess CodeZUBHUEK6
    Use this code to get free exclusive tutorials & project kit!Learn more

  • A Sweet Card with an Envelope Full of Butterflies

    A Sweet Card with an Envelope Full of Butterflies

    Happy Sunday to you!  Today I have one of those cards to share that is a little bit of this and a little bit of that from around your craft room.  But in the end doesn’t it turn out to be such a sweet card?

    I had seen a photo of a card that had the idea of an envelope with lots of butterflies flying out from that and so I tried to capture that with the supplies I had at home.  So I started out with my Strawberry Slush cardbase and had to add a bit of texture and so I pulled out my much under-used embossing folder – the Fancy Fan embossing folder.  Then I layered on a strip of Smoky Slate cardstock edged with the Scallop Edge border punch and a piece of the Gingham Garden washi tape.  Again… why don’t I use washi tape more often??  It is so stinkin’ easy and so cute on your projects.

    Finally, the center piece of the card!  I created my own envelope using one of the smallest dimensions on the Envelope Punch BoardSee?  It isn’t just for envelopes for your card!  Put your envelope together, punch out a variety of butterflies and glue them on to look like they are exploding out of the envelope.  Not hard to put together but think of how much of a smile this will bring to someone’s face when they get it from you!  Smile  See, I’m smiling just thinking of mailing it out. 

    Have a wonderful Sunday! 

    spaced shop now sig bar

    April Online Stamp Club Hostess CodeG4VQJ7VB
    Use this code to get free exclusive tutorials & project kit! Learn more

    Stampin’ Up! Supplies Used
    Stamps – Hip Notes
    Ink – Markers (Strawberry Slush, Basic Grey)
    Paper –Strawberry Slush, Smoky Slate, Very Vanilla, Whisper White, Pink Pirouette Designer Paper
    Accessories – Word Window punch, Gingham Garden washi tape, Elegant Butterfly punch, Bitty Butterfly punch, Big Shot, Fancy Fan embossing folder, Scalloped Edge Border punch, Envelope Punch board

    Favorite products:

    134820s
    127821s
    132140s
    117273s
    132622s
    132622s
    132622s
  • Beautiful Effects with Markers for an Easter Card

    Beautiful Effects with Markers for an Easter Card

    I had one more card to share with you this week from my Occasions Catalog swapl  This time it is a gorgeous card from Stacey Lane who never fails to stun me with her creations.  In this case, there are so many great touches but I was actually stuck admiring her awesome coloring of the tulips.

    But first up, here is her card:

    See, so much cute going on from the embossed cardstock to the hint of washi tape and just a few pearls for an elegant touch!

    But like I mentioned before, check out the flowers!

    I’ll admit, the reason I like stamping is because I’m not an artist that knows how to draw or paint.  But I can combine colored stamp images to make something cute.  However, I am going to have to give this two toned coloring a try!

    I know once we get the Blendabilities alcohol markers, this will be piece of cake… but I realized that I can even do something like this with my markers or blender pens that I have now!

    All you need to do is pick out 2 complimentary colors and start by coloring in the lighter color throughout the whole image.  Then use the darker color to highlight or shade parts of your image (in this case the bottoms of the tulips and some of the tips of the leaves).  Just a little goes a long way to an amazing effect.  Don’t you agree?

    So, hopefully you’ve been enjoying the posts all week with some of the great inspiration from the Fun n’ Crafty gals!  I love seeing what they create and share each month and we would love to have you join us!  Don’t forget that during Sale-a-Bration, the Stampin’ Up! starter kit comes with a bonus of an EXTRA $25 in anything you want in the kit!  So, for only $99, you can pick out $150 in supplies to start creating with!  Whether you are looking for a great way to connect with others who love this hobby and get a discount on all your orders or would love to find a way to earn some extra money to support your habit or pay some bills, we’d love to have you join us!

    Learn more about the benefits of getting started!


    spaced shop now sig bar

    Virtual Stamp Club Hostess CodeBNDDMDVU
    Use this code to get free exclusive tutorials & project kit! Learn more

  • Little Bit of Love

    Little Bit of Love

    I have a few more cards to share that have a love theme and so as we work our way to Valentine’s Day in a few days I thought I would post them here for last minute ideas.  Today’s card uses the stamp set that I was so excited to get at leadership and have been woefully slow at using – Love You to the Moon!  I mean, look at these cute images:

    image

    Love You to the Moon – #133143 (clear)/ #133140 (wood)

    I origionally started this card for a Stylin’ Stampin’ Inkspiration design team project themed on using your markers – but I had a little love/hate relationship with the card and ended up doing something completely different.  But, I still like some of the details of this card so I thought I would share it anyway. Smile

    The very first thing that started this whole card off was the diagonal rows of “Love you” on the bottom half of the card.  I stamped most of them in Midnight Muse and YES, I used the stamp-a-ma-jig!  I am an imperfect stamper and am ok with things not being totally straight, but in this case I don’t think even I could have handled the randomness if I didn’t use the stamp-a-ma-jig!  The lone red Love you was colored with markers.  I used Raspberry Ripple for the “Love”, Midnight Muse for the “you” and even Chocolate Chip for the head and tail of the arrow.  Then, to help pull it together, I used my Summer Starfruit maker to create little dots between each of the sentiments.

    After I had the stamping done, I looked at the card and it wasn’t quite sitting right with me.  I loved the look, but I didn’t have a plan for layering anything else on.  So, I started by creating a border using the Watercolor Wonder gold washi tape (both the solid and the stripe patterns).

    Great, that looked good, but now what?

    Well, this is where things started getting haphazard!  I started grabbing scraps of paper and ribbon and stamps and started playing around.  In the end, I liked the pennant idea coming down from the corner so I put those one.

    But they looked too plain, so I tried some faux stitching with my markers.  That was ok, but it still needed something, so I added an additional sentiment to the Raspberry Ripple pennant for a final touch.


    I won’t go so far as to say this is a favorite card of mine, but like I said, I think there are some fun elements to it.  If you have any suggestions for tweaks or improvements, I’d love to hear!  Leave me a comment and when I redo this card, maybe that will help make it look better. Smile

    On a side note –

    If you don’t already get copies of my blog posts each day in email, you may consider Following my blog with Bloglovin.  I currently help people get subscribed using Feedburner but Google has stopped supporting it and so it may stop working when I don’t expect it.  So in the meantime, I’m checking out other options and one option I know a lot of people are liking is Bloglovin.  I’m going to try as well and hopefully love it!

    spaced shop now sig bar

    Stampin’ Up! Supplies Used
    Stamps – Love you to the Moon
    Ink – Midnight Muse, Raspberry Ripple, Markers (Midnight Muse, Summer Starfruit, Raspberry Ripple, Chocolate Chip)
    Paper – Whisper White, Summer Starfruit, Raspberry Ripple
    Accessories – Watercolor Wonder washi tape, Stitched Satin Ribbon (Midnight Muse)

  • Last Minute Valentine Card Ideas from Leadership

    Last Minute Valentine Card Ideas from Leadership

    I have had a TON of cards sitting on my camera begging to get edited and shared with the world, and finally I had time yesterday to spend most of the day editing them.  So, with Valentine’s day just around the corner, I thought I would share some of the great card swaps I received at Leadership that are perfect for giving to a loved one on Friday.

    created by Robbie Chandler

    Isn’t Red, Gold, and Black such an awesome color scheme?!  I love how she did a bunch of gold embossing over the red base and the black cardstock (that she then punched out with the Petite Petals punch).  Then add some gold washi tape and the gold baker’s twine and just a touch of red glimmer paper.  Very elegant!

    created by Kim Allen

    A less traditional card but really fun and whimsical.  I love the sentiment from the Love You to the Moon set and I think the punched out moon for the rocket to fly around is so cute (yes the moon is part of the stamp image but I like the layering with a different color of cardstock.  And the Razzleberry button with white bakers twine is a nice touch at the top of the banner.

    created by Dawn Walker-Randall

    And finally a more traditional Valentine’s Day card with the red and white, and hearts!  This uses the heart framelits and see that cool flower background on the bigger heart?  That is the Petals-a-Plenty embossing folder that embossed the Pool Party paper and then they inked it!

    Check out my video tutorial for coloring the embossed flowers with this folder here

    So some totally fun ideas to give you a few more ideas while you still have time to create!  I’ll have at least one or two more ideas for you this week, but hopefully this gets you started!

    spaced shop now sig bar

  • Stamped Scrapbook Pages on a Kiwi Lane Designs Blog Hop

    76834_10152085028263232_1279811947_nI have a fun blog hop for you today and it is something a little bit different!  My friends have gone a little fan girl over Kiwi Lane and their designer templates.  Basically they are plastic templates that you can use to help design your projects by layering them on your base paper to decide what you want it to look like before you actually cut into your paper!  So, when I was offered the chance to play with a set and participate in this blog hop, I jumped at the chance.

    Wanna see what I made?

    Aren’t they cute?!  I swear these pictures make me smile every time I look at them. 🙂

    So, what am I showing off her in this layout besides my cuties?  Three things that are really fun to play with:

    1. The 12” Borders Clara Lane templates from Kiwi Lane.

      See all those waves – I totally traced them and, yes, cut them out.  But don’t they add some nice whimsy to the page? I actually started out this page by laying out a few of the templates on a piece of designer paper to get an idea for how I wanted to put it together:
      clara lane kiwi lane templates sample

      Then I just had to pick my papers, trace, and cut.

    2. Perfect Pennants Stamps from Stampin’ Up

      Have I mentioned how much I love the sentiments from this set?  Plus I had to use the border/pennant element stamps to add a little bit of something extra next to the photos.

      And even the heart next to my favorite little guy!

      (psst – I even used my rotary stamp to date the page!)

    3. Watercolor Wonder designer paper from Stampin’ Up!

      This is one of those sets of paper that I kept thinking was really pretty, but never actually got to cutting into it…. well, fixed that problem!  I loved the colors and decided to go for it on this page.

      And while you can’t see as much of them on the first page, I figured I decided I wanted to do something with the remaining “scraps” of paper that was left over after I cut out my waves for layout 1 and so I whipped together layout 2!

    I just took my leftover designer paper and thought it would make a great edge to a scrapbook page.  I layered them together – Don’t Gasp! – I’ll admit, I cut off the bottom two layers so I could save a ton of the paper for future projects, but I liked the pattern on top for a background for my page.  Then I layered all the waves over another piece of patterned paper (Soft Sky pattern from the paper stacks) to complete the look.

    Here are a few of my favorite touches I wanted to show you up close on this one:

    • Wood starburst accent from the Essentials Wooden Elements
    • Mix and match Washi Tape adding some pop behind my photo
    • Some Natural trim ribbon
    • And if you look REALLY CLOSE, you can see my faux stitching I did along the edge of the wave.  It is actually pretty subtle on the final page in person as well, but gives just a little extra something.

    So, what do you think? Fun, right?

    What I loved, I was able to pull these two layouts together in ONE naptime!  Yup, the first layout took me more of the time, but then the second one using the scraps just came together. I think I have the fun templates and the cute paper patterns to thank for that.

    Want to Win a $25 Gift Certificate to Kiwi Lane?

    You will see some amazing talent on this blog hop, so check everyone out and share the love by leaving a comment on each stop.  The hop runs through 11:59 PM MST on Sunday FEBRUARY 9TH.  A random winner from ONE of the participating blogs (including the Kiwi Lane blog), will be given a $25 gift certificate to the Kiwi Lane Shop, for leaving a comment and will be announced on the Kiwi Lane blog on Thursday, FEBRUARY 13TH.

    Blog Line Up:

    Kiwi Lane
    Charissa Miller
    Claire Spielman
    Lissa Mitchell
    Kristy MacKeen
    Gail Owens
    Arin Flynn
    Holly Gagnon
    Jennifer Blomquist  <—YOU ARE HERE
    Christine Meyer

    Thanks for stopping by and I hope you come back as I share card, scrapbook, and 3D projects regularly each week!  Or join the conversation with me over on Facebook. 🙂

    Happy Hopping!

    spaced shop now sig bar

    Stampin’ Supplies Used

    Stamps – Perfect Pennants, Remember This rotary stamp
    Ink – Summer Starfruit, So Saffron, Smoky Slate, Markers (Basic Grey, Summer Starfruit, Pacific Point)
    Paper – Watercolor Wonder designer paper, So Saffron cs, Whisper White cs
    Accessories – Summer Starfruit Striped Grosgrain ribbon, Decorative Label Punch, 1-3/4” Circle punch, Pennant framelits, Subtles Candy Dots, Sponge Daubers, Clara Lane (by Kiwi Lane)

    Stampin’ Supplies Used

    Stamps – a Round Array
    Ink – Marina Mist, Marker (Sahara Sand)
    Paper – Watercolor Wonder designer paper, Subtles designer paper stack (Soft Sky), Whisper White cs, Smoky Slate cs
    Accessories – Natural Trim ribbon, Essentials Wooden Accents, Watercolor Wonder Washi tape, Gingham Garden Washi tape, Epic Day washi tape, 7/8” Scallop circle punch, glue dots, Thickers stickers

  • Fringed and Fabulous Birthday Card

    Today, the design team over at Stylin’ Scrappin’ Inkspiration decided to do a post sharing ideas using the upcoming Sale-a-Bration items (if you have no idea what that means, Stampin’ Up has a promotion every spring – this time starting January 28th – where for every $50 you order, you can pick any item in this special catalog to get free with your order; which is what we are playing with today!)  And since I wanted to play along, I dug through my limited stash of Sale-a-Bration goodies to come up with a fun project to share. 

    So today I have another “Little bit of this and that” style card to share –

    It all started with the pair of fringe scissors on my desk and a vision of this super duper great fringed card that my downline, Stacey shared in our team facebook page.  I took the inspiration of layered fringing and started grabbing what was lying around on my desk. 

    This included a card base that got ink and spots on it at a recent card class:

    IMG_3986

    And the plan to use my fringes to cover it up… because darn it… it is still a totally usable card base!

    So, I grabbed some scrap paper and started cutting and layering.

    Then I needed something for the top – so Washi to the rescue!  Yup, I used the Gold washi tape and the Gingham Garden washi tape.  Mix and match away!

    Where is the Sale-a-Bration stuff you ask?

    All in the top of the card!

    First up, the super cute sentiment from a new See Ya Later stamp set (and yes, it has a sentiment that says “See Ya Later, Alligator”!  I had to color it in with markers because, well, I just did.

    And then see that flower and those diamonds?  More SAB goodies!

    These are the Sweet Sorbet self-adhesive cork embellishmentsI will warn you – this isn’t your kiddos adhesive.  I stuck one of those diamonds down and when I decided I wanted to move it, it was NOT going anywhere!  I had to carefully slice it out of my card using scissors to get it to move.  So, word to the wise, they are great embellishments, just make sure you have it where you think you want it before pushing it down.

    Stampin’ Up Supplies Used:

    Stamps – See Ya Later (free Sale-a-Bration item)

    Ink – Sahara Sand, Markers: Early Espresso, Raspberry Ripple, Primrose Petals, Daffodil Delight

    Paper – Whisper White, Primrose Petals, Raspberry Ripple, Sahara Sand, Coastal Cabana

    Accessories – Sweet Sorbet Accessory Pack (free Sale-a-Bration item), Gingham Garden washi tape, Watercolor Wonder washi tape, Fringe Scissors

    spaced shop now sig bar

  • Washi Tape on Sale–Make these Projects & More!

    So, I guess the good thing about my internet going out last night and not getting fixed until this morning is that I didn’t get a chance to schedule the blog post I was going to originally share with you today. 

    I still plan to share that project with you soon, but it gave me a chance to see the first of Stampin’ Up’s Daily Deals!  They have decided to offer one product (or set of products) on sale every Thursday of October.

    TODAY ONLY (10/3): you can get any of the following Washi Tape sets for only $3.71:

    Washi Tape daily deal

    So, just to give you some ideas of what you can create, here are some samples I’ve posted in the past.  Click any of the links to see more details on the actual projects:

    Thank You Notes with Gingham Garden Washi Tape Accent


    Frosted Glass Butterfly with Washi Tape Trim


    Scrapbooking with Epic Day Washi Tape Banners


    So, check them out and don’t forget to grab them today while the sale is going on!

    Use Hostess Code XJZ6BCKR when you check out and be entered to win an extra spool of Washi Tape from me!   Smile 


    spaced shop now sig bar